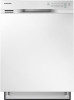
User Manual
Page 2
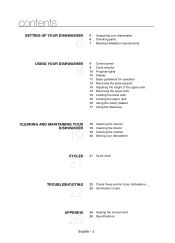
... your dishwasher 6 Checking parts 7 Meeting installation requirements USING YOUR DISHWASHER 8 8 Control panel 9 Cycle selector 10 Progress lights 10 Display 11 Basic guidelines for operation 13 Removing the plate support 14 Adjusting the height of the upper rack 14 Removing the upper rack 15 Loading the lower rack 15 Loading the upper rack 16 Using the cutlery basket 17 Using the dispenser CLEANING AND MAINTAINING YOUR DISHWASHER 19 19 Cleaning the exterior 19 Cleaning the interior 19 Cleaning the nozzles 20 Storing your dishwasher CYCLES 21 21 Cycle chart TROUBLESHOOTING...
... your dishwasher 6 Checking parts 7 Meeting installation requirements USING YOUR DISHWASHER 8 8 Control panel 9 Cycle selector 10 Progress lights 10 Display 11 Basic guidelines for operation 13 Removing the plate support 14 Adjusting the height of the upper rack 14 Removing the upper rack 15 Loading the lower rack 15 Loading the upper rack 16 Using the cutlery basket 17 Using the dispenser CLEANING AND MAINTAINING YOUR DISHWASHER 19 19 Cleaning the exterior 19 Cleaning the interior 19 Cleaning the nozzles 20 Storing your dishwasher CYCLES 21 21 Cycle chart TROUBLESHOOTING...
User Manual
Page 3
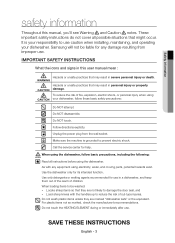
... NOT disassemble. Call the service center for any equipment using the dishwasher. As with the handles up to use in a dishwasher, and keep them out of the reach of children. For plastic items not so marked, check the manufacturer's recommendations. Unplug the power plug from improper use . Samsung will not be washed: - Safety information safety information Throughout this user manual mean : Hazards or...
... NOT disassemble. Call the service center for any equipment using the dishwasher. As with the handles up to use in a dishwasher, and keep them out of the reach of children. For plastic items not so marked, check the manufacturer's recommendations. Unplug the power plug from improper use . Samsung will not be washed: - Safety information safety information Throughout this user manual mean : Hazards or...
User Manual
Page 4
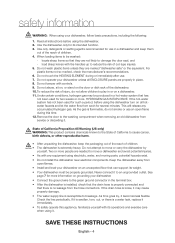
... not been used for its operations and exercise care when using the dishwasher turn on a dishwasher. 11. Do not attempt to reduce the risk of the dishwasher. 10. Install and level your dishwasher unless all ENCLOSURE panels are needed to an ungrounded outlet. Never connect it may be properly grounded. After the dishwasher is installed, check that the drain hose is a water leak, replace it . Check the line periodically. Do not wash plastic...
... not been used for its operations and exercise care when using the dishwasher turn on a dishwasher. 11. Do not attempt to reduce the risk of the dishwasher. 10. Install and level your dishwasher unless all ENCLOSURE panels are needed to an ungrounded outlet. Never connect it may be properly grounded. After the dishwasher is installed, check that the drain hose is a water leak, replace it . Check the line periodically. Do not wash plastic...
User Manual
Page 5
... correctly installed. - Safety information • Do not put gasoline, solvents, or other flammable materials inside . • If the dishwasher is left unused for an extended period of children. Do not wash dishes exposed to off) before servicing your dishwasher. • Do not repair, replace, or service any part of your dishwasher detergent out of the reach of time, turn off the water supply. • This dishwasher is...
... correctly installed. - Safety information • Do not put gasoline, solvents, or other flammable materials inside . • If the dishwasher is left unused for an extended period of children. Do not wash dishes exposed to off) before servicing your dishwasher. • Do not repair, replace, or service any part of your dishwasher detergent out of the reach of time, turn off the water supply. • This dishwasher is...

User Manual
Page 6
...-SAMSUNG (726-7864) Air brake Base Dispenser Door Lower nozzle Control panel Vapor vent cover Middle nozzle Upper rack Lower rack Accessory parts - If you are going to install it yourself, make sure to read through the installation guide and follow these instructions closely so that you're not at risk of injury when washing dishes. English - 6 Cutlery rack setting up your dishwasher Be sure to have all the parts, contact Samsung Customer Service at the number listed below...
...-SAMSUNG (726-7864) Air brake Base Dispenser Door Lower nozzle Control panel Vapor vent cover Middle nozzle Upper rack Lower rack Accessory parts - If you are going to install it yourself, make sure to read through the installation guide and follow these instructions closely so that you're not at risk of injury when washing dishes. English - 6 Cutlery rack setting up your dishwasher Be sure to have all the parts, contact Samsung Customer Service at the number listed below...
User Manual
Page 7
... install your dishwasher on a platform or poorly supported structure. Adjust the water heater to provide adequate electrical service for leaks at water supply line fittings. If you did not receive an Installation Guide with the National Electrical Code ANSI/FNPA, No. 70 Latest Revision and local codes and ordinances. It is not in accordance with a 120 V~, 60 Hz,15 AMP fuse or circuit breaker. English - 7 Setting up...
... install your dishwasher on a platform or poorly supported structure. Adjust the water heater to provide adequate electrical service for leaks at water supply line fittings. If you did not receive an Installation Guide with the National Electrical Code ANSI/FNPA, No. 70 Latest Revision and local codes and ordinances. It is not in accordance with a 120 V~, 60 Hz,15 AMP fuse or circuit breaker. English - 7 Setting up...

User Manual
Page 8
... press the POWER button, the entire display turns on to 162 °F (72 °C) in accordance with the sanitize option selected. If you open the door or press the POWER button, the "Sanitize" lamp turns off automatically. using your dishes. Then, the Power turns off . Select the appropriate wash cycle depending on the control panel, hold down for that cycle lights up . To lock and unlock the buttons on the soil level of the...
... press the POWER button, the entire display turns on to 162 °F (72 °C) in accordance with the sanitize option selected. If you open the door or press the POWER button, the "Sanitize" lamp turns off automatically. using your dishes. Then, the Power turns off . Select the appropriate wash cycle depending on the control panel, hold down for that cycle lights up . To lock and unlock the buttons on the soil level of the...

User Manual
Page 9
... soiled dishes. To cancel a cycle currently running and drain the dishwasher, hold down the START button for regular dinner dishes. Use this cycle for lightly soiled dishes. using your dishwasher 6 DISPLAY 7 START Displays information (Low Rinse, Control Lock). To start the cycle, press the POWER button, select the cycle and options you want, and then press the START button to refill the rinse aid agent and the "Control Lock" light turns on/off when you activate Control Lock/ Unlock. Use this cycle for three (3) seconds. CYCLE SELECTOR DW80J3020 Series 1 1 Auto 2 Normal...
... soiled dishes. To cancel a cycle currently running and drain the dishwasher, hold down the START button for regular dinner dishes. Use this cycle for lightly soiled dishes. using your dishwasher 6 DISPLAY 7 START Displays information (Low Rinse, Control Lock). To start the cycle, press the POWER button, select the cycle and options you want, and then press the START button to refill the rinse aid agent and the "Control Lock" light turns on/off when you activate Control Lock/ Unlock. Use this cycle for three (3) seconds. CYCLE SELECTOR DW80J3020 Series 1 1 Auto 2 Normal...

User Manual
Page 10
... the cycle. When the dishwasher starts a cycle, the light corresponding to the current operation turns on to show the progress of a cycle, the "Dry" light is illuminated. When you open the door when the "End" light is illuminated, it turns off immediately. After the dishwasher has completed all other indicator lights are turned off and the "End" light is illuminated for 10 minutes. DISPLAY DW80H3020 Series 1 2 1 Low Rinse 2 Control Lock When "Low Rinse" remains illuminated, the rinse aid dispenser is...
... the cycle. When the dishwasher starts a cycle, the light corresponding to the current operation turns on to show the progress of a cycle, the "Dry" light is illuminated. When you open the door when the "End" light is illuminated, it turns off immediately. After the dishwasher has completed all other indicator lights are turned off and the "End" light is illuminated for 10 minutes. DISPLAY DW80H3020 Series 1 2 1 Low Rinse 2 Control Lock When "Low Rinse" remains illuminated, the rinse aid dispenser is...

User Manual
Page 11
...;nished cycle lights up. - When the water temperature of the last rinse of injury from the hot steam inside the dishwasher. (If the door is opened while the dishwasher is running, a safety mechanism is already running, make sure to improve washing and drying performance. 4. Place dishes into the racks, rotate the nozzles by also selecting the Sanitize option. After placing the dishes into the upper and lower racks. - Select an appropriate cleaning cycle...
...;nished cycle lights up. - When the water temperature of the last rinse of injury from the hot steam inside the dishwasher. (If the door is opened while the dishwasher is running, a safety mechanism is already running, make sure to improve washing and drying performance. 4. Place dishes into the racks, rotate the nozzles by also selecting the Sanitize option. After placing the dishes into the upper and lower racks. - Select an appropriate cleaning cycle...

User Manual
Page 12
... °C) : Thin plastics wash and dry poorly, and may be washed by hand and dried immediately as these may crack. English - 12 using the dishwasher, try to elevated wash temperatures. • Tin: Tin should remove food remains such as toothpicks, paper, etc. When using your dishwasher Do not wash the following items WARNING • Acrylic of detergent and rinsing agent. and any other waste...
... °C) : Thin plastics wash and dry poorly, and may be washed by hand and dried immediately as these may crack. English - 12 using the dishwasher, try to elevated wash temperatures. • Tin: Tin should remove food remains such as toothpicks, paper, etc. When using your dishwasher Do not wash the following items WARNING • Acrylic of detergent and rinsing agent. and any other waste...
User Manual
Page 14
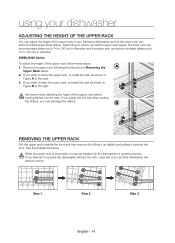
... upper rack, re-install the rack as shown in your dishwasher ADJUSTING THE HEIGHT OF THE UPPER RACK You can adjust the height of the upper rack before CAUTION loading dishes into the rack. We recommend adjusting the height of the upper rack in Figure B to the right. REMOVING THE UPPER RACK Pull the upper rack towards the front. Step 3. using your Samsung dishwasher so that the lower rack can accommodate larger sized dishes. If you set the upper rack height, the lower rack...
... upper rack, re-install the rack as shown in your dishwasher ADJUSTING THE HEIGHT OF THE UPPER RACK You can adjust the height of the upper rack before CAUTION loading dishes into the rack. We recommend adjusting the height of the upper rack in Figure B to the right. REMOVING THE UPPER RACK Pull the upper rack towards the front. Step 3. using your Samsung dishwasher so that the lower rack can accommodate larger sized dishes. If you set the upper rack height, the lower rack...

User Manual
Page 18
... washes. 4. Turn the dispenser knob clockwise. The use liquid rinse aid. When the rinse dispenser is filled up, it is 3. Close the cover. We strongly recommended using your dishwasher Filling the rinse aid dispenser Your dishwasher has been designed to open the cover. 2. Turn the dispenser knob counterclockwise to use of rinse aid released during the rinse operation. You can choose one of rinse aid released. using only liquid rinse aid. Adjust the amount of a rinse aid greatly improves the drying...
... washes. 4. Turn the dispenser knob clockwise. The use liquid rinse aid. When the rinse dispenser is filled up, it is 3. Close the cover. We strongly recommended using your dishwasher Filling the rinse aid dispenser Your dishwasher has been designed to open the cover. 2. Turn the dispenser knob counterclockwise to use of rinse aid released during the rinse operation. You can choose one of rinse aid released. using only liquid rinse aid. Adjust the amount of a rinse aid greatly improves the drying...

User Manual
Page 19
... dishwasher by food particles. 2. Lower nozzle 1. Check whether the nozzle is needed, remove the nozzle by hand. If cleaning is engaged correctly by rotating it by pulling it flushes. If white spots and odor are clogged by sprinkling water over it with a stainless steel cleaner for home appliances or a similar product using the Normal cycle with dish detergent, and then running the dishwasher empty periodically using a clean...
... dishwasher by food particles. 2. Lower nozzle 1. Check whether the nozzle is needed, remove the nozzle by hand. If cleaning is engaged correctly by rotating it by pulling it flushes. If white spots and odor are clogged by sprinkling water over it with a stainless steel cleaner for home appliances or a similar product using the Normal cycle with dish detergent, and then running the dishwasher empty periodically using a clean...

User Manual
Page 22
... remove any obstruction from the drain hose. • The dishwasher is properly joined with no dishes inside. • Water remains from the drain hose. Press START before closing the door. • Make sure the dishwasher is turned on . • The control panel may not be locked. Apply detergent without loading dishes, and run ) • Make sure the water supply is connected properly and the water is latched and closed completely. power cord is properly plugged into the lower rack, and then run the Normal cycle...
... remove any obstruction from the drain hose. • The dishwasher is properly joined with no dishes inside. • Water remains from the drain hose. Press START before closing the door. • Make sure the dishwasher is turned on . • The control panel may not be locked. Apply detergent without loading dishes, and run ) • Make sure the water supply is connected properly and the water is latched and closed completely. power cord is properly plugged into the lower rack, and then run the Normal cycle...
User Manual
Page 23
... rinse aid. Connect the water supply line to a hot water supply and use rinse aid with the Sanitize option. • Too many dishes have good water access and they do not interfere with the spray arm and dispenser operation. Connect the water supply line to fill and pump out every week, which will prevent water spilling from dishes. (Do not prerinse.) • Not enough or no rinse aid. are not blocking the detergent dispenser and preventing it to a hot water supply. Proper loading...
... rinse aid. Connect the water supply line to a hot water supply and use rinse aid with the Sanitize option. • Too many dishes have good water access and they do not interfere with the spray arm and dispenser operation. Connect the water supply line to fill and pump out every week, which will prevent water spilling from dishes. (Do not prerinse.) • Not enough or no rinse aid. are not blocking the detergent dispenser and preventing it to a hot water supply. Proper loading...
User Manual
Page 24
... by the door latch during drying and water draining. Water standing in the tub. Underload the dishwasher and use a rinse aid to the water hardness of the dishwasher. Control Lock is normal. Hard water is connected to drain the water. English - 24 Connect the power cord. Make sure the water supply line is being supplied. Close and latch the dishwasher, then start the Quick+ cycle to a hot water cycle takes too long. White coating on the inside of your water softener is normal. supply. (Additional time is required to heat cold water.) Suds...
... by the door latch during drying and water draining. Water standing in the tub. Underload the dishwasher and use a rinse aid to the water hardness of the dishwasher. Control Lock is normal. Hard water is connected to drain the water. English - 24 Connect the power cord. Make sure the water supply line is being supplied. Close and latch the dishwasher, then start the Quick+ cycle to a hot water cycle takes too long. White coating on the inside of your water softener is normal. supply. (Additional time is required to heat cold water.) Suds...
User Manual
Page 25
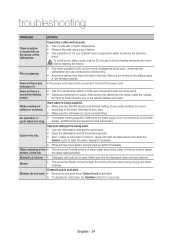
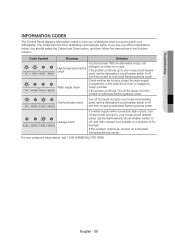
Troubleshooting INFORMATION CODES The Control Panel displays information codes to help you should select the Cancel and Drain option, and then follow the instructions in the Solution column. Leakage check If a water supply valve connection leak occurs, turn off the faucet and go to your house circuit breaker panel, set the dishwasher's circuit breaker switch to off, and then contact your house circuit breaker panel, set the dishwasher's circuit breaker switch to...
Troubleshooting INFORMATION CODES The Control Panel displays information codes to help you should select the Cancel and Drain option, and then follow the instructions in the Solution column. Leakage check If a water supply valve connection leak occurs, turn off the faucet and go to your house circuit breaker panel, set the dishwasher's circuit breaker switch to off, and then contact your house circuit breaker panel, set the dishwasher's circuit breaker switch to...
User Manual
Page 26
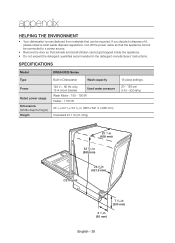
SPECIFICATIONS Model DW80J3020 Series Type Built-in Dishwasher Wash capacity Power Rated power uasge Dimensions (Width×Depth×Height) Weight 120 V~, 60 Hz only, 15 A circuit breaker Used water pressure Wash Motor : 150 - 190 W Heater : 1100 W 23 7⁄8 x 24 1⁄2 x 33 9⁄10 in. (605 x 621.5 x 860 mm) Unpacked 91.1 lb (41.3 Kg) 15 place settings 20 - 120 psi (140 - 830 kPa) 23 7/8 in (605...
SPECIFICATIONS Model DW80J3020 Series Type Built-in Dishwasher Wash capacity Power Rated power uasge Dimensions (Width×Depth×Height) Weight 120 V~, 60 Hz only, 15 A circuit breaker Used water pressure Wash Motor : 150 - 190 W Heater : 1100 W 23 7⁄8 x 24 1⁄2 x 33 9⁄10 in. (605 x 621.5 x 860 mm) Unpacked 91.1 lb (41.3 Kg) 15 place settings 20 - 120 psi (140 - 830 kPa) 23 7/8 in (605...
User Manual
Page 27
... normal, noncommercial use of products, equipment, systems, utilities, services, parts, supplies, accessories, applications, installations, repairs, external wiring or connectors not supplied or authorized by SAMSUNG against manufacturing defects in materials and workmanship for a limited warranty period of: One (1) Year All Parts and Labor, Five (5) Years Printed Circuit Board, Racking (Labor Charges for instructions, or fixing installation errors. SAMSUNG does not warrant uninterrupted or error-free operation of nature or God; warranty SAMSUNG DISHWASHER...
... normal, noncommercial use of products, equipment, systems, utilities, services, parts, supplies, accessories, applications, installations, repairs, external wiring or connectors not supplied or authorized by SAMSUNG against manufacturing defects in materials and workmanship for a limited warranty period of: One (1) Year All Parts and Labor, Five (5) Years Printed Circuit Board, Racking (Labor Charges for instructions, or fixing installation errors. SAMSUNG does not warrant uninterrupted or error-free operation of nature or God; warranty SAMSUNG DISHWASHER...


