Installation Guide Ver.1.0 (English, French, Spanish)
Page 2
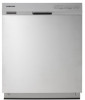
... notes. To safely operate this appliance, become familiar with its operation and exercise care when using electricity, water and moving parts, potential hazards exist. All wiring and grounding must be done in severe personal injury or WARNING death. safety instructions Throughout ...or personal injury when CAUTION using the appliance. Do not connect the dishwasher until you have completed the installation. Samsung is grounded to use . To reduce the risk of your circuit breaker. Keep the dishwasher away from improper use common sense, caution, and care when installing...
... notes. To safely operate this appliance, become familiar with its operation and exercise care when using electricity, water and moving parts, potential hazards exist. All wiring and grounding must be done in severe personal injury or WARNING death. safety instructions Throughout ...or personal injury when CAUTION using the appliance. Do not connect the dishwasher until you have completed the installation. Samsung is grounded to use . To reduce the risk of your circuit breaker. Keep the dishwasher away from improper use common sense, caution, and care when installing...

Installation Guide Ver.1.0 (English, French, Spanish)
Page 4
... 5 Enclosure dimensions INSTALLING THE DISHWASHER 6 6 STEP 1 Check the parts and tools 8 STEP 2 Select the best location for the dishwasher 9 STEP 3 Check water supply requirements and cautions 10 STEP 4 Check the electrical requirements and cautions 11 STEP 5 Unpacking and inspecting the dishwasher 13 STEP 6 Preparing the dishwasher 14 STEP 7 Placing the dishwasher and connecting the HOT WATER...
... 5 Enclosure dimensions INSTALLING THE DISHWASHER 6 6 STEP 1 Check the parts and tools 8 STEP 2 Select the best location for the dishwasher 9 STEP 3 Check water supply requirements and cautions 10 STEP 4 Check the electrical requirements and cautions 11 STEP 5 Unpacking and inspecting the dishwasher 13 STEP 6 Preparing the dishwasher 14 STEP 7 Placing the dishwasher and connecting the HOT WATER...
Installation Guide Ver.1.0 (English, French, Spanish)
Page 6
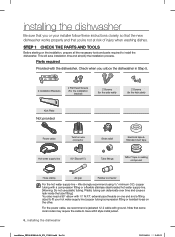
... fitting sized to fit your installer follow these instructions closely so that the new dishwasher works properly and that some local codes may require the cable to install the dishwasher. Parts required Provided with a compression fitting or a flexible stainless steel braided hot water... supply line. [Warning: Do not use plastic tubing. STEP 1 CHECK THE PARTS AND TOOLS Before starting on ® tape...
... fitting sized to fit your installer follow these instructions closely so that the new dishwasher works properly and that some local codes may require the cable to install the dishwasher. Parts required Provided with a compression fitting or a flexible stainless steel braided hot water... supply line. [Warning: Do not use plastic tubing. STEP 1 CHECK THE PARTS AND TOOLS Before starting on ® tape...
Installation Guide Ver.1.0 (English, French, Spanish)
Page 12
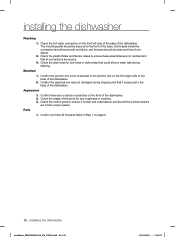
... of any roughness or cracking 3. Check the drain hose for any debris. 2. Check the edges of the dishwasher. 2. Confirm the electrical box was not damaged during draining. Parts 1. Check the control panel to the front of the base, the threads inside the connection should be smooth...-00046A-06_EN_130401.indd Sec3:12 2013-04-01 5:05:23 Confirm you have all the parts listed in their proper places. installing the dishwasher Plumbing 1. The mounting plate should be secured to ensure it is clear and unscratched, and that all the control markers are secure. ...
... of any roughness or cracking 3. Check the drain hose for any debris. 2. Check the edges of the dishwasher. 2. Confirm the electrical box was not damaged during draining. Parts 1. Check the control panel to the front of the base, the threads inside the connection should be smooth...-00046A-06_EN_130401.indd Sec3:12 2013-04-01 5:05:23 Confirm you have all the parts listed in their proper places. installing the dishwasher Plumbing 1. The mounting plate should be secured to ensure it is clear and unscratched, and that all the control markers are secure. ...
Installation Guide Ver.1.0 (English, French, Spanish)
Page 18
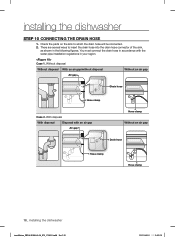
... Without an air gap Air gap Drain hose Hose clamp Case 2. There are several ways to which the drain hose will be connected. 2. Check the parts on the sink to insert the drain hose into the drain hose connector of the sink, as shown in the following figures. With disposal... installation regulations in accordance with an air gap Air gap Hose clamp Without an air gap Drain hose Hose clamp Hose clamp 18_ installing the dishwasher installation_DD68-00046A-06_EN_130401.indd Sec3:18 2013-04-01 5:05:24 You must connect the drain hose in your region. installing the...
... Without an air gap Air gap Drain hose Hose clamp Case 2. There are several ways to which the drain hose will be connected. 2. Check the parts on the sink to insert the drain hose into the drain hose connector of the sink, as shown in the following figures. With disposal... installation regulations in accordance with an air gap Air gap Hose clamp Without an air gap Drain hose Hose clamp Hose clamp 18_ installing the dishwasher installation_DD68-00046A-06_EN_130401.indd Sec3:18 2013-04-01 5:05:24 You must connect the drain hose in your region. installing the...
Installation Guide Ver.1.0 (English, French, Spanish)
Page 21
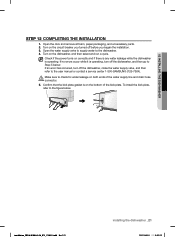
... to supply water to the figure below . If an error has occurred, turn off the dishwasher, and then go to the user manual or contact a service center 1-800-SAMSUNG (726-7864). Confirm that the kick plate gasket is operating, turn off before you began... THE DISHWASHER STEP 12 COMPLETING THE INSTALLATION 1. Check if the power turns on the bottom of the water supply line and drain hose CAUTION connector. 5. Open the door and remove all foam, paper packaging, and unnecessary parts. 2. installation_DD68-00046A-06_EN_130401.indd Sec3:21 installing the dishwasher _21 2013...
... to supply water to the figure below . If an error has occurred, turn off the dishwasher, and then go to the user manual or contact a service center 1-800-SAMSUNG (726-7864). Confirm that the kick plate gasket is operating, turn off before you began... THE DISHWASHER STEP 12 COMPLETING THE INSTALLATION 1. Check if the power turns on the bottom of the water supply line and drain hose CAUTION connector. 5. Open the door and remove all foam, paper packaging, and unnecessary parts. 2. installation_DD68-00046A-06_EN_130401.indd Sec3:21 installing the dishwasher _21 2013...
Quick Guide Installation Requirements And Pointers Ver.1.0 (English, French, Spanish)
Page 1
... joint. Connect the drain hose. Connect the black wire of the dishwasher. Test the dishwasher. 1. Replace the junction box cover. 2. Open the dishwasher door and remove all foam, paper packaging, and unnecessary parts. 3. Check the enclosure size. The enclosure must be between 20~120...). • The hot water must not extend more than the connections on the front of the dishwasher extend beyond the bottom of the dishwasher. Prepare the cabinet. Check the parts and tools. 2 installation brackets 2 flat head screws (for the installation bracket) 2 screws (for...
... joint. Connect the drain hose. Connect the black wire of the dishwasher. Test the dishwasher. 1. Replace the junction box cover. 2. Open the dishwasher door and remove all foam, paper packaging, and unnecessary parts. 3. Check the enclosure size. The enclosure must be between 20~120...). • The hot water must not extend more than the connections on the front of the dishwasher extend beyond the bottom of the dishwasher. Prepare the cabinet. Check the parts and tools. 2 installation brackets 2 flat head screws (for the installation bracket) 2 screws (for...
User Manual Ver.1.0 (English, French, Spanish)
Page 3
... when installing, maintaining, and operating your dishwasher. Use the dishwasher only for help. Load sharp knives with any equipment using the dishwasher. These important safety instructions do not cover all instructions before using electricity, water, and moving parts, potential hazards exist. It is grounded to... wall socket. SAVE THESE INSTRUCTIONS Safety information _3 DW7933LRASR-00141A-02_EN.indd Sec1:3 2012-09-05 12:09:04 Samsung will not be washed: - Do not touch the HEATING ELEMENT during or immediately after use in a dishwasher, and keep them out of the reach of ...
... when installing, maintaining, and operating your dishwasher. Use the dishwasher only for help. Load sharp knives with any equipment using the dishwasher. These important safety instructions do not cover all instructions before using electricity, water, and moving parts, potential hazards exist. It is grounded to... wall socket. SAVE THESE INSTRUCTIONS Safety information _3 DW7933LRASR-00141A-02_EN.indd Sec1:3 2012-09-05 12:09:04 Samsung will not be washed: - Do not touch the HEATING ELEMENT during or immediately after use in a dishwasher, and keep them out of the reach of ...
User Manual Ver.1.0 (English, French, Spanish)
Page 5
...door. Do not place excessive weight on the open door. - Electrically ground the dishwasher - This appliance can result in the junction box. - SAVE THESE INSTRUCTIONS Safety information _5 DW7933LRASR-00141A-02_EN.indd Sec1:5 2012-09-05 12:09:04 Disassembly, repairs and ... carbon monoxide. Do not repair, replace, or service any part of California to cause cancer, birth defects, or other reproductive harm, and requires businesses to cause cancer, birth defects, or other reproductive harm. This dishwasher is correctly installed. - This product contains a chemical known ...
...door. Do not place excessive weight on the open door. - Electrically ground the dishwasher - This appliance can result in the junction box. - SAVE THESE INSTRUCTIONS Safety information _5 DW7933LRASR-00141A-02_EN.indd Sec1:5 2012-09-05 12:09:04 Disassembly, repairs and ... carbon monoxide. Do not repair, replace, or service any part of California to cause cancer, birth defects, or other reproductive harm, and requires businesses to cause cancer, birth defects, or other reproductive harm. This dishwasher is correctly installed. - This product contains a chemical known ...

User Manual Ver.1.0 (English, French, Spanish)
Page 6
Contents SETTING UP YOUR DISHWASHER 7 7 Unpacking your dishwasher 7 Checking parts 8 Meeting installation requirements USING YOUR DISHWASHER 9 9 Control panel 11 Progress lights 11 Display 11 Cycle selector 12 Basic guidelines 14 Removing the plate support 14 Adjusting the ...Cleaning the interior 20 Cleaning the nozzles 21 Storing your dishwasher CYCLES 22 22 Cycle chart TROUBLESHOOTING 23 23 Check these points if your dishwasher... 26 Information codes 6_ Contents APPENDIX 27 27 Helping the environment 27 Specifications DW7933LRASR-00141A-02_EN.indd Sec2:6 2012-09-05 12:09...
Contents SETTING UP YOUR DISHWASHER 7 7 Unpacking your dishwasher 7 Checking parts 8 Meeting installation requirements USING YOUR DISHWASHER 9 9 Control panel 11 Progress lights 11 Display 11 Cycle selector 12 Basic guidelines 14 Removing the plate support 14 Adjusting the ...Cleaning the interior 20 Cleaning the nozzles 21 Storing your dishwasher CYCLES 22 22 Cycle chart TROUBLESHOOTING 23 23 Check these points if your dishwasher... 26 Information codes 6_ Contents APPENDIX 27 27 Helping the environment 27 Specifications DW7933LRASR-00141A-02_EN.indd Sec2:6 2012-09-05 12:09...
User Manual Ver.1.0 (English, French, Spanish)
Page 7
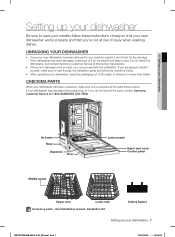
... not install the dishwasher, and contact Samsung Customer Service at 1-800-SAMSUNG (726-7864) Air brake Base Dispenser Door Lower nozzle Vapor vent cover Control panel Middle nozzle Upper rack Lower rack Accessory parts - UNPACKING YOUR DISHWASHER • Once your new dishwasher has been delivered ... you do not have your installer follow the directions inside. • After unpacking your dishwasher, keep a copy. User/Installation manual, Installation Kit. 01 Setting up your dishwasher Setting up your dishwasher _7 DW7933LRASR-00141A-02_EN.indd Sec3:7 2012-09-05 12:09:04
... not install the dishwasher, and contact Samsung Customer Service at 1-800-SAMSUNG (726-7864) Air brake Base Dispenser Door Lower nozzle Vapor vent cover Control panel Middle nozzle Upper rack Lower rack Accessory parts - UNPACKING YOUR DISHWASHER • Once your new dishwasher has been delivered ... you do not have your installer follow the directions inside. • After unpacking your dishwasher, keep a copy. User/Installation manual, Installation Kit. 01 Setting up your dishwasher Setting up your dishwasher _7 DW7933LRASR-00141A-02_EN.indd Sec3:7 2012-09-05 12:09:04
User Manual Ver.1.0 (English, French, Spanish)
Page 20
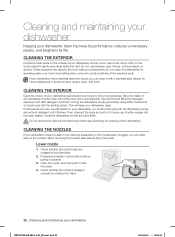
... opening of the electrical parts. CAUTION CLEANING THE NOZZLES If your dishwasher periodically to gently wipe away spills and dust. Use a soft, damp cloth on the outside of the nozzles. Check whether the nozzle holes are still present in your dishwasher DW7933LRASR-00141A-02_EN.indd Sec5:...20 2012-09-05 12:09:10 Cleaning and maintaining your dishwasher Keeping your dishwasher clean. Do not use benzene, wax, thinner, chlorine bleach, or alcohol. This...
... opening of the electrical parts. CAUTION CLEANING THE NOZZLES If your dishwasher periodically to gently wipe away spills and dust. Use a soft, damp cloth on the outside of the nozzles. Check whether the nozzle holes are still present in your dishwasher DW7933LRASR-00141A-02_EN.indd Sec5:...20 2012-09-05 12:09:10 Cleaning and maintaining your dishwasher Keeping your dishwasher clean. Do not use benzene, wax, thinner, chlorine bleach, or alcohol. This...
User Manual Ver.1.0 (English, French, Spanish)
Page 28
... lightning, or other acts of the product. 28_ Warranty DW7933LRASR-00141A-02_EN.indd Sec10:28 2012-09-05 12:09:13 In home service is not available, SAMSUNG may elect to provide transportation of the product to and ...parts and products assume the remaining original warranty, or ninety (90) days, whichever is valid only on the original date of purchase, and is longer. product removal and reinstallation; Warranty SAMSUNG DISHWASHER LIMITED WARRANTY TO ORIGINAL PURCHASER This SAMSUNG brand product, as proof of purchase to SAMSUNG or SAMSUNG's authorized service center. Samsung...
... lightning, or other acts of the product. 28_ Warranty DW7933LRASR-00141A-02_EN.indd Sec10:28 2012-09-05 12:09:13 In home service is not available, SAMSUNG may elect to provide transportation of the product to and ...parts and products assume the remaining original warranty, or ninety (90) days, whichever is valid only on the original date of purchase, and is longer. product removal and reinstallation; Warranty SAMSUNG DISHWASHER LIMITED WARRANTY TO ORIGINAL PURCHASER This SAMSUNG brand product, as proof of purchase to SAMSUNG or SAMSUNG's authorized service center. Samsung...


