Samsung DW7933LRASR/AA Research
View Results Below
Free Samsung DW7933LRASR/AA manuals!
Problems with Samsung DW7933LRASR/AA?
Ask a Question
Free Samsung DW7933LRASR/AA manuals!
Problems with Samsung DW7933LRASR/AA?
Ask a Question
Related Manual Pages


Related Videos

Samsung DW7933LRASR Built-In Undercounter Dishwasher
Duration: :58
Total Views: 913
Duration: :58
Total Views: 913
Similar Questions

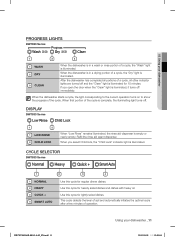
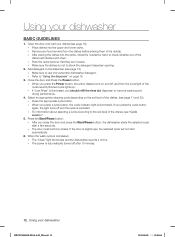
Time Of Each Step In A Cycle.
Where can I find the length of time that each step takes in a cycle? I have located the cycle chart ...
Where can I find the length of time that each step takes in a cycle? I have located the cycle chart ...
(Posted by carolineowen 7 years ago)

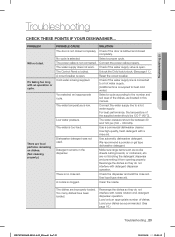
My Dishwasher Is Less Than Two Years Old.
fills and empties, never washes. New circuit board as much as new dishwasher. HELP1
fills and empties, never washes. New circuit board as much as new dishwasher. HELP1
(Posted by milodonn 9 years ago)

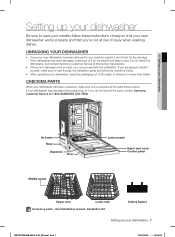
Wiring Location
Where is the wiring hookup located on this dishwasher? Front or rear? Is it easy to get to?
Where is the wiring hookup located on this dishwasher? Front or rear? Is it easy to get to?
(Posted by chiclien 10 years ago)

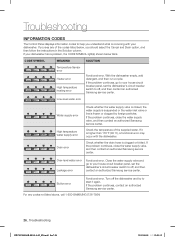
Samsung Dmr57lb Flashing Le Turned Power Off Found No Leaks. Will Not Reset.
(Posted by Toddhunt12 11 years ago)

Parts Manual For Sams Dmt800rhs Dishwasher
Need Top Rack Level Adj For Left Sid
(Posted by wbooth 12 years ago)
Related Terms
The following terms were also used when searching for Samsung DW7933LRASR/AA Research:- dw7933lrasr/aa troubleshooting
- samsung dishwasher dw7933lrasr/aa
- samsung dishwasher dw7933lrasr reviews
- samsung dishwasher dw7933lrasr aa
- samsung dishwasher dw7933lrasr
- new 24 dishwasher (dw7933lrasr/aa)
- model dw7933lrasr/aa
- model dw7933lrasr
- dw7933lrasr/ac
- dw7933lrasr/aa warranty
- samsung dishwasher model dw7933lrasr/aa
- dw7933lrasr/aa parts
- dw7933lrasr/aa manual
- dw7933lrasr/aa leakage code
- dw7933lrasr/aa error codes
- dw7933lrasr/aa dishwasher
- dw7933lrasr what in box
- dw7933lrasr water level sensor
- dw7933lrasr warranty
- samsung dw7933lrasr parts
- samsung new 24 dishwasher (dw7933lrasr/aa)
- samsung model dw7933lrasr/aa
- samsung model dw7933lrasr
- samsung dw7933lrasr/aa troubleshooting
- samsung dw7933lrasr/aa parts
- samsung dw7933lrasr/aa manual
- samsung dw7933lrasr/aa leakage code
- samsung dw7933lrasr/aa dishwasher
- dw7933lrasr user manual
- samsung dw7933lrasr manual
- samsung dw7933lrasr dishwasher reviews
- samsung dw7933lrasr dishwasher
- samsung dw7933lrasr aa meetings
- samsung dw7933lrasr aa meeting locations
- samsung dw7933lrasr 24 dishwasher
- samsung dw7933lrasr
- samsung dw7933 dw7933lrasr/aa
- dw7933lrasr aa service manual
- dw7933lrasr heavy light flashing
- dw7933lrasr error codes
- dw7933lrasr dishwasher ratings
- dw7933lrasr dishwasher
- dw7933lrasr dimensions
- dw7933lrasr case sensor
- dw7933lrasr canada
- dw7933lrasr black friday
- dw7933lrasr install manual
- dw7933lrasr aa parts
- dw7933lrasr aa meetings
- dw7933lrasr aa meeting locations
- dw7933lrasr
- dw7933 dw7933lrasr/aa
- dishwasher reviews dw7933lrasr
- dishwasher model dw7933lrasr/aa
- dishwasher dw7933lrasr/aa
- dw7933lrasr price
- dw7933lrasr user guide
- dw7933lrasr service manual
- dw7933lrasr samsung leaking error
- dw7933lrasr samsung dishwasher reviews
- dw7933lrasr samsung dishwasher parts
- dw7933lrasr samsung dishwasher
- dw7933lrasr samsung
- dw7933lrasr problems
- dishwasher dw7933lrasr aa
- dw7933lrasr parts
- dw7933lrasr owners manual
- dw7933lrasr manual
- dw7933lrasr lowes
- dw7933lrasr leaking error
- dw7933lrasr kick plate
- dw7933lrasr interior
- dw7933lrasr installation