User Manual
Page 6
... around the exhaust opening and adjacent surrounding areas free from service or discarded, remove the door to play on or in published user repair instructions that could ignite or explode. 3. Read all instructions before or after each load. 13. Flammable substances may cause the fabric to persons when using this appliance where it will be cleaned periodically by itself. 4. Do not install or store...
... around the exhaust opening and adjacent surrounding areas free from service or discarded, remove the door to play on or in published user repair instructions that could ignite or explode. 3. Read all instructions before or after each load. 13. Flammable substances may cause the fabric to persons when using this appliance where it will be cleaned periodically by itself. 4. Do not install or store...

User Manual
Page 7
...: • Do not dry items that have been removed. Close supervision of a tumble dryer cycle occurs without heat (cool down period). They emit vapors that the heat is dissipated. 17. SAVE THESE INSTRUCTIONS FlexDry_DM9600M_DC68-03381H-07_EN.indd 7 English 7 2019-06-03 2:57:13 Safety information 16. The control board and inlet valve are not caught in the door when closing it...
...: • Do not dry items that have been removed. Close supervision of a tumble dryer cycle occurs without heat (cool down period). They emit vapors that the heat is dissipated. 17. SAVE THESE INSTRUCTIONS FlexDry_DM9600M_DC68-03381H-07_EN.indd 7 English 7 2019-06-03 2:57:13 Safety information 16. The control board and inlet valve are not caught in the door when closing it...
User Manual
Page 8
... by a qualified installer, service agency, or your gas supplier, call your dryer from a neighbor's phone. Warnings WARNING • Ensure pockets are free of the appliance unless specifically instructed to service any phone in a dangerous situation. coins, knives, pins, etc. Important: Installation and service must be exposed to the weather. • Do not tamper with the controls. • Do not repair, replace, or attempt...
... by a qualified installer, service agency, or your gas supplier, call your dryer from a neighbor's phone. Warnings WARNING • Ensure pockets are free of the appliance unless specifically instructed to service any phone in a dangerous situation. coins, knives, pins, etc. Important: Installation and service must be exposed to the weather. • Do not tamper with the controls. • Do not repair, replace, or attempt...

User Manual
Page 9
... objects. • Gas leaks may contain significant amounts of the fabric softener or product. • Clean the lint screen before or after being washed, these oils. • Residual oil on clothing can become hot enough to occur. Even after each load. • Keep the area around the exhaust opening and surrounding areas free from the dryer hot or interrupt the drying cycle until the...
... objects. • Gas leaks may contain significant amounts of the fabric softener or product. • Clean the lint screen before or after being washed, these oils. • Residual oil on clothing can become hot enough to occur. Even after each load. • Keep the area around the exhaust opening and surrounding areas free from the dryer hot or interrupt the drying cycle until the...

User Manual
Page 15
... bottom, right or the left, use the accessory exhaust kit. Do not contact the following instructions before installing the dryer and keep this manual for the rear exhaust option. Instructions are no air-flow obstructions. The dryer area must meet national and local regulations. • An exhaust system made of electric shock only during servicing. Service Personnel - WARNING Remove the door from all discarded appliances to ensure adequate air for gas models) that...
... bottom, right or the left, use the accessory exhaust kit. Do not contact the following instructions before installing the dryer and keep this manual for the rear exhaust option. Instructions are no air-flow obstructions. The dryer area must meet national and local regulations. • An exhaust system made of electric shock only during servicing. Service Personnel - WARNING Remove the door from all discarded appliances to ensure adequate air for gas models) that...

User Manual
Page 20
The National Fuel Gas Code requires that an accessible, approved manual gas shut-off valve be installed within 6" of your dryer. • Gas dryers installed in residential garages must be raised 18 inches (46 cm) above the floor. • Additionally, a 1/8" (0.3 cm) N.P.T. (National Pipe Thread) plugged tapping, accessible for test gauge connection, must be resistant to the 3/8" (1 cm) gas line on the door frame. - 20,000 BTU: LPKIT-4/XAA (DC9804114A) - 22,000 BTU: LPKIT-3/XAA (DC9900792A...
The National Fuel Gas Code requires that an accessible, approved manual gas shut-off valve be installed within 6" of your dryer. • Gas dryers installed in residential garages must be raised 18 inches (46 cm) above the floor. • Additionally, a 1/8" (0.3 cm) N.P.T. (National Pipe Thread) plugged tapping, accessible for test gauge connection, must be resistant to the 3/8" (1 cm) gas line on the door frame. - 20,000 BTU: LPKIT-4/XAA (DC9804114A) - 22,000 BTU: LPKIT-3/XAA (DC9900792A...

User Manual
Page 21
... - This cord is properly installed and grounded in a risk of least resistance for the U.S.) or the Canadian Electrical Code CSA C22.1 - Grounding This dryer must be plugged into an appropriate outlet that is sold separately. • The plug must be plugged into an appropriate outlet that is located on the plate under the control panel or rear frame. Gas models WARNING • Your dryer has a cord with an...
... - This cord is properly installed and grounded in a risk of least resistance for the U.S.) or the Canadian Electrical Code CSA C22.1 - Grounding This dryer must be plugged into an appropriate outlet that is sold separately. • The plug must be plugged into an appropriate outlet that is located on the plate under the control panel or rear frame. Gas models WARNING • Your dryer has a cord with an...

User Manual
Page 22
... dryer is sold separately. Electrical connections Before operating or testing, follow all grounding instructions in the Grounding section. The power cord electric supply wiring must be run with a 15-ampere fuse or circuit breaker is required. and Canada A 120 volt, 60 Hz AC approved electrical service with the circuit conductors and connected to the equipment grounding terminal or lead on the data label located behind the door. Do not use with U.S. Installation Installation • If a power cord...
... dryer is sold separately. Electrical connections Before operating or testing, follow all grounding instructions in the Grounding section. The power cord electric supply wiring must be run with a 15-ampere fuse or circuit breaker is required. and Canada A 120 volt, 60 Hz AC approved electrical service with the circuit conductors and connected to the equipment grounding terminal or lead on the data label located behind the door. Do not use with U.S. Installation Installation • If a power cord...
User Manual
Page 23
... both cushion-tops. To change the door direction, see Door reversal. 3. Remove the protective cap from the packaging on its final location, and then set the dryer upright. • Secure room around the dryer to the dryer. Connect the gas supply to facilitate ducting and wiring. Step by -step installation Make sure you install the dryer in the same location as instructed in the duct. Turn on the dryer. FlexDry_DM9600M_DC68-03381H-07_EN.indd...
... both cushion-tops. To change the door direction, see Door reversal. 3. Remove the protective cap from the packaging on its final location, and then set the dryer upright. • Secure room around the dryer to the dryer. Connect the gas supply to facilitate ducting and wiring. Step by -step installation Make sure you install the dryer in the same location as instructed in the duct. Turn on the dryer. FlexDry_DM9600M_DC68-03381H-07_EN.indd...
User Manual
Page 30
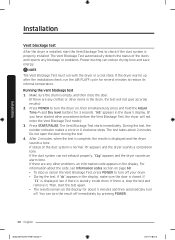
... stop the test and remove it. Running the vent blockage test 1. If "C1" is displayed, see Information codes section on , then simultaneously press and hold the Adjust Time and Dry level buttons for several minutes to check if the duct system is normal, "0" appears and the dryer sounds a completion tone. If there is, stop or cancel the Vent Blockage Test, press POWER to turn the result...
... stop the test and remove it. Running the vent blockage test 1. If "C1" is displayed, see Information codes section on , then simultaneously press and hold the Adjust Time and Dry level buttons for several minutes to check if the duct system is normal, "0" appears and the dryer sounds a completion tone. If there is, stop or cancel the Vent Blockage Test, press POWER to turn the result...

User Manual
Page 31
... test, the internal drum is installed properly so the air exhausts freely. 2. Make sure the dryer is hot. WARNING • To prevent fire, do not use lint-trapping screws. 3. Use caution to the installation instructions in incorrect results. Follow the proper procedures when testing the dryer. • Even if the test result is suspended, it slows down the dryer's performance. • Do not use excessively long ducts that you clean the exhaust...
... test, the internal drum is installed properly so the air exhausts freely. 2. Make sure the dryer is hot. WARNING • To prevent fire, do not use lint-trapping screws. 3. Use caution to the installation instructions in incorrect results. Follow the proper procedures when testing the dryer. • Even if the test result is suspended, it slows down the dryer's performance. • Do not use excessively long ducts that you clean the exhaust...
User Manual
Page 46
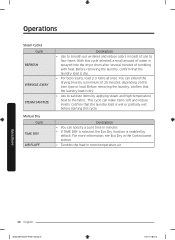
.... Operations Steam Cycles Cycle REFRESH WRINKLE AWAY STEAM SANITIZE Manual Dry Cycle TIME DRY AIR FLUFF Description • Use to smooth out wrinkles and reduce odors in loads of one to the fabric. Description • You can specify a cycle time in room temperature air. Before removing the laundry, confirm that the laundry load is dry. • Use to sanitize items by default. Confirm that the laundry load is enabled by applying steam and high-temperature heat to...
.... Operations Steam Cycles Cycle REFRESH WRINKLE AWAY STEAM SANITIZE Manual Dry Cycle TIME DRY AIR FLUFF Description • Use to smooth out wrinkles and reduce odors in loads of one to the fabric. Description • You can specify a cycle time in room temperature air. Before removing the laundry, confirm that the laundry load is dry. • Use to sanitize items by default. Confirm that the laundry load is enabled by applying steam and high-temperature heat to...
User Manual
Page 49
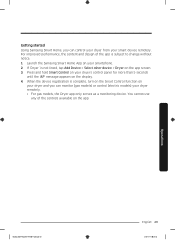
... (gas models) or control (electric models) your smartphone. 2. Operations FlexDry_DM9600M_DC68-03381H-07_EN.indd 49 English 49 2019-06-03 2:57:22 For improved performance, the content and design of the controls available on the app. You cannot use any of the app is complete, turn on the Smart Control function on the app screen. 3. When the device registration is subject to change...
... (gas models) or control (electric models) your smartphone. 2. Operations FlexDry_DM9600M_DC68-03381H-07_EN.indd 49 English 49 2019-06-03 2:57:22 For improved performance, the content and design of the controls available on the app. You cannot use any of the app is complete, turn on the Smart Control function on the app screen. 3. When the device registration is subject to change...

User Manual
Page 52
... servicing. Exterior • Clean with a soft, damp cloth. Exhaust system • Check and clean the exhaust system on a yearly or regular basis to maintain optimum performance. • The external exhaust hood must be cleaned more frequently to the dryer. Do not contact the following parts while the appliance is energized: Control board and inlet valve. General cleaning and maintenance instructions Main panel • Clean with a soft, damp cloth. Do not use...
... servicing. Exterior • Clean with a soft, damp cloth. Exhaust system • Check and clean the exhaust system on a yearly or regular basis to maintain optimum performance. • The external exhaust hood must be cleaned more frequently to the dryer. Do not contact the following parts while the appliance is energized: Control board and inlet valve. General cleaning and maintenance instructions Main panel • Clean with a soft, damp cloth. Do not use...
User Manual
Page 56
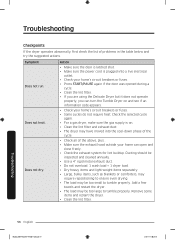
... Troubleshooting Checkpoints If the dryer operates abnormally, first check the list of the above, plus... • Make sure the exhaust hood outside your home's circuit breakers or fuses. • Some cycles do not require heat. Action • Make sure the door is latched shut. • Make sure the power cord is on. • Clean the lint filter and exhaust duct. • The dryer may be too small to tumble properly. Check the selected cycle...
... Troubleshooting Checkpoints If the dryer operates abnormally, first check the list of the above, plus... • Make sure the exhaust hood outside your home's circuit breakers or fuses. • Some cycles do not require heat. Action • Make sure the door is latched shut. • Make sure the power cord is on. • Clean the lint filter and exhaust duct. • The dryer may be too small to tumble properly. Check the selected cycle...

User Manual
Page 60
... electronic control needs to operate, you should do, check the list of codes in the door. High temperature heating check. • Clean the lint filter. • If this information code remains, contact a Samsung service center. To determine what you may see an information code on the control panel. Troubleshooting 60 English FlexDry_DM9600M_DC68-03381H-07_EN.indd 60 2019-06-03 2:57:23 Troubleshooting Information codes If the dryer fails to be checked. • Check if power is...
... electronic control needs to operate, you should do, check the list of codes in the door. High temperature heating check. • Clean the lint filter. • If this information code remains, contact a Samsung service center. To determine what you may see an information code on the control panel. Troubleshooting 60 English FlexDry_DM9600M_DC68-03381H-07_EN.indd 60 2019-06-03 2:57:23 Troubleshooting Information codes If the dryer fails to be checked. • Check if power is...
User Manual
Page 62
... non-chlorine (color-safe) bleach (when needed) Tumble dry Normal Permanent press / Wrinkle resistant / Wrinkle control Gentle / Delicates Special instructions Line dry / Hang to dry Drip dry Dry flat Heat setting High Medium Low Any heat No heat / Air Specification 62 English FlexDry_DM9600M_DC68-03381H-07_EN.indd 62 2019-06-03 2:57:25 Specifications Fabric care chart The following symbols provide garment care direction. The use of symbols ensures consistency among garment manufacturers...
... non-chlorine (color-safe) bleach (when needed) Tumble dry Normal Permanent press / Wrinkle resistant / Wrinkle control Gentle / Delicates Special instructions Line dry / Hang to dry Drip dry Dry flat Heat setting High Medium Low Any heat No heat / Air Specification 62 English FlexDry_DM9600M_DC68-03381H-07_EN.indd 62 2019-06-03 2:57:25 Specifications Fabric care chart The following symbols provide garment care direction. The use of symbols ensures consistency among garment manufacturers...
User Manual
Page 64
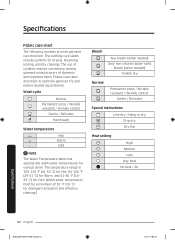
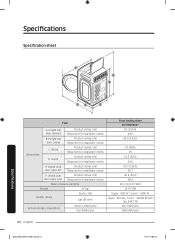
...-inches (cm) Required for Installation-inches Dimensions C. Specification Specification sheet F A B Specification E D C Type A. Width D. Height-top door closed Product-inches (cm) Required for Installation-inches E. Depth with door open 90° Product-inches (cm) Required for Installation-inches B. Width with door open 120° Product-inches (cm) Required for Installation-inches Water pressure-psl (kPa) Weight lb (kg) Heater rating Electric (W) Gas (BTU/hr) Annual energy consumption Electric (kWh/year) Gas (kWh/year) Front loading dryer DV*55M9600** 61...
...-inches (cm) Required for Installation-inches Dimensions C. Specification Specification sheet F A B Specification E D C Type A. Width D. Height-top door closed Product-inches (cm) Required for Installation-inches E. Depth with door open 90° Product-inches (cm) Required for Installation-inches B. Width with door open 120° Product-inches (cm) Required for Installation-inches Water pressure-psl (kPa) Weight lb (kg) Heater rating Electric (W) Gas (BTU/hr) Annual energy consumption Electric (kWh/year) Gas (kWh/year) Front loading dryer DV*55M9600** 61...

User Manual
Page 68
... by use of equipment, utilities, services, parts, supplies, accessories, applications, installations, repairs, external wiring or connectors not supplied or authorized by abuse, misuse, pest infestations, accident, fire, floods, or other damage to instructions; damage caused by this product was not intended; cosmetic damage including scratches, dents, chips, and other acts of nature or God; damage caused by SAMSUNG; in-home instruction...
... by use of equipment, utilities, services, parts, supplies, accessories, applications, installations, repairs, external wiring or connectors not supplied or authorized by abuse, misuse, pest infestations, accident, fire, floods, or other damage to instructions; damage caused by this product was not intended; cosmetic damage including scratches, dents, chips, and other acts of nature or God; damage caused by SAMSUNG; in-home instruction...
User Manual
Page 71
..., services, parts, supplies, accessories, applications, installations, repairs, external wiring or connectors not supplied or authorized by pest infestations. use of a service call for which this product or result in shipment; customer adjustments and failure to the following: damage that damage this product was not intended; This limited warranty does not cover problems resulting from incorrect electric current, voltage or supply, light bulbs, house fuses, house wiring...
..., services, parts, supplies, accessories, applications, installations, repairs, external wiring or connectors not supplied or authorized by pest infestations. use of a service call for which this product or result in shipment; customer adjustments and failure to the following: damage that damage this product was not intended; This limited warranty does not cover problems resulting from incorrect electric current, voltage or supply, light bulbs, house fuses, house wiring...


