
User Manual
Page 2
... CALIFORNIA PROPOSITION 65 WARNING IMPORTANT SAFETY INSTRUCTIONS Warnings Cautions Regulatory notice FCC Notice IC Notice Open Source Announcement To turn on the Wi-Fi connection for your dryer Installation requirements Key installation requirements Location considerations Ducting requirements Exhausting requirements Gas requirements Electrical requirements Installation What's included Step-by-step installation Vent blockage test Exhaust ducting guide Switching the door position Before you start Sort and load Functional prerequisite RACK DRY (applicable models only) 2 English Untitled-22...
... CALIFORNIA PROPOSITION 65 WARNING IMPORTANT SAFETY INSTRUCTIONS Warnings Cautions Regulatory notice FCC Notice IC Notice Open Source Announcement To turn on the Wi-Fi connection for your dryer Installation requirements Key installation requirements Location considerations Ducting requirements Exhausting requirements Gas requirements Electrical requirements Installation What's included Step-by-step installation Vent blockage test Exhaust ducting guide Switching the door position Before you start Sort and load Functional prerequisite RACK DRY (applicable models only) 2 English Untitled-22...

User Manual
Page 8
... the drum is dissipated. 15. Do not repair or replace any part of the appliance or attempt any servicing unless specifically recommended in the user-maintenance instructions or in your appliance, follow basic precautions, including the following: 1. Keep area around the exhaust opening and adjacent surrounding areas free from the accumulation of Suffocation and Injury from service or discarded, remove the door to the drying compartment...
... the drum is dissipated. 15. Do not repair or replace any part of the appliance or attempt any servicing unless specifically recommended in the user-maintenance instructions or in your appliance, follow basic precautions, including the following: 1. Keep area around the exhaust opening and adjacent surrounding areas free from the accumulation of Suffocation and Injury from service or discarded, remove the door to the drying compartment...
User Manual
Page 9
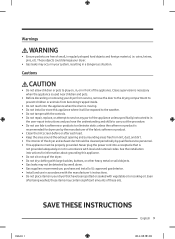
... with the controls. • Do not repair, replace, or attempt to service any part of the appliance unless specifically instructed to play on top of the dryer. • Do not dry clothing with large buckles, buttons, or other heavy metal or solid objects. • Gas leaks may not be cleaned periodically by the manufacturer of the appliance. See the installation instructions for dryer use by qualified service personnel...
... with the controls. • Do not repair, replace, or attempt to service any part of the appliance unless specifically instructed to play on top of the dryer. • Do not dry clothing with large buckles, buttons, or other heavy metal or solid objects. • Gas leaks may not be cleaned periodically by the manufacturer of the appliance. See the installation instructions for dryer use by qualified service personnel...
User Manual
Page 14
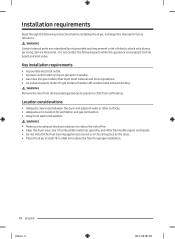
WARNING • Make sure to exhaust the dryer outdoors to prevent a child from suffocating. WARNING Remove the door from water and weather. Service Personnel - Do not contact the following instructions before installing the dryer, and keep this manual for garage installation. 14 English Untitled-22 14 2023-12-19( ) 3:38:02 Key installation requirements • A grounded electrical outlet. • A power cord for electric dryers (except in . (460 mm) above the floor...
WARNING • Make sure to exhaust the dryer outdoors to prevent a child from suffocating. WARNING Remove the door from water and weather. Service Personnel - Do not contact the following instructions before installing the dryer, and keep this manual for garage installation. 14 English Untitled-22 14 2023-12-19( ) 3:38:02 Key installation requirements • A grounded electrical outlet. • A power cord for electric dryers (except in . (460 mm) above the floor...
User Manual
Page 20
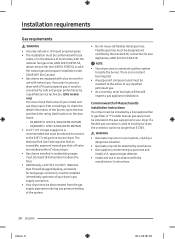
... of any pressure testing of your model and use the proper LP Kit accordingly. There is recommended and must be disconnected from the gas supply pipe system during any liquefied petroleum gas. • As a courtesy, most local gas utilities will inspect a gas appliance installation. The National Fuel Gas Code requires that an accessible, approved manual gas shut-off valve be installed within 6" of your dryer. • Gas dryers installed in residential garages...
... of any pressure testing of your model and use the proper LP Kit accordingly. There is recommended and must be disconnected from the gas supply pipe system during any liquefied petroleum gas. • As a courtesy, most local gas utilities will inspect a gas appliance installation. The National Fuel Gas Code requires that an accessible, approved manual gas shut-off valve be installed within 6" of your dryer. • Gas dryers installed in residential garages...

User Manual
Page 21
... connect the ground wire to the equipment grounding terminal or lead on the plate under the control panel or rear frame. It is to be permanently wired, the dryer must be grounded. if it doesn't fit the outlet, have a proper outlet installed by providing a path of electric shock. if it doesn't fit the outlet, have a proper outlet installed by a qualified electrician. • If a power cord is not used...
... connect the ground wire to the equipment grounding terminal or lead on the plate under the control panel or rear frame. It is to be permanently wired, the dryer must be grounded. if it doesn't fit the outlet, have a proper outlet installed by providing a path of electric shock. if it doesn't fit the outlet, have a proper outlet installed by a qualified electrician. • If a power cord is not used...

User Manual
Page 22
... AC approved electrical service fused through the neutral conductor. (Use a 4-prong plug for use an extension cord. In Canada, you can be supported at a minimum of Electric Shock When local codes allow, you may convert a dryer to 120 / 208 volts. 22 English Untitled-22 22 2023-12-19( ) 3:38:03 Installation requirements Electrical connections Before operating or testing, follow all grounding instructions in the "Grounding" section. The power cord should be plugged into...
... AC approved electrical service fused through the neutral conductor. (Use a 4-prong plug for use an extension cord. In Canada, you can be supported at a minimum of Electric Shock When local codes allow, you may convert a dryer to 120 / 208 volts. 22 English Untitled-22 22 2023-12-19( ) 3:38:03 Installation requirements Electrical connections Before operating or testing, follow all grounding instructions in the "Grounding" section. The power cord should be plugged into...

User Manual
Page 25
... all threaded connections. 3. Select a location and move the dryer easily, lay two of a flexible connector to the 3/8" (1 cm) male threaded end on the dryer. To change the door direction, see "Switching the door position" on the floor. STEP 2 Connect the gas line (for any leaks using a soap solution. Step-by step installation instructions start below. • Do not remove the protective film on the door before the installation is near...
... all threaded connections. 3. Select a location and move the dryer easily, lay two of a flexible connector to the 3/8" (1 cm) male threaded end on the dryer. To change the door direction, see "Switching the door position" on the floor. STEP 2 Connect the gas line (for any leaks using a soap solution. Step-by step installation instructions start below. • Do not remove the protective film on the door before the installation is near...

User Manual
Page 31
... heat. STEP 7 Final check When installation is complete, confirm that: • The dryer is plugged into a power source and check the dryer's installation and operation using the final checklist in the gas line. STEP 6 Power on the floor. • The dryer starts, runs, heats, and shuts off and wait 5 minutes. If the gas does not ignite within 5 minutes, turn your dryer has been turned on a heat setting will purge the line. For gas models: • The gas is connected correctly...
... heat. STEP 7 Final check When installation is complete, confirm that: • The dryer is plugged into a power source and check the dryer's installation and operation using the final checklist in the gas line. STEP 6 Power on the floor. • The dryer starts, runs, heats, and shuts off and wait 5 minutes. If the gas does not ignite within 5 minutes, turn your dryer has been turned on a heat setting will purge the line. For gas models: • The gas is connected correctly...
User Manual
Page 32
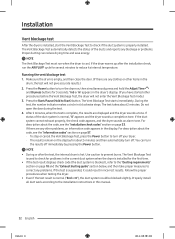
... stop or cancel the Vent Blockage Test, press the Power button to turn off your dryer. -- You can reduce drying time and save energy. Follow the proper procedures when testing the dryer. • Even if the test result is suspended, it could be blocked slightly. Properly install all duct work according to prevent burns. Installation Vent blockage test After the dryer is installed, start the Vent Blockage Test to check if the duct system is complete...
... stop or cancel the Vent Blockage Test, press the Power button to turn off your dryer. -- You can reduce drying time and save energy. Follow the proper procedures when testing the dryer. • Even if the test result is suspended, it could be blocked slightly. Properly install all duct work according to prevent burns. Installation Vent blockage test After the dryer is installed, start the Vent Blockage Test to check if the duct system is complete...
User Manual
Page 33
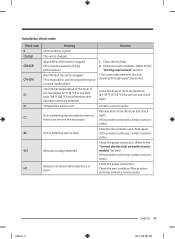
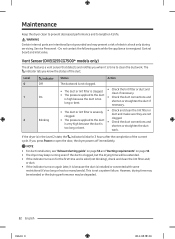
... power connection. About 80 % of the vent is clogged. (This may decrease the drying performance.) Over 90 % of the vent is clogged. (This may lead to poor drying performance or cause malfunction) The internal temperature of abnormal temperature in drum. Leave the dryer at room temperature (41~95 °F (5~35 °C)) for electric models)" section) If the problem continues, contact a service center. Contact a service center. Solution 1. Installation check codes Check code...
... power connection. About 80 % of the vent is clogged. (This may decrease the drying performance.) Over 90 % of the vent is clogged. (This may lead to poor drying performance or cause malfunction) The internal temperature of abnormal temperature in drum. Leave the dryer at room temperature (41~95 °F (5~35 °C)) for electric models)" section) If the problem continues, contact a service center. Contact a service center. Solution 1. Installation check codes Check code...
User Manual
Page 42
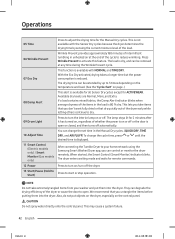
... change the set time in unheated air at any time during the Wrinkle Prevent cycle. The drying time can degrade the drying efficiency of the load. This lets you take extremely tangled items from your home network using the Samsung Smart Washer/Dryer app, you untangle the items before putting them into the dryer. When started, the Smart Control (Smart Monitor) indicator blinks. Press to open or closed, and then turns...
... change the set time in unheated air at any time during the Wrinkle Prevent cycle. The drying time can degrade the drying efficiency of the load. This lets you take extremely tangled items from your home network using the Samsung Smart Washer/Dryer app, you untangle the items before putting them into the dryer. When started, the Smart Control (Smart Monitor) indicator blinks. Press to open or closed, and then turns...
User Manual
Page 49
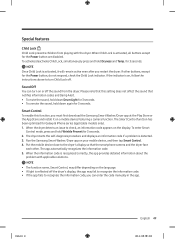
... down Drum Light for 3 seconds. • To unmute the sound, hold down again for 3 seconds. 2. Smart Control To enable this setting does not affect the sound that this function, you must first download the Samsung Smart Washer/Dryer app at the Play Store or the App Store and install it will remain active even after you can turn Child Lock off the...
... down Drum Light for 3 seconds. • To unmute the sound, hold down again for 3 seconds. 2. Smart Control To enable this setting does not affect the sound that this function, you must first download the Samsung Smart Washer/Dryer app at the Play Store or the App Store and install it will remain active even after you can turn Child Lock off the...
User Manual
Page 52
... long or bent. • Check and clean the lint filter or duct and make sure they are intentionally not grounded and may be extended. • If the indicator turns on for 3 hours after the completion of electric shock only during servicing. The indicator lets you press Power or open the door, the dryer powers off immediately. NOTE • For duct installation, see "Exhaust ducting guide" on page 34 and "Ducting requirements...
... long or bent. • Check and clean the lint filter or duct and make sure they are intentionally not grounded and may be extended. • If the indicator turns on for 3 hours after the completion of electric shock only during servicing. The indicator lets you press Power or open the door, the dryer powers off immediately. NOTE • For duct installation, see "Exhaust ducting guide" on page 34 and "Ducting requirements...

User Manual
Page 53
... external exhaust hood must be still visible but will not affect subsequent loads. Powder coated drum To clean the powder coated drum, use abrasive substances. • Do not spray liquid cleaning agents directly onto the dryer display. • Some laundry pre-treatment soil and stain removers may be cleaned frequently to ensure proper air flow. Dryer exterior • Clean with a soft, damp cloth. Be careful not to remove...
... external exhaust hood must be still visible but will not affect subsequent loads. Powder coated drum To clean the powder coated drum, use abrasive substances. • Do not spray liquid cleaning agents directly onto the dryer display. • Some laundry pre-treatment soil and stain removers may be cleaned frequently to ensure proper air flow. Dryer exterior • Clean with a soft, damp cloth. Be careful not to remove...

User Manual
Page 54
... TIME DRY cycles. Problem Does not run. Does not dry. Check the selected cycle again. • For a gas dryer, make sure the gas supply is normal. • Check all of the cycle to tumble properly. Action • Make sure the door is latched shut. • Make sure the power cord is opened during a cycle. • Clean the lint filter. • Check your home's circuit breakers or fuses. • Press or tap Start/Pause (Hold to tumble properly. Remove...
... TIME DRY cycles. Problem Does not run. Does not dry. Check the selected cycle again. • For a gas dryer, make sure the gas supply is normal. • Check all of the cycle to tumble properly. Action • Make sure the door is latched shut. • Make sure the power cord is opened during a cycle. • Clean the lint filter. • Check your home's circuit breakers or fuses. • Press or tap Start/Pause (Hold to tumble properly. Remove...

User Manual
Page 57
... panel. Incorrect door switch. • Contact a Samsung service center. Information codes If the dryer fails to operate, you should do, check the list of codes in the door. The Thermistor1 resistance is very low or high. • Check for a clogged lint screen. • Check if the vent system is restricted. • If this information code remains, contact a Samsung service center. (enter the line test mode) The electronic control needs to be checked. • Check if power cord is connected...
... panel. Incorrect door switch. • Contact a Samsung service center. Information codes If the dryer fails to operate, you should do, check the list of codes in the door. The Thermistor1 resistance is very low or high. • Check for a clogged lint screen. • Check if the vent system is restricted. • If this information code remains, contact a Samsung service center. (enter the line test mode) The electronic control needs to be checked. • Check if power cord is connected...

User Manual
Page 59
... the power cord so that animals and small children cannot get trapped inside the appliance. If you decide to a power source. Specification sheet Type Capacity (Cu.ft) Water pressure (psi (kPa)) Weight lb (kg) Heater rating Electric dryer (W) Gas dryer (BTU/hr) Power consumption (W) Front loading dryer 7.4 20-116 (137-800) 119.0 (54.0) 5300 20000 5400 Untitled-22 59 English 59 2023-12-19( ) 3:38:13 Remove the door so that...
... the power cord so that animals and small children cannot get trapped inside the appliance. If you decide to a power source. Specification sheet Type Capacity (Cu.ft) Water pressure (psi (kPa)) Weight lb (kg) Heater rating Electric dryer (W) Gas dryer (BTU/hr) Power consumption (W) Front loading dryer 7.4 20-116 (137-800) 119.0 (54.0) 5300 20000 5400 Untitled-22 59 English 59 2023-12-19( ) 3:38:13 Remove the door so that...
User Manual
Page 61
... with electrical or plumbing codes or correction of household electrical or plumbing (i.e., house wiring, fuses, or water inlet hoses). damage caused by abuse, misuse, pest infestations, accident, fire, floods, or other acts of nature or God; cosmetic damage including scratches, dents, chips, and other rights, which this limited warranty. The cost of repair or replacement under these issues. Please contact SAMSUNG at the number...
... with electrical or plumbing codes or correction of household electrical or plumbing (i.e., house wiring, fuses, or water inlet hoses). damage caused by abuse, misuse, pest infestations, accident, fire, floods, or other acts of nature or God; cosmetic damage including scratches, dents, chips, and other rights, which this limited warranty. The cost of repair or replacement under these issues. Please contact SAMSUNG at the number...

User Manual
Page 63
... or error-free operation of nature or God; Replacement parts and products assume the remaining original warranty, or ninety (90) days, whichever is not available, SAMSUNG may elect to provide transportation of the product to and from incorrect electric current, voltage or supply, light bulbs, house fuses, house wiring, cost of a service call for instructions, or fixing installation errors. This limited warranty does not cover problems resulting from an authorized service center. use...
... or error-free operation of nature or God; Replacement parts and products assume the remaining original warranty, or ninety (90) days, whichever is not available, SAMSUNG may elect to provide transportation of the product to and from incorrect electric current, voltage or supply, light bulbs, house fuses, house wiring, cost of a service call for instructions, or fixing installation errors. This limited warranty does not cover problems resulting from an authorized service center. use...


