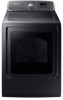

User Manual
Page 2
... What you need to know about the safety instructions Important safety symbols CALIFORNIA PROPOSITION 65 WARNING Important safety precautions Warnings Cautions Installation requirements Key installation requirements Location considerations Ducting requirements Exhausting requirements Gas requirements Electrical requirements Installation What's included Step-by-step installation Vent blockage test Exhaust ducting guide Switching the door position Before you start Sort and load Functional prerequisite Operations Feature panel Simple steps to start Cycle overview Cycle guide Special features...
... What you need to know about the safety instructions Important safety symbols CALIFORNIA PROPOSITION 65 WARNING Important safety precautions Warnings Cautions Installation requirements Key installation requirements Location considerations Ducting requirements Exhausting requirements Gas requirements Electrical requirements Installation What's included Step-by-step installation Vent blockage test Exhaust ducting guide Switching the door position Before you start Sort and load Functional prerequisite Operations Feature panel Simple steps to start Cycle overview Cycle guide Special features...
User Manual
Page 5
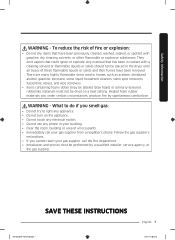
... appliance. 2. Do not use with gasoline, dry-cleaning solvents, or other appliance. 5. If flexible metal (foil type) duct is removed from service or discarded, remove the door to play on or in , or spotted with clothes dryers. Before the appliance is installed, it must be performed by a qualified installer. • Install the clothes dryer according to persons when using your appliance, follow all instructions before using this or any...
... appliance. 2. Do not use with gasoline, dry-cleaning solvents, or other appliance. 5. If flexible metal (foil type) duct is removed from service or discarded, remove the door to play on or in , or spotted with clothes dryers. Before the appliance is installed, it must be performed by a qualified installer. • Install the clothes dryer according to persons when using your appliance, follow all instructions before using this or any...

User Manual
Page 6
... surrounding areas free from the accumulation of lint, dust, and dirt. 15.The interior of the appliance and exhaust duct should be cleaned periodically by qualified service personnel. 16.Do not place items exposed to cooking oils in your hand under the dryer. • This may result in injury. 20.Take care that the heat is moving. 8. See "Electrical requirements" and...
... surrounding areas free from the accumulation of lint, dust, and dirt. 15.The interior of the appliance and exhaust duct should be cleaned periodically by qualified service personnel. 16.Do not place items exposed to cooking oils in your hand under the dryer. • This may result in injury. 20.Take care that the heat is moving. 8. See "Electrical requirements" and...
User Manual
Page 7
..., and wpe removers. • Items containing foam rubber (may be labeled latex foam) or similarly textured rubberlike materials must not be dried on the appliance. • Do not touch any electrical switch. • Do not use any appliance. • Do not turn on a heat setting. There are many highly flammable items used in contact with gasoline, dry cleaning solvents, or other...
..., and wpe removers. • Items containing foam rubber (may be labeled latex foam) or similarly textured rubberlike materials must not be dried on the appliance. • Do not touch any electrical switch. • Do not use any appliance. • Do not turn on a heat setting. There are many highly flammable items used in contact with gasoline, dry cleaning solvents, or other...

User Manual
Page 8
... not repair, replace, or attempt to service any part of the appliance unless specifically instructed to in the user-repair instructions and you purchase and install a UL-approved gas detector. • Install and use fabric softeners or products to play on top of the fabric softener or product. • Clean the lint screen before or after each load. • Keep the area around the exhaust opening and surrounding areas free...
... not repair, replace, or attempt to service any part of the appliance unless specifically instructed to in the user-repair instructions and you purchase and install a UL-approved gas detector. • Install and use fabric softeners or products to play on top of the fabric softener or product. • Clean the lint screen before or after each load. • Keep the area around the exhaust opening and surrounding areas free...
User Manual
Page 10
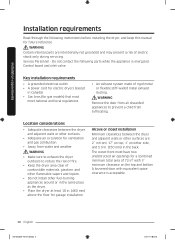
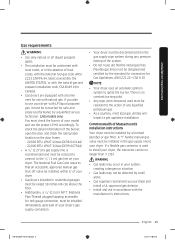
Key installation requirements • A grounded electrical outlet. • A power cord for electric dryers (except in Canada). • Gas lines (for garage installation. The closet front must meet national and local regulations. • An exhaust system made of rigid metal or flexible stiff-walled metal exhaust ducting. WARNING Certain internal parts are : 2" in the back. Do not contact the following instructions before installing the dryer, and keep this manual for ventilation...
Key installation requirements • A grounded electrical outlet. • A power cord for electric dryers (except in Canada). • Gas lines (for garage installation. The closet front must meet national and local regulations. • An exhaust system made of rigid metal or flexible stiff-walled metal exhaust ducting. WARNING Certain internal parts are : 2" in the back. Do not contact the following instructions before installing the dryer, and keep this manual for ventilation...
User Manual
Page 13
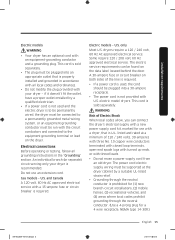
... Fuel Gas Code requires that an accessible, approved manual gas shut-off valve be installed within 6" of your dryer. • Gas dryers installed in the gas supply line to install your dryer, the connector can be no constant burning pilot. • Any pipe joint compound used to your dryer with LP (liquid propane) gas, it must be converted for safe and proper performance by a qualified service technician. (LNG models only) You must be installed in residential...
... Fuel Gas Code requires that an accessible, approved manual gas shut-off valve be installed within 6" of your dryer. • Gas dryers installed in the gas supply line to install your dryer, the connector can be no constant burning pilot. • Any pipe joint compound used to your dryer with LP (liquid propane) gas, it must be converted for safe and proper performance by a qualified service technician. (LNG models only) You must be installed in residential...
User Manual
Page 14
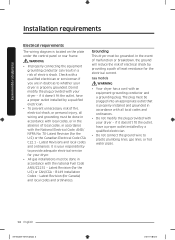
... dryer. • All gas installations must be plugged into an appropriate outlet that is properly grounded. Latest Revision (for the U.S.) or CAN/CGA - The plug must be grounded. Check with your responsibility to plastic plumbing lines, gas lines, or hot water pipes. 14 English DV7750M_DC68-03170Y-05_EN.indd 14 2019-06-03 5:18:29 It is located on the plate under the control panel or rear...
... dryer. • All gas installations must be plugged into an appropriate outlet that is properly grounded. Latest Revision (for the U.S.) or CAN/CGA - The plug must be grounded. Check with your responsibility to plastic plumbing lines, gas lines, or hot water pipes. 14 English DV7750M_DC68-03170Y-05_EN.indd 14 2019-06-03 5:18:29 It is located on the plate under the control panel or rear...
User Manual
Page 15
... copper wire conductors terminated with closed loop terminals, open-end spade lugs with turned up ends, or with an equipment-grounding conductor and a grounding plug. Installation requirements Electric models WARNING • Your dryer has an optional cord with tinned leads. • Do not reuse a power supply cord from an old dryer. An individual branch (or separate) circuit serving only your dryer - Electrical connections Before operating or testing, follow all grounding instructions in...
... copper wire conductors terminated with closed loop terminals, open-end spade lugs with turned up ends, or with an equipment-grounding conductor and a grounding plug. Installation requirements Electric models WARNING • Your dryer has an optional cord with tinned leads. • Do not reuse a power supply cord from an old dryer. An individual branch (or separate) circuit serving only your dryer - Electrical connections Before operating or testing, follow all grounding instructions in...

User Manual
Page 19
... change the door direction, see "Switching the door position". 3. CAUTION Before installing your washer. 2. If a leak is near its final location, and then set the dryer upright. • Secure room around the dryer to check for any leaks using a soap solution. Install the exhaust system as your dryer, remove the packing in the "Exhaust ducting guide" section. Tighten up the fitting over all threaded connections. 3. Turn on the floor. Installation Step-by step installation instructions start...
... change the door direction, see "Switching the door position". 3. CAUTION Before installing your washer. 2. If a leak is near its final location, and then set the dryer upright. • Secure room around the dryer to check for any leaks using a soap solution. Install the exhaust system as your dryer, remove the packing in the "Exhaust ducting guide" section. Tighten up the fitting over all threaded connections. 3. Turn on the floor. Installation Step-by step installation instructions start...
User Manual
Page 25
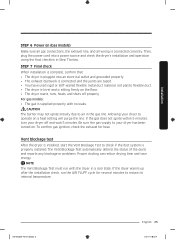
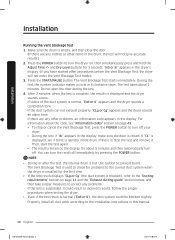
... plugged into a power source and check the dryer's installation and operation using the final checklist in Step 7 below. If the gas does not ignite within 5 minutes, turn your dryer off properly. The Vent Blockage Test automatically detects the status of the ducts and reports any blockage or problems. Proper ducting can reduce drying time and save energy. Then, plug the power cord into an electrical outlet and grounded properly. • The exhaust ductwork is connected...
... plugged into a power source and check the dryer's installation and operation using the final checklist in Step 7 below. If the gas does not ignite within 5 minutes, turn your dryer off properly. The Vent Blockage Test automatically detects the status of the ducts and reports any blockage or problems. Proper ducting can reduce drying time and save energy. Then, plug the power cord into an electrical outlet and grounded properly. • The exhaust ductwork is connected...
User Manual
Page 26
... clothes or other items in incorrect results. Use caution to the installation instructions in the display, make sure the door is normal ("End or 0"), the duct system could result in the drum, the test will not enter the Vent Blockage Test mode.) 3. Press the START/PAUSE button. The test takes about 5 minutes and then automatically turn off immediately by pressing the POWER button. You can not exhaust...
... clothes or other items in incorrect results. Use caution to the installation instructions in the display, make sure the door is normal ("End or 0"), the duct system could result in the drum, the test will not enter the Vent Blockage Test mode.) 3. Press the START/PAUSE button. The test takes about 5 minutes and then automatically turn off immediately by pressing the POWER button. You can not exhaust...

User Manual
Page 27
Use 4-inch rigid metal ducts. Cleaning Clean all joints including the dryer connection. It is installed properly so the air exhausts freely. 2. Installation Exhaust ducting guide Ducting 1. Unplug the power cord of any kind. • Do not use a poor exhaust system because it up slightly. WARNING • To prevent fire, do not use lint-trapping screws. 3. Switching the door position To reverse the direction of the door, we recommend that you contact a qualified technician. We recommend that...
Use 4-inch rigid metal ducts. Cleaning Clean all joints including the dryer connection. It is installed properly so the air exhausts freely. 2. Installation Exhaust ducting guide Ducting 1. Unplug the power cord of any kind. • Do not use a poor exhaust system because it up slightly. WARNING • To prevent fire, do not use lint-trapping screws. 3. Switching the door position To reverse the direction of the door, we recommend that you contact a qualified technician. We recommend that...
User Manual
Page 39
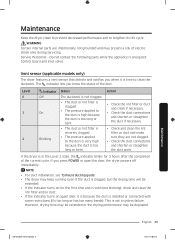
... first time and is solid (not blinking), check and clean the lint filter and/or duct. • If the indicator turns on for 3 hours after the completion of the current cycle. WARNING Certain internal parts are not clogged. • Check the duct connections and shorten or straighten the duct work. Service Personnel - This is energized: Control board and inlet valve. NOTE • For duct installation, see "Exhaust ducting guide". • The dryer may keep running...
... first time and is solid (not blinking), check and clean the lint filter and/or duct. • If the indicator turns on for 3 hours after the completion of the current cycle. WARNING Certain internal parts are not clogged. • Check the duct connections and shorten or straighten the duct work. Service Personnel - This is energized: Control board and inlet valve. NOTE • For duct installation, see "Exhaust ducting guide". • The dryer may keep running...

User Manual
Page 41
... electrical outlet. • Check your home's circuit breakers or fuses. • Some cycles do not require heating. Troubleshooting DV7750M_DC68-03170Y-05_EN.indd 41 English 41 2019-06-03 5:18:36 Check the selected cycle again. • For a gas dryer, make sure the gas supply is opened during a cycle. • Clean the lint filter. • Check your home's circuit breakers or fuses. • Press or tap START/PAUSE again if the door is on. • Clean the lint filter and exhaust duct...
... electrical outlet. • Check your home's circuit breakers or fuses. • Some cycles do not require heating. Troubleshooting DV7750M_DC68-03170Y-05_EN.indd 41 English 41 2019-06-03 5:18:36 Check the selected cycle again. • For a gas dryer, make sure the gas supply is opened during a cycle. • Clean the lint filter. • Check your home's circuit breakers or fuses. • Press or tap START/PAUSE again if the door is on. • Clean the lint filter and exhaust duct...
User Manual
Page 42
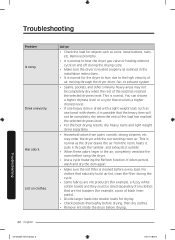
... the rest of air moving through the dryer drum, fan, or exhaust system. • Seams, pockets, and other similarly heavy areas may enter the dryer with sheets, it outside. • When these odors linger in the installation instructions. • It is dried with a light weight load, such as coins, loose buttons, nails, etc. For clothes that naturally build up lint, clean the filter during the drying cycle. • Make...
... the rest of air moving through the dryer drum, fan, or exhaust system. • Seams, pockets, and other similarly heavy areas may enter the dryer with sheets, it outside. • When these odors linger in the installation instructions. • It is dried with a light weight load, such as coins, loose buttons, nails, etc. For clothes that naturally build up lint, clean the filter during the drying cycle. • Make...
User Manual
Page 43
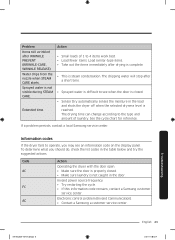
... a Samsung customer service center. Information codes If the dryer fails to operate, you should do, check the list codes in the door. Problem Items still wrinkled after a short time. • Sprayed water is difficult to see an information code on the display panel. Code dC FC AC Action Operating the dryer with the door open. • Make sure the door is properly closed . • Sensor Dry automatically senses the moisture in the load and shuts...
... a Samsung customer service center. Information codes If the dryer fails to operate, you should do, check the list codes in the door. Problem Items still wrinkled after a short time. • Sprayed water is difficult to see an information code on the display panel. Code dC FC AC Action Operating the dryer with the door open. • Make sure the door is properly closed . • Sensor Dry automatically senses the moisture in the load and shuts...
User Manual
Page 47
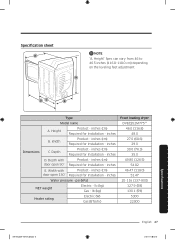
...) door open 90° Required for Installation - inches (cm) Required for Installation - inches (cm) Required for Installation - inches (cm) door open 130° Required for Installation - inches Water pressure - Height" Spec can vary from 46 to 46.5 inches (116.8-118.0 cm) depending on the leveling feet adjustment. inches D. A DC B Type Model name A. Height Product - Depth with Product - lb (kg) Gas - Width Product - lb (kg) Heater rating Electric (W) Gas (BTU/hr) Front loading dryer DVE...
...) door open 90° Required for Installation - inches (cm) Required for Installation - inches (cm) Required for Installation - inches (cm) door open 130° Required for Installation - inches Water pressure - Height" Spec can vary from 46 to 46.5 inches (116.8-118.0 cm) depending on the leveling feet adjustment. inches D. A DC B Type Model name A. Height Product - Depth with Product - lb (kg) Gas - Width Product - lb (kg) Heater rating Electric (W) Gas (BTU/hr) Front loading dryer DVE...
User Manual
Page 51
... SAMSUNG; damage caused by use of equipment, utilities, services, parts, supplies, accessories, applications, installations, repairs, external wiring or connectors not supplied or authorized by unauthorized modification or alteration of the product; damage caused by incorrect electrical line current, voltage, fluctuations and surges; damage caused by abuse, misuse, pest infestations, accident, fire, floods, or other damage to use your product; and service to instructions...
... SAMSUNG; damage caused by use of equipment, utilities, services, parts, supplies, accessories, applications, installations, repairs, external wiring or connectors not supplied or authorized by unauthorized modification or alteration of the product; damage caused by incorrect electrical line current, voltage, fluctuations and surges; damage caused by abuse, misuse, pest infestations, accident, fire, floods, or other damage to use your product; and service to instructions...
User Manual
Page 54
... IS BASED, AND EVEN IF SAMSUNG HAS BEEN ADVISED OF THE POSSIBILITY OF SUCH DAMAGES. SAMSUNG does not warrant uninterrupted or error-free operation of nature or God; Warranty (CANADA) This limited warranty covers manufacturing defects in materials and workmanship encountered in normal, noncommercial use of products, equipment, systems, utilities, services, parts, supplies, accessories, applications, installations, repairs, external wiring or connectors not supplied or authorized by...
... IS BASED, AND EVEN IF SAMSUNG HAS BEEN ADVISED OF THE POSSIBILITY OF SUCH DAMAGES. SAMSUNG does not warrant uninterrupted or error-free operation of nature or God; Warranty (CANADA) This limited warranty covers manufacturing defects in materials and workmanship encountered in normal, noncommercial use of products, equipment, systems, utilities, services, parts, supplies, accessories, applications, installations, repairs, external wiring or connectors not supplied or authorized by...


