User Manual
Page 2
... know about the safety instructions Important safety symbols CALIFORNIA PROPOSITION 65 WARNING Important safety precautions Warnings Cautions Installation requirements Key installation requirements Location considerations Ducting requirements Exhausting requirements Gas requirements Electrical requirements Installation What's included Step-by-step installation Vent blockage test Exhaust ducting guide Switching the door position Before you start Sort and load Functional prerequisite Operations Control panel Simple steps to start Cycle overview Cycle chart Cycle guide Special features 2 English...
... know about the safety instructions Important safety symbols CALIFORNIA PROPOSITION 65 WARNING Important safety precautions Warnings Cautions Installation requirements Key installation requirements Location considerations Ducting requirements Exhausting requirements Gas requirements Electrical requirements Installation What's included Step-by-step installation Vent blockage test Exhaust ducting guide Switching the door position Before you start Sort and load Functional prerequisite Operations Control panel Simple steps to start Cycle overview Cycle chart Cycle guide Special features 2 English...

User Manual
Page 6
....Do not use heat to dry articles containing foam rubber or similarly textured rubber-like materials. 14.Keep area around the exhaust opening and adjacent surrounding areas free from service or discarded, remove the door to contaminated loads, the final part of electric shock only during servicing. - This may contribute to play on or in injury. 21.Control board and inlet valve are quickly removed and...
....Do not use heat to dry articles containing foam rubber or similarly textured rubber-like materials. 14.Keep area around the exhaust opening and adjacent surrounding areas free from service or discarded, remove the door to contaminated loads, the final part of electric shock only during servicing. - This may contribute to play on or in injury. 21.Control board and inlet valve are quickly removed and...
User Manual
Page 7
...; Immediately call your gas supplier, call the fire department. • Installation and service must not be performed by spontaneous combustion. WARNING - Follow the gas supplier's instructions. • If you smell gas: • Do not try to light any appliance. • Do not turn on the appliance. • Do not touch any electrical switch. • Do not use any phone in homes...
...; Immediately call your gas supplier, call the fire department. • Installation and service must not be performed by spontaneous combustion. WARNING - Follow the gas supplier's instructions. • If you smell gas: • Do not try to light any appliance. • Do not turn on the appliance. • Do not touch any electrical switch. • Do not use any phone in homes...
User Manual
Page 8
.... Never plug the power cord into the appliance when the drum is moving. • Do not install or store this appliance. • Do not sit on , in, or in accordance with controls. • Do not repair, replace, or attempt to service any part of the appliance unless specifically instructed to in the user-repair instructions and you purchase and install a UL-approved gas detector. • Install and use fabric...
.... Never plug the power cord into the appliance when the drum is moving. • Do not install or store this appliance. • Do not sit on , in, or in accordance with controls. • Do not repair, replace, or attempt to service any part of the appliance unless specifically instructed to in the user-repair instructions and you purchase and install a UL-approved gas detector. • Install and use fabric...
User Manual
Page 10
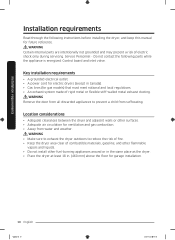
... the following instructions before installing the dryer, and keep this manual for gas models) that must meet national and local regulations. • An exhaust system made of rigid metal or flexible stiff-walled metal exhaust ducting. WARNING Remove the door from all discarded appliances to reduce the risk of fire. • Keep the dryer area clear of electric shock only during servicing. Location considerations •...
... the following instructions before installing the dryer, and keep this manual for gas models) that must meet national and local regulations. • An exhaust system made of rigid metal or flexible stiff-walled metal exhaust ducting. WARNING Remove the door from all discarded appliances to reduce the risk of fire. • Keep the dryer area clear of electric shock only during servicing. Location considerations •...
User Manual
Page 16
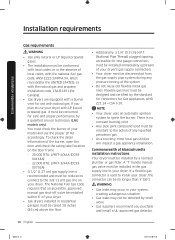
...) plugged tapping, accessible for safe and proper performance by a qualified service technician. (LNG models only) You must check the burner of your model and use with natural gas. There is no constant burning pilot. • Any pipe joint compound used to your dryer. The National Fuel Gas Code requires that an accessible, approved manual gas shut-off valve be installed within 6" of your dryer. • Gas dryers installed in the gas supply line to install your dryer, the connector...
...) plugged tapping, accessible for safe and proper performance by a qualified service technician. (LNG models only) You must check the burner of your model and use with natural gas. There is no constant burning pilot. • Any pipe joint compound used to your dryer. The National Fuel Gas Code requires that an accessible, approved manual gas shut-off valve be installed within 6" of your dryer. • Gas dryers installed in the gas supply line to install your dryer, the connector...

User Manual
Page 17
...; Install and use in accordance with your dryer - Untitled-16 17 English 17 2020-07-14 3:36:14 B149 Installation Codes - Check with an equipment-grounding conductor and a grounding plug. Gas models WARNING • Your dryer has a cord with a qualified electrician or serviceman if you are in doubt as to whether your dryer is located on the plate under the control panel or rear frame. Electrical requirements The wiring diagram...
...; Install and use in accordance with your dryer - Untitled-16 17 English 17 2020-07-14 3:36:14 B149 Installation Codes - Check with an equipment-grounding conductor and a grounding plug. Gas models WARNING • Your dryer has a cord with a qualified electrician or serviceman if you are in doubt as to whether your dryer is located on the plate under the control panel or rear frame. Electrical requirements The wiring diagram...
User Manual
Page 19
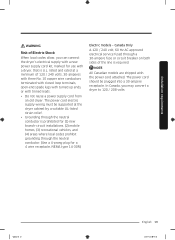
The power cord electric supply wiring must be plugged into a 30-ampere receptacle. Installation requirements WARNING Risk of Electric Shock When local codes allow, you may convert a dryer to 120 / 208 volts. Canada Only A 120 / 240 volt, 60 Hz AC approved electrical service fused through a 30-ampere fuse or circuit breaker on both sides of 120 / 240 volts, 30-amperes with three No. 10 copper wire conductors terminated with closed...
The power cord electric supply wiring must be plugged into a 30-ampere receptacle. Installation requirements WARNING Risk of Electric Shock When local codes allow, you may convert a dryer to 120 / 208 volts. Canada Only A 120 / 240 volt, 60 Hz AC approved electrical service fused through a 30-ampere fuse or circuit breaker on both sides of 120 / 240 volts, 30-amperes with three No. 10 copper wire conductors terminated with closed...
User Manual
Page 22
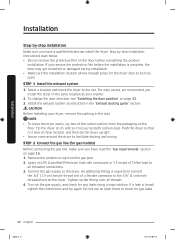
... dryer, remove the packing in the "Exhaust ducting guide" section. Installation Installation Step-by step installation instructions start below. • Do not remove the protective film on the dryer. Apply an LPG (Liquefied Petroleum Gas)-safe compound or 1.5 wraps of a flexible connector to the 3/8" (1 cm) male threaded end on the door before the installation is found, tighten the connections and try again. STEP 2 Connect the gas line (for any leaks using...
... dryer, remove the packing in the "Exhaust ducting guide" section. Installation Installation Step-by step installation instructions start below. • Do not remove the protective film on the dryer. Apply an LPG (Liquefied Petroleum Gas)-safe compound or 1.5 wraps of a flexible connector to the 3/8" (1 cm) male threaded end on the door before the installation is found, tighten the connections and try again. STEP 2 Connect the gas line (for any leaks using...
User Manual
Page 29
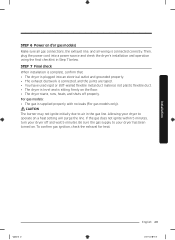
... dryer starts, runs, heats, and shuts off and wait 5 minutes. To confirm gas ignition, check the exhaust for gas models) Make sure all gas connections, the exhaust line, and all wiring is supplied properly with no leaks (For gas models only). Installation Untitled-16 29 English 29 2020-07-14 3:36:17 STEP 7 Final check When installation is complete, confirm that: • The dryer is plugged into a power source and check the dryer's installation and operation using the...
... dryer starts, runs, heats, and shuts off and wait 5 minutes. To confirm gas ignition, check the exhaust for gas models) Make sure all gas connections, the exhaust line, and all wiring is supplied properly with no leaks (For gas models only). Installation Untitled-16 29 English 29 2020-07-14 3:36:17 STEP 7 Final check When installation is complete, confirm that: • The dryer is plugged into a power source and check the dryer's installation and operation using the...
User Manual
Page 30
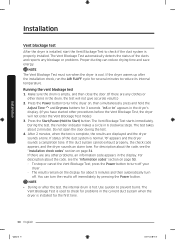
... drying time and save energy. NOTE • During or after the installation check, run when the dryer is normal, "0" appears and the dryer sounds a completion tone. The Vent Blockage Test starts immediately. If the duct system cannot exhaust properly, the check code appears, and the dryer sounds an alarm tone. To stop or cancel the Vent Blockage Test, press the Power button to turn the results off immediately by pressing the Power button...
... drying time and save energy. NOTE • During or after the installation check, run when the dryer is normal, "0" appears and the dryer sounds a completion tone. The Vent Blockage Test starts immediately. If the duct system cannot exhaust properly, the check code appears, and the dryer sounds an alarm tone. To stop or cancel the Vent Blockage Test, press the Power button to turn the results off immediately by pressing the Power button...
User Manual
Page 31
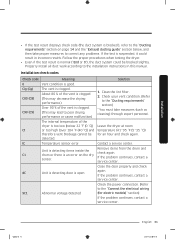
... any problems. If the test is open Abnormal voltage detected Solution 1. Leave the dryer at room temperature (41~95 °F (5~35 °C)) for electric models)" section) If the problem continues, contact a service center. Close the door properly and check again. Properly install all duct work according to the installation instructions in incorrect results. Clean the lint filter. 2. Remove items from the drum and check again. Contact a service center. Check the power connection. (Refer to the "Connect the electrical wiring...
... any problems. If the test is open Abnormal voltage detected Solution 1. Leave the dryer at room temperature (41~95 °F (5~35 °C)) for electric models)" section) If the problem continues, contact a service center. Close the door properly and check again. Properly install all duct work according to the installation instructions in incorrect results. Clean the lint filter. 2. Remove items from the drum and check again. Contact a service center. Check the power connection. (Refer to the "Connect the electrical wiring...
User Manual
Page 32
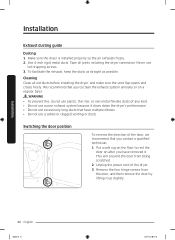
...-metal flexible ducts of any kind. • Do not use lint-trapping screws. 3. Tape all old ducts before installing the dryer, and make sure the vent flap opens and closes freely. Switching the door position To reverse the direction of the dryer. 3. Never use a poor exhaust system because it . Put a soft rug on the floor to clean the exhaust system annually or on after you contact a qualified technician. 1. Installation Installation Exhaust ducting guide Ducting 1.
...-metal flexible ducts of any kind. • Do not use lint-trapping screws. 3. Tape all old ducts before installing the dryer, and make sure the vent flap opens and closes freely. Switching the door position To reverse the direction of the dryer. 3. Never use a poor exhaust system because it . Put a soft rug on the floor to clean the exhaust system annually or on after you contact a qualified technician. 1. Installation Installation Exhaust ducting guide Ducting 1.
User Manual
Page 39
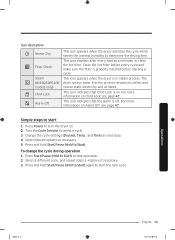
... the drum to stop operation. 2. Clean the lint filter before every cycle and make sure the filter is in steam process. For more information on . For more information on . 2. Change the cycle settings (Dryness, Temp., and Time) as necessary. 5. Operations Untitled-16 39 English 39 2020-07-14 3:36:20 Select desired options as necessary. 4. Press Power to select a cycle. 3. Turn the Cycle Selector to turn the dryer on Child Lock...
... the drum to stop operation. 2. Clean the lint filter before every cycle and make sure the filter is in steam process. For more information on . For more information on . 2. Change the cycle settings (Dryness, Temp., and Time) as necessary. 5. Operations Untitled-16 39 English 39 2020-07-14 3:36:20 Select desired options as necessary. 4. Press Power to select a cycle. 3. Turn the Cycle Selector to turn the dryer on Child Lock...

User Manual
Page 41
... long after the cycle has ended. WRINKLE RELEASE can change the cycle time if necessary. Manual Dry You can be used with any temperature selection. The WRINKLE RELEASE cycle will release wrinkles from items that are clean, dry, and only slightly wrinkled, such as clothes from a crowded closet, suitcase or items that have been in room temperature air. The default cycle time is enabled by default. You can specify a cycle time in the "Control panel...
... long after the cycle has ended. WRINKLE RELEASE can change the cycle time if necessary. Manual Dry You can be used with any temperature selection. The WRINKLE RELEASE cycle will release wrinkles from items that are clean, dry, and only slightly wrinkled, such as clothes from a crowded closet, suitcase or items that have been in room temperature air. The default cycle time is enabled by default. You can specify a cycle time in the "Control panel...
User Manual
Page 49
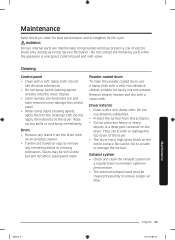
... control panel. • When using liquid cleaning agents, apply them directly to ensure proper air flow. Cleaning Control panel • Clean with a soft, damp cloth. Drum • Remove any stains from sharp objects. • Do not place any spills or overspray immediately. Do not apply them to lengthen its life cycle. They can scratch or damage the top cover of electric shock only during servicing. Exhaust system • Check and clean...
... control panel. • When using liquid cleaning agents, apply them directly to ensure proper air flow. Cleaning Control panel • Clean with a soft, damp cloth. Drum • Remove any stains from sharp objects. • Do not place any spills or overspray immediately. Do not apply them to lengthen its life cycle. They can scratch or damage the top cover of electric shock only during servicing. Exhaust system • Check and clean...
User Manual
Page 51
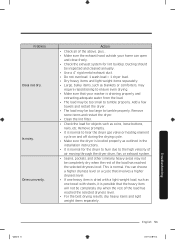
...; Check the exhaust system for lint buildup. Remove promptly. • It is normal to hear the dryer gas valve or heating element cycle on and off during the drying cycle. • Make sure the dryer is leveled properly as one towel with sheets, it is possible that your washer is draining properly and extracting adequate water from the load. • The load may require repositioning to tumble properly. Dries unevenly. Troubleshooting...
...; Check the exhaust system for lint buildup. Remove promptly. • It is normal to hear the dryer gas valve or heating element cycle on and off during the drying cycle. • Make sure the dryer is leveled properly as one towel with sheets, it is possible that your washer is draining properly and extracting adequate water from the load. • The load may require repositioning to tumble properly. Dries unevenly. Troubleshooting...
User Manual
Page 52
..., heats it, pulls it through the tumbler, and exhausts it outside. • When these odors linger in the load and shuts the dryer off when the selected dryness level is not visible during STEAM CARE. If a problem persists, contact a local Samsung service center. See the cycle chart for drying. • Check pockets thoroughly before drying, then dry clothes. • Remove lint inside the drum before drying. • Small loads of laundry. Troubleshooting...
..., heats it, pulls it through the tumbler, and exhausts it outside. • When these odors linger in the load and shuts the dryer off when the selected dryness level is not visible during STEAM CARE. If a problem persists, contact a local Samsung service center. See the cycle chart for drying. • Check pockets thoroughly before drying, then dry clothes. • Remove lint inside the drum before drying. • Small loads of laundry. Troubleshooting...
User Manual
Page 53
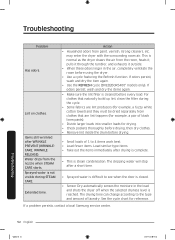
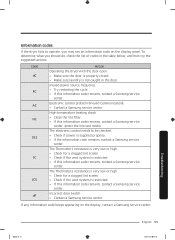
... high. • Check for a clogged lint screen • Check if the vent system is restricted. • If this information code remains, contact a Samsung service center. (enter the line test mode) The electronic control needs to operate, you should do, check the list of codes in the door. Electronic control problem (Invalid Communication). • Contact a Samsung service center. Incorrect door switch. • Contact a Samsung service center. Information codes If the dryer fails to be checked. • Check if power is not...
... high. • Check for a clogged lint screen • Check if the vent system is restricted. • If this information code remains, contact a Samsung service center. (enter the line test mode) The electronic control needs to operate, you should do, check the list of codes in the door. Electronic control problem (Invalid Communication). • Contact a Samsung service center. Incorrect door switch. • Contact a Samsung service center. Information codes If the dryer fails to be checked. • Check if power is not...
User Manual
Page 58
... this limited warranty. and service to correct installation not in -home instruction on how to the product's finishes; damage caused by incorrect electrical line current, voltage, fluctuations and surges; Please contact SAMSUNG at the number below for which this product and shall not cover the following: damage that occurs in any of household electrical or plumbing (i.e., house wiring, fuses, or water inlet hoses). cosmetic...
... this limited warranty. and service to correct installation not in -home instruction on how to the product's finishes; damage caused by incorrect electrical line current, voltage, fluctuations and surges; Please contact SAMSUNG at the number below for which this product and shall not cover the following: damage that occurs in any of household electrical or plumbing (i.e., house wiring, fuses, or water inlet hoses). cosmetic...


