User Manual
Page 2
... Safety information What you need to know about the safety instructions Important safety symbols Important safety precautions Warnings Cautions Installation requirements Key installation requirements Location considerations Ducting requirements Exhausting requirements Gas requirements Electrical requirements Installation What's included Step-by-step installation Vent blockage test Exhaust ducting guide Switching the door position Before you start Sort and load Functional prerequisite Operations Feature panel Simple steps to start Cycle overview Cycle guide Special features 2 English DV7450M...
... Safety information What you need to know about the safety instructions Important safety symbols Important safety precautions Warnings Cautions Installation requirements Key installation requirements Location considerations Ducting requirements Exhausting requirements Gas requirements Electrical requirements Installation What's included Step-by-step installation Vent blockage test Exhaust ducting guide Switching the door position Before you start Sort and load Functional prerequisite Operations Feature panel Simple steps to start Cycle overview Cycle guide Special features 2 English DV7450M...
User Manual
Page 6
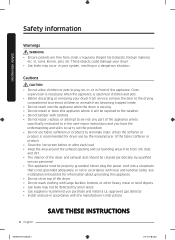
... or product. 12.Clean the lint screen before or after each load. 13.Do not use heat to dry articles containing foam rubber or similarly textured rubber-like materials. 14.Keep area around the exhaust opening and adjacent surrounding areas free from service or discarded, remove the door to play on or in the door when closing it will be grounded. See "Electrical requirements" and "Grounding...
... or product. 12.Clean the lint screen before or after each load. 13.Do not use heat to dry articles containing foam rubber or similarly textured rubber-like materials. 14.Keep area around the exhaust opening and adjacent surrounding areas free from service or discarded, remove the door to play on or in the door when closing it will be grounded. See "Electrical requirements" and "Grounding...
User Manual
Page 7
... previously cleaned, washed, soaked, or spotted with a cleaning solvent or flammable liquids or solids should not be dried on the appliance. • Do not touch any electrical switch. • Do not use any appliance. • Do not turn on a heat setting. Safety information WARNING - Heated foam rubber materials can, under certain circumstances, produce fire by a qualified installer, service agency, or the gas supplier...
... previously cleaned, washed, soaked, or spotted with a cleaning solvent or flammable liquids or solids should not be dried on the appliance. • Do not touch any electrical switch. • Do not use any appliance. • Do not turn on a heat setting. Safety information WARNING - Heated foam rubber materials can, under certain circumstances, produce fire by a qualified installer, service agency, or the gas supplier...
User Manual
Page 8
... dryer from service, remove the door to the drying compartment to prevent children or animals from becoming trapped inside. • Do not reach into a receptacle that is moving. • Do not install or store this appliance. • Do not sit on , in, or in accordance with controls. • Do not repair, replace, or attempt to service any part of the appliance unless specifically instructed...
... dryer from service, remove the door to the drying compartment to prevent children or animals from becoming trapped inside. • Do not reach into a receptacle that is moving. • Do not install or store this appliance. • Do not sit on , in, or in accordance with controls. • Do not repair, replace, or attempt to service any part of the appliance unless specifically instructed...
User Manual
Page 10
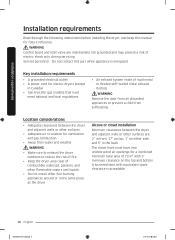
... installation requirements • A grounded electrical outlet. • A power cord for electric dryers (except in Canada). • Gas lines (for a combined minimum total area of rigid metal or flexible stiff-walled metal exhaust ducting. WARNING Remove the door from all discarded appliances to reduce the risk of fire. • Keep the dryer area clear of electric shock only during servicing. The closet front must have two unobstructed air openings for gas models...
... installation requirements • A grounded electrical outlet. • A power cord for electric dryers (except in Canada). • Gas lines (for a combined minimum total area of rigid metal or flexible stiff-walled metal exhaust ducting. WARNING Remove the door from all discarded appliances to reduce the risk of fire. • Keep the dryer area clear of electric shock only during servicing. The closet front must have two unobstructed air openings for gas models...
User Manual
Page 14
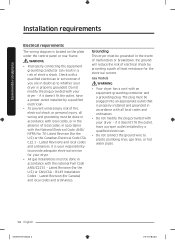
... connect the ground wire to whether your dryer is located on the plate under the control panel or rear frame. Latest Revision (for the U.S.) or the Canadian Electrical Code CSA C22.1 - Do not modify the plug provided with an equipment-grounding conductor and a grounding plug. B149 Installation Codes - Grounding This dryer must be done in accordance with your dryer - Gas models WARNING • Your dryer has a cord with your dryer...
... connect the ground wire to whether your dryer is located on the plate under the control panel or rear frame. Latest Revision (for the U.S.) or the Canadian Electrical Code CSA C22.1 - Do not modify the plug provided with an equipment-grounding conductor and a grounding plug. B149 Installation Codes - Grounding This dryer must be done in accordance with your dryer - Gas models WARNING • Your dryer has a cord with your dryer...
User Manual
Page 16
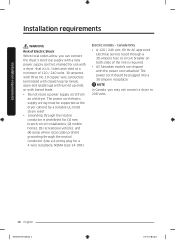
... circuit breaker on both sides of the line is U.L. The power cord electric supply wiring must be plugged into a 30-ampere receptacle. Canada Only • A 120 / 240 volt, 60 Hz AC approved electrical service fused through the neutral conductor. (Use a 4-prong plug for use with a dryer, that is required. • All Canadian models are shipped with the power cord attached. Installation requirements Installation requirements WARNING Risk of Electric Shock When local codes allow, you may not convert a dryer...
... circuit breaker on both sides of the line is U.L. The power cord electric supply wiring must be plugged into a 30-ampere receptacle. Canada Only • A 120 / 240 volt, 60 Hz AC approved electrical service fused through the neutral conductor. (Use a 4-prong plug for use with a dryer, that is required. • All Canadian models are shipped with the power cord attached. Installation requirements Installation requirements WARNING Risk of Electric Shock When local codes allow, you may not convert a dryer...
User Manual
Page 19
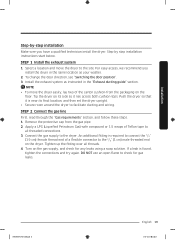
... the dryer to check for any leaks using a soap solution. STEP 2 Connect the gas line First, read through the "Gas requirements" section, and follow these steps. 1. Tighten up the fitting over all threaded connections. 3. DV7450M-03170Z-00_EN.indd 19 English 19 2017-01-25 11:24:20 Installation Step-by step installation instructions start below. STEP 1 Install the exhaust system 1. To change the door direction, see "Switching the door position...
... the dryer to check for any leaks using a soap solution. STEP 2 Connect the gas line First, read through the "Gas requirements" section, and follow these steps. 1. Tighten up the fitting over all threaded connections. 3. DV7450M-03170Z-00_EN.indd 19 English 19 2017-01-25 11:24:20 Installation Step-by step installation instructions start below. STEP 1 Install the exhaust system 1. To change the door direction, see "Switching the door position...
User Manual
Page 25
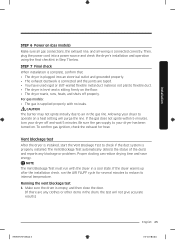
..., plug the power cord into an electrical outlet and grounded properly. • The exhaust ductwork is sitting firmly on the floor. • The dryer starts, runs, heats, and shuts off and wait 5 minutes. Allowing your dryer off properly. If the gas does not ignite within 5 minutes, turn your dryer to air in the drum, the test will purge the line. Installation STEP 6 Power on (Gas models) Make sure all gas connections, the exhaust line, and all wiring is...
..., plug the power cord into an electrical outlet and grounded properly. • The exhaust ductwork is sitting firmly on the floor. • The dryer starts, runs, heats, and shuts off and wait 5 minutes. Allowing your dryer off properly. If the gas does not ignite within 5 minutes, turn your dryer to air in the drum, the test will purge the line. Installation STEP 6 Power on (Gas models) Make sure all gas connections, the exhaust line, and all wiring is...
User Manual
Page 26
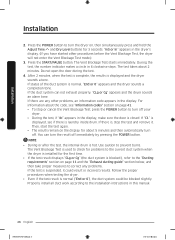
... tone. Installation Installation 2. The Vent Blockage Test is used to check for problems to turn the dryer on page 11 and the "Exhaust ducting guide" section below, and then take proper measures to the "Ducting requirements" section on , then simultaneously press and hold the Adjust Time and Dry Level buttons for about 2 minutes. "InS or In" appears in the dryer's display. (If you have started other problems, an information code appears...
... tone. Installation Installation 2. The Vent Blockage Test is used to check for problems to turn the dryer on page 11 and the "Exhaust ducting guide" section below, and then take proper measures to the "Ducting requirements" section on , then simultaneously press and hold the Adjust Time and Dry Level buttons for about 2 minutes. "InS or In" appears in the dryer's display. (If you have started other problems, an information code appears...

User Manual
Page 27
... ducts before installing the dryer, and make sure the vent flap opens and closes freely. Cleaning Clean all joints including the dryer connection. Unplug the power cord of any kind. • Do not use excessively long ducts that you contact a qualified technician. Use 4-inch rigid metal ducts. Make sure the dryer is recommended to put a soft rug on the floor to clean the exhaust system annually or on the door. 1. Installation Exhaust ducting guide Ducting 1. Remove...
... ducts before installing the dryer, and make sure the vent flap opens and closes freely. Cleaning Clean all joints including the dryer connection. Unplug the power cord of any kind. • Do not use excessively long ducts that you contact a qualified technician. Use 4-inch rigid metal ducts. Make sure the dryer is recommended to put a soft rug on the floor to clean the exhaust system annually or on the door. 1. Installation Exhaust ducting guide Ducting 1. Remove...
User Manual
Page 32
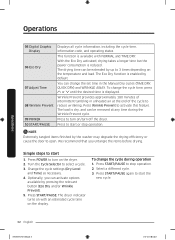
.... Press Wrinkle Prevent to select a cycle. 3. Press to stop operation. We recommend that you can change the set time in unheated air at any time during operation 1. Turn the Cycle Selector to activate this feature. Select a different cycle. 3. Change the cycle settings (Dry Level and Time) as necessary. 4. The Eco Dry function is enabled by the washer may degrade the drying efficiency or cause the door to 3 times depending on the dryer. 2. Simple...
.... Press Wrinkle Prevent to select a cycle. 3. Press to stop operation. We recommend that you can change the set time in unheated air at any time during operation 1. Turn the Cycle Selector to activate this feature. Select a different cycle. 3. Change the cycle settings (Dry Level and Time) as necessary. 4. The Eco Dry function is enabled by the washer may degrade the drying efficiency or cause the door to 3 times depending on the dryer. 2. Simple...
User Manual
Page 37
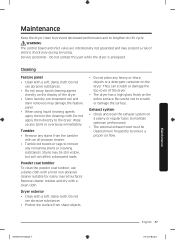
Service personnel - Do not apply them to ensure a proper air flow. Cleaning Feature panel • Clean with a clean cloth. Tumbler • Remove any stains from sharp objects. • Do not place any spills or overspray immediately. Remove cleaner residue and dry with a soft, damp cloth. Dryer exterior • Clean with a mild, non-abrasive cleaner suitable for easily marred surfaces. Exhaust system • Check and clean the exhaust system on...
Service personnel - Do not apply them to ensure a proper air flow. Cleaning Feature panel • Clean with a clean cloth. Tumbler • Remove any stains from sharp objects. • Do not place any spills or overspray immediately. Remove cleaner residue and dry with a soft, damp cloth. Dryer exterior • Clean with a mild, non-abrasive cleaner suitable for easily marred surfaces. Exhaust system • Check and clean the exhaust system on...
User Manual
Page 38
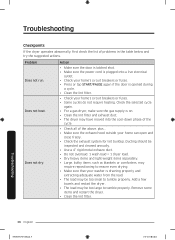
... heat. Troubleshooting Checkpoints If the dryer operates abnormally, first check the list of the above, plus... • Make sure the exhaust hood outside your home can open and close freely. • Check the exhaust system for lint buildup. Action • Make sure the door is latched shut. • Make sure the power cord is opened during a cycle. • Clean the lint filter. • Check your home's circuit breakers or fuses. • Some cycles do not require heating. Troubleshooting...
... heat. Troubleshooting Checkpoints If the dryer operates abnormally, first check the list of the above, plus... • Make sure the exhaust hood outside your home can open and close freely. • Check the exhaust system for lint buildup. Action • Make sure the door is latched shut. • Make sure the power cord is opened during a cycle. • Clean the lint filter. • Check your home's circuit breakers or fuses. • Some cycles do not require heating. Troubleshooting...
User Manual
Page 41
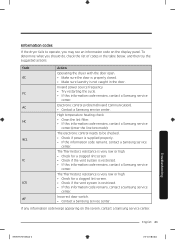
... code remains, contact a Samsung service center. Incorrect door switch. • Contact a Samsung service center. High temperature heating check • Clean the lint filter. • If this information code remains, contact a Samsung service center. English 41 Troubleshooting DV7450M-03170Z-00_EN.indd 41 2017-01-25 11:24:24 Invalid power source frequency • Try restarting the cycle. • If this information code remains, contact a Samsung service center.(enter the line test mode) The electronic control needs to operate...
... code remains, contact a Samsung service center. Incorrect door switch. • Contact a Samsung service center. High temperature heating check • Clean the lint filter. • If this information code remains, contact a Samsung service center. English 41 Troubleshooting DV7450M-03170Z-00_EN.indd 41 2017-01-25 11:24:24 Invalid power source frequency • Try restarting the cycle. • If this information code remains, contact a Samsung service center.(enter the line test mode) The electronic control needs to operate...
User Manual
Page 42
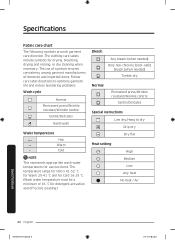
The clothing care labels include symbols for detergent activation and eff ective cleaning.) Bleach Any bleach (when needed) Only non-chlorine (color-safe) bleach (when needed) Tumble dry Normal Permanent press/Wrinkle resistant/Wrinkle control Gentle/Delicates Special instructions Line dry/Hang to optimize garment life and reduce laundering problems. Wash cycle Normal Permanent press/Wrinkle resistant/Wrinkle control Gentle/Delicates Hand wash Water temperature Hot Warm Cold NOTE This represents...
The clothing care labels include symbols for detergent activation and eff ective cleaning.) Bleach Any bleach (when needed) Only non-chlorine (color-safe) bleach (when needed) Tumble dry Normal Permanent press/Wrinkle resistant/Wrinkle control Gentle/Delicates Special instructions Line dry/Hang to optimize garment life and reduce laundering problems. Wash cycle Normal Permanent press/Wrinkle resistant/Wrinkle control Gentle/Delicates Hand wash Water temperature Hot Warm Cold NOTE This represents...
User Manual
Page 44
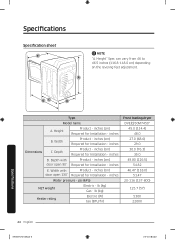
... - inches (cm) door open 130° Required for Installation - Depth Product - Specification Specification sheet E NOTE "A. Height" Spec can vary from 46 to 46.5 inches (116.8-118.0 cm) depending on the leveling feet adjustment. inches E. inches (cm) door open 90° Required for Installation - inches (cm) Required for Installation - inches Dimensions C. Width with Product - inches D. Width Product - inches Water pressure - inches (cm) Required for Installation - Height Product - lb (kg) Gas -
... - inches (cm) door open 130° Required for Installation - Depth Product - Specification Specification sheet E NOTE "A. Height" Spec can vary from 46 to 46.5 inches (116.8-118.0 cm) depending on the leveling feet adjustment. inches E. inches (cm) door open 90° Required for Installation - inches (cm) Required for Installation - inches Dimensions C. Width with Product - inches D. Width Product - inches Water pressure - inches (cm) Required for Installation - Height Product - lb (kg) Gas -
User Manual
Page 46
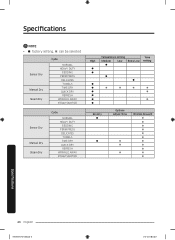
... selected Sensor Dry Manual Dry Steam Dry Cycle NORMAL HEAVY DUTY BEDDING PERM PRESS DELICATES TOWELS TIME DRY QUICK DRY REFRESH WRINKLE AWAY STEAM SANITIZE Sensor Dry Manual Dry Steam Dry Cycle NORMAL HEAVY DUTY BEDDING PERM PRESS DELICATES TOWELS TIME DRY QUICK DRY REFRESH WRINKLE AWAY STEAM SANITIZE High Temperature setting Medium Low Extra Low Time setting Eco Dry Options Adjust Time Wrinkle Prevent Specification...
... selected Sensor Dry Manual Dry Steam Dry Cycle NORMAL HEAVY DUTY BEDDING PERM PRESS DELICATES TOWELS TIME DRY QUICK DRY REFRESH WRINKLE AWAY STEAM SANITIZE Sensor Dry Manual Dry Steam Dry Cycle NORMAL HEAVY DUTY BEDDING PERM PRESS DELICATES TOWELS TIME DRY QUICK DRY REFRESH WRINKLE AWAY STEAM SANITIZE High Temperature setting Medium Low Extra Low Time setting Eco Dry Options Adjust Time Wrinkle Prevent Specification...
User Manual
Page 48
... AMOUNT THAN THE PURCHASE PRICE OF THE PRODUCT SOLD BY SAMSUNG AND CAUSING THE ALLEGED DAMAGE. altered product or serial numbers; Warranty (U.S.A) This limited warranty covers manufacturing defects in materials and workmanship encountered in normal, noncommercial use of products, equipment, systems, utilities, services, parts, supplies, accessories, applications, installations, repairs, external wiring or connectors not supplied or authorized by pest infestations. WITHOUT LIMITING THE...
... AMOUNT THAN THE PURCHASE PRICE OF THE PRODUCT SOLD BY SAMSUNG AND CAUSING THE ALLEGED DAMAGE. altered product or serial numbers; Warranty (U.S.A) This limited warranty covers manufacturing defects in materials and workmanship encountered in normal, noncommercial use of products, equipment, systems, utilities, services, parts, supplies, accessories, applications, installations, repairs, external wiring or connectors not supplied or authorized by pest infestations. WITHOUT LIMITING THE...

User Manual
Page 51
... and uses for instructions, or fixing installation errors. product removal and reinstallation; THIS LIMITED WARRANTY SHALL NOT EXTEND TO ANYONE OTHER THAN THE ORIGINAL PURCHASER OF THIS PRODUCT, IS NONTRANSFERABLE AND STATES YOUR EXCLUSIVE REMEDY. This limited warranty covers manufacturing defects in materials and workmanship encountered in normal, noncommercial use of products, equipment, systems, utilities, services, parts, supplies, accessories, applications, installations, repairs, external wiring or connectors...
... and uses for instructions, or fixing installation errors. product removal and reinstallation; THIS LIMITED WARRANTY SHALL NOT EXTEND TO ANYONE OTHER THAN THE ORIGINAL PURCHASER OF THIS PRODUCT, IS NONTRANSFERABLE AND STATES YOUR EXCLUSIVE REMEDY. This limited warranty covers manufacturing defects in materials and workmanship encountered in normal, noncommercial use of products, equipment, systems, utilities, services, parts, supplies, accessories, applications, installations, repairs, external wiring or connectors...


