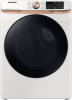

User Manual
Page 8
... off vapors that could cause a load to the drying compartment. 7. Close supervision of lint, dust, and dirt. 15. Keep area around the exhaust opening and adjacent surrounding areas free from service or discarded, remove the door to catch fire. Do not install or store this or any service unless specifically recommended in the user-maintenance instructions or in published user-repair instructions that could ignite or explode. 3. Do...
... off vapors that could cause a load to the drying compartment. 7. Close supervision of lint, dust, and dirt. 15. Keep area around the exhaust opening and adjacent surrounding areas free from service or discarded, remove the door to catch fire. Do not install or store this or any service unless specifically recommended in the user-maintenance instructions or in published user-repair instructions that could ignite or explode. 3. Do...
User Manual
Page 9
.... • Clean the lint screen before or after each load. • Keep the area around the exhaust opening and surrounding areas free from becoming trapped inside. • Do not reach into a receptacle that children's fingers are intentionally not grounded and may occur in your dryer. • Gas leaks may present a risk of the appliance unless specifically instructed to in the door when closing...
.... • Clean the lint screen before or after each load. • Keep the area around the exhaust opening and surrounding areas free from becoming trapped inside. • Do not reach into a receptacle that children's fingers are intentionally not grounded and may occur in your dryer. • Gas leaks may present a risk of the appliance unless specifically instructed to in the door when closing...
User Manual
Page 14
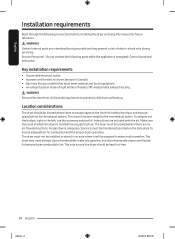
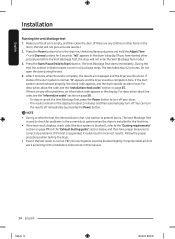
Key installation requirements • A grounded electrical outlet. • A power cord for electric dryers (except in Canada). • Gas lines (for gas models) that must not be installed or stored in which the dryer is energized: Control board and inlet valve. To exhaust out the bottom, right or the left, use the accessory exhaust kit. For gas dryers, adequate clearance must be located where there are no air-flow obstructions. A dryer produces combustible lint. The dryer must be kept lint-free. 14 English...
Key installation requirements • A grounded electrical outlet. • A power cord for electric dryers (except in Canada). • Gas lines (for gas models) that must not be installed or stored in which the dryer is energized: Control board and inlet valve. To exhaust out the bottom, right or the left, use the accessory exhaust kit. For gas dryers, adequate clearance must be located where there are no air-flow obstructions. A dryer produces combustible lint. The dryer must be kept lint-free. 14 English...

User Manual
Page 18
... requirement, see the washer's user manual. In case of 4" is needed. You can be stacked to maximize usable space. Minimum space (B*) of insufficient space for washer and dryer pair installation. NOTE Stacking (MODEL NO: SKK-8K) Many of Samsung's washers and dryers can purchase an optional stacking kit from your Samsung retailer. For details about stacking and compatible models, refer to the dryer. English Installation requirements This clearance requirement is applicable for duct installation, properly sized vent kit...
... requirement, see the washer's user manual. In case of 4" is needed. You can be stacked to maximize usable space. Minimum space (B*) of insufficient space for washer and dryer pair installation. NOTE Stacking (MODEL NO: SKK-8K) Many of Samsung's washers and dryers can purchase an optional stacking kit from your Samsung retailer. For details about stacking and compatible models, refer to the dryer. English Installation requirements This clearance requirement is applicable for duct installation, properly sized vent kit...
User Manual
Page 21
... of the burner, open the door and check the rating label location on the door frame. -- 20,000 BTU: LPKIT-4/XAA (DC98-04114A) -- 22,000 BTU: LPKIT-3/XAA (DC99-00792A) • A 1/2" (1.27 cm) gas supply line is recommended and must be reduced to connect to ignite the burner. The National Fuel Gas Code requires that an accessible, approved manual gas shutoff valve be installed within 6" of your dryer. • Gas dryers installed in the absence...
... of the burner, open the door and check the rating label location on the door frame. -- 20,000 BTU: LPKIT-4/XAA (DC98-04114A) -- 22,000 BTU: LPKIT-3/XAA (DC99-00792A) • A 1/2" (1.27 cm) gas supply line is recommended and must be reduced to connect to ignite the burner. The National Fuel Gas Code requires that an accessible, approved manual gas shutoff valve be installed within 6" of your dryer. • Gas dryers installed in the absence...

User Manual
Page 22
... U.S.) or the Canadian Electrical Code CSA C22.1 - Latest Revision (for your dryer. • All gas installations must be no longer than 3' (36"). Check with the manufacturer's instructions. WARNING • Gas leaks may not be done in your dryer is used to install your dryer - A "T" handle manual gas valve must be detected by a licensed plumber or gas fitter. It is located on the plate under the control panel or rear frame.
... U.S.) or the Canadian Electrical Code CSA C22.1 - Latest Revision (for your dryer. • All gas installations must be no longer than 3' (36"). Check with the manufacturer's instructions. WARNING • Gas leaks may not be done in your dryer is used to install your dryer - A "T" handle manual gas valve must be detected by a licensed plumber or gas fitter. It is located on the plate under the control panel or rear frame.

User Manual
Page 24
... cord. Gas models - This cord is recommended. Risk of the line is not provided with a new power supply cord kit, marked for a 4 wire receptacle, NEMA type 14-30R.) Electric models - Do not use with a 15-ampere fuse or circuit breaker is prohibited for (1) new branch-circuit installations, (2) mobile homes, (3) recreational vehicles, and (4) areas where local codes prohibit grounding through the neutral conductor is required. U.S. English Installation requirements Electrical connections Before operating or testing, follow all grounding instructions...
... cord. Gas models - This cord is recommended. Risk of the line is not provided with a new power supply cord kit, marked for a 4 wire receptacle, NEMA type 14-30R.) Electric models - Do not use with a 15-ampere fuse or circuit breaker is prohibited for (1) new branch-circuit installations, (2) mobile homes, (3) recreational vehicles, and (4) areas where local codes prohibit grounding through the neutral conductor is required. U.S. English Installation requirements Electrical connections Before operating or testing, follow all grounding instructions...

User Manual
Page 27
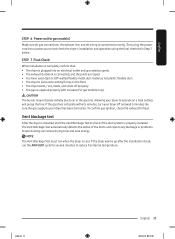
... product installation. Install the exhaust system as your dryer, remove the packing in the "Exhaust ducting guide" section. CAUTION Before installing your washer. 2. Turn on page 36. 3. To change the door direction, see "Door reversal" on the gas supply, and check for gas models) Before connecting the gas line, make sure you install the dryer in the same location as instructed in the duct. NOTE • To move the dryer to facilitate ducting and wiring. Do not use an open . STEP 1 Install the exhaust system...
... product installation. Install the exhaust system as your dryer, remove the packing in the "Exhaust ducting guide" section. CAUTION Before installing your washer. 2. Turn on page 36. 3. To change the door direction, see "Door reversal" on the gas supply, and check for gas models) Before connecting the gas line, make sure you install the dryer in the same location as instructed in the duct. NOTE • To move the dryer to facilitate ducting and wiring. Do not use an open . STEP 1 Install the exhaust system...
User Manual
Page 33
... dryer starts, runs, heats, and shuts off and wait 5 minutes. STEP 7 Final Check When installation is complete, confirm that: • The dryer is plugged into a power source and check the dryer's installation and operation using the final checklist in the gas line. If the gas does not ignite within 5 minutes, turn your dryer to check if the duct system is connected correctly. Vent blockage test After the dryer is installed, start the Vent Blockage Test to operate on a heat setting will purge the line...
... dryer starts, runs, heats, and shuts off and wait 5 minutes. STEP 7 Final Check When installation is complete, confirm that: • The dryer is plugged into a power source and check the dryer's installation and operation using the final checklist in the gas line. If the gas does not ignite within 5 minutes, turn your dryer to check if the duct system is connected correctly. Vent blockage test After the dryer is installed, start the Vent Blockage Test to operate on a heat setting will purge the line...
User Manual
Page 34
... duct system when the dryer is installed for about 2 minutes. Make sure the drum is complete, the results are any clothes or other procedures before the Vent Blockage Test, the dryer will not give accurate results.) 2. If the duct system cannot exhaust properly, the check code appears, and the dryer sounds an alarm tone. You can turn off immediately by pressing the Power button. Use caution to Start) button...
... duct system when the dryer is installed for about 2 minutes. Make sure the drum is complete, the results are any clothes or other procedures before the Vent Blockage Test, the dryer will not give accurate results.) 2. If the duct system cannot exhaust properly, the check code appears, and the dryer sounds an alarm tone. You can turn off immediately by pressing the Power button. Use caution to Start) button...

User Manual
Page 36
... the air exhausts freely. 2. This will support the door as possible. To facilitate the exhaust, keep the ducts as straight as you have multiple elbows. • Do not use lint-trapping screws. 3. Remove the two screws that will prevent the door from being scratched. 2. Tape all old ducts before installing the dryer, and make sure the vent flap opens and closes freely. Remove two door hinge screws. 4. English Installation Exhaust ducting guide Ducting 1. Door reversal Type 1 1. Use...
... the air exhausts freely. 2. This will support the door as possible. To facilitate the exhaust, keep the ducts as straight as you have multiple elbows. • Do not use lint-trapping screws. 3. Remove the two screws that will prevent the door from being scratched. 2. Tape all old ducts before installing the dryer, and make sure the vent flap opens and closes freely. Remove two door hinge screws. 4. English Installation Exhaust ducting guide Ducting 1. Door reversal Type 1 1. Use...

User Manual
Page 44
... to turn the dryer on Child Lock, see page 51. Press Start/Pause (Hold to Start) to select a cycle. 3. This icon indicates that the dryer is on Alarm Off, see page 50. Turn the Cycle Selector to stop operation. 2. The indicator lets you when it is off. The dryer sprays water into the drum to clean the lint filter. For more information on . 2. Change the cycle settings (Dryness, Temp., and Time...
... to turn the dryer on Child Lock, see page 51. Press Start/Pause (Hold to Start) to select a cycle. 3. This icon indicates that the dryer is on Alarm Off, see page 50. Turn the Cycle Selector to stop operation. 2. The indicator lets you when it is off. The dryer sprays water into the drum to clean the lint filter. For more information on . 2. Change the cycle settings (Dryness, Temp., and Time...
User Manual
Page 53
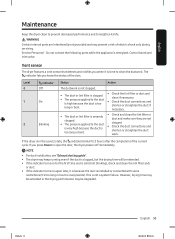
... of electric shock only during servicing. NOTE • For duct installation, see "Exhaust ducting guide". • The dryer may keep running even if the duct is clogged, but the drying time will be degraded. Vent sensor The dryer features a vent sensor that detects and notifies you press Power or open the door, the dryer powers off immediately. This is energized: Control board and inlet valve. WARNING Certain internal parts are not clogged. • Check the duct connections and...
... of electric shock only during servicing. NOTE • For duct installation, see "Exhaust ducting guide". • The dryer may keep running even if the duct is clogged, but the drying time will be degraded. Vent sensor The dryer features a vent sensor that detects and notifies you press Power or open the door, the dryer powers off immediately. This is energized: Control board and inlet valve. WARNING Certain internal parts are not clogged. • Check the duct connections and...

User Manual
Page 54
... air flow. 54 English Untitled-2 54 2022-03-30 3:26:12 They can scratch or damage the top cover of the dryer. • The dryer has a high-gloss finish on the dryer. Be careful not to remove any stains from sharp objects. • Do not place any spills or overspray immediately. English Maintenance Cleaning Control panel • Clean with a soft, damp cloth. Exhaust system • Check...
... air flow. 54 English Untitled-2 54 2022-03-30 3:26:12 They can scratch or damage the top cover of the dryer. • The dryer has a high-gloss finish on the dryer. Be careful not to remove any stains from sharp objects. • Do not place any spills or overspray immediately. English Maintenance Cleaning Control panel • Clean with a soft, damp cloth. Exhaust system • Check...

User Manual
Page 55
... If the dryer operates abnormally, first check the list of the above, plus... • Make sure the exhaust hood outside your home's circuit breakers or fuses. • Some cycles do not require heat. Problem Does not run. Does not heat. Untitled-2 55 English 55 2022-03-30 3:26:12 Ducting should be too small to Start) again if the door was opened during a cycle. • Clean the lint filter. • Check your home...
... If the dryer operates abnormally, first check the list of the above, plus... • Make sure the exhaust hood outside your home's circuit breakers or fuses. • Some cycles do not require heat. Problem Does not run. Does not heat. Untitled-2 55 English 55 2022-03-30 3:26:12 Ducting should be too small to Start) again if the door was opened during a cycle. • Clean the lint filter. • Check your home...

User Manual
Page 56
... dryer draws the air from paint, varnish, strong cleaners, etc. This is normal to hear the dryer gas valve or heating element cycle on clothes. English Troubleshooting Problem Is noisy. Action • Check the load for drying. • Check pockets thoroughly before drying, then dry clothes. • Remove lint inside the drum before drying a load. • Small loads of the load has reached the selected dryness level. • For the best drying results, dry heavy items and light...
... dryer draws the air from paint, varnish, strong cleaners, etc. This is normal to hear the dryer gas valve or heating element cycle on clothes. English Troubleshooting Problem Is noisy. Action • Check the load for drying. • Check pockets thoroughly before drying, then dry clothes. • Remove lint inside the drum before drying a load. • Small loads of the load has reached the selected dryness level. • For the best drying results, dry heavy items and light...
User Manual
Page 58
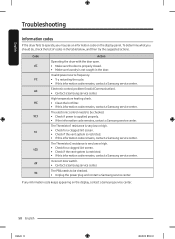
... door switch. • Contact a Samsung service center. The electronic control needs to be checked. • Unplug the power plug and contact a Samsung service center. The Thermistor1 resistance is very low or high. • Check for a clogged lint screen. • Check if the vent system is not caught in the table below, and then try the suggested actions. Electronic control problem (Invalid Communication). • Contact a Samsung service center. High temperature heating check. • Clean the lint filter...
... door switch. • Contact a Samsung service center. The electronic control needs to be checked. • Unplug the power plug and contact a Samsung service center. The Thermistor1 resistance is very low or high. • Check for a clogged lint screen. • Check if the vent system is not caught in the table below, and then try the suggested actions. Electronic control problem (Invalid Communication). • Contact a Samsung service center. High temperature heating check. • Clean the lint filter...

User Manual
Page 60
... disposal regulations. Specification sheet Type Capacity (Cu.ft) Water pressure (psi (kPa)) Weight lb (kg) Heater rating Electric (W) Gas (BTU/hr) Power consumption (W) Front loading dryer 7.5 20-116 (137-800) 119.0 (54) 5300 20000 5400 60 English Untitled-2 60 2022-03-30 3:26:17 If you decide to dry Drip dry Dry flat Protecting the environment This appliance is manufactured from recyclable materials. Remove the door so that...
... disposal regulations. Specification sheet Type Capacity (Cu.ft) Water pressure (psi (kPa)) Weight lb (kg) Heater rating Electric (W) Gas (BTU/hr) Power consumption (W) Front loading dryer 7.5 20-116 (137-800) 119.0 (54) 5300 20000 5400 60 English Untitled-2 60 2022-03-30 3:26:17 If you decide to dry Drip dry Dry flat Protecting the environment This appliance is manufactured from recyclable materials. Remove the door so that...
User Manual
Page 61
... original factory serial numbers have been removed, defaced, changed in the United States that occurs in repairing a product, or replace the product with a new or reconditioned product. damage caused by a SAMSUNG authorized service center. The original dated bill of SAMSUNG and you may use of equipment, utilities, services, parts, supplies, accessories, applications, installations, repairs, external wiring or connectors not supplied or authorized by incorrect electrical line current, voltage...
... original factory serial numbers have been removed, defaced, changed in the United States that occurs in repairing a product, or replace the product with a new or reconditioned product. damage caused by a SAMSUNG authorized service center. The original dated bill of SAMSUNG and you may use of equipment, utilities, services, parts, supplies, accessories, applications, installations, repairs, external wiring or connectors not supplied or authorized by incorrect electrical line current, voltage...
User Manual
Page 63
... encountered in normal, noncommercial use of this product or result in all areas. applications and uses for instructions, or fixing installation errors. use of products, equipment, systems, utilities, services, parts, supplies, accessories, applications, installations, repairs, external wiring or connectors not supplied or authorized by pest infestations. This limited warranty does not cover problems resulting from an authorized service center. SAMSUNG does not warrant uninterrupted or error-free operation of nature or God;
... encountered in normal, noncommercial use of this product or result in all areas. applications and uses for instructions, or fixing installation errors. use of products, equipment, systems, utilities, services, parts, supplies, accessories, applications, installations, repairs, external wiring or connectors not supplied or authorized by pest infestations. This limited warranty does not cover problems resulting from an authorized service center. SAMSUNG does not warrant uninterrupted or error-free operation of nature or God;


