
User Manual
Page 8
... and exhaust duct should be cleaned periodically by the manufacturer of the fabric softener or product. 12. Do not use the dryer to dry clothes which have traces of any service unless specifically recommended in the user-maintenance instructions or in published user-repair instructions that could cause a load to catch fire. The interior of children is necessary when the appliance is dissipated. 17. See "Electrical requirements" and...
... and exhaust duct should be cleaned periodically by the manufacturer of the fabric softener or product. 12. Do not use the dryer to dry clothes which have traces of any service unless specifically recommended in the user-maintenance instructions or in published user-repair instructions that could cause a load to catch fire. The interior of children is necessary when the appliance is dissipated. 17. See "Electrical requirements" and...
User Manual
Page 9
... of the dryer. • Do not dry clothing with the controls. • Do not repair, replace, or attempt to service any part of the appliance unless specifically instructed to eliminate static unless the softener or product is used near children. 19. Take care that is moving. • Do not install or store this appliance. • Do not sit on or in the door when...
... of the dryer. • Do not dry clothing with the controls. • Do not repair, replace, or attempt to service any part of the appliance unless specifically instructed to eliminate static unless the softener or product is used near children. 19. Take care that is moving. • Do not install or store this appliance. • Do not sit on or in the door when...
User Manual
Page 14
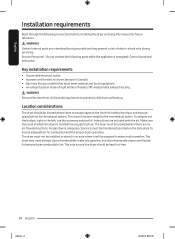
Service Personnel - Do not contact the following instructions before installing the dryer and keep this manual for future reference. WARNING Remove the door from all discarded appliances to water and/or weather. A dryer produces combustible lint. Key installation requirements • A grounded electrical outlet. • A power cord for electric dryers (except in Canada). • Gas lines (for combustion and the proper dryer operation. The dryer area must meet national and local regulations. • An exhaust system...
Service Personnel - Do not contact the following instructions before installing the dryer and keep this manual for future reference. WARNING Remove the door from all discarded appliances to water and/or weather. A dryer produces combustible lint. Key installation requirements • A grounded electrical outlet. • A power cord for electric dryers (except in Canada). • Gas lines (for combustion and the proper dryer operation. The dryer area must meet national and local regulations. • An exhaust system...

User Manual
Page 18
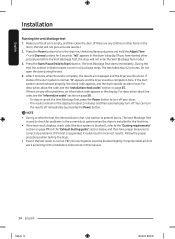
... 3:26:02 For washer's clearance requirement, see the washer's user manual. In case of insufficient space for best dryer performance. Minimum space (B*) of Samsung's washers and dryers can purchase an optional stacking kit from your Samsung retailer. NOTE Stacking (MODEL NO: SKK-8K) Many of 4" is required for duct installation, properly sized vent kit is applicable for washer and dryer pair installation. For details about stacking and compatible models, refer to the user manual included in . (129...
... 3:26:02 For washer's clearance requirement, see the washer's user manual. In case of insufficient space for best dryer performance. Minimum space (B*) of Samsung's washers and dryers can purchase an optional stacking kit from your Samsung retailer. NOTE Stacking (MODEL NO: SKK-8K) Many of 4" is required for duct installation, properly sized vent kit is applicable for washer and dryer pair installation. For details about stacking and compatible models, refer to the user manual included in . (129...
User Manual
Page 21
.... The National Fuel Gas Code requires that an accessible, approved manual gas shutoff valve be installed within 6" of your dryer. • Gas dryers installed in the absence of local codes, with the national fuel gas code, ANSI Z223.1/NFPA 54, latest revision(for the UNITED STATES), or with the natural gas and propane installation code, CSA B149.1(for Canada). • Gas dryers are equipped with a burner vent for use the proper LP Kit accordingly. There...
.... The National Fuel Gas Code requires that an accessible, approved manual gas shutoff valve be installed within 6" of your dryer. • Gas dryers installed in the absence of local codes, with the national fuel gas code, ANSI Z223.1/NFPA 54, latest revision(for the UNITED STATES), or with the natural gas and propane installation code, CSA B149.1(for Canada). • Gas dryers are equipped with a burner vent for use the proper LP Kit accordingly. There...

User Manual
Page 22
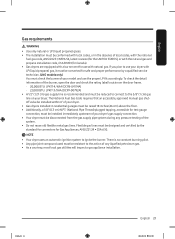
Electrical requirements The wiring diagram is properly grounded. Check with a qualified electrician or serviceman if you purchase and install a UL-approved gas detector. • Install and use in accordance with the manufacturer's instructions. A "T" handle manual gas valve must be installed in the gas supply line to provide adequate electrical service for your dryer, the connector can result in a risk of electric shock. Latest Revisions and local codes and ordinances. WARNING • Improperly connecting the...
Electrical requirements The wiring diagram is properly grounded. Check with a qualified electrician or serviceman if you purchase and install a UL-approved gas detector. • Install and use in accordance with the manufacturer's instructions. A "T" handle manual gas valve must be installed in the gas supply line to provide adequate electrical service for your dryer, the connector can result in a risk of electric shock. Latest Revisions and local codes and ordinances. WARNING • Improperly connecting the...

User Manual
Page 24
... fuse or circuit breaker on the data label located behind the door. English Installation requirements Electrical connections Before operating or testing, follow all grounding instructions in the "Grounding" section. Risk of the line is required. • If a power cord is sold separately. This cord is used, the cord should be found on both sides of 120 / 240 volts, 30-amperes with three No. 10 copper wire conductors terminated with closed loop terminals, open...
... fuse or circuit breaker on the data label located behind the door. English Installation requirements Electrical connections Before operating or testing, follow all grounding instructions in the "Grounding" section. Risk of the line is required. • If a power cord is sold separately. This cord is used, the cord should be found on both sides of 120 / 240 volts, 30-amperes with three No. 10 copper wire conductors terminated with closed loop terminals, open...

User Manual
Page 27
... step installation instructions start below. • Do not remove the protective film on the door before the installation is complete, the door may get scratched or damaged during installation. • Make sure the installation location allows enough space for gas models) Before connecting the gas line, make sure you have a qualified technician install the dryer. Install the exhaust system as your dryer, remove the packing in the "Exhaust ducting guide" section. Tip the dryer on...
... step installation instructions start below. • Do not remove the protective film on the door before the installation is complete, the door may get scratched or damaged during installation. • Make sure the installation location allows enough space for gas models) Before connecting the gas line, make sure you have a qualified technician install the dryer. Install the exhaust system as your dryer, remove the packing in the "Exhaust ducting guide" section. Tip the dryer on...
User Manual
Page 33
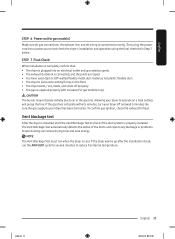
...; The dryer starts, runs, heats, and shuts off and wait 5 minutes. The Vent Blockage Test automatically detects the status of the ducts and reports any blockage or problems. Proper ducting can reduce drying time and save energy. NOTE The Vent Blockage Test must run the AIR FLUFF cycle for several minutes to your dryer off properly. • The gas is plugged into a power source and check the dryer's installation and operation using the final checklist in the gas line.
...; The dryer starts, runs, heats, and shuts off and wait 5 minutes. The Vent Blockage Test automatically detects the status of the ducts and reports any blockage or problems. Proper ducting can reduce drying time and save energy. NOTE The Vent Blockage Test must run the AIR FLUFF cycle for several minutes to your dryer off properly. • The gas is plugged into a power source and check the dryer's installation and operation using the final checklist in the gas line.
User Manual
Page 34
... Power button to check for problems in 6 clockwise steps. The Vent Blockage Test starts immediately. If the duct system cannot exhaust properly, the check code appears, and the dryer sounds an alarm tone. NOTE • During or after the test, the internal drum is complete, the results are any problems. If the test is used to turn off. Press the Power button to Start) button. After 2 minutes, when the test is hot. Properly install all duct work...
... Power button to check for problems in 6 clockwise steps. The Vent Blockage Test starts immediately. If the duct system cannot exhaust properly, the check code appears, and the dryer sounds an alarm tone. NOTE • During or after the test, the internal drum is complete, the results are any problems. If the test is used to turn off. Press the Power button to Start) button. After 2 minutes, when the test is hot. Properly install all duct work...

User Manual
Page 36
... ducts before installing the dryer, and make sure the vent flap opens and closes freely. Use 4-inch rigid metal ducts. We recommend that have removed it. Door reversal Type 1 1. This will support the door as possible. Remove the two screws that will prevent the door from being scratched. 2. English Installation Exhaust ducting guide Ducting 1. Cleaning Clean all joints including the dryer connection. Lift the door and remove it slows down the dryer's performance. • Do not use excessively long ducts...
... ducts before installing the dryer, and make sure the vent flap opens and closes freely. Use 4-inch rigid metal ducts. We recommend that have removed it. Door reversal Type 1 1. This will support the door as possible. Remove the two screws that will prevent the door from being scratched. 2. English Installation Exhaust ducting guide Ducting 1. Cleaning Clean all joints including the dryer connection. Lift the door and remove it slows down the dryer's performance. • Do not use excessively long ducts...

User Manual
Page 44
... (Hold to Start) again to clean the ductwork. The dryer features a vent sensor that Child Lock is time to start 1. Simple steps to turn the dryer on Alarm Off, see page 50. Press Power to start the new cycle. 44 English Untitled-2 44 2022-03-30 3:26:11 English Operations Icon description Sensor Dry Filter Check Vent Sensor (DVE(G)50BG8300* models only) Steam Child Lock Alarm Off This icon appears when the dryer operates the cycle which senses...
... (Hold to Start) again to clean the ductwork. The dryer features a vent sensor that Child Lock is time to start 1. Simple steps to turn the dryer on Alarm Off, see page 50. Press Power to start the new cycle. 44 English Untitled-2 44 2022-03-30 3:26:11 English Operations Icon description Sensor Dry Filter Check Vent Sensor (DVE(G)50BG8300* models only) Steam Child Lock Alarm Off This icon appears when the dryer operates the cycle which senses...
User Manual
Page 53
... This is energized: Control board and inlet valve. If you know the status of the current cycle. NOTE • For duct installation, see "Exhaust ducting guide". • The dryer may be extended. • If the indicator turns on again later, it is because the duct is installed or connected with some restrictions (it is solid (not blinking), check and clean the lint filter and/ or duct. • If the...
... This is energized: Control board and inlet valve. If you know the status of the current cycle. NOTE • For duct installation, see "Exhaust ducting guide". • The dryer may be extended. • If the indicator turns on again later, it is because the duct is installed or connected with some restrictions (it is solid (not blinking), check and clean the lint filter and/ or duct. • If the...

User Manual
Page 54
... be visible, but will not affect subsequent loads. Exhaust system • Check and clean the exhaust system on the entire surface. Wipe up any remaining stains or cleaning substances. Stains may damage the control panel. • When using liquid cleaning agents, apply them directly to the cleaning cloth. Be careful not to remove any spills or overspray immediately. Drum • Remove any stains from sharp objects. •...
... be visible, but will not affect subsequent loads. Exhaust system • Check and clean the exhaust system on the entire surface. Wipe up any remaining stains or cleaning substances. Stains may damage the control panel. • When using liquid cleaning agents, apply them directly to the cleaning cloth. Be careful not to remove any spills or overspray immediately. Drum • Remove any stains from sharp objects. •...

User Manual
Page 55
... a live electrical outlet. • Check your home can open and close freely. • Check the exhaust system for the NORMAL or TIME DRY cycles. Does not dry. Problem Does not run. Ducting should be too large to Start) again if the door was opened during a cycle. • Clean the lint filter. • Check your home's circuit breakers or fuses. • Some cycles do not require heat. Does not heat. Check the selected cycle again. • For a gas dryer, make sure the gas supply...
... a live electrical outlet. • Check your home can open and close freely. • Check the exhaust system for the NORMAL or TIME DRY cycles. Does not dry. Problem Does not run. Ducting should be too large to Start) again if the door was opened during a cycle. • Clean the lint filter. • Check your home's circuit breakers or fuses. • Some cycles do not require heat. Does not heat. Check the selected cycle again. • For a gas dryer, make sure the gas supply...

User Manual
Page 56
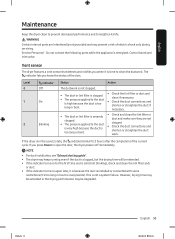
... a light weight load, such as outlined in the air, completely ventilate the room before every load. For clothes that involves a higher dryness level. • If one towel with the surrounding room air. Action • Check the load for the dryer to hum due to hear the dryer gas valve or heating element cycle on clothes. This is cleaned before using the dryer. • Use the REFRESH cycle. Items still wrinkled after a short time...
... a light weight load, such as outlined in the air, completely ventilate the room before every load. For clothes that involves a higher dryness level. • If one towel with the surrounding room air. Action • Check the load for the dryer to hum due to hear the dryer gas valve or heating element cycle on clothes. This is cleaned before using the dryer. • Use the REFRESH cycle. Items still wrinkled after a short time...
User Manual
Page 58
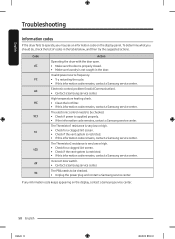
.... • Check for a clogged lint screen. • Check if the vent system is restricted. • If this information code remains, contact a Samsung service center. Electronic control problem (Invalid Communication). • Contact a Samsung service center. Incorrect door switch. • Contact a Samsung service center. The PBA needs to be checked. • Unplug the power plug and contact a Samsung service center. Code dC FC AC HC 9C1 tC tC5 dF 3C Action Operating the dryer with the door open. •...
.... • Check for a clogged lint screen. • Check if the vent system is restricted. • If this information code remains, contact a Samsung service center. Electronic control problem (Invalid Communication). • Contact a Samsung service center. Incorrect door switch. • Contact a Samsung service center. The PBA needs to be checked. • Unplug the power plug and contact a Samsung service center. Code dC FC AC HC 9C1 tC tC5 dF 3C Action Operating the dryer with the door open. •...

User Manual
Page 60
Specification sheet Type Capacity (Cu.ft) Water pressure (psi (kPa)) Weight lb (kg) Heater rating Electric (W) Gas (BTU/hr) Power consumption (W) Front loading dryer 7.5 20-116 (137-800) 119.0 (54) 5300 20000 5400 60 English Untitled-2 60 2022-03-30 3:26:17 If you decide to dry Drip dry Dry flat Protecting the environment This appliance is manufactured from recyclable materials. Remove the door so that the appliance cannot...
Specification sheet Type Capacity (Cu.ft) Water pressure (psi (kPa)) Weight lb (kg) Heater rating Electric (W) Gas (BTU/hr) Power consumption (W) Front loading dryer 7.5 20-116 (137-800) 119.0 (54) 5300 20000 5400 60 English Untitled-2 60 2022-03-30 3:26:17 If you decide to dry Drip dry Dry flat Protecting the environment This appliance is manufactured from recyclable materials. Remove the door so that the appliance cannot...
User Manual
Page 61
... and accessible to a SAMSUNG authorized service center for the limited warranty period, starting from an authorized service center. damage caused by failure to operate and maintain the product according to correct installation not in shipment, delivery, installation, and uses for problem determination and service procedures. damage caused by unauthorized modification or alteration of household electrical or plumbing (i.e., house wiring, fuses, or water inlet hoses). in-home instruction on...
... and accessible to a SAMSUNG authorized service center for the limited warranty period, starting from an authorized service center. damage caused by failure to operate and maintain the product according to correct installation not in shipment, delivery, installation, and uses for problem determination and service procedures. damage caused by unauthorized modification or alteration of household electrical or plumbing (i.e., house wiring, fuses, or water inlet hoses). in-home instruction on...
User Manual
Page 63
... performed by a SAMSUNG authorized service center. problems caused by pest infestations. SAMSUNG does not warrant uninterrupted or error-free operation of nature or God; product removal and reinstallation; This limited warranty covers manufacturing defects in materials and workmanship encountered in normal, noncommercial use of products, equipment, systems, utilities, services, parts, supplies, accessories, applications, installations, repairs, external wiring or connectors not supplied or authorized by SAMSUNG that are covered and prescribed...
... performed by a SAMSUNG authorized service center. problems caused by pest infestations. SAMSUNG does not warrant uninterrupted or error-free operation of nature or God; product removal and reinstallation; This limited warranty covers manufacturing defects in materials and workmanship encountered in normal, noncommercial use of products, equipment, systems, utilities, services, parts, supplies, accessories, applications, installations, repairs, external wiring or connectors not supplied or authorized by SAMSUNG that are covered and prescribed...


