
User Manual
Page 6
... in the dryer until all traces of fire or explosion: • Do not dry items that has been in contact with gasoline, dry cleaning solvents, or other appliance. • Installation and service must not be performed by a qualified installer, service agency, or the gas supplier. • Do not install a booster fan in the exhaust duct. There are many highly flammable items used in...
... in the dryer until all traces of fire or explosion: • Do not dry items that has been in contact with gasoline, dry cleaning solvents, or other appliance. • Installation and service must not be performed by a qualified installer, service agency, or the gas supplier. • Do not install a booster fan in the exhaust duct. There are many highly flammable items used in...

User Manual
Page 8
Do not allow children to contaminated loads, the final part of a tumble dryer cycle occurs without heat (cool down period). Clean the lint screen before using your dryer. Keep area around the exhaust opening and adjacent surrounding areas free from service or discarded, remove the door to the weather. 9. The interior of the appliance and exhaust duct should be grounded. SAVE THESE INSTRUCTIONS 8 English Untitled-1 8 2022-05-30 3:25:19 Do...
Do not allow children to contaminated loads, the final part of a tumble dryer cycle occurs without heat (cool down period). Clean the lint screen before using your dryer. Keep area around the exhaust opening and adjacent surrounding areas free from service or discarded, remove the door to the weather. 9. The interior of the appliance and exhaust duct should be grounded. SAVE THESE INSTRUCTIONS 8 English Untitled-1 8 2022-05-30 3:25:19 Do...
User Manual
Page 9
... accordance with the controls. • Do not repair, replace, or attempt to service any part of small, irregularly shaped hard objects and foreign material, i.e. English 18. See the installation instructions for dryer use fabric softeners or products to prevent children or animals from lint, dust, and dirt. • The interior of the dryer and exhaust duct should be cleaned periodically by qualified service personnel. •...
... accordance with the controls. • Do not repair, replace, or attempt to service any part of small, irregularly shaped hard objects and foreign material, i.e. English 18. See the installation instructions for dryer use fabric softeners or products to prevent children or animals from lint, dust, and dirt. • The interior of the dryer and exhaust duct should be cleaned periodically by qualified service personnel. •...

User Manual
Page 12
... number only signifies that may not cause interference, and 2. Cet appareil numérique de la classe B est conforme á la norme NMB-003 du Canada. Contact Information Samsung Electronics America, Inc. For products sold in conjunction with any other antenna or transmitter. English Regulatory notice Unintentional emitter per FCC Part 15 Product type : Clothes Dryers Model...
... number only signifies that may not cause interference, and 2. Cet appareil numérique de la classe B est conforme á la norme NMB-003 du Canada. Contact Information Samsung Electronics America, Inc. For products sold in conjunction with any other antenna or transmitter. English Regulatory notice Unintentional emitter per FCC Part 15 Product type : Clothes Dryers Model...
User Manual
Page 14
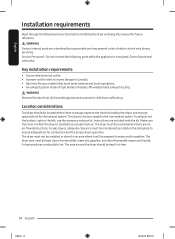
... internal parts are included with the kit. WARNING Remove the door from suffocating. Make sure the room in Canada). • Gas lines (for the rear exhaust option. Service Personnel - Instructions are intentionally not grounded and may present a risk of rigid metal or flexible stiff-walled metal exhaust ducting. Key installation requirements • A grounded electrical outlet. • A power cord for electric dryers (except in which the dryer is factory-ready for gas models) that...
... internal parts are included with the kit. WARNING Remove the door from suffocating. Make sure the room in Canada). • Gas lines (for the rear exhaust option. Service Personnel - Instructions are intentionally not grounded and may present a risk of rigid metal or flexible stiff-walled metal exhaust ducting. Key installation requirements • A grounded electrical outlet. • A power cord for electric dryers (except in which the dryer is factory-ready for gas models) that...

User Manual
Page 18
...:20 Minimum space (B*) of 4" is required for washer and dryer pair installation. Installation requirements This clearance requirement is applicable for best dryer performance. NOTE Stacking (DVE(G)53BB8900*/DVE(G)53BB8700*/DVE(G)46BB6700* : SKK-9MC*, DVE(G)46BG6500* : SKK-8MC) Many of insufficient space for duct installation, properly sized vent kit is needed. For washer's clearance requirement, see the washer's user manual. In case of Samsung's washers and dryers can purchase an optional stacking kit from your Samsung retailer.
...:20 Minimum space (B*) of 4" is required for washer and dryer pair installation. Installation requirements This clearance requirement is applicable for best dryer performance. NOTE Stacking (DVE(G)53BB8900*/DVE(G)53BB8700*/DVE(G)46BB6700* : SKK-9MC*, DVE(G)46BG6500* : SKK-8MC) Many of insufficient space for duct installation, properly sized vent kit is needed. For washer's clearance requirement, see the washer's user manual. In case of Samsung's washers and dryers can purchase an optional stacking kit from your Samsung retailer.

User Manual
Page 21
... propane installation code, CSA B149.1(for Canada). • Gas dryers are equipped with a burner vent for test gauge connection, must be installed immediately upstream of your dryer. • Gas dryers installed in the gas supply line to use your model and use the proper LP Kit accordingly. If a flexible gas connector is recommended and must be reduced to connect to the action of any pressure testing of the burner, open the door and check the rating label location...
... propane installation code, CSA B149.1(for Canada). • Gas dryers are equipped with a burner vent for test gauge connection, must be installed immediately upstream of your dryer. • Gas dryers installed in the gas supply line to use your model and use the proper LP Kit accordingly. If a flexible gas connector is recommended and must be reduced to connect to the action of any pressure testing of the burner, open the door and check the rating label location...
User Manual
Page 22
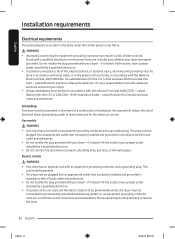
... doesn't fit the outlet, have a proper outlet installed by a qualified electrician. • Do not connect the ground wire to the equipment grounding terminal or lead on the plate under the control panel or rear frame. English Installation requirements Electrical requirements The wiring diagram is properly installed and grounded in accordance with all local codes and ordinances. • Do not modify the plug provided with the National Electrical Code, ANSI/NFPA...
... doesn't fit the outlet, have a proper outlet installed by a qualified electrician. • Do not connect the ground wire to the equipment grounding terminal or lead on the plate under the control panel or rear frame. English Installation requirements Electrical requirements The wiring diagram is properly installed and grounded in accordance with all local codes and ordinances. • Do not modify the plug provided with the National Electrical Code, ANSI/NFPA...
User Manual
Page 23
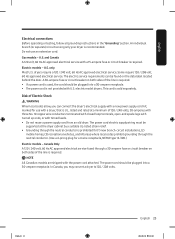
... Hz AC approved electrical service with the power cord attached. The electric service requirements can connect the dryer's electrical supply with a new power supply cord kit, marked for use an extension cord. Risk of 120 / 240 volts, 30-amperes with three No. 10 copper wire conductors terminated with closed loop terminals, open-end spade lugs with turned up ends, or with U.S. English Electrical connections Before operating or testing, follow all grounding instructions in the "Grounding...
... Hz AC approved electrical service with the power cord attached. The electric service requirements can connect the dryer's electrical supply with a new power supply cord kit, marked for use an extension cord. Risk of 120 / 240 volts, 30-amperes with three No. 10 copper wire conductors terminated with closed loop terminals, open-end spade lugs with turned up ends, or with U.S. English Electrical connections Before operating or testing, follow all grounding instructions in the "Grounding...
User Manual
Page 26
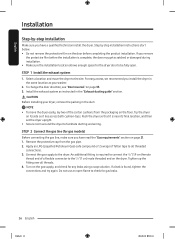
... installation location allows enough space for gas models) Before connecting the gas line, make sure you remove the protective film before completing the product installation. Do not use an open . If you have a qualified technician install the dryer. STEP 2 Connect the gas line (for the dryer door to be fully open flame to the 3/8" (1 cm) male threaded end on page 35. 3. Connect the gas supply to the site. STEP 1 Install the exhaust system 1. Remove...
... installation location allows enough space for gas models) Before connecting the gas line, make sure you remove the protective film before completing the product installation. Do not use an open . If you have a qualified technician install the dryer. STEP 2 Connect the gas line (for the dryer door to be fully open flame to the 3/8" (1 cm) male threaded end on page 35. 3. Connect the gas supply to the site. STEP 1 Install the exhaust system 1. Remove...
User Manual
Page 33
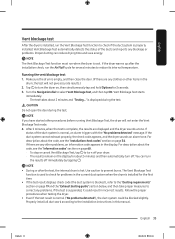
... reports any other problems, an information code appears in this manual. You can reduce drying time and save energy. The Vent Blockage Test function is installed for about the code, see the "Installation check codes" section on page 60. -- CAUTION Do not open the door during the test. Turn the Navigation dial to check for problems in the current duct system when the dryer is used to select Vent Blockage Test, and then tap...
... reports any other problems, an information code appears in this manual. You can reduce drying time and save energy. The Vent Blockage Test function is installed for about the code, see the "Installation check codes" section on page 60. -- CAUTION Do not open the door during the test. Turn the Navigation dial to check for problems in the current duct system when the dryer is used to select Vent Blockage Test, and then tap...

User Manual
Page 35
... the hinge screws. 5. Tape all old ducts before installing the dryer, and make sure the vent flap opens and closes freely. Never use crushed or clogged venting or ducts. Cleaning Clean all joints including the dryer connection. To facilitate the exhaust, keep the ducts as straight as you have multiple elbows. • Do not use lint-trapping screws. 3. This will support the door as possible. WARNING • To prevent...
... the hinge screws. 5. Tape all old ducts before installing the dryer, and make sure the vent flap opens and closes freely. Never use crushed or clogged venting or ducts. Cleaning Clean all joints including the dryer connection. To facilitate the exhaust, keep the ducts as straight as you have multiple elbows. • Do not use lint-trapping screws. 3. This will support the door as possible. WARNING • To prevent...
User Manual
Page 56
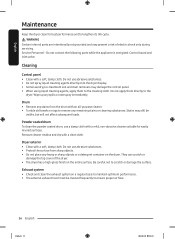
Remove cleaner residue and dry with a soft, damp cloth. Do not use a damp cloth with a mild, non-abrasive cleaner suitable for best performance and to scratch or damage the surface. Be careful not to lengthen its life cycle. Exhaust system • Check and clean the exhaust system on the dryer. Cleaning Control panel • Clean with a clean cloth. Drum • Remove any stains from sharp objects. • Do not place any...
Remove cleaner residue and dry with a soft, damp cloth. Do not use a damp cloth with a mild, non-abrasive cleaner suitable for best performance and to scratch or damage the surface. Be careful not to lengthen its life cycle. Exhaust system • Check and clean the exhaust system on the dryer. Cleaning Control panel • Clean with a clean cloth. Drum • Remove any stains from sharp objects. • Do not place any...

User Manual
Page 58
... require heat. again. • Check your home can open and close freely. • Check the exhaust system for the Normal or Time Dry cycles. Check the selected cycle again. • For a gas dryer, make sure the gas supply is on , the dryer performs an air dry process in . • Make sure the door is plugged in the beginning of the cycle. • Turn off the Eco Dry option for lint buildup. Problem Dryer does not start...
... require heat. again. • Check your home can open and close freely. • Check the exhaust system for the Normal or Time Dry cycles. Check the selected cycle again. • For a gas dryer, make sure the gas supply is on , the dryer performs an air dry process in . • Make sure the door is plugged in the beginning of the cycle. • Turn off the Eco Dry option for lint buildup. Problem Dryer does not start...

User Manual
Page 59
... the lint filter is clean before • The load is too small. Sprayed water is not visible during the drying cycle. • Seams, pockets, and other parts of paint, varnish, cleaning agents, and other objects and remove them . • Always make sure they are not dried evenly. English Problem Action The dryer is too loud. • Look for a long time. The dryer turns off during Steam cycles. • Sprayed water...
... the lint filter is clean before • The load is too small. Sprayed water is not visible during the drying cycle. • Seams, pockets, and other parts of paint, varnish, cleaning agents, and other objects and remove them . • Always make sure they are not dried evenly. English Problem Action The dryer is too loud. • Look for a long time. The dryer turns off during Steam cycles. • Sprayed water...

User Manual
Page 60
...; Sensor Dry automatically senses the moisture in the door • Try restarting the cycle. • If this information code remains, contact a Samsung service center. • Check if power cord is connected properly. • Check if the electrical outlet is restricted. • If this information code remains, contact a Samsung service center. 60 English Untitled-1 60 2022-05-30 3:25:26 Electronic control problem (Invalid Communication). The drying time can change according to be checked...
...; Sensor Dry automatically senses the moisture in the door • Try restarting the cycle. • If this information code remains, contact a Samsung service center. • Check if power cord is connected properly. • Check if the electrical outlet is restricted. • If this information code remains, contact a Samsung service center. 60 English Untitled-1 60 2022-05-30 3:25:26 Electronic control problem (Invalid Communication). The drying time can change according to be checked...

User Manual
Page 62
The clothing care labels include symbols for detergent activation and effective cleaning.) Bleach Any bleach (when needed) Only non-chlorine (color-safe) bleach (when needed) Tumble dry Normal Permanent press/Wrinkle resistant/ Wrinkle control Gentle/Delicates Special instructions Line dry/Hang to optimize garment life and reduce laundering problems. Wash cycle Normal Permanent press/Wrinkle resistant/ Wrinkle control Gentle/Delicates Hand wash Water temperature Hot Warm Cold NOTE The Water Temperature table lists appropriate...
The clothing care labels include symbols for detergent activation and effective cleaning.) Bleach Any bleach (when needed) Only non-chlorine (color-safe) bleach (when needed) Tumble dry Normal Permanent press/Wrinkle resistant/ Wrinkle control Gentle/Delicates Special instructions Line dry/Hang to optimize garment life and reduce laundering problems. Wash cycle Normal Permanent press/Wrinkle resistant/ Wrinkle control Gentle/Delicates Hand wash Water temperature Hot Warm Cold NOTE The Water Temperature table lists appropriate...

User Manual
Page 63
Specification sheet Type Capacity (Cu.ft) Water pressure (psi (kPa)) Weight lb (kg) Heater rating Electric (W) Gas (BTU/hr) Power consumption (W) Front loading dryer DVE(G)53BB8900*/DVE(G)53BB8700* : 7.6 DVE(G)46BB6700*/DVE(G)46BG6500*: 7.5 20-116 (137-800) DVE(G)53BB8900*/DVE(G)53BB8700*/ DVE(G)46BB6700* : 121 (55) DVE(G)46BG6500* : 119 (54) 5300 20000 5400 Untitled-1 63 English 63 2022-05-30 3:25:28 Remove the door so that the...
Specification sheet Type Capacity (Cu.ft) Water pressure (psi (kPa)) Weight lb (kg) Heater rating Electric (W) Gas (BTU/hr) Power consumption (W) Front loading dryer DVE(G)53BB8900*/DVE(G)53BB8700* : 7.6 DVE(G)46BB6700*/DVE(G)46BG6500*: 7.5 20-116 (137-800) DVE(G)53BB8900*/DVE(G)53BB8700*/ DVE(G)46BB6700* : 121 (55) DVE(G)46BG6500* : 119 (54) 5300 20000 5400 Untitled-1 63 English 63 2022-05-30 3:25:28 Remove the door so that the...
User Manual
Page 64
... factory serial numbers have been installed, operated, and maintained according to the instructions attached to use of the original product's warranty or ninety (90) days, whichever is not available, you must contact SAMSUNG at the address or phone number provided below for the remaining portion of equipment, utilities, services, parts, supplies, accessories, applications, installations, repairs, external wiring or connectors not supplied or authorized by use your...
... factory serial numbers have been installed, operated, and maintained according to the instructions attached to use of the original product's warranty or ninety (90) days, whichever is not available, you must contact SAMSUNG at the address or phone number provided below for the remaining portion of equipment, utilities, services, parts, supplies, accessories, applications, installations, repairs, external wiring or connectors not supplied or authorized by use your...
User Manual
Page 66
... serial numbers; use of a service call for instructions, or fixing installation errors. Warranty service can only be returned to SAMSUNG or SAMSUNG's authorized service center. To receive in all areas. Replacement parts and products assume the remaining original warranty, or ninety (90) days, whichever is valid only on the original date of purchase to SAMSUNG. product removal and reinstallation; SAMSUNG does not warrant uninterrupted or error-free operation of nature or God; incorrect electrical line...
... serial numbers; use of a service call for instructions, or fixing installation errors. Warranty service can only be returned to SAMSUNG or SAMSUNG's authorized service center. To receive in all areas. Replacement parts and products assume the remaining original warranty, or ninety (90) days, whichever is valid only on the original date of purchase to SAMSUNG. product removal and reinstallation; SAMSUNG does not warrant uninterrupted or error-free operation of nature or God; incorrect electrical line...


