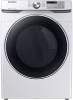

User Manual
Page 2
... the safety instructions Important safety symbols CALIFORNIA PROPOSITION 65 WARNING Important safety precautions Warnings Cautions Installation requirements Key installation requirements Location considerations Ducting requirements Exhausting requirements Gas requirements Electrical requirements Installation What's included Step-by-step installation Vent blockage test Exhaust ducting guide Door reversal Before you start Sort and load Functional prerequisite Rack Dry (applicable models only) Operations Control panel Simple steps to start Cycle overview Cycle chart Drying guide Special features...
... the safety instructions Important safety symbols CALIFORNIA PROPOSITION 65 WARNING Important safety precautions Warnings Cautions Installation requirements Key installation requirements Location considerations Ducting requirements Exhausting requirements Gas requirements Electrical requirements Installation What's included Step-by-step installation Vent blockage test Exhaust ducting guide Door reversal Before you start Sort and load Functional prerequisite Rack Dry (applicable models only) Operations Control panel Simple steps to start Cycle overview Cycle chart Drying guide Special features...
User Manual
Page 5
... trap lint. Important safety precautions WARNING To reduce the risk of severe injury or death, follow all installation instructions. • Save these instructions. To safely operate this manual, store it in , or spotted with its operation and exercise care when using the appliance. Risk of a specific type identified by a qualified installer. • Install the clothes dryer according to the manufacturer's instructions and local codes. • Do not install a clothes dryer with clothes dryers...
... trap lint. Important safety precautions WARNING To reduce the risk of severe injury or death, follow all installation instructions. • Save these instructions. To safely operate this manual, store it in , or spotted with its operation and exercise care when using the appliance. Risk of a specific type identified by a qualified installer. • Install the clothes dryer according to the manufacturer's instructions and local codes. • Do not install a clothes dryer with clothes dryers...

User Manual
Page 6
... the exhaust opening and adjacent surrounding areas free from service or discarded, remove the door to dry clothes which have the skills to carry out. 11.Do not use the dryer to the drying compartment. 7. Items contaminated with internal controls. 10.Do not repair or replace any part of the appliance and exhaust duct should be grounded. Close supervision of the drying cycle unless all items are quickly removed and...
... the exhaust opening and adjacent surrounding areas free from service or discarded, remove the door to dry clothes which have the skills to carry out. 11.Do not use the dryer to the drying compartment. 7. Items contaminated with internal controls. 10.Do not repair or replace any part of the appliance and exhaust duct should be grounded. Close supervision of the drying cycle unless all items are quickly removed and...

User Manual
Page 7
... a qualified installer, service agency, or the gas supplier. What to light any appliance. • Do not turn on a heat setting. To reduce the risk of electric shock only during servicing. - This may be labeled latex foam) or similarly textured rubberlike materials must be dried on the appliance. • Do not touch any electrical switch. • Do not use any phone in the door when...
... a qualified installer, service agency, or the gas supplier. What to light any appliance. • Do not turn on a heat setting. To reduce the risk of electric shock only during servicing. - This may be labeled latex foam) or similarly textured rubberlike materials must be dried on the appliance. • Do not touch any electrical switch. • Do not use any phone in the door when...
User Manual
Page 8
... 3:30:02 See the installation instructions for dryer use by the manufacturer of the fabric softener or product. • Clean the lint screen before or after each load. • Keep the area around the exhaust opening and surrounding areas free from lint, dust, and dirt. • The interior of the dryer and exhaust duct should be cleaned periodically by smell alone. • Gas suppliers recommend you purchase...
... 3:30:02 See the installation instructions for dryer use by the manufacturer of the fabric softener or product. • Clean the lint screen before or after each load. • Keep the area around the exhaust opening and surrounding areas free from lint, dust, and dirt. • The interior of the dryer and exhaust duct should be cleaned periodically by smell alone. • Gas suppliers recommend you purchase...
User Manual
Page 10
... for the rear exhaust option. Instructions are no air-flow obstructions. The dryer must be maintained as noted on the data plate to prevent a child from suffocating. The dryer area must not be kept lint-free. 10 English Untitled-13 10 2020-07-14 3:30:02 Key installation requirements • A grounded electrical outlet. • A power cord for electric dryers (except in Canada). • Gas lines (for gas models) that must be located where...
... for the rear exhaust option. Instructions are no air-flow obstructions. The dryer must be maintained as noted on the data plate to prevent a child from suffocating. The dryer area must not be kept lint-free. 10 English Untitled-13 10 2020-07-14 3:30:02 Key installation requirements • A grounded electrical outlet. • A power cord for electric dryers (except in Canada). • Gas lines (for gas models) that must be located where...

User Manual
Page 17
...; Gas dryers are equipped with a burner vent for use with LP (liquid propane) gas, it must be converted for safe and proper performance by the standard for connectors for test gauge connection, must be installed immediately upstream of your dryer's gas supply connection. • Your dryer must be reduced to connect to the action of any pressure testing of the burner, open the door and check the rating label location on your dryer...
...; Gas dryers are equipped with a burner vent for use with LP (liquid propane) gas, it must be converted for safe and proper performance by the standard for connectors for test gauge connection, must be installed immediately upstream of your dryer's gas supply connection. • Your dryer must be reduced to connect to the action of any pressure testing of the burner, open the door and check the rating label location on your dryer...

User Manual
Page 18
... a qualified electrician or serviceman if you purchase and install a UL-approved gas detector. • Install and use in accordance with your dryer - B149 Installation Codes - Electrical requirements The wiring diagram is used to your dryer. It is properly grounded. If a flexible gas connector is located on the plate under the control panel or rear frame. Installation requirements Installation requirements Commonwealth of Massachusetts installation instructions Your dryer must be installed by a qualified electrician. • To prevent unnecessary risk...
... a qualified electrician or serviceman if you purchase and install a UL-approved gas detector. • Install and use in accordance with your dryer - B149 Installation Codes - Electrical requirements The wiring diagram is used to your dryer. It is properly grounded. If a flexible gas connector is located on the plate under the control panel or rear frame. Installation requirements Installation requirements Commonwealth of Massachusetts installation instructions Your dryer must be installed by a qualified electrician. • To prevent unnecessary risk...
User Manual
Page 20
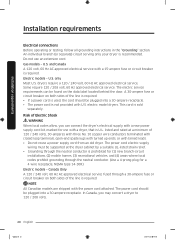
... (or separate) circuit serving only your dryer is sold separately. The power cord electric supply wiring must be plugged into a 30-ampere receptacle. • The power cord is required. Installation requirements Installation requirements Electrical connections Before operating or testing, follow all grounding instructions in the "Grounding" section. and Canada A 120 volt, 60 Hz AC approved electrical service with the power cord attached. Electric models - Gas models - A 30-ampere fuse or circuit breaker on the data label located behind the door. U.S. electric model dryers.
... (or separate) circuit serving only your dryer is sold separately. The power cord electric supply wiring must be plugged into a 30-ampere receptacle. • The power cord is required. Installation requirements Installation requirements Electrical connections Before operating or testing, follow all grounding instructions in the "Grounding" section. and Canada A 120 volt, 60 Hz AC approved electrical service with the power cord attached. Electric models - Gas models - A 30-ampere fuse or circuit breaker on the data label located behind the door. U.S. electric model dryers.

User Manual
Page 23
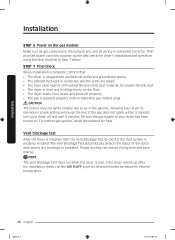
... you install the dryer in the same location as instructed in the duct. If you have a qualified technician install the dryer. Tip the dryer on the floor. Push the dryer so that it lies across both cushion-tops. STEP 1 Install the exhaust system 1. Apply an LPG (Liquefied Petroleum Gas)-safe compound or 1.5 wraps of a flexible connector to check for gas models) Before connecting the gas line, make sure you remove...
... you install the dryer in the same location as instructed in the duct. If you have a qualified technician install the dryer. Tip the dryer on the floor. Push the dryer so that it lies across both cushion-tops. STEP 1 Install the exhaust system 1. Apply an LPG (Liquefied Petroleum Gas)-safe compound or 1.5 wraps of a flexible connector to check for gas models) Before connecting the gas line, make sure you remove...
User Manual
Page 30
... or problems. Proper ducting can reduce drying time and save energy. NOTE The Vent Blockage Test must run the AIR FLUFF cycle for gas models) Make sure all gas connections, the exhaust line, and all wiring is properly installed. To confirm gas ignition, check the exhaust for heat. If the gas does not ignite within 5 minutes, turn your dryer has been turned on the floor. • The dryer starts, runs, heats, and shuts off and wait 5 minutes. Then, plug the power cord into an electrical outlet...
... or problems. Proper ducting can reduce drying time and save energy. NOTE The Vent Blockage Test must run the AIR FLUFF cycle for gas models) Make sure all gas connections, the exhaust line, and all wiring is properly installed. To confirm gas ignition, check the exhaust for heat. If the gas does not ignite within 5 minutes, turn your dryer has been turned on the floor. • The dryer starts, runs, heats, and shuts off and wait 5 minutes. Then, plug the power cord into an electrical outlet...
User Manual
Page 31
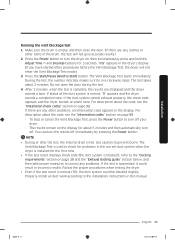
... the Power button. The Vent Blockage Test is used to check for problems in the current duct system when the dryer is installed for the first time. • If the test result displays check code (the duct system is empty, and then close the door. (If there are any other procedures before the Vent Blockage Test, the dryer will not give accurate results.) 2. Properly install all duct work according to turn off your dryer...
... the Power button. The Vent Blockage Test is used to check for problems in the current duct system when the dryer is installed for the first time. • If the test result displays check code (the duct system is empty, and then close the door. (If there are any other procedures before the Vent Blockage Test, the dryer will not give accurate results.) 2. Properly install all duct work according to turn off your dryer...
User Manual
Page 32
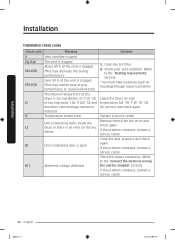
... a service center. Check the power connection. (Refer to the "Connect the electrical wiring (for an hour and check again. About 80 % of the vent is clogged. (This may decrease the drying performance.) Over 90 % of the vent is clogged. (This may lead to the "Ducting requirements" section) * You must take measures (such as cleaning) through expert personnel. Clean the lint filter. 2. Temperature sensor error Unit is detecting items inside the drum...
... a service center. Check the power connection. (Refer to the "Connect the electrical wiring (for an hour and check again. About 80 % of the vent is clogged. (This may decrease the drying performance.) Over 90 % of the vent is clogged. (This may lead to the "Ducting requirements" section) * You must take measures (such as cleaning) through expert personnel. Clean the lint filter. 2. Temperature sensor error Unit is detecting items inside the drum...

User Manual
Page 33
... clogged venting or ducts. Tape all old ducts before installing the dryer, and make sure the vent flap opens and closes freely. Never use plastic, thin-foil, or non-metal flexible ducts of the hinge that have removed it . Door reversal Type 1 1. WARNING • To prevent fire, do not use lint-trapping screws. 3. Installation Exhaust ducting guide Ducting 1. Make sure the dryer is a screw on a regular basis. Use 4-inch rigid metal ducts. Remove two door hinge...
... clogged venting or ducts. Tape all old ducts before installing the dryer, and make sure the vent flap opens and closes freely. Never use plastic, thin-foil, or non-metal flexible ducts of the hinge that have removed it . Door reversal Type 1 1. WARNING • To prevent fire, do not use lint-trapping screws. 3. Installation Exhaust ducting guide Ducting 1. Make sure the dryer is a screw on a regular basis. Use 4-inch rigid metal ducts. Remove two door hinge...

User Manual
Page 51
... control panel. • When using liquid cleaning agents, apply them directly to maintain optimum performance. • The external exhaust hood must be visible, but will not affect subsequent loads. Maintenance Keep the dryer clean for easily marred surfaces. Service Personnel - Be careful not to ensure proper air flow. Do not contact the following parts while the appliance is energized: Control board and inlet valve. Exhaust system • Check and clean...
... control panel. • When using liquid cleaning agents, apply them directly to maintain optimum performance. • The external exhaust hood must be visible, but will not affect subsequent loads. Maintenance Keep the dryer clean for easily marred surfaces. Service Personnel - Be careful not to ensure proper air flow. Do not contact the following parts while the appliance is energized: Control board and inlet valve. Exhaust system • Check and clean...

User Manual
Page 53
... sure the exhaust hood outside your washer is draining properly and extracting adequate water from the load. • The load may require repositioning to the high velocity of the load has reached the selected dryness level. Remove some items and restart the dryer. • Clean the lint filter. • Check the load for lint buildup. Remove promptly. • It is normal to hear the dryer gas valve or heating element cycle on...
... sure the exhaust hood outside your washer is draining properly and extracting adequate water from the load. • The load may require repositioning to the high velocity of the load has reached the selected dryness level. Remove some items and restart the dryer. • Clean the lint filter. • Check the load for lint buildup. Remove promptly. • It is normal to hear the dryer gas valve or heating element cycle on...

User Manual
Page 55
... electronic control needs to be checked. • Unplug the power plug and contact a Samsung service center. Troubleshooting Untitled-13 55 English 55 2020-07-14 3:30:12 The PBA needs to be checked. • Check if power is restricted. • If this information code remains, contact a Samsung service center. Information codes If the dryer fails to operate, you should do, check the list of codes in the door. High temperature heating check. • Clean the lint filter. •...
... electronic control needs to be checked. • Unplug the power plug and contact a Samsung service center. Troubleshooting Untitled-13 55 English 55 2020-07-14 3:30:12 The PBA needs to be checked. • Check if power is restricted. • If this information code remains, contact a Samsung service center. Information codes If the dryer fails to operate, you should do, check the list of codes in the door. High temperature heating check. • Clean the lint filter. •...

User Manual
Page 57
Specification sheet Type Capacity (Cu.ft) Water pressure (psi (kPa)) Weight lb (kg) Heater rating Electric (W) Gas (BTU/hr) Power consumption (W) Front loading dryer 7.5 20-116 (137-800) 123.5 (56.0) 5300 20000 5400 Specification Untitled-13 57 English 57 2020-07-14 3:30:15 Warning symbols for laundering Do not wash Do not wring Do not bleach Do not tumble dry No steam (added to iron) Do...
Specification sheet Type Capacity (Cu.ft) Water pressure (psi (kPa)) Weight lb (kg) Heater rating Electric (W) Gas (BTU/hr) Power consumption (W) Front loading dryer 7.5 20-116 (137-800) 123.5 (56.0) 5300 20000 5400 Specification Untitled-13 57 English 57 2020-07-14 3:30:15 Warning symbols for laundering Do not wash Do not wring Do not bleach Do not tumble dry No steam (added to iron) Do...
User Manual
Page 59
.... product where the original factory serial numbers have been removed, defaced, changed in any of these excluded circumstances shall be readily determined; damage caused by incorrect electrical line current, voltage, fluctuations and surges; and service to use of equipment, utilities, services, parts, supplies, accessories, applications, installations, repairs, external wiring or connectors not supplied or authorized by SAMSUNG; damage caused by use your product; damage caused by...
.... product where the original factory serial numbers have been removed, defaced, changed in any of these excluded circumstances shall be readily determined; damage caused by incorrect electrical line current, voltage, fluctuations and surges; and service to use of equipment, utilities, services, parts, supplies, accessories, applications, installations, repairs, external wiring or connectors not supplied or authorized by SAMSUNG; damage caused by use your product; damage caused by...
User Manual
Page 62
... acts of the product. This limited warranty does not cover problems resulting from incorrect electric current, voltage or supply, light bulbs, house fuses, house wiring, cost of a service call for which this product and shall not apply to follow operating instructions, maintenance and environmental instructions that damage this product or result in service problems; applications and uses for instructions, or fixing installation errors. NO WARRANTY OR GUARANTEE GIVEN BY ANY PERSON...
... acts of the product. This limited warranty does not cover problems resulting from incorrect electric current, voltage or supply, light bulbs, house fuses, house wiring, cost of a service call for which this product and shall not apply to follow operating instructions, maintenance and environmental instructions that damage this product or result in service problems; applications and uses for instructions, or fixing installation errors. NO WARRANTY OR GUARANTEE GIVEN BY ANY PERSON...


