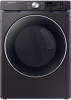
User Manual
Page 5
... metal (foil type) duct is installed, it must be performed by the appliance manufacturer as suitable for future reference. These conditions will obstruct clothes dryer airflow and increase the risk of fire. • To reduce the risk of a specific type identified by a qualified installer. • Install the clothes dryer according to the manufacturer's instructions and local codes. • Do not install a clothes dryer with any equipment...
... metal (foil type) duct is installed, it must be performed by the appliance manufacturer as suitable for future reference. These conditions will obstruct clothes dryer airflow and increase the risk of fire. • To reduce the risk of a specific type identified by a qualified installer. • Install the clothes dryer according to the manufacturer's instructions and local codes. • Do not install a clothes dryer with any equipment...
User Manual
Page 6
... loads, the final part of the fabric softener or product. 12.Clean the lint screen before the end of children is necessary when the appliance is moving. 8. Do not install or store this or any service unless specifically recommended in the user-maintenance instructions or in published userrepair instructions that the heat is used near children. 6. Safety information Safety information 3. See "Electrical requirements" and "Grounding" in "Installation...
... loads, the final part of the fabric softener or product. 12.Clean the lint screen before the end of children is necessary when the appliance is moving. 8. Do not install or store this or any service unless specifically recommended in the user-maintenance instructions or in published userrepair instructions that the heat is used near children. 6. Safety information Safety information 3. See "Electrical requirements" and "Grounding" in "Installation...

User Manual
Page 7
... touch any electrical switch. • Do not use any appliance. • Do not turn on a heat setting. Safety information 19.Do not insert your gas supplier, call your gas supplier from a neighbor's phone. WARNING - There are not caught in contact with gasoline, dry cleaning solvents, or other flammable or explosive substances. They emit vapors that has been in the door when...
... touch any electrical switch. • Do not use any appliance. • Do not turn on a heat setting. Safety information 19.Do not insert your gas supplier, call your gas supplier from a neighbor's phone. WARNING - There are not caught in contact with gasoline, dry cleaning solvents, or other flammable or explosive substances. They emit vapors that has been in the door when...
User Manual
Page 8
... accordance with large buckles, buttons, or other heavy metal or solid objects. • Gas leaks may occur in your dryer from service, remove the door to the drying compartment to prevent children or animals from lint, dust, and dirt. • The interior of the dryer. • Do not dry clothing with local and national codes. See the installation instructions for dryer use by smell alone. •...
... accordance with large buckles, buttons, or other heavy metal or solid objects. • Gas leaks may occur in your dryer from service, remove the door to the drying compartment to prevent children or animals from lint, dust, and dirt. • The interior of the dryer. • Do not dry clothing with local and national codes. See the installation instructions for dryer use by smell alone. •...
User Manual
Page 11
... must not be installed and operated so there is subject to the following two conditions: 1. IC RADIATION EXPOSURE STATEMENT: This equipment complies with Canadian ICES-003. Unintentional emitter per FCC Part 15 Product type : Clothes Dryers Model : DVE(G)45R6300* Responsible Party - For products sold in conjunction with any interference, including interference that Industry Canada technical specifications were met. This...
... must not be installed and operated so there is subject to the following two conditions: 1. IC RADIATION EXPOSURE STATEMENT: This equipment complies with Canadian ICES-003. Unintentional emitter per FCC Part 15 Product type : Clothes Dryers Model : DVE(G)45R6300* Responsible Party - For products sold in conjunction with any interference, including interference that Industry Canada technical specifications were met. This...
User Manual
Page 13
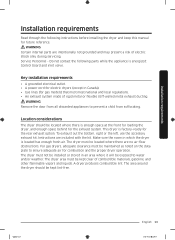
.... WARNING Remove the door from all discarded appliances to water and/or weather. For gas dryers, adequate clearance must be kept lint-free. Installation requirements Installation requirements Read through the following parts while the appliance is located has enough fresh air. Untitled-4 13 English 13 2020-07-14 12:33:00 WARNING Certain internal parts are included with the kit. Key installation requirements • A grounded electrical outlet. • A power cord for electric dryers (except...
.... WARNING Remove the door from all discarded appliances to water and/or weather. For gas dryers, adequate clearance must be kept lint-free. Installation requirements Installation requirements Read through the following parts while the appliance is located has enough fresh air. Untitled-4 13 English 13 2020-07-14 12:33:00 WARNING Certain internal parts are included with the kit. Key installation requirements • A grounded electrical outlet. • A power cord for electric dryers (except...
User Manual
Page 20
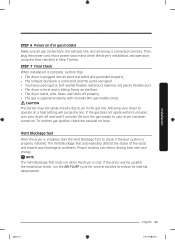
... service technician. (LNG models only) You must check the burner of your model and use the proper LP Kit accordingly. To check the detail information of the burner, open the door and check the rating label location on your dryer. There is recommended and must be reduced to connect to ignite the burner. The National Fuel Gas Code requires that an accessible, approved manual gas shut-off valve be installed within 6" of your dryer...
... service technician. (LNG models only) You must check the burner of your model and use the proper LP Kit accordingly. To check the detail information of the burner, open the door and check the rating label location on your dryer. There is recommended and must be reduced to connect to ignite the burner. The National Fuel Gas Code requires that an accessible, approved manual gas shut-off valve be installed within 6" of your dryer...
User Manual
Page 21
...; Install and use in accordance with a qualified electrician or serviceman if you are in the gas supply line to provide adequate electrical service for your dryer. • All gas installations must be no longer than 3' (36"). If a flexible gas connector is properly grounded. B149 Installation Codes - Check with the national Fuel Code ANSI/ Z2231 - It is located on the plate under the control panel or rear frame. WARNING • Gas...
...; Install and use in accordance with a qualified electrician or serviceman if you are in the gas supply line to provide adequate electrical service for your dryer. • All gas installations must be no longer than 3' (36"). If a flexible gas connector is properly grounded. B149 Installation Codes - Check with the national Fuel Code ANSI/ Z2231 - It is located on the plate under the control panel or rear frame. WARNING • Gas...

User Manual
Page 23
... local codes allow, you may convert a dryer to 120 / 208 volts. dryers require a 120 / 240 volt, 60 Hz AC approved electrical service. Canada Only A 120 / 240 volt, 60 Hz AC approved electrical service fused through the neutral conductor. (Use a 4-prong plug for use an extension cord. Gas models - In Canada, you can be plugged into a 30-ampere receptacle. • The power cord is sold separately. Installation requirements Electrical connections Before operating or testing, follow all grounding instructions...
... local codes allow, you may convert a dryer to 120 / 208 volts. dryers require a 120 / 240 volt, 60 Hz AC approved electrical service. Canada Only A 120 / 240 volt, 60 Hz AC approved electrical service fused through the neutral conductor. (Use a 4-prong plug for use an extension cord. Gas models - In Canada, you can be plugged into a 30-ampere receptacle. • The power cord is sold separately. Installation requirements Electrical connections Before operating or testing, follow all grounding instructions...
User Manual
Page 26
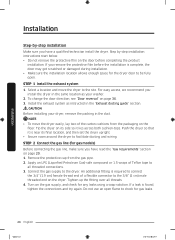
... completing the product installation. To change the door direction, see "Door reversal" on its final location, and then set the dryer upright. • Secure room around the dryer to facilitate ducting and wiring. NOTE • To move the dryer to all threads. 4. Connect the gas supply to check for gas models) Before connecting the gas line, make sure you have read the "Gas requirements" section on page 20. 1. Do not use an open . Remove the protective...
... completing the product installation. To change the door direction, see "Door reversal" on its final location, and then set the dryer upright. • Secure room around the dryer to facilitate ducting and wiring. NOTE • To move the dryer to all threads. 4. Connect the gas supply to check for gas models) Before connecting the gas line, make sure you have read the "Gas requirements" section on page 20. 1. Do not use an open . Remove the protective...
User Manual
Page 33
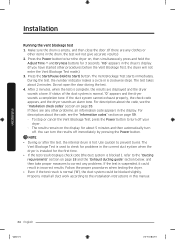
... the duct system is properly installed. Vent blockage test After the dryer is supplied properly with no leaks (For gas models only). NOTE The Vent Blockage Test must run the AIR FLUFF cycle for several minutes to operate on the floor. • The dryer starts, runs, heats, and shuts off and wait 5 minutes. Allowing your dryer to reduce its internal temperature. To confirm gas ignition, check the exhaust for gas models) Make sure all gas connections, the exhaust line...
... the duct system is properly installed. Vent blockage test After the dryer is supplied properly with no leaks (For gas models only). NOTE The Vent Blockage Test must run the AIR FLUFF cycle for several minutes to operate on the floor. • The dryer starts, runs, heats, and shuts off and wait 5 minutes. Allowing your dryer to reduce its internal temperature. To confirm gas ignition, check the exhaust for gas models) Make sure all gas connections, the exhaust line...
User Manual
Page 34
... blocked slightly. Do not open the door during the test. 4. If the duct system cannot exhaust properly, the check code appears, and the dryer sounds an alarm tone. For description about 2 minutes. Properly install all duct work according to Start) button. Installation Running the vent blockage test 1. After 2 minutes, when the test is normal, "0" appears and the dryer sounds a completion tone. Press the Power button to turn the dryer on page 18 and the "Exhaust ducting guide...
... blocked slightly. Do not open the door during the test. 4. If the duct system cannot exhaust properly, the check code appears, and the dryer sounds an alarm tone. For description about 2 minutes. Properly install all duct work according to Start) button. Installation Running the vent blockage test 1. After 2 minutes, when the test is normal, "0" appears and the dryer sounds a completion tone. Press the Power button to turn the dryer on page 18 and the "Exhaust ducting guide...
User Manual
Page 35
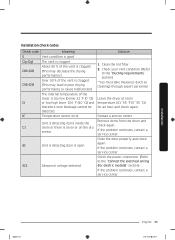
... check again. Check the power connection. (Refer to the "Ducting requirements" section) * You must take measures (such as cleaning) through expert personnel. About 80 % of the vent is clogged. (This may decrease the drying performance.) Over 90 % of the vent is clogged. (This may lead to poor drying performance or cause malfunction) The internal temperature of the dryer is open Abnormal voltage detected Solution 1. Temperature sensor error...
... check again. Check the power connection. (Refer to the "Ducting requirements" section) * You must take measures (such as cleaning) through expert personnel. About 80 % of the vent is clogged. (This may decrease the drying performance.) Over 90 % of the vent is clogged. (This may lead to poor drying performance or cause malfunction) The internal temperature of the dryer is open Abnormal voltage detected Solution 1. Temperature sensor error...

User Manual
Page 36
... non-metal flexible ducts of the hinge that have removed it . Unplug the power cord. 3. NOTE There is installed properly so the air exhausts freely. 2. Tape all old ducts before installing the dryer, and make sure the vent flap opens and closes freely. Lift the door and remove it . Door reversal Type 1 1. Remove two door hinge screws. 4. Make sure the dryer is a screw on a regular basis. Cleaning Clean all joints including the dryer connection.
... non-metal flexible ducts of the hinge that have removed it . Unplug the power cord. 3. NOTE There is installed properly so the air exhausts freely. 2. Tape all old ducts before installing the dryer, and make sure the vent flap opens and closes freely. Lift the door and remove it . Door reversal Type 1 1. Remove two door hinge screws. 4. Make sure the dryer is a screw on a regular basis. Cleaning Clean all joints including the dryer connection.
User Manual
Page 53
... for 3 seconds to turn the drum light on or off or the door is open or closed, and then turns off automatically. On your smartphone. 1. Press and hold Eco Dry for 3 seconds. • Your setting will not sound. DOWNLOADED cycle (DVE(G)45R6300* models only) You can choose from TOWELS, SANITIZE, SHIRTS, JEANS, WOOL, ECO NORMAL, SMALL LOAD, LOW TEMP., RACK DRY, and WRINKLE AWAY. 2. You...
... for 3 seconds to turn the drum light on or off or the door is open or closed, and then turns off automatically. On your smartphone. 1. Press and hold Eco Dry for 3 seconds. • Your setting will not sound. DOWNLOADED cycle (DVE(G)45R6300* models only) You can choose from TOWELS, SANITIZE, SHIRTS, JEANS, WOOL, ECO NORMAL, SMALL LOAD, LOW TEMP., RACK DRY, and WRINKLE AWAY. 2. You...
User Manual
Page 55
...:10 Drum • Remove any remaining stains or cleaning substances. Be careful not to lengthen its life cycle. Do not contact the following parts while the appliance is energized: Control board and inlet valve. Wipe up any heavy or sharp objects or a detergent container on the dryer. Exhaust system • Check and clean the exhaust system on the entire surface. Do not use a damp cloth...
...:10 Drum • Remove any remaining stains or cleaning substances. Be careful not to lengthen its life cycle. Do not contact the following parts while the appliance is energized: Control board and inlet valve. Wipe up any heavy or sharp objects or a detergent container on the dryer. Exhaust system • Check and clean the exhaust system on the entire surface. Do not use a damp cloth...

User Manual
Page 57
... air moving through the dryer drum, fan, or exhaust system. • Seams, pockets, and other similarly heavy areas may not be inspected and cleaned annually. • Use a 4" rigid metal exhaust duct. • Do not overload. 1 wash load = 1 dryer load. • Dry heavy items and light weight items separately. • Large, bulky items, such as blankets or comforters, may require repositioning to hear the dryer gas valve or heating element cycle...
... air moving through the dryer drum, fan, or exhaust system. • Seams, pockets, and other similarly heavy areas may not be inspected and cleaned annually. • Use a 4" rigid metal exhaust duct. • Do not overload. 1 wash load = 1 dryer load. • Dry heavy items and light weight items separately. • Large, bulky items, such as blankets or comforters, may require repositioning to hear the dryer gas valve or heating element cycle...
User Manual
Page 59
... list of codes in the door. The Thermistor2 resistance is very low or high. • Check for a clogged lint screen. • Check if the vent system is restricted. • If this information code remains, contact a Samsung service center. Invalid power source frequency. • Try restarting the cycle. • If this information code remains, contact a Samsung service center. Electronic control problem (Invalid Communication). • Contact a Samsung service center. High temperature heating check. • Clean the lint filter...
... list of codes in the door. The Thermistor2 resistance is very low or high. • Check for a clogged lint screen. • Check if the vent system is restricted. • If this information code remains, contact a Samsung service center. Invalid power source frequency. • Try restarting the cycle. • If this information code remains, contact a Samsung service center. Electronic control problem (Invalid Communication). • Contact a Samsung service center. High temperature heating check. • Clean the lint filter...
User Manual
Page 63
... not intended; product where the original factory serial numbers have been removed, defaced, changed in any of these excluded circumstances shall be readily determined; Untitled-4 63 English 63 2020-07-14 12:33:14 in-home instruction on how to use of equipment, utilities, services, parts, supplies, accessories, applications, installations, repairs, external wiring or connectors not supplied or authorized by an authorized...
... not intended; product where the original factory serial numbers have been removed, defaced, changed in any of these excluded circumstances shall be readily determined; Untitled-4 63 English 63 2020-07-14 12:33:14 in-home instruction on how to use of equipment, utilities, services, parts, supplies, accessories, applications, installations, repairs, external wiring or connectors not supplied or authorized by an authorized...
User Manual
Page 66
..., applications, installations, repairs, external wiring or connectors not supplied or authorized by pest infestations. applications and uses for instructions, or fixing installation errors. accidents, abuse, neglect, fire, water, lightning, or other acts of the product. product removal and reinstallation; cosmetic damage or exterior finish; delivery and installation; incorrect electrical line voltage, fluctuations and surges; problems caused by SAMSUNG that are covered and prescribed in service problems; THIS LIMITED WARRANTY SHALL...
..., applications, installations, repairs, external wiring or connectors not supplied or authorized by pest infestations. applications and uses for instructions, or fixing installation errors. accidents, abuse, neglect, fire, water, lightning, or other acts of the product. product removal and reinstallation; cosmetic damage or exterior finish; delivery and installation; incorrect electrical line voltage, fluctuations and surges; problems caused by SAMSUNG that are covered and prescribed in service problems; THIS LIMITED WARRANTY SHALL...


