
User Manual
Page 6
... load. 13.Do not use heat to dry articles containing foam rubber or similarly textured rubber-like materials. 14.Keep area around the exhaust opening and adjacent surrounding areas free from service or discarded, remove the door to cooking oils in the door when closing it will be grounded. Do not install or store this part while appliance is removed from the accumulation of lint...
... load. 13.Do not use heat to dry articles containing foam rubber or similarly textured rubber-like materials. 14.Keep area around the exhaust opening and adjacent surrounding areas free from service or discarded, remove the door to cooking oils in the door when closing it will be grounded. Do not install or store this part while appliance is removed from the accumulation of lint...
User Manual
Page 7
... similarly textured rubberlike materials must be dried on the appliance. • Do not touch any electrical switch. • Do not use any appliance. • Do not turn on a heat setting. They emit vapors that have been removed. Follow the gas supplier's instructions. • If you smell gas: • Do not try to light any phone in your gas supplier from a neighbor's phone. Untitled...
... similarly textured rubberlike materials must be dried on the appliance. • Do not touch any electrical switch. • Do not use any appliance. • Do not turn on a heat setting. They emit vapors that have been removed. Follow the gas supplier's instructions. • If you smell gas: • Do not try to light any phone in your gas supplier from a neighbor's phone. Untitled...

User Manual
Page 8
... wash clothing with local and national codes. Never plug the power cord into the appliance when the drum is moving. • Do not install or store this appliance. • Do not sit on , in, or in accordance with large buckles, buttons, or other heavy metal or solid objects. • Gas leaks may occur in your dryer from service, remove the door to the drying...
... wash clothing with local and national codes. Never plug the power cord into the appliance when the drum is moving. • Do not install or store this appliance. • Do not sit on , in, or in accordance with large buckles, buttons, or other heavy metal or solid objects. • Gas leaks may occur in your dryer from service, remove the door to the drying...
User Manual
Page 11
... must not be installed and operated so there is subject to the following two conditions: 1. For products sold in conjunction with any other antenna or transmitter. This device and its antenna(s) must accept any interference, including interference that Industry Canada technical specifications were met. Unintentional emitter per FCC Part 15 Product type : Clothes Dryers Model : DVE55A7300* Responsible Party - Operation is at...
... must not be installed and operated so there is subject to the following two conditions: 1. For products sold in conjunction with any other antenna or transmitter. This device and its antenna(s) must accept any interference, including interference that Industry Canada technical specifications were met. Unintentional emitter per FCC Part 15 Product type : Clothes Dryers Model : DVE55A7300* Responsible Party - Operation is at...
User Manual
Page 13
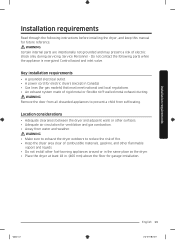
... clear of combustible materials, gasoline, and other flammable vapors and liquids. • Do not install other surfaces. • Adequate air circulation for gas models) that must meet national and local regulations. • An exhaust system made of electric shock only during servicing. Key installation requirements • A grounded electrical outlet. • A power cord for electric dryers (except in . (460 mm) above the floor for future reference.
... clear of combustible materials, gasoline, and other flammable vapors and liquids. • Do not install other surfaces. • Adequate air circulation for gas models) that must meet national and local regulations. • An exhaust system made of electric shock only during servicing. Key installation requirements • A grounded electrical outlet. • A power cord for electric dryers (except in . (460 mm) above the floor for future reference.

User Manual
Page 19
... by a qualified service technician. (LNG models only) You must check the burner of your model and use with natural gas. To check the detail information of the burner, open the door and check the rating label location on your dryer. Flexible gas lines must be reduced to connect to ignite the burner. The National Fuel Gas Code requires that an accessible, approved manual gas shut-off valve be installed within 6" of your dryer. • Gas dryers installed in the absence...
... by a qualified service technician. (LNG models only) You must check the burner of your model and use with natural gas. To check the detail information of the burner, open the door and check the rating label location on your dryer. Flexible gas lines must be reduced to connect to ignite the burner. The National Fuel Gas Code requires that an accessible, approved manual gas shut-off valve be installed within 6" of your dryer. • Gas dryers installed in the absence...

User Manual
Page 20
...'t fit the outlet, have a proper outlet installed by a qualified electrician. • To prevent unnecessary risk of local codes, in accordance with the manufacturer's instructions. Latest Revision (for Canada) and local codes and ordinances. Grounding This dryer must be grounded. Gas models WARNING • Your dryer has a cord with your dryer is located on the plate under the control panel or rear frame. Electrical requirements The wiring diagram is properly grounded...
...'t fit the outlet, have a proper outlet installed by a qualified electrician. • To prevent unnecessary risk of local codes, in accordance with the manufacturer's instructions. Latest Revision (for Canada) and local codes and ordinances. Grounding This dryer must be grounded. Gas models WARNING • Your dryer has a cord with your dryer is located on the plate under the control panel or rear frame. Electrical requirements The wiring diagram is properly grounded...

User Manual
Page 22
... power cord attached. In Canada, you can connect the dryer's electrical supply with a new power supply cord kit, marked for (1) new branch-circuit installations, (2) mobile homes, (3) recreational vehicles, and (4) areas where local codes prohibit grounding through a 30-ampere fuse or circuit breaker on both sides of 120 / 240 volts, 30-amperes with three No. 10 copper wire conductors terminated with closed loop terminals, open-end spade lugs with turned...
... power cord attached. In Canada, you can connect the dryer's electrical supply with a new power supply cord kit, marked for (1) new branch-circuit installations, (2) mobile homes, (3) recreational vehicles, and (4) areas where local codes prohibit grounding through a 30-ampere fuse or circuit breaker on both sides of 120 / 240 volts, 30-amperes with three No. 10 copper wire conductors terminated with closed loop terminals, open-end spade lugs with turned...
User Manual
Page 25
...-05 10:16:10 STEP 2 Connect the gas line (for gas models) Before connecting the gas line, make sure you install the dryer in the same location as instructed in the duct. To change the door direction, see "Switching the door position" on its side so it is near its final location, and then set the dryer upright. • Secure room around the dryer to facilitate ducting and wiring. Remove the protective cap from the...
...-05 10:16:10 STEP 2 Connect the gas line (for gas models) Before connecting the gas line, make sure you install the dryer in the same location as instructed in the duct. To change the door direction, see "Switching the door position" on its side so it is near its final location, and then set the dryer upright. • Secure room around the dryer to facilitate ducting and wiring. Remove the protective cap from the...
User Manual
Page 32
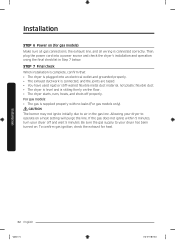
... exhaust for gas models) Make sure all gas connections, the exhaust line, and all wiring is sitting firmly on the floor. • The dryer starts, runs, heats, and shuts off and wait 5 minutes. Installation 32 English Untitled-1 32 2021-04-05 10:16:11 Be sure the gas supply to operate on . CAUTION The burner may not ignite initially due to air in Step 7 below. Then, plug the power cord...
... exhaust for gas models) Make sure all gas connections, the exhaust line, and all wiring is sitting firmly on the floor. • The dryer starts, runs, heats, and shuts off and wait 5 minutes. Installation 32 English Untitled-1 32 2021-04-05 10:16:11 Be sure the gas supply to operate on . CAUTION The burner may not ignite initially due to air in Step 7 below. Then, plug the power cord...

User Manual
Page 33
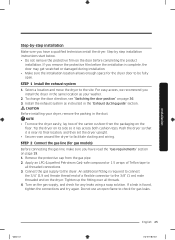
... test is installed for several minutes to turn off your dryer. - For description about the code, see the "Information codes" section on the display for 3 seconds. For description about 2 minutes. To stop or cancel the Vent Blockage Test, press the Power button to reduce its internal temperature. You can reduce drying time and save energy. If the duct system cannot exhaust properly, the check code appears, and the dryer...
... test is installed for several minutes to turn off your dryer. - For description about the code, see the "Information codes" section on the display for 3 seconds. For description about 2 minutes. To stop or cancel the Vent Blockage Test, press the Power button to reduce its internal temperature. You can reduce drying time and save energy. If the duct system cannot exhaust properly, the check code appears, and the dryer...

User Manual
Page 34
... dry sensor. Check your vent condition. (Refer to the "Ducting requirements" section) * You must take proper measures to the "Connect the electrical wiring (for an hour and check again. Check the power connection. (Refer to correct any problems. If the test is normal ("End or 0"), the duct system could result in this manual. Clean the lint filter. 2. Close the door properly and check again. Contact a service center. Follow the proper procedures when testing the dryer...
... dry sensor. Check your vent condition. (Refer to the "Ducting requirements" section) * You must take proper measures to the "Connect the electrical wiring (for an hour and check again. Check the power connection. (Refer to correct any problems. If the test is normal ("End or 0"), the duct system could result in this manual. Clean the lint filter. 2. Close the door properly and check again. Contact a service center. Follow the proper procedures when testing the dryer...

User Manual
Page 35
Cleaning Clean all joints including the dryer connection. Installation Untitled-1 35 English 35 2021-04-05 10:16:11 Check the vent condition if the problem continue, contact a service center. Use 4-inch rigid metal ducts. Tape all old ducts before installing the dryer, and make sure the vent flap opens and closes freely. Solution Check the power connection. Make sure the dryer is installed properly so the air exhausts freely. 2. To facilitate the exhaust, keep...
Cleaning Clean all joints including the dryer connection. Installation Untitled-1 35 English 35 2021-04-05 10:16:11 Check the vent condition if the problem continue, contact a service center. Use 4-inch rigid metal ducts. Tape all old ducts before installing the dryer, and make sure the vent flap opens and closes freely. Solution Check the power connection. Make sure the dryer is installed properly so the air exhausts freely. 2. To facilitate the exhaust, keep...

User Manual
Page 45
... the filter is in steam process. Press Power to determine the drying time. To change the cycle during operation 1. Icon description Sensor Dry Filter Check Vent Sensor (DVE(G)55A7**** models only) Steam Child Lock Alarm Off Wi-Fi This icon appears when the dryer operates the cycle which senses the internal humidity to turn the dryer on. 2. This icon indicates that Child Lock is off. Simple steps to deodorize clothes and reduce static electricity and wrinkles. Change the cycle settings (Dryness...
... the filter is in steam process. Press Power to determine the drying time. To change the cycle during operation 1. Icon description Sensor Dry Filter Check Vent Sensor (DVE(G)55A7**** models only) Steam Child Lock Alarm Off Wi-Fi This icon appears when the dryer operates the cycle which senses the internal humidity to turn the dryer on. 2. This icon indicates that Child Lock is off. Simple steps to deodorize clothes and reduce static electricity and wrinkles. Change the cycle settings (Dryness...

User Manual
Page 47
... the load in the "Control panel" section. Operations Untitled-1 47 English 47 2021-04-05 10:16:16 For more information, see Eco Dry in room temperature air. Manual Dry You can specify a cycle time in minutes. However, you may manually change the drying settings manually to sanitize items by default. Steam Cycles Use steam to reduce wrinkling and odors on items. Cycle STEAM SANITIZE REFRESH Description Use to your preference. You can change the cycle time...
... the load in the "Control panel" section. Operations Untitled-1 47 English 47 2021-04-05 10:16:16 For more information, see Eco Dry in room temperature air. Manual Dry You can specify a cycle time in minutes. However, you may manually change the drying settings manually to sanitize items by default. Steam Cycles Use steam to reduce wrinkling and odors on items. Cycle STEAM SANITIZE REFRESH Description Use to your preference. You can change the cycle time...
User Manual
Page 54
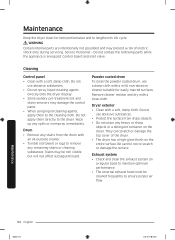
Dryer exterior • Clean with a clean cloth. Do not contact the following parts while the appliance is energized: Control board and inlet valve. Remove cleaner residue and dry with a soft, damp cloth. WARNING Certain internal parts are intentionally not grounded and may be cleaned frequently to ensure proper air flow. Service Personnel - They can scratch or damage the top cover of electric shock only during servicing. Cleaning Control panel • Clean with a mild...
Dryer exterior • Clean with a clean cloth. Do not contact the following parts while the appliance is energized: Control board and inlet valve. Remove cleaner residue and dry with a soft, damp cloth. WARNING Certain internal parts are intentionally not grounded and may be cleaned frequently to ensure proper air flow. Service Personnel - They can scratch or damage the top cover of electric shock only during servicing. Cleaning Control panel • Clean with a mild...

User Manual
Page 56
..., plus... • Make sure the exhaust hood outside your home can choose a higher dryness level or a cycle that involves a higher dryness level. • If one towel with a light weight load, such as outlined in the installation instructions. • It is normal. Dries unevenly. Remove some items and restart the dryer. • Clean the lint filter. • Check the load for objects such as blankets...
..., plus... • Make sure the exhaust hood outside your home can choose a higher dryness level or a cycle that involves a higher dryness level. • If one towel with a light weight load, such as outlined in the installation instructions. • It is normal. Dries unevenly. Remove some items and restart the dryer. • Clean the lint filter. • Check the load for objects such as blankets...
User Manual
Page 58
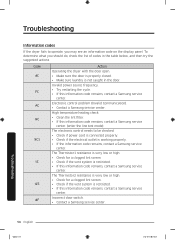
... this information code remains, contact a Samsung service center. Troubleshooting Information codes If the dryer fails to be checked. • Check if power cord is connected properly. • Check if the electrical outlet is working properly. • If the information code remains, contact a Samsung service center. High temperature heating check • Clean the lint filter. • If this information code remains, contact a Samsung service center. Code dC FC AC HC 9C1 tC tC5 dF Action Operating the dryer with the door open. •...
... this information code remains, contact a Samsung service center. Troubleshooting Information codes If the dryer fails to be checked. • Check if power cord is connected properly. • Check if the electrical outlet is working properly. • If the information code remains, contact a Samsung service center. High temperature heating check • Clean the lint filter. • If this information code remains, contact a Samsung service center. Code dC FC AC HC 9C1 tC tC5 dF Action Operating the dryer with the door open. •...

User Manual
Page 62
Specification Specification sheet Type Capacity (Cu.ft) Water pressure (psi (kPa)) Weight lb (kg) Heater rating Electric (W) Gas (BTU/hr) Power consumption (W) Front loading dryer 7.4 20-116 (137-800) 119.0 (54.0) 5300 20000 5300 Specification 62 English Untitled-1 62 2021-04-05 10:16:22
Specification Specification sheet Type Capacity (Cu.ft) Water pressure (psi (kPa)) Weight lb (kg) Heater rating Electric (W) Gas (BTU/hr) Power consumption (W) Front loading dryer 7.4 20-116 (137-800) 119.0 (54.0) 5300 20000 5300 Specification 62 English Untitled-1 62 2021-04-05 10:16:22
User Manual
Page 64
..., services, parts, supplies, accessories, applications, installations, repairs, external wiring or connectors not supplied or authorized by failure to operate and maintain the product according to instructions; damage caused by SAMSUNG; The cost of the product; product where the original factory serial numbers have been removed, defaced, changed in -home instruction on how to correct installation not in shipment, delivery, installation, and uses for assistance with electrical or plumbing codes...
..., services, parts, supplies, accessories, applications, installations, repairs, external wiring or connectors not supplied or authorized by failure to operate and maintain the product according to instructions; damage caused by SAMSUNG; The cost of the product; product where the original factory serial numbers have been removed, defaced, changed in -home instruction on how to correct installation not in shipment, delivery, installation, and uses for assistance with electrical or plumbing codes...


