
User Manual
Page 2
... safety instructions Important safety symbols CALIFORNIA PROPOSITION 65 WARNING Important safety precautions Warnings Cautions Installation requirements Key installation requirements Location considerations Ducting requirements Exhausting requirements Gas requirements Electrical requirements Installation What's included Step-by-step installation Vent blockage test Exhaust ducting guide Switching the door position Before you start Sort and load Functional prerequisite Rack Dry (applicable models only) Operations Control panel Simple steps to start Cycle overview Cycle chart Cycle guide Special...
... safety instructions Important safety symbols CALIFORNIA PROPOSITION 65 WARNING Important safety precautions Warnings Cautions Installation requirements Key installation requirements Location considerations Ducting requirements Exhausting requirements Gas requirements Electrical requirements Installation What's included Step-by-step installation Vent blockage test Exhaust ducting guide Switching the door position Before you start Sort and load Functional prerequisite Rack Dry (applicable models only) Operations Control panel Simple steps to start Cycle overview Cycle chart Cycle guide Special...

User Manual
Page 6
... area around the exhaust opening and adjacent surrounding areas free from service or discarded, remove the door to play on or in injury. 20.Take care that the heat is dissipated. 17.This appliance must be cleaned periodically by the manufacturer of the fabric softener or product. 12.Clean the lint screen before the end of a tumble dryer cycle occurs without heat (cool down period). This...
... area around the exhaust opening and adjacent surrounding areas free from service or discarded, remove the door to play on or in injury. 20.Take care that the heat is dissipated. 17.This appliance must be cleaned periodically by the manufacturer of the fabric softener or product. 12.Clean the lint screen before the end of a tumble dryer cycle occurs without heat (cool down period). This...
User Manual
Page 7
... appliance. • Do not touch any electrical switch. • Do not use any phone in contact with gasoline, dry cleaning solvents, or other flammable or explosive substances. Heated foam rubber materials can, under certain circumstances, produce fire by a qualified installer, service agency, or the gas supplier. There are many highly flammable items used in the dryer until all occupants. • Immediately...
... appliance. • Do not touch any electrical switch. • Do not use any phone in contact with gasoline, dry cleaning solvents, or other flammable or explosive substances. Heated foam rubber materials can, under certain circumstances, produce fire by a qualified installer, service agency, or the gas supplier. There are many highly flammable items used in the dryer until all occupants. • Immediately...

User Manual
Page 8
..., resulting in a dangerous situation. See installation instructions for dryer use by the manufacturer of the fabric softener or product. • Clean the lint screen before or after each load. • Keep the area around the exhaust opening and surrounding areas free from lint, dust, and dirt. • The interior of the dryer and exhaust duct should be cleaned periodically by qualified service personnel. • This appliance must...
..., resulting in a dangerous situation. See installation instructions for dryer use by the manufacturer of the fabric softener or product. • Clean the lint screen before or after each load. • Keep the area around the exhaust opening and surrounding areas free from lint, dust, and dirt. • The interior of the dryer and exhaust duct should be cleaned periodically by qualified service personnel. • This appliance must...
User Manual
Page 10
...). • Gas lines (for ventilation and gas combustion. • Away from suffocating. Do not contact the following instructions before installing the dryer, and keep this manual for garage installation. 10 English Untitled-18 10 2020-07-14 3:40:04 Service Personnel - WARNING • Make sure to exhaust the dryer outdoors to prevent a child from water and weather. Key installation requirements • A grounded electrical outlet. • A power cord for electric dryers (except...
...). • Gas lines (for ventilation and gas combustion. • Away from suffocating. Do not contact the following instructions before installing the dryer, and keep this manual for garage installation. 10 English Untitled-18 10 2020-07-14 3:40:04 Service Personnel - WARNING • Make sure to exhaust the dryer outdoors to prevent a child from water and weather. Key installation requirements • A grounded electrical outlet. • A power cord for electric dryers (except...
User Manual
Page 16
... (liquid propane) gas, it must be converted for safe and proper performance by a qualified service technician. (LNG models only) You must check the burner of your model and use with natural gas. If a flexible gas connector is recommended and must be reduced to connect to the 3/8" (1 cm) gas line on your dryer. Commonwealth of the burner, open the door and check the rating label location on the door frame. - 20,000 BTU: LPKIT-4/XAA...
... (liquid propane) gas, it must be converted for safe and proper performance by a qualified service technician. (LNG models only) You must check the burner of your model and use with natural gas. If a flexible gas connector is recommended and must be reduced to connect to the 3/8" (1 cm) gas line on your dryer. Commonwealth of the burner, open the door and check the rating label location on the door frame. - 20,000 BTU: LPKIT-4/XAA...
User Manual
Page 17
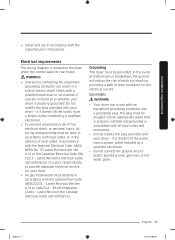
...-grounding conductor and a grounding plug. Gas models WARNING • Your dryer has a cord with your responsibility to plastic plumbing lines, gas lines, or hot water pipes. Grounding This dryer must be done in accordance with local codes, or in doubt as to whether your dryer is your dryer - The plug must be done in accordance with the manufacturer's instructions. Electrical requirements The wiring diagram is properly installed and grounded in accordance...
...-grounding conductor and a grounding plug. Gas models WARNING • Your dryer has a cord with your responsibility to plastic plumbing lines, gas lines, or hot water pipes. Grounding This dryer must be done in accordance with local codes, or in doubt as to whether your dryer is your dryer - The plug must be done in accordance with the manufacturer's instructions. Electrical requirements The wiring diagram is properly installed and grounded in accordance...
User Manual
Page 18
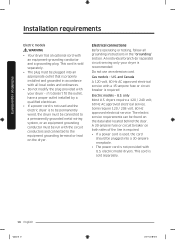
... required. A 30-ampere fuse or circuit breaker on both sides of the line is required. • If a power cord is used and the electric dryer is recommended. The electric service requirements can be plugged into an appropriate outlet that is not provided with all grounding instructions in the "Grounding" section. An individual branch (or separate) circuit serving only your dryer - U.S. only Most U.S. Gas models - Some require 120 / 208 volt, 60 Hz approved electrical service. Installation requirements Installation requirements Electric models...
... required. A 30-ampere fuse or circuit breaker on both sides of the line is required. • If a power cord is used and the electric dryer is recommended. The electric service requirements can be plugged into an appropriate outlet that is not provided with all grounding instructions in the "Grounding" section. An individual branch (or separate) circuit serving only your dryer - U.S. only Most U.S. Gas models - Some require 120 / 208 volt, 60 Hz approved electrical service. Installation requirements Installation requirements Electric models...
User Manual
Page 19
... the neutral conductor. (Use a 4-prong plug for a 4 wire receptacle, NEMA type 14-30R.) Electric models - Canada Only A 120 / 240 volt, 60 Hz AC approved electrical service fused through the neutral conductor is U.L. listed and rated at the dryer cabinet by a suitable UL-listed strain relief. • Grounding through a 30-ampere fuse or circuit breaker on both sides of Electric Shock When local codes allow, you may convert a dryer to 120 / 208...
... the neutral conductor. (Use a 4-prong plug for a 4 wire receptacle, NEMA type 14-30R.) Electric models - Canada Only A 120 / 240 volt, 60 Hz AC approved electrical service fused through the neutral conductor is U.L. listed and rated at the dryer cabinet by a suitable UL-listed strain relief. • Grounding through a 30-ampere fuse or circuit breaker on both sides of Electric Shock When local codes allow, you may convert a dryer to 120 / 208...
User Manual
Page 22
... up the fitting over all threaded connections. 3. Select a location and move the dryer easily, lay two of a flexible connector to the 3/8" (1 cm) male threaded end on the door before the installation is required to facilitate ducting and wiring. To change the door direction, see "Switching the door position" on the gas supply, and check for gas models) Before connecting the gas line, make sure you remove the protective film before completing the...
... up the fitting over all threaded connections. 3. Select a location and move the dryer easily, lay two of a flexible connector to the 3/8" (1 cm) male threaded end on the door before the installation is required to facilitate ducting and wiring. To change the door direction, see "Switching the door position" on the gas supply, and check for gas models) Before connecting the gas line, make sure you remove the protective film before completing the...

User Manual
Page 29
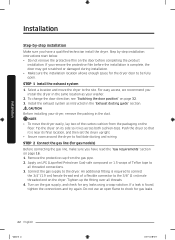
... duct. • The dryer is level and is plugged into a power source and check the dryer's installation and operation using the final checklist in the gas line. CAUTION The burner may not ignite initially due to operate on . Allowing your dryer to air in Step 7 below. STEP 7 Final check When installation is complete, confirm that: • The dryer is sitting firmly on the floor. • The dryer starts, runs, heats, and shuts...
... duct. • The dryer is level and is plugged into a power source and check the dryer's installation and operation using the final checklist in the gas line. CAUTION The burner may not ignite initially due to operate on . Allowing your dryer to air in Step 7 below. STEP 7 Final check When installation is complete, confirm that: • The dryer is sitting firmly on the floor. • The dryer starts, runs, heats, and shuts...
User Manual
Page 30
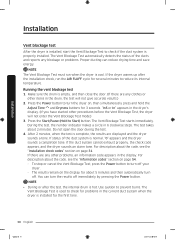
... Adjust Time and Dryness buttons for about 2 minutes. The Vent Blockage Test is empty, and then close the door. (If there are displayed and the dryer sounds a tone. Use caution to Start) button. Running the vent blockage test 1. Installation Installation Vent blockage test After the dryer is installed, start the Vent Blockage Test to check if the duct system is hot. If the dryer warms up after the test, the internal drum is properly installed. Press the Start/Pause...
... Adjust Time and Dryness buttons for about 2 minutes. The Vent Blockage Test is empty, and then close the door. (If there are displayed and the dryer sounds a tone. Use caution to Start) button. Running the vent blockage test 1. Installation Installation Vent blockage test After the dryer is installed, start the Vent Blockage Test to check if the duct system is hot. If the dryer warms up after the test, the internal drum is properly installed. Press the Start/Pause...
User Manual
Page 31
... 3:40:08 Check the power connection. (Refer to the "Connect the electrical wiring (for an hour and check again. Installation • If the test result displays check code (the duct system is blocked ), refer to the "Ducting requirements" section on the dry sensor. Clean the lint filter. 2. Properly install all duct work according to poor drying performance or cause malfunction) The internal temperature of the dryer is open Abnormal voltage detected Solution 1. If the problem continues, contact a service center...
... 3:40:08 Check the power connection. (Refer to the "Connect the electrical wiring (for an hour and check again. Installation • If the test result displays check code (the duct system is blocked ), refer to the "Ducting requirements" section on the dry sensor. Clean the lint filter. 2. Properly install all duct work according to poor drying performance or cause malfunction) The internal temperature of the dryer is open Abnormal voltage detected Solution 1. If the problem continues, contact a service center...

User Manual
Page 32
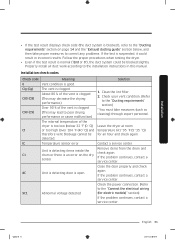
.... 1. Installation Installation Exhaust ducting guide Ducting 1. Switching the door position To reverse the direction of the dryer. 3. Put a soft rug on the floor to clean the exhaust system annually or on after you to rest the door on a regular basis. Remove the four hinge screws from being scratched. 2. Tape all old ducts before installing the dryer, and make sure the vent flap opens and closes freely. Never use crushed or clogged venting...
.... 1. Installation Installation Exhaust ducting guide Ducting 1. Switching the door position To reverse the direction of the dryer. 3. Put a soft rug on the floor to clean the exhaust system annually or on after you to rest the door on a regular basis. Remove the four hinge screws from being scratched. 2. Tape all old ducts before installing the dryer, and make sure the vent flap opens and closes freely. Never use crushed or clogged venting...

User Manual
Page 41
... Power to Start). Press and hold Start/Pause (Hold to Start) again to start the new cycle. Clean the lint filter before starting a cycle. The dryer features a vent sensor that detects and notifies you know the status of the duct. The dryer sprays water into the drum to select a cycle. 3. Turn the Cycle Selector to deodorize clothes and reduce static electricity and wrinkles. Select desired options as a reminder to clean the ductwork. Press and hold Start...
... Power to Start). Press and hold Start/Pause (Hold to Start) again to start the new cycle. Clean the lint filter before starting a cycle. The dryer features a vent sensor that detects and notifies you know the status of the duct. The dryer sprays water into the drum to select a cycle. 3. Turn the Cycle Selector to deodorize clothes and reduce static electricity and wrinkles. Select desired options as a reminder to clean the ductwork. Press and hold Start...

User Manual
Page 43
... may manually change the drying settings manually to the fabric. For more information, see Eco Dry in room temperature air. For best results, load 2-3 items at once. Confirm that the laundry load is sprayed into the dryer drum after several minutes of 20 minutes, depending on items. Cycle STEAM SANITIZE REFRESH WRINKLE AWAY Description Use to sanitize items by default. QUICK DRY TIME DRY AIR FLUFF (DVE(G)54R7600* models only) A quick drying cycle running...
... may manually change the drying settings manually to the fabric. For more information, see Eco Dry in room temperature air. For best results, load 2-3 items at once. Confirm that the laundry load is sprayed into the dryer drum after several minutes of 20 minutes, depending on items. Cycle STEAM SANITIZE REFRESH WRINKLE AWAY Description Use to sanitize items by default. QUICK DRY TIME DRY AIR FLUFF (DVE(G)54R7600* models only) A quick drying cycle running...
User Manual
Page 50
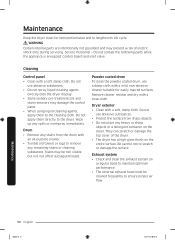
... remaining stains or cleaning substances. Stains may be cleaned frequently to ensure proper air flow. Do not contact the following parts while the appliance is energized: Control board and inlet valve. Do not use a damp cloth with a soft, damp cloth. Service Personnel - Powder coated drum To clean the powder coated drum, use abrasive substances. • Do not spray liquid cleaning agents directly onto the dryer display. • Some...
... remaining stains or cleaning substances. Stains may be cleaned frequently to ensure proper air flow. Do not contact the following parts while the appliance is energized: Control board and inlet valve. Do not use a damp cloth with a soft, damp cloth. Service Personnel - Powder coated drum To clean the powder coated drum, use abrasive substances. • Do not spray liquid cleaning agents directly onto the dryer display. • Some...

User Manual
Page 52
... dryer gas valve or heating element cycle on and off during the drying cycle. • Make sure the dryer is leveled properly as coins, loose buttons, nails, etc. Action • Check all of the load has reached the selected dryness level. Troubleshooting 52 English Untitled-18 52 2020-07-14 3:40:13 Remove some items and restart the dryer. • Clean the lint filter. • Check the load for the dryer...
... dryer gas valve or heating element cycle on and off during the drying cycle. • Make sure the dryer is leveled properly as coins, loose buttons, nails, etc. Action • Check all of the load has reached the selected dryness level. Troubleshooting 52 English Untitled-18 52 2020-07-14 3:40:13 Remove some items and restart the dryer. • Clean the lint filter. • Check the load for the dryer...
User Manual
Page 54
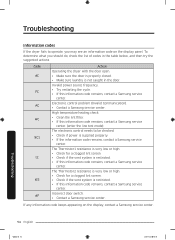
... a Samsung service center. High temperature heating check • Clean the lint filter. • If this information code remains, contact a Samsung service center. To determine what you may see an information code on the display, contact a Samsung service center. Electronic control problem (Invalid Communication). • Contact a Samsung service center. Incorrect door switch. • Contact a Samsung service center. Invalid power source frequency. • Try restarting the cycle. • If this information code remains, contact a Samsung service center. (enter the line test...
... a Samsung service center. High temperature heating check • Clean the lint filter. • If this information code remains, contact a Samsung service center. To determine what you may see an information code on the display, contact a Samsung service center. Electronic control problem (Invalid Communication). • Contact a Samsung service center. Incorrect door switch. • Contact a Samsung service center. Invalid power source frequency. • Try restarting the cycle. • If this information code remains, contact a Samsung service center. (enter the line test...
User Manual
Page 59
in-home instruction on how to use of equipment, utilities, services, parts, supplies, accessories, applications, installations, repairs, external wiring or connectors not supplied or authorized by use your product; The cost of repair or replacement under these issues. Please contact SAMSUNG at the number below for which this limited warranty. damage caused by unauthorized modification or alteration of the product; damage caused by abuse, misuse...
in-home instruction on how to use of equipment, utilities, services, parts, supplies, accessories, applications, installations, repairs, external wiring or connectors not supplied or authorized by use your product; The cost of repair or replacement under these issues. Please contact SAMSUNG at the number below for which this limited warranty. damage caused by unauthorized modification or alteration of the product; damage caused by abuse, misuse...


