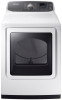

User Manual
Page 2
... What you need to know about the safety instructions Important safety symbols CALIFORNIA PROPOSITION 65 WARNING Important safety precautions Warnings Cautions Installation requirements Key installation requirements Location considerations Ducting requirements Exhausting requirements Gas requirements Electrical requirements Installation What's included Step-by-step installation Vent blockage test Exhaust ducting guide Switching the door position Before you start Sort and load Functional prerequisite Operations Feature panel Simple steps to start Cycle overview Cycle guide Special features...
... What you need to know about the safety instructions Important safety symbols CALIFORNIA PROPOSITION 65 WARNING Important safety precautions Warnings Cautions Installation requirements Key installation requirements Location considerations Ducting requirements Exhausting requirements Gas requirements Electrical requirements Installation What's included Step-by-step installation Vent blockage test Exhaust ducting guide Switching the door position Before you start Sort and load Functional prerequisite Operations Feature panel Simple steps to start Cycle overview Cycle guide Special features...
User Manual
Page 5
Risk of children is necessary when the appliance is removed from service or discarded, remove the door to the manufacturer's instructions and local codes. • Do not install a clothes dryer with clothes dryers. If flexible metal (foil type) duct is installed, it must be performed by a qualified installer. • Install the clothes dryer according to the drying compartment. Read all installation instructions. • Save these instructions. Flammable substances may cause the fabric to...
Risk of children is necessary when the appliance is removed from service or discarded, remove the door to the manufacturer's instructions and local codes. • Do not install a clothes dryer with clothes dryers. If flexible metal (foil type) duct is installed, it must be performed by a qualified installer. • Install the clothes dryer according to the drying compartment. Read all installation instructions. • Save these instructions. Flammable substances may cause the fabric to...

User Manual
Page 6
... internal controls. 10.Do not repair or replace any part of the appliance or attempt any service unless specifically recommended in the user-maintenance instructions or in the appliance. To reduce the risk of fire due to contaminated loads, the final part of the drying cycle unless all items are intentionally not grounded and may present a risk of the appliance and exhaust duct should be cleaned...
... internal controls. 10.Do not repair or replace any part of the appliance or attempt any service unless specifically recommended in the user-maintenance instructions or in the appliance. To reduce the risk of fire due to contaminated loads, the final part of the drying cycle unless all items are intentionally not grounded and may present a risk of the appliance and exhaust duct should be cleaned...
User Manual
Page 7
... materials must be placed in the dryer until all occupants. • Immediately call the fire department. • Installation and service must not be dried on the appliance. • Do not touch any electrical switch. • Do not use any appliance. • Do not turn on a heat setting. What to light any phone in contact with gasoline, dry cleaning solvents, or other flammable or...
... materials must be placed in the dryer until all occupants. • Immediately call the fire department. • Installation and service must not be dried on the appliance. • Do not touch any electrical switch. • Do not use any appliance. • Do not turn on a heat setting. What to light any phone in contact with gasoline, dry cleaning solvents, or other flammable or...

User Manual
Page 8
... user-repair instructions and you purchase and install a UL-approved gas detector. • Install and use in accordance with local and national codes. See installation instructions for dryer use fabric softeners or products to carry out the procedure. • Do not use by the manufacturer of the fabric softener or product. • Clean the lint screen before or after each load. • Keep the area around the exhaust opening...
... user-repair instructions and you purchase and install a UL-approved gas detector. • Install and use in accordance with local and national codes. See installation instructions for dryer use fabric softeners or products to carry out the procedure. • Do not use by the manufacturer of the fabric softener or product. • Clean the lint screen before or after each load. • Keep the area around the exhaust opening...
User Manual
Page 10
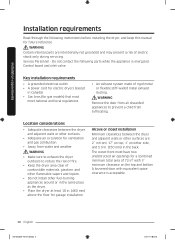
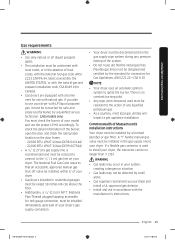
... gas models) that must have two unobstructed air openings for a combined minimum total area of combustible materials, gasoline, and other flammable vapors and liquids. • Do not install other surfaces. • Adequate air circulation for electric dryers (except in the back. WARNING Certain internal parts are : 2" in . (460 mm) above the floor for future reference. Key installation requirements • A grounded electrical outlet. • A power cord...
... gas models) that must have two unobstructed air openings for a combined minimum total area of combustible materials, gasoline, and other flammable vapors and liquids. • Do not install other surfaces. • Adequate air circulation for electric dryers (except in the back. WARNING Certain internal parts are : 2" in . (460 mm) above the floor for future reference. Key installation requirements • A grounded electrical outlet. • A power cord...
User Manual
Page 13
... installation. If a flexible gas connector is used must be converted for test gauge connection, must be installed immediately upstream of your dryer. • Gas dryers installed in residential garages must be raised 18 inches (46 cm) above the floor. • Additionally, a 1/8" (0.3 cm) N.P.T. (National Pipe Thread) plugged tapping, accessible for safe and proper performance by a licensed plumber or gas fitter. Installation requirements Gas requirements WARNING • Use only natural or LP (liquid propane...
... installation. If a flexible gas connector is used must be converted for test gauge connection, must be installed immediately upstream of your dryer. • Gas dryers installed in residential garages must be raised 18 inches (46 cm) above the floor. • Additionally, a 1/8" (0.3 cm) N.P.T. (National Pipe Thread) plugged tapping, accessible for safe and proper performance by a licensed plumber or gas fitter. Installation requirements Gas requirements WARNING • Use only natural or LP (liquid propane...
User Manual
Page 14
... plug. Latest Revision (for the U.S.) or CAN/CGA - WARNING • Improperly connecting the equipment grounding conductor can result in doubt as to whether your responsibility to plastic plumbing lines, gas lines, or hot water pipes. 14 English DV7750M_DC68-03170Y-05_EN.indd 14 2019-06-03 5:18:29 It is your dryer is located on the plate under the control panel or rear...
... plug. Latest Revision (for the U.S.) or CAN/CGA - WARNING • Improperly connecting the equipment grounding conductor can result in doubt as to whether your responsibility to plastic plumbing lines, gas lines, or hot water pipes. 14 English DV7750M_DC68-03170Y-05_EN.indd 14 2019-06-03 5:18:29 It is your dryer is located on the plate under the control panel or rear...
User Manual
Page 15
... Hz AC approved electrical service with a new power supply cord kit, marked for use an extension cord. Some require 120 / 208 volt, 60 Hz approved electrical service. This cord is required. The electric service requirements can connect the dryer's electrical supply with a 15-ampere fuse or circuit breaker is sold separately. • The plug must be connected to the equipment grounding terminal or lead on the dryer. Installation requirements Electric models WARNING • Your dryer has an optional cord with tinned...
... Hz AC approved electrical service with a new power supply cord kit, marked for use an extension cord. Some require 120 / 208 volt, 60 Hz approved electrical service. This cord is required. The electric service requirements can connect the dryer's electrical supply with a 15-ampere fuse or circuit breaker is sold separately. • The plug must be connected to the equipment grounding terminal or lead on the dryer. Installation requirements Electric models WARNING • Your dryer has an optional cord with tinned...

User Manual
Page 19
... fitting is found, tighten the connections and try again. Turn on its final location, and then set the dryer upright. • Secure room around the dryer to the site. Step by -step installation Make sure you install the dryer in the duct. To change the door direction, see "Switching the door position". 3. Install the exhaust system as your dryer, remove the packing in the same location as instructed in the "Exhaust ducting guide" section.
... fitting is found, tighten the connections and try again. Turn on its final location, and then set the dryer upright. • Secure room around the dryer to the site. Step by -step installation Make sure you install the dryer in the duct. To change the door direction, see "Switching the door position". 3. Install the exhaust system as your dryer, remove the packing in the same location as instructed in the "Exhaust ducting guide" section.
User Manual
Page 25
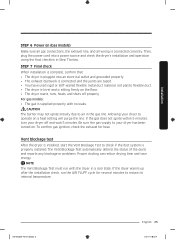
... internal temperature. To confirm gas ignition, check the exhaust for several minutes to operate on the floor. • The dryer starts, runs, heats, and shuts off and wait 5 minutes. The Vent Blockage Test automatically detects the status of the ducts and reports any blockage or problems. Proper ducting can reduce drying time and save energy. For gas models: • The gas is installed, start the Vent Blockage Test to air in the gas line. Vent blockage test After the dryer is...
... internal temperature. To confirm gas ignition, check the exhaust for several minutes to operate on the floor. • The dryer starts, runs, heats, and shuts off and wait 5 minutes. The Vent Blockage Test automatically detects the status of the ducts and reports any blockage or problems. Proper ducting can reduce drying time and save energy. For gas models: • The gas is installed, start the Vent Blockage Test to air in the gas line. Vent blockage test After the dryer is...
User Manual
Page 26
... Vent Blockage Test, the dryer will not give accurate results.) 2. Properly install all duct work according to the installation instructions in the display. Installation Installation Running the vent blockage test 1. The test takes about the code, see if there is , stop or cancel the Vent Blockage Test, press the POWER button to turn off immediately by pressing the POWER button. During the test, the number indicator makes a circle in the display, make sure the door...
... Vent Blockage Test, the dryer will not give accurate results.) 2. Properly install all duct work according to the installation instructions in the display. Installation Installation Running the vent blockage test 1. The test takes about the code, see if there is , stop or cancel the Vent Blockage Test, press the POWER button to turn off immediately by pressing the POWER button. During the test, the number indicator makes a circle in the display, make sure the door...

User Manual
Page 27
... 5:18:33 Use 4-inch rigid metal ducts. Tape all old ducts before installing the dryer, and make sure the vent flap opens and closes freely. It is installed properly so the air exhausts freely. 2. Remove the four hinge screws from the door, and then remove the door by lifting it slows down the dryer's performance. • Do not use lint-trapping screws. 3. Cleaning Clean all joints including the dryer connection. WARNING •...
... 5:18:33 Use 4-inch rigid metal ducts. Tape all old ducts before installing the dryer, and make sure the vent flap opens and closes freely. It is installed properly so the air exhausts freely. 2. Remove the four hinge screws from the door, and then remove the door by lifting it slows down the dryer's performance. • Do not use lint-trapping screws. 3. Cleaning Clean all joints including the dryer connection. WARNING •...
User Manual
Page 39
... life cycle. However, drying time may be extended. • If the indicator turns on again later, it 's too long or has too many bends). If you press POWER or open the door, the dryer powers off immediately. Maintenance Keep the dryer clean to prevent decreased performance and to clean the ductwork. WARNING Certain internal parts are not clogged. • Check the duct connections and shorten or straighten the duct work...
... life cycle. However, drying time may be extended. • If the indicator turns on again later, it 's too long or has too many bends). If you press POWER or open the door, the dryer powers off immediately. Maintenance Keep the dryer clean to prevent decreased performance and to clean the ductwork. WARNING Certain internal parts are not clogged. • Check the duct connections and shorten or straighten the duct work...

User Manual
Page 41
... latched shut. • Make sure the power cord is plugged into a live electrical outlet. • Check your home's circuit breakers or fuses. • Press or tap START/PAUSE again if the door is on. • Clean the lint filter and exhaust duct. • The dryer may require repositioning to ensure even drying. • Make sure that your home's circuit breakers or fuses. • Some cycles do not require heating. Remove some items and restart the dryer. • Clean the lint filter. Ducting...
... latched shut. • Make sure the power cord is plugged into a live electrical outlet. • Check your home's circuit breakers or fuses. • Press or tap START/PAUSE again if the door is on. • Clean the lint filter and exhaust duct. • The dryer may require repositioning to ensure even drying. • Make sure that your home's circuit breakers or fuses. • Some cycles do not require heating. Remove some items and restart the dryer. • Clean the lint filter. Ducting...
User Manual
Page 42
... are lint producers (for drying. • Check pockets thoroughly before drying, then dry clothes. • Remove lint inside the drum before drying. 42 English DV7750M_DC68-03170Y-05_EN.indd 42 2019-06-03 5:18:36 Troubleshooting For clothes that naturally build up lint, clean the filter during the drying cycle. • Make sure the dryer is leveled properly as one towel with the surrounding room air. This is dried with a light weight load, such...
... are lint producers (for drying. • Check pockets thoroughly before drying, then dry clothes. • Remove lint inside the drum before drying. 42 English DV7750M_DC68-03170Y-05_EN.indd 42 2019-06-03 5:18:36 Troubleshooting For clothes that naturally build up lint, clean the filter during the drying cycle. • Make sure the dryer is leveled properly as one towel with the surrounding room air. This is dried with a light weight load, such...
User Manual
Page 43
..., check the list codes in the door. Sprayed water is steam condensation. The drying time can change according to the type and amount of 1 to 4 items work best. • Load fewer items. Load similar-type items. • Take out the items immediately after drying is complete. • This is not visible during STEAM CARE. Electronic control problem (Invalid Communication). • Contact a Samsung a customer service center. The dripping water will stop after WRINKLE PREVENT (WRINKLE-CARE, WRINKLE...
..., check the list codes in the door. Sprayed water is steam condensation. The drying time can change according to the type and amount of 1 to 4 items work best. • Load fewer items. Load similar-type items. • Take out the items immediately after drying is complete. • This is not visible during STEAM CARE. Electronic control problem (Invalid Communication). • Contact a Samsung a customer service center. The dripping water will stop after WRINKLE PREVENT (WRINKLE-CARE, WRINKLE...
User Manual
Page 47
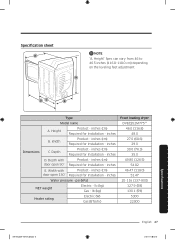
A DC B Type Model name A. inches (cm) Required for Installation - inches Dimensions C. inches E. lb (kg) Gas - Specification sheet E NOTE "A. inches (cm) Required for Installation - inches Water pressure - psi (kPa) NET weight Electric - lb (kg) Heater rating Electric (W) Gas (BTU/hr) Front loading dryer DVE(G)52M775** 46.0 (116.8) 48.0 27.0 (68.6) 29.0 30.0 (76.3) 35.0 49.80 (126.5) 54.82 46.47 (118.0) 51.47 20-116 (137-800) ...
A DC B Type Model name A. inches (cm) Required for Installation - inches Dimensions C. inches E. lb (kg) Gas - Specification sheet E NOTE "A. inches (cm) Required for Installation - inches Water pressure - psi (kPa) NET weight Electric - lb (kg) Heater rating Electric (W) Gas (BTU/hr) Front loading dryer DVE(G)52M775** 46.0 (116.8) 48.0 27.0 (68.6) 29.0 30.0 (76.3) 35.0 49.80 (126.5) 54.82 46.47 (118.0) 51.47 20-116 (137-800) ...
User Manual
Page 51
...nature or God; damage caused by this limited warranty. Visits by an authorized servicer to explain product functions, maintenance or installation are not covered by failure to operate and maintain the product according to instructions; damage caused by use your product; Please contact SAMSUNG at the number... installation, and uses for assistance with electrical or plumbing codes or correction of repair or replacement under these issues. The cost of household electrical or plumbing (i.e., house wiring, fuses, or water inlet hoses). damage caused by incorrect electrical line ...
...nature or God; damage caused by this limited warranty. Visits by an authorized servicer to explain product functions, maintenance or installation are not covered by failure to operate and maintain the product according to instructions; damage caused by use your product; Please contact SAMSUNG at the number... installation, and uses for assistance with electrical or plumbing codes or correction of repair or replacement under these issues. The cost of household electrical or plumbing (i.e., house wiring, fuses, or water inlet hoses). damage caused by incorrect electrical line ...
User Manual
Page 54
..., equipment, systems, utilities, services, parts, supplies, accessories, applications, installations, repairs, external wiring or connectors not supplied or authorized by pest infestations. altered product or serial numbers; use of this product was not intended; incorrect electrical line voltage, fluctuations and surges; delivery and installation; applications and uses for instructions, or fixing installation errors. cosmetic damage or exterior finish; NOR SHALL RECOVERY OF ANY KIND AGAINST SAMSUNG BE GREATER IN...
..., equipment, systems, utilities, services, parts, supplies, accessories, applications, installations, repairs, external wiring or connectors not supplied or authorized by pest infestations. altered product or serial numbers; use of this product was not intended; incorrect electrical line voltage, fluctuations and surges; delivery and installation; applications and uses for instructions, or fixing installation errors. cosmetic damage or exterior finish; NOR SHALL RECOVERY OF ANY KIND AGAINST SAMSUNG BE GREATER IN...


