
User Manual
Page 6
.... 21.Control board and inlet valve are not caught in published userrepair instructions that you understand and have the skills to carry out. 11.Do not use heat to dry articles containing foam rubber or similarly textured rubber-like materials. 14.Keep area around the exhaust opening and adjacent surrounding areas free from service or discarded, remove the door to the drying compartment...
.... 21.Control board and inlet valve are not caught in published userrepair instructions that you understand and have the skills to carry out. 11.Do not use heat to dry articles containing foam rubber or similarly textured rubber-like materials. 14.Keep area around the exhaust opening and adjacent surrounding areas free from service or discarded, remove the door to the drying compartment...
User Manual
Page 7
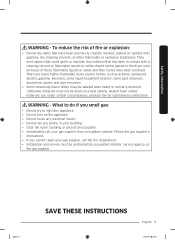
... that have been removed. WARNING - Heated foam rubber materials can, under certain circumstances, produce fire by a qualified installer, service agency, or the gas supplier. Untitled-1 7 SAVE THESE INSTRUCTIONS English 7 2021-04-05 10:16:07 What to light any phone in your gas supplier from a neighbor's phone. There are many highly flammable items used in the dryer until all traces...
... that have been removed. WARNING - Heated foam rubber materials can, under certain circumstances, produce fire by a qualified installer, service agency, or the gas supplier. Untitled-1 7 SAVE THESE INSTRUCTIONS English 7 2021-04-05 10:16:07 What to light any phone in your gas supplier from a neighbor's phone. There are many highly flammable items used in the dryer until all traces...

User Manual
Page 8
... free from lint, dust, and dirt. • The interior of the dryer and exhaust duct should be cleaned periodically by qualified service personnel. • This appliance must be exposed to the weather. • Do not tamper with controls. • Do not repair, replace, or attempt to service any part of the appliance unless specifically instructed to in the user-repair instructions and you purchase and install a UL-approved gas...
... free from lint, dust, and dirt. • The interior of the dryer and exhaust duct should be cleaned periodically by qualified service personnel. • This appliance must be exposed to the weather. • Do not tamper with controls. • Do not repair, replace, or attempt to service any part of the appliance unless specifically instructed to in the user-repair instructions and you purchase and install a UL-approved gas...
User Manual
Page 11
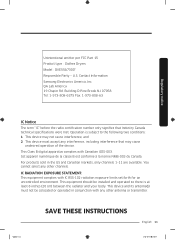
...interference, including interference that Industry Canada technical specifications were met. Building D Pine Brook NJ 07058 Tel: 1-973-808-6375 Fax: 1-973-808-63 Regulatory notice IC Notice The term "IC" before the radio certification number only signifies that may not cause interference...225; la norme NMB-003 du Canada. Untitled-1 11 SAVE THESE INSTRUCTIONS English 11 2021-04-05 10:16:07 Operation is at least 8 inches (20 cm) between the radiator and your body. U.S. Unintentional emitter per FCC Part 15 Product type : Clothes Dryers Model : DVE55A7300* Responsible Party -
...interference, including interference that Industry Canada technical specifications were met. Building D Pine Brook NJ 07058 Tel: 1-973-808-6375 Fax: 1-973-808-63 Regulatory notice IC Notice The term "IC" before the radio certification number only signifies that may not cause interference...225; la norme NMB-003 du Canada. Untitled-1 11 SAVE THESE INSTRUCTIONS English 11 2021-04-05 10:16:07 Operation is at least 8 inches (20 cm) between the radiator and your body. U.S. Unintentional emitter per FCC Part 15 Product type : Clothes Dryers Model : DVE55A7300* Responsible Party -
User Manual
Page 13
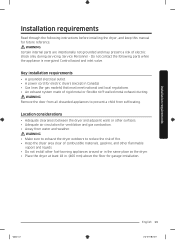
Do not contact the following instructions before installing the dryer, and keep this manual for ventilation and gas combustion. • Away from suffocating. WARNING • Make sure to exhaust the dryer outdoors to prevent a child from water and weather. Service Personnel - Key installation requirements • A grounded electrical outlet. • A power cord for electric dryers (except in . (460 mm) above the floor for gas models) that must meet national and local regulations...
Do not contact the following instructions before installing the dryer, and keep this manual for ventilation and gas combustion. • Away from suffocating. WARNING • Make sure to exhaust the dryer outdoors to prevent a child from water and weather. Service Personnel - Key installation requirements • A grounded electrical outlet. • A power cord for electric dryers (except in . (460 mm) above the floor for gas models) that must meet national and local regulations...

User Manual
Page 19
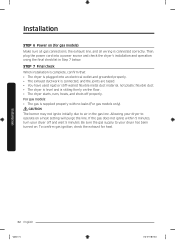
... propane) gas, it must be converted for test gauge connection, must be installed immediately upstream of your dryer. • Gas dryers installed in the gas supply line to use your dryer, the connector can be disconnected from the gas supply pipe system during any liquefied petroleum gas. • As a courtesy, most local gas utilities will inspect a gas appliance installation. The National Fuel Gas Code requires that an accessible, approved manual gas shut-off valve be installed within 6" of your dryer's gas...
... propane) gas, it must be converted for test gauge connection, must be installed immediately upstream of your dryer. • Gas dryers installed in the gas supply line to use your dryer, the connector can be disconnected from the gas supply pipe system during any liquefied petroleum gas. • As a courtesy, most local gas utilities will inspect a gas appliance installation. The National Fuel Gas Code requires that an accessible, approved manual gas shut-off valve be installed within 6" of your dryer's gas...

User Manual
Page 20
... located on the plate under the control panel or rear frame. It is properly grounded. if it doesn't fit the outlet, have a proper outlet installed by a qualified electrician. • Do not connect the ground wire to whether your dryer is your responsibility to provide adequate electrical service for Canada) and local codes and ordinances. The plug must be done in accordance with your dryer - Electrical requirements The wiring diagram...
... located on the plate under the control panel or rear frame. It is properly grounded. if it doesn't fit the outlet, have a proper outlet installed by a qualified electrician. • Do not connect the ground wire to whether your dryer is your responsibility to provide adequate electrical service for Canada) and local codes and ordinances. The plug must be done in accordance with your dryer - Electrical requirements The wiring diagram...

User Manual
Page 22
... power supply cord kit, marked for use with a dryer, that is U.L. The power cord should be supported at a minimum of 120 / 240 volts, 30-amperes with three No. 10 copper wire conductors terminated with closed loop terminals, open-end spade lugs with turned up ends, or with the power cord attached. Canada Only A 120 / 240 volt, 60 Hz AC approved electrical service fused through a 30-ampere fuse or circuit breaker on...
... power supply cord kit, marked for use with a dryer, that is U.L. The power cord should be supported at a minimum of 120 / 240 volts, 30-amperes with three No. 10 copper wire conductors terminated with closed loop terminals, open-end spade lugs with turned up ends, or with the power cord attached. Canada Only A 120 / 240 volt, 60 Hz AC approved electrical service fused through a 30-ampere fuse or circuit breaker on...
User Manual
Page 25
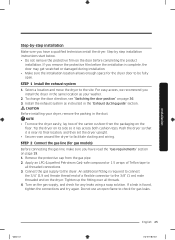
... "Exhaust ducting guide" section. Tip the dryer on its final location, and then set the dryer upright. • Secure room around the dryer to check for gas leaks. Turn on the gas supply, and check for gas models) Before connecting the gas line, make sure you remove the protective film before completing the product installation. Remove the protective cap from the packaging on the floor. If a leak is complete, the door may...
... "Exhaust ducting guide" section. Tip the dryer on its final location, and then set the dryer upright. • Secure room around the dryer to check for gas leaks. Turn on the gas supply, and check for gas models) Before connecting the gas line, make sure you remove the protective film before completing the product installation. Remove the protective cap from the packaging on the floor. If a leak is complete, the door may...
User Manual
Page 32
... gas is plugged into a power source and check the dryer's installation and operation using the final checklist in the gas line. If the gas does not ignite within 5 minutes, turn your dryer has been turned on the floor. • The dryer starts, runs, heats, and shuts off and wait 5 minutes. Installation 32 English Untitled-1 32 2021-04-05 10:16:11 Then, plug the power cord into an electrical outlet and grounded properly. • The exhaust...
... gas is plugged into a power source and check the dryer's installation and operation using the final checklist in the gas line. If the gas does not ignite within 5 minutes, turn your dryer has been turned on the floor. • The dryer starts, runs, heats, and shuts off and wait 5 minutes. Installation 32 English Untitled-1 32 2021-04-05 10:16:11 Then, plug the power cord into an electrical outlet and grounded properly. • The exhaust...

User Manual
Page 33
... Power button to turn the results off your dryer. - Do not open the door during the test. 4. If status of the ducts and reports any other procedures before the Vent Blockage Test, the dryer will not give accurate results.) 2. Use caution to Start) button. NOTE The Vent Blockage Test must run the AIR FLUFF cycle for the first time. Installation Vent blockage test After the dryer is installed, start the Vent Blockage Test to check if the duct system is cool...
... Power button to turn the results off your dryer. - Do not open the door during the test. 4. If status of the ducts and reports any other procedures before the Vent Blockage Test, the dryer will not give accurate results.) 2. Use caution to Start) button. NOTE The Vent Blockage Test must run the AIR FLUFF cycle for the first time. Installation Vent blockage test After the dryer is installed, start the Vent Blockage Test to check if the duct system is cool...

User Manual
Page 34
... If the problem continues, contact a service center. If the problem continues, contact a service center. Properly install all duct work according to the "Connect the electrical wiring (for an hour and check again. Clean the lint filter. 2. Follow the proper procedures when testing the dryer. • Even if the test result is normal ("End or 0"), the duct system could result in this manual. Temperature sensor error Unit is detecting items inside the drum or...
... If the problem continues, contact a service center. If the problem continues, contact a service center. Properly install all duct work according to the "Connect the electrical wiring (for an hour and check again. Clean the lint filter. 2. Follow the proper procedures when testing the dryer. • Even if the test result is normal ("End or 0"), the duct system could result in this manual. Temperature sensor error Unit is detecting items inside the drum or...

User Manual
Page 35
Tape all old ducts before installing the dryer, and make sure the vent flap opens and closes freely. Solution Check the power connection. To facilitate the exhaust, keep the ducts as straight as possible. Cleaning Clean all joints including the dryer connection. Check the vent condition if the problem continue, contact a service center. We recommend that have multiple elbows. • Do not use lint-trapping screws. 3. Check code Meaning HC Detection of any kind...
Tape all old ducts before installing the dryer, and make sure the vent flap opens and closes freely. Solution Check the power connection. To facilitate the exhaust, keep the ducts as straight as possible. Cleaning Clean all joints including the dryer connection. Check the vent condition if the problem continue, contact a service center. We recommend that have multiple elbows. • Do not use lint-trapping screws. 3. Check code Meaning HC Detection of any kind...

User Manual
Page 45
... to Start) again to turn the dryer on . This icon displays after every load as necessary. 4. Simple steps to deodorize clothes and reduce static electricity and wrinkles. Select desired options as necessary. 5. Press Power to start 1. Press and hold Start/Pause (Hold to determine the drying time. Icon description Sensor Dry Filter Check Vent Sensor (DVE(G)55A7**** models only) Steam Child Lock Alarm Off Wi-Fi This icon appears when the dryer operates the cycle...
... to Start) again to turn the dryer on . This icon displays after every load as necessary. 4. Simple steps to deodorize clothes and reduce static electricity and wrinkles. Select desired options as necessary. 5. Press Power to start 1. Press and hold Start/Pause (Hold to determine the drying time. Icon description Sensor Dry Filter Check Vent Sensor (DVE(G)55A7**** models only) Steam Child Lock Alarm Off Wi-Fi This icon appears when the dryer operates the cycle...

User Manual
Page 47
..., you may manually change the drying settings manually to sanitize items by default. Manual Dry You can change the cycle time if necessary. Confirm that the laundry load is wet or partially wet before starting this cycle selected, a small amount of water is enabled by applying steam and high-temperature heat to four items. With this cycle. Steam Cycles Use steam to reduce wrinkling and odors on items. Cycle STEAM SANITIZE REFRESH Description Use to your...
..., you may manually change the drying settings manually to sanitize items by default. Manual Dry You can change the cycle time if necessary. Confirm that the laundry load is wet or partially wet before starting this cycle selected, a small amount of water is enabled by applying steam and high-temperature heat to four items. With this cycle. Steam Cycles Use steam to reduce wrinkling and odors on items. Cycle STEAM SANITIZE REFRESH Description Use to your...
User Manual
Page 54
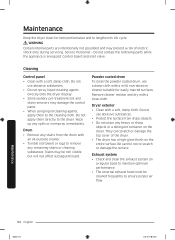
... be cleaned frequently to the cleaning cloth. Powder coated drum To clean the powder coated drum, use a damp cloth with a clean cloth. Remove cleaner residue and dry with a mild, non-abrasive cleaner suitable for best performance and to scratch or damage the surface. Be careful not to lengthen its life cycle. Cleaning Control panel • Clean with a soft, damp cloth. Service Personnel - Do not apply them to ensure proper air flow. Maintenance 54...
... be cleaned frequently to the cleaning cloth. Powder coated drum To clean the powder coated drum, use a damp cloth with a clean cloth. Remove cleaner residue and dry with a mild, non-abrasive cleaner suitable for best performance and to scratch or damage the surface. Be careful not to lengthen its life cycle. Cleaning Control panel • Clean with a soft, damp cloth. Service Personnel - Do not apply them to ensure proper air flow. Maintenance 54...

User Manual
Page 56
.... Remove promptly. • It is normal to hear the dryer gas valve or heating element cycle on and off during the drying cycle. • Make sure the dryer is leveled properly as outlined in the installation instructions. • It is draining properly and extracting adequate water from the load. • The load may be completely dry when the rest of air moving through the dryer drum, fan, or exhaust system...
.... Remove promptly. • It is normal to hear the dryer gas valve or heating element cycle on and off during the drying cycle. • Make sure the dryer is leveled properly as outlined in the installation instructions. • It is draining properly and extracting adequate water from the load. • The load may be completely dry when the rest of air moving through the dryer drum, fan, or exhaust system...
User Manual
Page 58
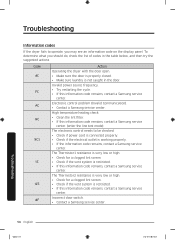
...; Check for a clogged lint screen. • Check if the vent system is restricted. • If this information code remains, contact a Samsung service center. (enter the line test mode) The electronic control needs to operate, you should do, check the list of codes in the door. Troubleshooting Information codes If the dryer fails to be checked. • Check if power cord is connected properly. • Check if the electrical outlet is working properly. • If the information code remains, contact a Samsung service center. Code...
...; Check for a clogged lint screen. • Check if the vent system is restricted. • If this information code remains, contact a Samsung service center. (enter the line test mode) The electronic control needs to operate, you should do, check the list of codes in the door. Troubleshooting Information codes If the dryer fails to be checked. • Check if power cord is connected properly. • Check if the electrical outlet is working properly. • If the information code remains, contact a Samsung service center. Code...

User Manual
Page 62
Specification Specification sheet Type Capacity (Cu.ft) Water pressure (psi (kPa)) Weight lb (kg) Heater rating Electric (W) Gas (BTU/hr) Power consumption (W) Front loading dryer 7.4 20-116 (137-800) 119.0 (54.0) 5300 20000 5300 Specification 62 English Untitled-1 62 2021-04-05 10:16:22
Specification Specification sheet Type Capacity (Cu.ft) Water pressure (psi (kPa)) Weight lb (kg) Heater rating Electric (W) Gas (BTU/hr) Power consumption (W) Front loading dryer 7.4 20-116 (137-800) 119.0 (54.0) 5300 20000 5300 Specification 62 English Untitled-1 62 2021-04-05 10:16:22
User Manual
Page 64
... this limited warranty. Visits by an authorized servicer to explain product functions, maintenance or installation are not covered by failure to operate and maintain the product according to instructions; damage caused by incorrect electrical line current, voltage, fluctuations and surges; damage caused by unauthorized modification or alteration of household electrical or plumbing (i.e., house wiring, fuses, or water inlet hoses). Please contact SAMSUNG at the number below...
... this limited warranty. Visits by an authorized servicer to explain product functions, maintenance or installation are not covered by failure to operate and maintain the product according to instructions; damage caused by incorrect electrical line current, voltage, fluctuations and surges; damage caused by unauthorized modification or alteration of household electrical or plumbing (i.e., house wiring, fuses, or water inlet hoses). Please contact SAMSUNG at the number below...


