
User Manual
Page 2
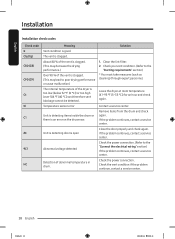
... safety instructions Important safety symbols CALIFORNIA PROPOSITION 65 WARNING Important safety precautions Warnings Cautions Installation requirements Key installation requirements Location considerations Ducting requirements Mobile home installation Exhausting requirements Gas requirements Electrical requirements Installation What's included Step-by-step installation Vent blockage test Exhaust ducting guide Switching the door position Before you start Sort and load Functional prerequisite Operations Control panel Simple steps to start Cycle overview Cycle chart Cycle guide Special features...
... safety instructions Important safety symbols CALIFORNIA PROPOSITION 65 WARNING Important safety precautions Warnings Cautions Installation requirements Key installation requirements Location considerations Ducting requirements Mobile home installation Exhausting requirements Gas requirements Electrical requirements Installation What's included Step-by-step installation Vent blockage test Exhaust ducting guide Switching the door position Before you start Sort and load Functional prerequisite Operations Control panel Simple steps to start Cycle overview Cycle chart Cycle guide Special features...

User Manual
Page 6
... property damage. • Do not store or use gasoline or other flammable vapors and liquids near this or any other flammable or explosive substances. Any material that could result in contact with gasoline, dry cleaning solvents, or other appliance. • Installation and service must not be dried on a heat setting. SAVE THESE INSTRUCTIONS 6 English Untitled-1 6 2022-06-14 10...
... property damage. • Do not store or use gasoline or other flammable vapors and liquids near this or any other flammable or explosive substances. Any material that could result in contact with gasoline, dry cleaning solvents, or other appliance. • Installation and service must not be dried on a heat setting. SAVE THESE INSTRUCTIONS 6 English Untitled-1 6 2022-06-14 10...

User Manual
Page 8
... part of the appliance or attempt any service unless specifically recommended in the user-maintenance instructions or in published user-repair instructions that could ignite or explode. 3. This appliance must be cleaned periodically by itself. 4. Do not use fabric softeners or products to cooking oils in the appliance. Keep area around the exhaust opening and adjacent surrounding areas free from service or discarded, remove the door to dry clothes...
... part of the appliance or attempt any service unless specifically recommended in the user-maintenance instructions or in published user-repair instructions that could ignite or explode. 3. This appliance must be cleaned periodically by itself. 4. Do not use fabric softeners or products to cooking oils in the appliance. Keep area around the exhaust opening and adjacent surrounding areas free from service or discarded, remove the door to dry clothes...

User Manual
Page 9
...; Clean the lint screen before or after each load. • Keep the area around the exhaust opening and surrounding areas free from lint, dust, and dirt. • The interior of the dryer and exhaust duct should be exposed to the weather. • Do not tamper with the controls. • Do not repair, replace, or attempt to service any part of the appliance unless specifically instructed to in the user-repair instructions...
...; Clean the lint screen before or after each load. • Keep the area around the exhaust opening and surrounding areas free from lint, dust, and dirt. • The interior of the dryer and exhaust duct should be exposed to the weather. • Do not tamper with the controls. • Do not repair, replace, or attempt to service any part of the appliance unless specifically instructed to in the user-repair instructions...
User Manual
Page 11
... instructions before installing the dryer, and keep this manual for gas models) that must meet national and local regulations. • An exhaust system made of electric shock only during servicing. WARNING Certain internal parts are intentionally not grounded and may present a risk of rigid metal or flexible stiff-walled metal exhaust ducting. WARNING • Make sure to exhaust the dryer outdoors to prevent a child from water...
... instructions before installing the dryer, and keep this manual for gas models) that must meet national and local regulations. • An exhaust system made of electric shock only during servicing. WARNING Certain internal parts are intentionally not grounded and may present a risk of rigid metal or flexible stiff-walled metal exhaust ducting. WARNING • Make sure to exhaust the dryer outdoors to prevent a child from water...
User Manual
Page 17
... test gauge connection, must be converted for safe and proper performance by smell alone. • Gas suppliers recommend you plan to ignite the burner. NOTE • Your dryer uses an automatic ignition system to use the proper LP Kit accordingly. If you purchase and install a UL-approved gas detector. • Install and use in accordance with natural gas. The National Fuel Gas Code requires that an accessible, approved manual gas shut...
... test gauge connection, must be converted for safe and proper performance by smell alone. • Gas suppliers recommend you plan to ignite the burner. NOTE • Your dryer uses an automatic ignition system to use the proper LP Kit accordingly. If you purchase and install a UL-approved gas detector. • Install and use in accordance with natural gas. The National Fuel Gas Code requires that an accessible, approved manual gas shut...

User Manual
Page 18
... Installation Codes - if it doesn't fit the outlet, have a proper outlet installed by a qualified electrician. • If a power cord is not used and the electric dryer is located on the dryer. 18 English Untitled-1 18 2022-06-14 10:23:10 Gas models WARNING • Your dryer has a cord with an equipment-grounding conductor and a grounding plug. English Installation requirements Electrical requirements The wiring diagram is to be permanently wired, the dryer must be connected to...
... Installation Codes - if it doesn't fit the outlet, have a proper outlet installed by a qualified electrician. • If a power cord is not used and the electric dryer is located on the dryer. 18 English Untitled-1 18 2022-06-14 10:23:10 Gas models WARNING • Your dryer has a cord with an equipment-grounding conductor and a grounding plug. English Installation requirements Electrical requirements The wiring diagram is to be permanently wired, the dryer must be connected to...
User Manual
Page 19
... circuit breaker on both sides of the line is required. only Most U.S. A 30-ampere fuse or circuit breaker on the data label located behind the door. U.S. Some require 120 / 208 volt, 60 Hz approved electrical service. electric model dryers. Do not use with a dryer, that is not provided with the power cord attached. The power cord should be plugged into a 30-ampere receptacle. • The power cord is U.L. Gas models - English Electrical connections Before operating or testing, follow all grounding instructions...
... circuit breaker on both sides of the line is required. only Most U.S. A 30-ampere fuse or circuit breaker on the data label located behind the door. U.S. Some require 120 / 208 volt, 60 Hz approved electrical service. electric model dryers. Do not use with a dryer, that is not provided with the power cord attached. The power cord should be plugged into a 30-ampere receptacle. • The power cord is U.L. Gas models - English Electrical connections Before operating or testing, follow all grounding instructions...

User Manual
Page 22
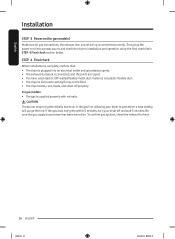
... product installation. To change the door direction, see "Switching the door position" on the door before the installation is required to connect the 3/4" (1.9 cm) female thread end of Teflon tape to facilitate ducting and wiring. Push the dryer so that it lies across both cushion-tops. If you install the dryer in the same location as instructed in the duct. Install the exhaust system as your dryer, remove the packing in the "Exhaust ducting guide...
... product installation. To change the door direction, see "Switching the door position" on the door before the installation is required to connect the 3/4" (1.9 cm) female thread end of Teflon tape to facilitate ducting and wiring. Push the dryer so that it lies across both cushion-tops. If you install the dryer in the same location as instructed in the duct. Install the exhaust system as your dryer, remove the packing in the "Exhaust ducting guide...
User Manual
Page 26
..., turn your dryer to operate on a heat setting will purge the line. To confirm gas ignition, check the exhaust for gas models) Make sure all gas connections, the exhaust line, and all wiring is supplied properly with no leaks. CAUTION The burner may not ignite initially due to your dryer has been turned on the floor. • The dryer starts, runs, heats, and shuts off and wait 5 minutes. Then, plug the power cord into an electrical outlet and...
..., turn your dryer to operate on a heat setting will purge the line. To confirm gas ignition, check the exhaust for gas models) Make sure all gas connections, the exhaust line, and all wiring is supplied properly with no leaks. CAUTION The burner may not ignite initially due to your dryer has been turned on the floor. • The dryer starts, runs, heats, and shuts off and wait 5 minutes. Then, plug the power cord into an electrical outlet and...
User Manual
Page 27
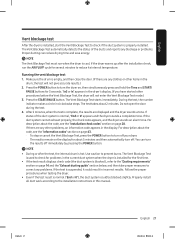
... drum is empty, and then close the door. (If there are displayed and the dryer sounds a tone. Press the START/PAUSE button. The test takes about 5 minutes and then automatically turn the dryer on the display for 3 seconds. NOTE The Vent Blockage Test must run the AIR FLUFF cycle for the first time. • If the test result displays check code (the duct system is blocked ), refer to the "Ducting requirements...
... drum is empty, and then close the door. (If there are displayed and the dryer sounds a tone. Press the START/PAUSE button. The test takes about 5 minutes and then automatically turn the dryer on the display for 3 seconds. NOTE The Vent Blockage Test must run the AIR FLUFF cycle for the first time. • If the test result displays check code (the duct system is blocked ), refer to the "Ducting requirements...
User Manual
Page 28
.... Remove items from the drum and check again. Check the power connection. (Refer to the "Ducting requirements" section) * You must take measures (such as cleaning) through expert personnel. Clean the lint filter. 2. Close the door properly and check again. If the problem continues, contact a service center. Solution 1. Check the power connection. Temperature sensor error Unit is detecting items inside the drum or there is an error on the dry sensor. Check your vent condition. (Refer to the "Connect the electrical wiring...
.... Remove items from the drum and check again. Check the power connection. (Refer to the "Ducting requirements" section) * You must take measures (such as cleaning) through expert personnel. Clean the lint filter. 2. Close the door properly and check again. If the problem continues, contact a service center. Solution 1. Check the power connection. Temperature sensor error Unit is detecting items inside the drum or there is an error on the dry sensor. Check your vent condition. (Refer to the "Connect the electrical wiring...
User Manual
Page 34
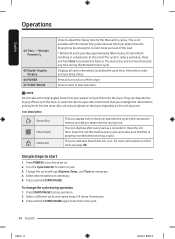
... POWER to open. Press and hold Time to determine the drying time. They can be removed at the end of the dryer or cause the door to turn off the dryer. We recommend that Child Lock is dry, and can degrade the drying efficiency of the cycle to start or stop operation. 2. This icon displays after every load as necessary. 5. Press and hold START/PAUSE again to reduce wrinkling. This...
... POWER to open. Press and hold Time to determine the drying time. They can be removed at the end of the dryer or cause the door to turn off the dryer. We recommend that Child Lock is dry, and can degrade the drying efficiency of the cycle to start or stop operation. 2. This icon displays after every load as necessary. 5. Press and hold START/PAUSE again to reduce wrinkling. This...
User Manual
Page 39
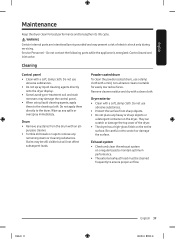
...: Control board and inlet valve. Exhaust system • Check and clean the exhaust system on the dryer. Untitled-1 39 English 39 2022-06-14 10:23:14 Service Personnel - Do not apply them to lengthen its life cycle. Do not use abrasive substances. • Protect the surface from the drum with an all- Remove cleaner residue and dry with a soft, damp cloth. Cleaning Control panel • Clean with...
...: Control board and inlet valve. Exhaust system • Check and clean the exhaust system on the dryer. Untitled-1 39 English 39 2022-06-14 10:23:14 Service Personnel - Do not apply them to lengthen its life cycle. Do not use abrasive substances. • Protect the surface from the drum with an all- Remove cleaner residue and dry with a soft, damp cloth. Cleaning Control panel • Clean with...

User Manual
Page 40
... a gas dryer, make sure the gas supply is opened during a cycle. • Clean the lint filter. • Check your home's circuit breakers or fuses. • Some cycles do not require heating. Add a few towels and restart the dryer. • The load may be too small to tumble properly. Action • Make sure the door is latched shut. • Make sure the power cord is plugged into the cool-down phase of the cycle. • Turn...
... a gas dryer, make sure the gas supply is opened during a cycle. • Clean the lint filter. • Check your home's circuit breakers or fuses. • Some cycles do not require heating. Add a few towels and restart the dryer. • The load may be too small to tumble properly. Action • Make sure the door is latched shut. • Make sure the power cord is plugged into the cool-down phase of the cycle. • Turn...

User Manual
Page 41
... from clothes that are lint producers (for objects such as the dryer draws the air from the nozzle when STEAM CARE starts. The dripping water will not be completely dry when the rest of the load has reached the selected dryness level. English Problem Is noisy. Dries unevenly. Remove promptly. • It is normal to hear the dryer gas valve or heating element cycle on clothes. This is dried with a light weight load...
... from clothes that are lint producers (for objects such as the dryer draws the air from the nozzle when STEAM CARE starts. The dripping water will not be completely dry when the rest of the load has reached the selected dryness level. English Problem Is noisy. Dries unevenly. Remove promptly. • It is normal to hear the dryer gas valve or heating element cycle on clothes. This is dried with a light weight load...

User Manual
Page 43
... High temperature heating check • Clean the lint filter. • If this information code remains, contact a Samsung service center. (enter the line test mode) The electronic control needs to operate, you should do, check the list of codes in the door. English Information codes If the dryer fails to be checked. • Check if power is not caught in the table below, and then try the suggested actions. Electronic control problem (Invalid Communication). • Contact a Samsung service...
... High temperature heating check • Clean the lint filter. • If this information code remains, contact a Samsung service center. (enter the line test mode) The electronic control needs to operate, you should do, check the list of codes in the door. English Information codes If the dryer fails to be checked. • Check if power is not caught in the table below, and then try the suggested actions. Electronic control problem (Invalid Communication). • Contact a Samsung service...

User Manual
Page 45
... decide to dry Drip dry Dry flat Protecting the environment This appliance is manufactured from recyclable materials. Specification sheet Type Model name Capacity (Cu.ft) Water pressure (psi (kPa)) Weight lb (kg) Heater rating Electric (W) Gas (BTU/hr) Power consumption (W) Front loading dryer DVE(G)50B5100* 7.4 20-116 (137-800) 119.0 (54.0) 5300 20000 5400 Untitled-1 45 English 45 2022-06-14 10:23:16 Remove the door so that...
... decide to dry Drip dry Dry flat Protecting the environment This appliance is manufactured from recyclable materials. Specification sheet Type Model name Capacity (Cu.ft) Water pressure (psi (kPa)) Weight lb (kg) Heater rating Electric (W) Gas (BTU/hr) Power consumption (W) Front loading dryer DVE(G)50B5100* 7.4 20-116 (137-800) 119.0 (54.0) 5300 20000 5400 Untitled-1 45 English 45 2022-06-14 10:23:16 Remove the door so that...
User Manual
Page 46
... with electrical or plumbing codes or correction of household electrical or plumbing (i.e., house wiring, fuses, or water inlet hoses). damage caused by use your product; SAMSUNG may be presented upon request as supplied and distributed by SAMSUNG ELECTRONICS AMERICA, INC. (SAMSUNG) and delivered new, in -home service is valid only on how to use of equipment, utilities, services, parts, supplies, accessories, applications, installations, repairs, external wiring or connectors not...
... with electrical or plumbing codes or correction of household electrical or plumbing (i.e., house wiring, fuses, or water inlet hoses). damage caused by use your product; SAMSUNG may be presented upon request as supplied and distributed by SAMSUNG ELECTRONICS AMERICA, INC. (SAMSUNG) and delivered new, in -home service is valid only on how to use of equipment, utilities, services, parts, supplies, accessories, applications, installations, repairs, external wiring or connectors not...
User Manual
Page 48
... in the instruction book; This limited warranty covers manufacturing defects in materials and workmanship encountered in normal, noncommercial use of products, equipment, systems, utilities, services, parts, supplies, accessories, applications, installations, repairs, external wiring or connectors not supplied or authorized by SAMSUNG against manufacturing defects in materials and workmanship for instructions, or fixing installation errors. cosmetic damage or exterior finish; This limited warranty does not cover problems resulting from...
... in the instruction book; This limited warranty covers manufacturing defects in materials and workmanship encountered in normal, noncommercial use of products, equipment, systems, utilities, services, parts, supplies, accessories, applications, installations, repairs, external wiring or connectors not supplied or authorized by SAMSUNG against manufacturing defects in materials and workmanship for instructions, or fixing installation errors. cosmetic damage or exterior finish; This limited warranty does not cover problems resulting from...


