User Manual
Page 5
..., be easily crushed, and trap lint. Important safety precautions WARNING To reduce the risk of fire, electric shock, or injury to the manufacturer's instructions and local codes. • Do not install a clothes dryer with flexible plastic venting materials. After reading this manual, store it . CALIFORNIA PROPOSITION 65 WARNING WARNING Cancer and Reproductive Harm - As with gasoline, dry-cleaning solvents, or other flammable...
..., be easily crushed, and trap lint. Important safety precautions WARNING To reduce the risk of fire, electric shock, or injury to the manufacturer's instructions and local codes. • Do not install a clothes dryer with flexible plastic venting materials. After reading this manual, store it . CALIFORNIA PROPOSITION 65 WARNING WARNING Cancer and Reproductive Harm - As with gasoline, dry-cleaning solvents, or other flammable...
User Manual
Page 6
... of a tumble dryer cycle occurs without heat (cool down period). Flammable substances may contribute to a chemical reaction that could cause a load to catch fire by itself. 4. Items contaminated with internal controls. 10.Do not repair or replace any part of the appliance or attempt any service unless specifically recommended in the user-maintenance instructions or in published userrepair instructions that the heat is used near children. 6. Do...
... of a tumble dryer cycle occurs without heat (cool down period). Flammable substances may contribute to a chemical reaction that could cause a load to catch fire by itself. 4. Items contaminated with internal controls. 10.Do not repair or replace any part of the appliance or attempt any service unless specifically recommended in the user-maintenance instructions or in published userrepair instructions that the heat is used near children. 6. Do...

User Manual
Page 7
... a qualified installer, service agency, or the gas supplier. This may result in injury. 21.The control board and inlet valve are many highly flammable items used in the door when closing it. - WARNING - Any material that have been removed. Follow the gas supplier's instructions. • If you smell gas: • Do not try to light any appliance. • Do not turn on a heat setting. Do...
... a qualified installer, service agency, or the gas supplier. This may result in injury. 21.The control board and inlet valve are many highly flammable items used in the door when closing it. - WARNING - Any material that have been removed. Follow the gas supplier's instructions. • If you smell gas: • Do not try to light any appliance. • Do not turn on a heat setting. Do...
User Manual
Page 8
... and national codes. Cautions CAUTION • Do not allow children or pets to in the user-repair instructions and you purchase and install a UL-approved gas detector. • Install and use by the manufacturer of the fabric softener or product. • Clean the lint screen before or after each load. • Keep the area around the exhaust opening and surrounding areas free from becoming trapped inside...
... and national codes. Cautions CAUTION • Do not allow children or pets to in the user-repair instructions and you purchase and install a UL-approved gas detector. • Install and use by the manufacturer of the fabric softener or product. • Clean the lint screen before or after each load. • Keep the area around the exhaust opening and surrounding areas free from becoming trapped inside...
User Manual
Page 11
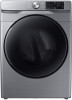
Unintentional emitter per FCC Part 15 Product type : Clothes Dryers Model : DVE(G)45R6300* Responsible Party - Building D Pine Brook NJ 07058 Tel: 1-973-808-6375 Fax: 1-973-808-63 Regulatory notice IC Notice The term "IC" before the radio certification number only signifies that may not cause interference, and 2. Operation is at least 8 inches (20 cm) between the radiator...
Unintentional emitter per FCC Part 15 Product type : Clothes Dryers Model : DVE(G)45R6300* Responsible Party - Building D Pine Brook NJ 07058 Tel: 1-973-808-6375 Fax: 1-973-808-63 Regulatory notice IC Notice The term "IC" before the radio certification number only signifies that may not cause interference, and 2. Operation is at least 8 inches (20 cm) between the radiator...
User Manual
Page 13
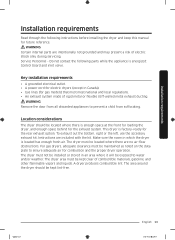
Key installation requirements • A grounded electrical outlet. • A power cord for electric dryers (except in Canada). • Gas lines (for the exhaust system. WARNING Remove the door from all discarded appliances to ensure adequate air for the rear exhaust option. The dryer must not be installed or stored in which the dryer is located has enough fresh air. Service Personnel - The dryer must be exposed to water and/or weather. The dryer area must meet national...
Key installation requirements • A grounded electrical outlet. • A power cord for electric dryers (except in Canada). • Gas lines (for the exhaust system. WARNING Remove the door from all discarded appliances to ensure adequate air for the rear exhaust option. The dryer must not be installed or stored in which the dryer is located has enough fresh air. Service Personnel - The dryer must be exposed to water and/or weather. The dryer area must meet national...
User Manual
Page 20
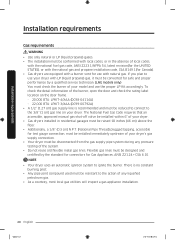
... gas lines. NOTE • Your dryer uses an automatic ignition system to use your dryer with LP (liquid propane) gas, it must check the burner of any pressure testing of the burner, open the door and check the rating label location on your dryer. Installation requirements Installation requirements Gas requirements WARNING • Use only natural or LP (liquid propane) gases. • The installation must be reduced to connect to the 3/8" (1 cm) gas line on the door frame. - 20,000 BTU: LPKIT-4/XAA...
... gas lines. NOTE • Your dryer uses an automatic ignition system to use your dryer with LP (liquid propane) gas, it must check the burner of any pressure testing of the burner, open the door and check the rating label location on your dryer. Installation requirements Installation requirements Gas requirements WARNING • Use only natural or LP (liquid propane) gases. • The installation must be reduced to connect to the 3/8" (1 cm) gas line on the door frame. - 20,000 BTU: LPKIT-4/XAA...
User Manual
Page 21
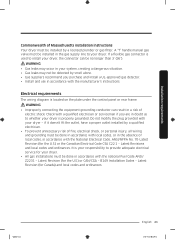
... a flexible gas connector is located on the plate under the control panel or rear frame. Latest Revision (for your responsibility to install your dryer - Electrical requirements The wiring diagram is used to provide adequate electrical service for Canada) and local codes and ordinances. Installation requirements Commonwealth of Massachusetts installation instructions Your dryer must be done in accordance with local codes, or in the absence of local codes, in accordance with the National Electrical Code, ANSI...
... a flexible gas connector is located on the plate under the control panel or rear frame. Latest Revision (for your responsibility to install your dryer - Electrical requirements The wiring diagram is used to provide adequate electrical service for Canada) and local codes and ordinances. Installation requirements Commonwealth of Massachusetts installation instructions Your dryer must be done in accordance with local codes, or in the absence of local codes, in accordance with the National Electrical Code, ANSI...

User Manual
Page 23
... fuse or circuit breaker on both sides of the line is used, the cord should be plugged into a 30-ampere receptacle. NOTE All Canadian models are shipped with a new power supply cord kit, marked for use an extension cord. only Most U.S. Installation requirements Electrical connections Before operating or testing, follow all grounding instructions in the "Grounding" section. Gas models - U.S. U.S. The electric service requirements can be supported at a minimum of Electric Shock WARNING When local codes allow, you may convert a dryer...
... fuse or circuit breaker on both sides of the line is used, the cord should be plugged into a 30-ampere receptacle. NOTE All Canadian models are shipped with a new power supply cord kit, marked for use an extension cord. only Most U.S. Installation requirements Electrical connections Before operating or testing, follow all grounding instructions in the "Grounding" section. Gas models - U.S. U.S. The electric service requirements can be supported at a minimum of Electric Shock WARNING When local codes allow, you may convert a dryer...
User Manual
Page 26
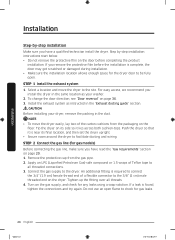
... product installation. Remove the protective cap from the packaging on page 36. 3. Install the exhaust system as your dryer, remove the packing in the "Exhaust ducting guide" section. STEP 2 Connect the gas line (for any leaks using a soap solution. Tip the dryer on page 20. 1. Installation Step-by step installation instructions start below. • Do not remove the protective film on the door before the installation is found, tighten the connections and...
... product installation. Remove the protective cap from the packaging on page 36. 3. Install the exhaust system as your dryer, remove the packing in the "Exhaust ducting guide" section. STEP 2 Connect the gas line (for any leaks using a soap solution. Tip the dryer on page 20. 1. Installation Step-by step installation instructions start below. • Do not remove the protective film on the door before the installation is found, tighten the connections and...
User Manual
Page 33
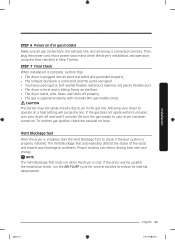
... stiff-walled flexible metal duct material, not plastic flexible duct. • The dryer is level and is sitting firmly on the floor. • The dryer starts, runs, heats, and shuts off and wait 5 minutes. NOTE The Vent Blockage Test must run the AIR FLUFF cycle for several minutes to operate on . STEP 6 Power on (for gas models) Make sure all gas connections, the exhaust line, and all wiring is supplied properly with...
... stiff-walled flexible metal duct material, not plastic flexible duct. • The dryer is level and is sitting firmly on the floor. • The dryer starts, runs, heats, and shuts off and wait 5 minutes. NOTE The Vent Blockage Test must run the AIR FLUFF cycle for several minutes to operate on . STEP 6 Power on (for gas models) Make sure all gas connections, the exhaust line, and all wiring is supplied properly with...
User Manual
Page 34
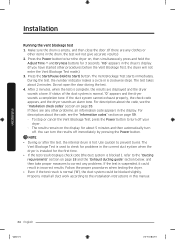
... Adjust Time and Dryness buttons for the first time. • If the test result displays check code (the duct system is installed for 3 seconds. Use caution to correct any problems. If the test is complete, the results are any other items in this manual. Properly install all duct work according to turn off your dryer. - Press the Power button to the installation instructions in the drum, the test will not enter the Vent Blockage Test...
... Adjust Time and Dryness buttons for the first time. • If the test result displays check code (the duct system is installed for 3 seconds. Use caution to correct any problems. If the test is complete, the results are any other items in this manual. Properly install all duct work according to turn off your dryer. - Press the Power button to the installation instructions in the drum, the test will not enter the Vent Blockage Test...
User Manual
Page 35
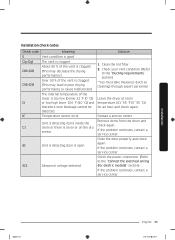
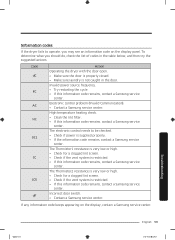
... the "Ducting requirements" section) * You must take measures (such as cleaning) through expert personnel. Untitled-4 35 English 35 2020-07-14 12:33:05 Temperature sensor error Unit is detecting items inside the drum or there is clogged. The vent is an error on the dry sensor. Contact a service center. Close the door properly and check again. If the problem continues, contact a service center. Clean the lint filter. 2. Installation Installation check codes Check code 0 Clg...
... the "Ducting requirements" section) * You must take measures (such as cleaning) through expert personnel. Untitled-4 35 English 35 2020-07-14 12:33:05 Temperature sensor error Unit is detecting items inside the drum or there is clogged. The vent is an error on the dry sensor. Contact a service center. Close the door properly and check again. If the problem continues, contact a service center. Clean the lint filter. 2. Installation Installation check codes Check code 0 Clg...

User Manual
Page 36
.... 2. Door reversal Type 1 1. Never use crushed or clogged venting or ducts. Put a soft rug on the floor to rest the door on after you have multiple elbows. • Do not use lint-trapping screws. 3. Lift the door and remove it . Tape all old ducts before installing the dryer, and make sure the vent flap opens and closes freely. To facilitate the exhaust, keep the ducts as straight as you clean...
.... 2. Door reversal Type 1 1. Never use crushed or clogged venting or ducts. Put a soft rug on the floor to rest the door on after you have multiple elbows. • Do not use lint-trapping screws. 3. Lift the door and remove it . Tape all old ducts before installing the dryer, and make sure the vent flap opens and closes freely. To facilitate the exhaust, keep the ducts as straight as you clean...
User Manual
Page 53
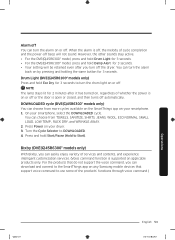
... turn the alarm back on any Samsung mobile devices that do not support the voice command, you can download and connect to Start). DOWNLOADED cycle (DVE(G)45R6300* models only) You can choose from TOWELS, SANITIZE, SHIRTS, JEANS, WOOL, ECO NORMAL, SMALL LOAD, LOW TEMP., RACK DRY, and WRINKLE AWAY. 2. However, the other sounds stay active. • For the DVE(G)45R6300* model, press and hold Drum Light...
... turn the alarm back on any Samsung mobile devices that do not support the voice command, you can download and connect to Start). DOWNLOADED cycle (DVE(G)45R6300* models only) You can choose from TOWELS, SANITIZE, SHIRTS, JEANS, WOOL, ECO NORMAL, SMALL LOAD, LOW TEMP., RACK DRY, and WRINKLE AWAY. 2. However, the other sounds stay active. • For the DVE(G)45R6300* model, press and hold Drum Light...
User Manual
Page 55
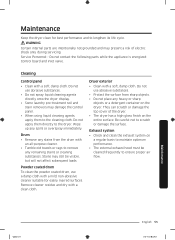
... a clean cloth. They can scratch or damage the top cover of electric shock only during servicing. Service Personnel - Exhaust system • Check and clean the exhaust system on the dryer. Remove cleaner residue and dry with a soft, damp cloth. Dryer exterior • Clean with a soft, damp cloth. Do not use a damp cloth with an all-purpose cleaner. • Tumble old towels or rags to ensure proper air flow. WARNING Certain internal parts...
... a clean cloth. They can scratch or damage the top cover of electric shock only during servicing. Service Personnel - Exhaust system • Check and clean the exhaust system on the dryer. Remove cleaner residue and dry with a soft, damp cloth. Dryer exterior • Clean with a soft, damp cloth. Do not use a damp cloth with an all-purpose cleaner. • Tumble old towels or rags to ensure proper air flow. WARNING Certain internal parts...

User Manual
Page 57
... dried with a light weight load, such as coins, loose buttons, nails, etc. You can open and close freely. • Check the exhaust system for lint buildup. Troubleshooting Untitled-4 57 English 57 2020-07-14 12:33:10 Remove some items and restart the dryer. • Clean the lint filter. • Check the load for the dryer to hum due to the high velocity of air moving through the dryer drum...
... dried with a light weight load, such as coins, loose buttons, nails, etc. You can open and close freely. • Check the exhaust system for lint buildup. Troubleshooting Untitled-4 57 English 57 2020-07-14 12:33:10 Remove some items and restart the dryer. • Clean the lint filter. • Check the load for the dryer to hum due to the high velocity of air moving through the dryer drum...
User Manual
Page 59
..., check the list of codes in the door. Troubleshooting Untitled-4 59 English 59 2020-07-14 12:33:10 Incorrect door switch. • Contact a Samsung service center. The Thermistor2 resistance is very low or high. • Check for a clogged lint screen. • Check if the vent system is not caught in the table below, and then try the suggested actions. High temperature heating check. • Clean the lint filter. •...
..., check the list of codes in the door. Troubleshooting Untitled-4 59 English 59 2020-07-14 12:33:10 Incorrect door switch. • Contact a Samsung service center. The Thermistor2 resistance is very low or high. • Check for a clogged lint screen. • Check if the vent system is not caught in the table below, and then try the suggested actions. High temperature heating check. • Clean the lint filter. •...
User Manual
Page 63
... wiring, fuses, or water inlet hoses). damage caused by this product was not intended; in-home instruction on how to the product's finishes; Visits by an authorized servicer to correct installation not in accordance with any way, or cannot be the customer's responsibility. damage caused by SAMSUNG; damage caused by use of equipment, utilities, services, parts, supplies, accessories, applications, installations, repairs, external wiring or connectors...
... wiring, fuses, or water inlet hoses). damage caused by this product was not intended; in-home instruction on how to the product's finishes; Visits by an authorized servicer to correct installation not in accordance with any way, or cannot be the customer's responsibility. damage caused by SAMSUNG; damage caused by use of equipment, utilities, services, parts, supplies, accessories, applications, installations, repairs, external wiring or connectors...
User Manual
Page 66
... USE, MISUSE, OR INABILITY TO USE THIS PRODUCT. Warranty (CANADA) This limited warranty covers manufacturing defects in materials and workmanship encountered in normal, noncommercial use of products, equipment, systems, utilities, services, parts, supplies, accessories, applications, installations, repairs, external wiring or connectors not supplied or authorized by pest infestations. altered product or serial numbers; cosmetic damage or exterior finish; SAMSUNG does not warrant uninterrupted or error-free operation of nature...
... USE, MISUSE, OR INABILITY TO USE THIS PRODUCT. Warranty (CANADA) This limited warranty covers manufacturing defects in materials and workmanship encountered in normal, noncommercial use of products, equipment, systems, utilities, services, parts, supplies, accessories, applications, installations, repairs, external wiring or connectors not supplied or authorized by pest infestations. altered product or serial numbers; cosmetic damage or exterior finish; SAMSUNG does not warrant uninterrupted or error-free operation of nature...


