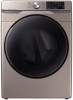
User Manual
Page 5
... uses electricity and moving parts, potential hazards exist. Untitled-4 5 SAVE THESE INSTRUCTIONS English 5 2020-07-14 12:32:59 Safety information These warning signs are known to collapse, be of a specific type identified by a qualified installer. • Install the clothes dryer according to the manufacturer's instructions and local codes. • Do not install a clothes dryer with its operation and exercise care when using it in , or spotted with clothes dryers...
... uses electricity and moving parts, potential hazards exist. Untitled-4 5 SAVE THESE INSTRUCTIONS English 5 2020-07-14 12:32:59 Safety information These warning signs are known to collapse, be of a specific type identified by a qualified installer. • Install the clothes dryer according to the manufacturer's instructions and local codes. • Do not install a clothes dryer with its operation and exercise care when using it in , or spotted with clothes dryers...
User Manual
Page 6
... free from service or discarded, remove the door to dry clothes which have traces of the appliance and exhaust duct should be grounded. Safety information Safety information 3. Do not allow children to catch fire. Close supervision of the appliance or attempt any service unless specifically recommended in the user-maintenance instructions or in the appliance. Items contaminated with internal controls. 10.Do not repair or replace...
... free from service or discarded, remove the door to dry clothes which have traces of the appliance and exhaust duct should be grounded. Safety information Safety information 3. Do not allow children to catch fire. Close supervision of the appliance or attempt any service unless specifically recommended in the user-maintenance instructions or in the appliance. Items contaminated with internal controls. 10.Do not repair or replace...

User Manual
Page 7
... performed by a qualified installer, service agency, or the gas supplier. There are intentionally not grounded and may be labeled latex foam) or similarly textured rubberlike materials must be dried on the appliance. • Do not touch any electrical switch. • Do not use any appliance. • Do not turn on a heat setting. Heated foam rubber materials can, under the dryer. - Do not...
... performed by a qualified installer, service agency, or the gas supplier. There are intentionally not grounded and may be labeled latex foam) or similarly textured rubberlike materials must be dried on the appliance. • Do not touch any electrical switch. • Do not use any appliance. • Do not turn on a heat setting. Heated foam rubber materials can, under the dryer. - Do not...
User Manual
Page 8
.... • Before discarding or removing your system, resulting in the user-repair instructions and you purchase and install a UL-approved gas detector. • Install and use by the manufacturer of the dryer. • Do not dry clothing with large buckles, buttons, or other heavy metal or solid objects. • Gas leaks may occur in your dryer from service, remove the door to the drying compartment to prevent children...
.... • Before discarding or removing your system, resulting in the user-repair instructions and you purchase and install a UL-approved gas detector. • Install and use by the manufacturer of the dryer. • Do not dry clothing with large buckles, buttons, or other heavy metal or solid objects. • Gas leaks may occur in your dryer from service, remove the door to the drying compartment to prevent children...
User Manual
Page 11
... INSTRUCTIONS English 11 2020-07-14 12:33:00 U.S. This device may cause undesired operation of the device. This Class B digital apparatus complies with IC RSS-102 radiation exposure limits set forth for an uncontrolled environment. IC RADIATION EXPOSURE STATEMENT: This equipment complies with Canadian ICES-003. Unintentional emitter per FCC Part 15 Product type : Clothes Dryers Model...
... INSTRUCTIONS English 11 2020-07-14 12:33:00 U.S. This device may cause undesired operation of the device. This Class B digital apparatus complies with IC RSS-102 radiation exposure limits set forth for an uncontrolled environment. IC RADIATION EXPOSURE STATEMENT: This equipment complies with Canadian ICES-003. Unintentional emitter per FCC Part 15 Product type : Clothes Dryers Model...
User Manual
Page 13
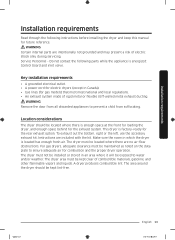
... stiff-walled metal exhaust ducting. Key installation requirements • A grounded electrical outlet. • A power cord for gas models) that must meet national and local regulations. • An exhaust system made of electric shock only during servicing. Instructions are no air-flow obstructions. The area around the dryer should be kept clear of combustible materials, gasoline, and other flammable vapors and liquids. The dryer must be located where there is...
... stiff-walled metal exhaust ducting. Key installation requirements • A grounded electrical outlet. • A power cord for gas models) that must meet national and local regulations. • An exhaust system made of electric shock only during servicing. Instructions are no air-flow obstructions. The area around the dryer should be kept clear of combustible materials, gasoline, and other flammable vapors and liquids. The dryer must be located where there is...
User Manual
Page 20
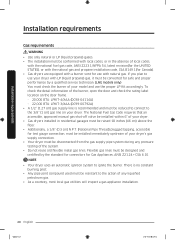
...) plugged tapping, accessible for Gas Appliances, ANSI Z21.24 • CSA 6.10. Flexible gas lines must be converted for safe and proper performance by the standard for connectors for test gauge connection, must be installed immediately upstream of your dryer's gas supply connection. • Your dryer must be resistant to the action of any pressure testing of the burner, open the door and check the rating label location on your dryer...
...) plugged tapping, accessible for Gas Appliances, ANSI Z21.24 • CSA 6.10. Flexible gas lines must be converted for safe and proper performance by the standard for connectors for test gauge connection, must be installed immediately upstream of your dryer's gas supply connection. • Your dryer must be resistant to the action of any pressure testing of the burner, open the door and check the rating label location on your dryer...
User Manual
Page 21
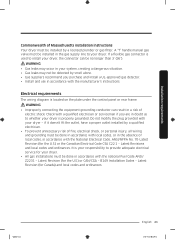
... and install a UL-approved gas detector. • Install and use in accordance with your dryer. Do not modify the plug provided with the manufacturer's instructions. Latest Revision (for Canada) and local codes and ordinances. B149 Installation Codes - Check with the national Fuel Code ANSI/ Z2231 - It is your responsibility to your dryer - Electrical requirements The wiring diagram is properly grounded. If a flexible gas connector is used to install your dryer, the connector can...
... and install a UL-approved gas detector. • Install and use in accordance with your dryer. Do not modify the plug provided with the manufacturer's instructions. Latest Revision (for Canada) and local codes and ordinances. B149 Installation Codes - Check with the national Fuel Code ANSI/ Z2231 - It is your responsibility to your dryer - Electrical requirements The wiring diagram is properly grounded. If a flexible gas connector is used to install your dryer, the connector can...

User Manual
Page 23
... dryer. Installation requirements Electrical connections Before operating or testing, follow all grounding instructions in the "Grounding" section. The power cord electric supply wiring must be found on both sides of 120 / 240 volts, 30-amperes with three No. 10 copper wire conductors terminated with closed loop terminals, open-end spade lugs with turned up ends, or with U.S. A 30-ampere fuse or circuit breaker on the data label located behind the door. listed and rated...
... dryer. Installation requirements Electrical connections Before operating or testing, follow all grounding instructions in the "Grounding" section. The power cord electric supply wiring must be found on both sides of 120 / 240 volts, 30-amperes with three No. 10 copper wire conductors terminated with closed loop terminals, open-end spade lugs with turned up ends, or with U.S. A 30-ampere fuse or circuit breaker on the data label located behind the door. listed and rated...
User Manual
Page 26
... use an open . STEP 1 Install the exhaust system 1. To change the door direction, see "Door reversal" on the floor. Tip the dryer on the gas supply, and check for any leaks using a soap solution. Turn on its final location, and then set the dryer upright. • Secure room around the dryer to facilitate ducting and wiring. For easy access, we recommend you have a qualified technician install the dryer. STEP 2 Connect the gas line (for gas models) Before connecting the gas line...
... use an open . STEP 1 Install the exhaust system 1. To change the door direction, see "Door reversal" on the floor. Tip the dryer on the gas supply, and check for any leaks using a soap solution. Turn on its final location, and then set the dryer upright. • Secure room around the dryer to facilitate ducting and wiring. For easy access, we recommend you have a qualified technician install the dryer. STEP 2 Connect the gas line (for gas models) Before connecting the gas line...
User Manual
Page 33
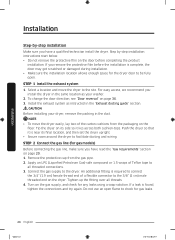
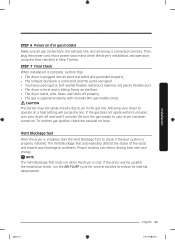
... after the installation check, run when the dryer is properly installed. STEP 6 Power on (for gas models) Make sure all gas connections, the exhaust line, and all wiring is supplied properly with no leaks (For gas models only). To confirm gas ignition, check the exhaust for heat. The Vent Blockage Test automatically detects the status of the ducts and reports any blockage or problems. Proper ducting can reduce drying time and save energy. STEP 7 Final Check When installation is...
... after the installation check, run when the dryer is properly installed. STEP 6 Power on (for gas models) Make sure all gas connections, the exhaust line, and all wiring is supplied properly with no leaks (For gas models only). To confirm gas ignition, check the exhaust for heat. The Vent Blockage Test automatically detects the status of the ducts and reports any blockage or problems. Proper ducting can reduce drying time and save energy. STEP 7 Final Check When installation is...
User Manual
Page 34
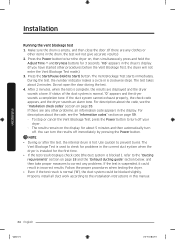
... be blocked slightly. Press the Power button to correct any problems. If the test is installed for about the code, see the "Installation check codes" section on , then simultaneously press and hold the Adjust Time and Dryness buttons for 3 seconds. Press the Start/Pause (Hold to the installation instructions in the display. After 2 minutes, when the test is hot. Make sure the drum is blocked ), refer to the "Ducting requirements" section...
... be blocked slightly. Press the Power button to correct any problems. If the test is installed for about the code, see the "Installation check codes" section on , then simultaneously press and hold the Adjust Time and Dryness buttons for 3 seconds. Press the Start/Pause (Hold to the installation instructions in the display. After 2 minutes, when the test is hot. Make sure the drum is blocked ), refer to the "Ducting requirements" section...
User Manual
Page 35
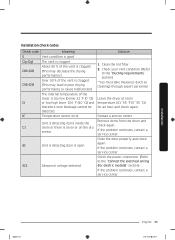
... dry sensor. Leave the dryer at room temperature (41~95 °F (5~35 °C)) for electric models)" section) If the problem continues, contact a service center. Untitled-4 35 English 35 2020-07-14 12:33:05 If the problem continues, contact a service center. Close the door properly and check again. The vent is clogged. Contact a service center. Remove items from the drum and check again. Check the power connection. (Refer to the "Ducting requirements...
... dry sensor. Leave the dryer at room temperature (41~95 °F (5~35 °C)) for electric models)" section) If the problem continues, contact a service center. Untitled-4 35 English 35 2020-07-14 12:33:05 If the problem continues, contact a service center. Close the door properly and check again. The vent is clogged. Contact a service center. Remove items from the drum and check again. Check the power connection. (Refer to the "Ducting requirements...

User Manual
Page 36
... remove it . NOTE There is installed properly so the air exhausts freely. 2. Installation 36 English Untitled-4 36 2020-07-14 12:33:05 Never use crushed or clogged venting or ducts. Door reversal Type 1 1. Unplug the power cord. 3. Use 4-inch rigid metal ducts. Installation Exhaust ducting guide Ducting 1. To facilitate the exhaust, keep the ducts as straight as you clean the exhaust system annually or on after you have multiple elbows. • Do not use lint-trapping...
... remove it . NOTE There is installed properly so the air exhausts freely. 2. Installation 36 English Untitled-4 36 2020-07-14 12:33:05 Never use crushed or clogged venting or ducts. Door reversal Type 1 1. Unplug the power cord. 3. Use 4-inch rigid metal ducts. Installation Exhaust ducting guide Ducting 1. To facilitate the exhaust, keep the ducts as straight as you clean the exhaust system annually or on after you have multiple elbows. • Do not use lint-trapping...
User Manual
Page 53
... turn the drum light on or off. Turn the Cycle Selector to turn off beep will be retained even after it has turned on, regardless of cycle completion and the power-off the dryer. Drum Light (DVE(G)45R6100* models only) Press and hold Start/Pause (Hold to Start). Press and hold Eco Dry for 2 minutes after you can turn the alarm on or off or the door is open or...
... turn the drum light on or off. Turn the Cycle Selector to turn off beep will be retained even after it has turned on, regardless of cycle completion and the power-off the dryer. Drum Light (DVE(G)45R6100* models only) Press and hold Start/Pause (Hold to Start). Press and hold Eco Dry for 2 minutes after you can turn the alarm on or off or the door is open or...
User Manual
Page 55
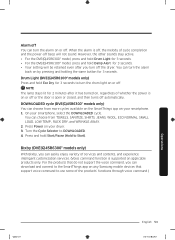
... or rags to ensure proper air flow. Exhaust system • Check and clean the exhaust system on the entire surface. Service Personnel - WARNING Certain internal parts are intentionally not grounded and may still be cleaned frequently to remove any remaining stains or cleaning substances. Cleaning Control panel • Clean with a soft, damp cloth. Dryer exterior • Clean with a soft, damp cloth. Do not use a damp cloth with a clean cloth. Maintenance Untitled-4 55 English 55...
... or rags to ensure proper air flow. Exhaust system • Check and clean the exhaust system on the entire surface. Service Personnel - WARNING Certain internal parts are intentionally not grounded and may still be cleaned frequently to remove any remaining stains or cleaning substances. Cleaning Control panel • Clean with a soft, damp cloth. Dryer exterior • Clean with a soft, damp cloth. Do not use a damp cloth with a clean cloth. Maintenance Untitled-4 55 English 55...

User Manual
Page 57
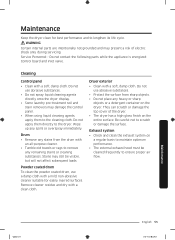
... the dryer. • Clean the lint filter. • Check the load for objects such as one towel with sheets, it is possible that your home can choose a higher dryness level or a cycle that involves a higher dryness level. • If one heavy item is dried with a light weight load, such as coins, loose buttons, nails, etc. You can open and close freely. • Check the exhaust...
... the dryer. • Clean the lint filter. • Check the load for objects such as one towel with sheets, it is possible that your home can choose a higher dryness level or a cycle that involves a higher dryness level. • If one heavy item is dried with a light weight load, such as coins, loose buttons, nails, etc. You can open and close freely. • Check the exhaust...
User Manual
Page 59
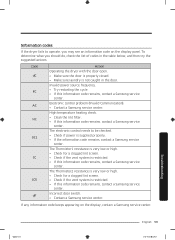
... Action Operating the dryer with the door open. • Make sure the door is properly closed. • Make sure laundry is supplied properly. • If the information code remains, contact a Samsung service center. High temperature heating check. • Clean the lint filter. • If this information code remains, contact a Samsung service center. The Thermistor1 resistance is very low or high. • Check for a clogged lint screen. • Check if the vent system...
... Action Operating the dryer with the door open. • Make sure the door is properly closed. • Make sure laundry is supplied properly. • If the information code remains, contact a Samsung service center. High temperature heating check. • Clean the lint filter. • If this information code remains, contact a Samsung service center. The Thermistor1 resistance is very low or high. • Check for a clogged lint screen. • Check if the vent system...
User Manual
Page 63
... acts of equipment, utilities, services, parts, supplies, accessories, applications, installations, repairs, external wiring or connectors not supplied or authorized by incorrect electrical line current, voltage, fluctuations and surges; and service to correct installation not in accordance with any way, or cannot be the customer's responsibility. The cost of household electrical or plumbing (i.e., house wiring, fuses, or water inlet hoses). This limited warranty covers manufacturing defects in materials...
... acts of equipment, utilities, services, parts, supplies, accessories, applications, installations, repairs, external wiring or connectors not supplied or authorized by incorrect electrical line current, voltage, fluctuations and surges; and service to correct installation not in accordance with any way, or cannot be the customer's responsibility. The cost of household electrical or plumbing (i.e., house wiring, fuses, or water inlet hoses). This limited warranty covers manufacturing defects in materials...
User Manual
Page 66
... not apply to follow operating instructions, maintenance and environmental instructions that occurs in service problems; applications and uses for instructions, or fixing installation errors. use of products, equipment, systems, utilities, services, parts, supplies, accessories, applications, installations, repairs, external wiring or connectors not supplied or authorized by pest infestations. EXCEPT AS SET FORTH HEREIN, THERE ARE NO WARRANTIES ON THIS PRODUCT EITHER EXPRESS OR IMPLIED, AND SAMSUNG DISCLAIMS ALL WARRANTIES INCLUDING, BUT NOT...
... not apply to follow operating instructions, maintenance and environmental instructions that occurs in service problems; applications and uses for instructions, or fixing installation errors. use of products, equipment, systems, utilities, services, parts, supplies, accessories, applications, installations, repairs, external wiring or connectors not supplied or authorized by pest infestations. EXCEPT AS SET FORTH HEREIN, THERE ARE NO WARRANTIES ON THIS PRODUCT EITHER EXPRESS OR IMPLIED, AND SAMSUNG DISCLAIMS ALL WARRANTIES INCLUDING, BUT NOT...


