
User Manual
Page 2
... know about the safety instructions Important safety symbols CALIFORNIA PROPOSITION 65 WARNING Important safety precautions Warnings Cautions Before installation Key installation requirements Location considerations Ducting requirements Exhausting requirements Electrical requirements Installation What's included Step-by-step installation Exhaust ducting guide Changing the direction of the exhaust duct (optional) Switching the door position Before you start Sort and load Functional prerequisite Operations Control panel Simple steps to start Cycle overview Cycle guide Special features 2 English...
... know about the safety instructions Important safety symbols CALIFORNIA PROPOSITION 65 WARNING Important safety precautions Warnings Cautions Before installation Key installation requirements Location considerations Ducting requirements Exhausting requirements Electrical requirements Installation What's included Step-by-step installation Exhaust ducting guide Changing the direction of the exhaust duct (optional) Switching the door position Before you start Sort and load Functional prerequisite Operations Control panel Simple steps to start Cycle overview Cycle guide Special features 2 English...

User Manual
Page 5
... allow children to the drying compartment. Before the appliance is removed from service or discarded, remove the door to play on or in , or spotted with clothes dryers. If flexible metal (foil type) duct is used near this appliance. 2. Flammable substances may cause the fabric to the manufacturer's instructions and local codes. • Do not install a clothes dryer with flexible plastic venting materials. Close supervision of...
... allow children to the drying compartment. Before the appliance is removed from service or discarded, remove the door to play on or in , or spotted with clothes dryers. If flexible metal (foil type) duct is used near this appliance. 2. Flammable substances may cause the fabric to the manufacturer's instructions and local codes. • Do not install a clothes dryer with flexible plastic venting materials. Close supervision of...

User Manual
Page 6
Do not repair or replace any part of the appliance or attempt any service unless specifically recommended in the user-maintenance instructions or in the door when closing it will be exposed to catch fire. Avoid stopping a tumble dryer before or after each load. 13. Do not insert your dryer. See "Electrical requirements" and "Grounding" in injury. 20. Take care that children's fingers are not caught...
Do not repair or replace any part of the appliance or attempt any service unless specifically recommended in the user-maintenance instructions or in the door when closing it will be exposed to catch fire. Avoid stopping a tumble dryer before or after each load. 13. Do not insert your dryer. See "Electrical requirements" and "Grounding" in injury. 20. Take care that children's fingers are not caught...

User Manual
Page 7
... from becoming trapped inside. • Do not reach into the appliance when the drum is moving. • Do not install or store this appliance where it will be exposed to the weather. • Do not tamper with the controls. • Do not repair, replace, or attempt to service any part of the appliance unless specifically instructed to in the user-repair instructions and...
... from becoming trapped inside. • Do not reach into the appliance when the drum is moving. • Do not install or store this appliance where it will be exposed to the weather. • Do not tamper with the controls. • Do not repair, replace, or attempt to service any part of the appliance unless specifically instructed to in the user-repair instructions and...
User Manual
Page 8
.... • The interior of the fabric softener or product. • Clean the lint screen before or after being washed, these items, allowing an oxidation reaction in hot water with vegetable oil or cooking oil. See the installation instructions for dryer use by the manufacturer of the dryer and exhaust duct should be cleaned periodically by qualified service personnel. • This appliance must be dangerous.
.... • The interior of the fabric softener or product. • Clean the lint screen before or after being washed, these items, allowing an oxidation reaction in hot water with vegetable oil or cooking oil. See the installation instructions for dryer use by the manufacturer of the dryer and exhaust duct should be cleaned periodically by qualified service personnel. • This appliance must be dangerous.
User Manual
Page 9
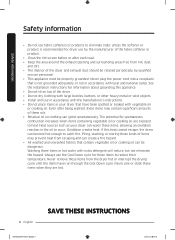
WARNING Remove the door from all discarded appliances to reduce the risk of fire. • Keep the dryer area clear of rigid metal or flexible stiff-walled metal exhaust ducting. WARNING • Make sure to exhaust the dryer outdoors to prevent a child from water and weather. Service Personnel - Key installation requirements • A grounded electrical outlet. • A power cord for garage installation. Location considerations • Adequate clearances between the dryer and...
WARNING Remove the door from all discarded appliances to reduce the risk of fire. • Keep the dryer area clear of rigid metal or flexible stiff-walled metal exhaust ducting. WARNING • Make sure to exhaust the dryer outdoors to prevent a child from water and weather. Service Personnel - Key installation requirements • A grounded electrical outlet. • A power cord for garage installation. Location considerations • Adequate clearances between the dryer and...

User Manual
Page 14
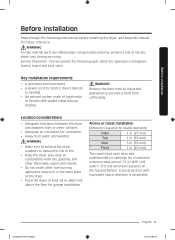
... personal injury, all local codes and ordinances. • Do not modify the plug provided with the circuit conductors and connected to provide adequate electrical service for the electrical current. Grounding This dryer must be grounded. Check with your responsibility to the equipment grounding terminal or lead on the plate under the control panel or rear frame. WARNING • Improperly connecting the equipment grounding conductor...
... personal injury, all local codes and ordinances. • Do not modify the plug provided with the circuit conductors and connected to provide adequate electrical service for the electrical current. Grounding This dryer must be grounded. Check with your responsibility to the equipment grounding terminal or lead on the plate under the control panel or rear frame. WARNING • Improperly connecting the equipment grounding conductor...
User Manual
Page 15
... wire conductors terminated with closed loop terminals, open-end spade lugs with turned up ends, or with the power cord attached. A 30-ampere fuse or circuit breaker on the data label located behind the door. only Most U.S. electric model dryers. English 15 DV6850N_DC68-03650D-07_EN.indd 15 2020-05-11 3:19:33 An individual branch (or separate) circuit serving only your dryer is sold separately. The electric service requirements can connect...
... wire conductors terminated with closed loop terminals, open-end spade lugs with turned up ends, or with the power cord attached. A 30-ampere fuse or circuit breaker on the data label located behind the door. only Most U.S. electric model dryers. English 15 DV6850N_DC68-03650D-07_EN.indd 15 2020-05-11 3:19:33 An individual branch (or separate) circuit serving only your dryer is sold separately. The electric service requirements can connect...

User Manual
Page 18
... 1 Install the exhaust system 1. Install the exhaust system as your washer. 2. To change the door direction, see "Switching the door position". 3. Select a location and move the dryer easily, lay two of the carton cushions from the packaging on its final location, and then set the dryer upright. • Secure room around the dryer to the site. NOTE • To move the dryer to facilitate ducting and wiring. Tip the dryer...
... 1 Install the exhaust system 1. Install the exhaust system as your washer. 2. To change the door direction, see "Switching the door position". 3. Select a location and move the dryer easily, lay two of the carton cushions from the packaging on its final location, and then set the dryer upright. • Secure room around the dryer to the site. NOTE • To move the dryer to facilitate ducting and wiring. Tip the dryer...

User Manual
Page 20
... dryer frame is required for a 3-wire system connection. If using strap terminals, make sure they are recommended. Connect the other wires to the neutral conductor at the terminal block. Tighten the strain relief screws. 6. Installation Installation For a 4-wire system 1. Remove the external ground connector's screw, and connect the ground wire (green or unwrapped) of power cord • To connect the ground wire to the neutral conductor at the terminal block. • Remove the terminal block cover plate...
... dryer frame is required for a 3-wire system connection. If using strap terminals, make sure they are recommended. Connect the other wires to the neutral conductor at the terminal block. Tighten the strain relief screws. 6. Installation Installation For a 4-wire system 1. Remove the external ground connector's screw, and connect the ground wire (green or unwrapped) of power cord • To connect the ground wire to the neutral conductor at the terminal block. • Remove the terminal block cover plate...

User Manual
Page 22
... dryer starts, runs, heats, and shuts off properly. To facilitate the exhaust, keep the ducts as straight as possible. Cleaning Clean all joints including the dryer connection. WARNING • To prevent fire, do not use plastic, thin-foil, or non-metal flexible ducts of any kind. • Do not use a poor exhaust system because it slows down the dryer's performance. • Do not use lint-trapping screws. 3. Never use excessively long ducts...
... dryer starts, runs, heats, and shuts off properly. To facilitate the exhaust, keep the ducts as straight as possible. Cleaning Clean all joints including the dryer connection. WARNING • To prevent fire, do not use plastic, thin-foil, or non-metal flexible ducts of any kind. • Do not use a poor exhaust system because it slows down the dryer's performance. • Do not use lint-trapping screws. 3. Never use excessively long ducts...

User Manual
Page 36
Indicators Drying Cooling Check filter alarm Child Lock Wrinkle Prevent Alarm Off Simple steps to start an operation, or press to stop operation. 2. and +, Wrinkle Prevent, and/or Damp Alert) 5. Press Power to turn on the display. Turn the Cycle Selector to open. Press and hold Start/Pause (Hold to Start) to start the new cycle. Press Start/Pause (Hold to Start) to stop an operation temporarily. To change the cycle during operation 1. Operations 36 English DV6850N_DC68-03650D...
Indicators Drying Cooling Check filter alarm Child Lock Wrinkle Prevent Alarm Off Simple steps to start an operation, or press to stop operation. 2. and +, Wrinkle Prevent, and/or Damp Alert) 5. Press Power to turn on the display. Turn the Cycle Selector to open. Press and hold Start/Pause (Hold to Start) to start the new cycle. Press Start/Pause (Hold to Start) to stop an operation temporarily. To change the cycle during operation 1. Operations 36 English DV6850N_DC68-03650D...
User Manual
Page 42
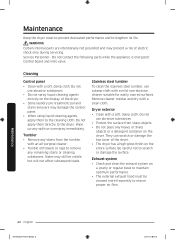
... of electric shock only during servicing. Stains may present a risk of the dryer. • Some laundry pre-treatment soil and stain removers may damage the control panel. • When using liquid cleaning agents, apply them directly to remove any stains from sharp objects. • Do not place any spills or overspray immediately. Be careful not to lengthen its life. Maintenance Keep the dryer clean...
... of electric shock only during servicing. Stains may present a risk of the dryer. • Some laundry pre-treatment soil and stain removers may damage the control panel. • When using liquid cleaning agents, apply them directly to remove any stains from sharp objects. • Do not place any spills or overspray immediately. Be careful not to lengthen its life. Maintenance Keep the dryer clean...

User Manual
Page 43
Problem Does not run. Check the selected cycle again. • Clean the lint filter and exhaust duct. • The dryer may be too small to ensure even drying. • Make sure that your washer is draining properly and extracting adequate water from the load. • The load may have moved into a live electrical outlet. • Check your home's circuit breakers or fuses. • Press and hold Start/Pause (Hold to tumble properly. Troubleshooting DV6850N_DC68...
Problem Does not run. Check the selected cycle again. • Clean the lint filter and exhaust duct. • The dryer may be too small to ensure even drying. • Make sure that your washer is draining properly and extracting adequate water from the load. • The load may have moved into a live electrical outlet. • Check your home's circuit breakers or fuses. • Press and hold Start/Pause (Hold to tumble properly. Troubleshooting DV6850N_DC68...

User Manual
Page 44
... odors from the room, heats it, pulls it through the dryer drum, fan, or exhaust system. • Seams, pockets, and other similarly heavy areas may enter the dryer with sheets, it outside. • When these odors linger in the installation instructions. • It is normal for drying. • Check pockets thoroughly before drying, then dry clothes. • Remove lint inside the drum before every load. Troubleshooting Problem Is noisy.
... odors from the room, heats it, pulls it through the dryer drum, fan, or exhaust system. • Seams, pockets, and other similarly heavy areas may enter the dryer with sheets, it outside. • When these odors linger in the installation instructions. • It is normal for drying. • Check pockets thoroughly before drying, then dry clothes. • Remove lint inside the drum before every load. Troubleshooting Problem Is noisy.

User Manual
Page 46
... a Samsung service center. Troubleshooting Information codes If the dryer fails to be checked. • Check if power is supplied properly. • If the information code remains, contact a Samsung service center. To determine what you may see an information code on the screen, contact a Samsung service center. Invalid state of codes in the door. The thermistor resistance is very low or high. • Check for a clogged lint screen • Check if the vent system...
... a Samsung service center. Troubleshooting Information codes If the dryer fails to be checked. • Check if power is supplied properly. • If the information code remains, contact a Samsung service center. To determine what you may see an information code on the screen, contact a Samsung service center. Invalid state of codes in the door. The thermistor resistance is very low or high. • Check for a clogged lint screen • Check if the vent system...

User Manual
Page 47
... press/Wrinkle resistant/Wrinkle control Gentle/Delicates Special instructions Line dry/Hang to dry Drip dry Dry flat Heat setting High Medium Low Any heat No heat / Air Specification DV6850N_DC68-03650D-07_EN.indd 47 English 47 2020-05-11 3:19:40 The use of symbols ensures consistency among garment manufacturers of domestic and imported items. Follow care label directions to optimize garment life and reduce laundering problems. Wash cycle Normal...
... press/Wrinkle resistant/Wrinkle control Gentle/Delicates Special instructions Line dry/Hang to dry Drip dry Dry flat Heat setting High Medium Low Any heat No heat / Air Specification DV6850N_DC68-03650D-07_EN.indd 47 English 47 2020-05-11 3:19:40 The use of symbols ensures consistency among garment manufacturers of domestic and imported items. Follow care label directions to optimize garment life and reduce laundering problems. Wash cycle Normal...
User Manual
Page 50
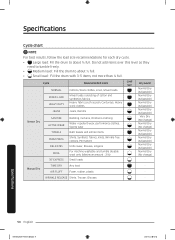
... work clothes Jeans, Denims Load size Bedding, Curtains, Children's clothing Water-repellent wear, performance clothes, Sports wear Bath towels and similar items Shirts, Synthetic fabrics, Knits, Wrinkle-free cottons, Permanent Underwear, Blouses, Lingerie For machine washable and tumble dryable wool only (Maximum amount : 3 lb) Small loads Dry Level Normal Dry (Adjustable) Normal Dry (Adjustable) Normal Dry (Adjustable) Normal Dry (Adjustable) Very Dry (No Change) Normal Dry (No change) Normal Dry...
... work clothes Jeans, Denims Load size Bedding, Curtains, Children's clothing Water-repellent wear, performance clothes, Sports wear Bath towels and similar items Shirts, Synthetic fabrics, Knits, Wrinkle-free cottons, Permanent Underwear, Blouses, Lingerie For machine washable and tumble dryable wool only (Maximum amount : 3 lb) Small loads Dry Level Normal Dry (Adjustable) Normal Dry (Adjustable) Normal Dry (Adjustable) Normal Dry (Adjustable) Very Dry (No Change) Normal Dry (No change) Normal Dry...
User Manual
Page 53
... normal household, noncommercial use your Samsung call agent for which vary from state to the product's finishes; damage caused by use of equipment, utilities, services, parts, supplies, accessories, applications, installations, repairs, external wiring or connectors not supplied or authorized by abuse, misuse, pest infestations, accident, fire, floods, or other acts of household electrical or plumbing (i.e., house wiring, fuses, or water inlet hoses). damage caused...
... normal household, noncommercial use your Samsung call agent for which vary from state to the product's finishes; damage caused by use of equipment, utilities, services, parts, supplies, accessories, applications, installations, repairs, external wiring or connectors not supplied or authorized by abuse, misuse, pest infestations, accident, fire, floods, or other acts of household electrical or plumbing (i.e., house wiring, fuses, or water inlet hoses). damage caused...
User Manual
Page 56
... products, equipment, systems, utilities, services, parts, supplies, accessories, applications, installations, repairs, external wiring or connectors not supplied or authorized by pest infestations. use of this product and shall not apply to follow operating instructions, maintenance and environmental instructions that occurs in the instruction book; problems caused by SAMSUNG that damage this product was not intended; incorrect electrical line voltage, fluctuations and surges; SAMSUNG SHALL NOT BE LIABLE...
... products, equipment, systems, utilities, services, parts, supplies, accessories, applications, installations, repairs, external wiring or connectors not supplied or authorized by pest infestations. use of this product and shall not apply to follow operating instructions, maintenance and environmental instructions that occurs in the instruction book; problems caused by SAMSUNG that damage this product was not intended; incorrect electrical line voltage, fluctuations and surges; SAMSUNG SHALL NOT BE LIABLE...


