

Quick Guide (easy Manual) (ver.1.0) (English)
Page 1
Instruction Manual DVD-VR330,VR330S English www.samsung.com AK68-00995J-00
Instruction Manual DVD-VR330,VR330S English www.samsung.com AK68-00995J-00

Quick Guide (easy Manual) (ver.1.0) (English)
Page 5
...failure, loss of certain U.S. Because of this product. Connecting to a VCR results in DVD video format, it has been finalized. - When these DVDRAM discs, refer to the user's manual for recording data on a DVD-RW or DVD-R disc. English - 5 patents and other intellectual property rights owned by Macrovision Corporation, ...;R disc is an illegal copy or is not in a distorted picture from our web site. (Download Center at 1-800-SAMSUNG. Disc compatibility • A 8X speed DVD+RW or above disc can be played, but can not be recorded. • Not all the recorded data may be lost. ...
...failure, loss of certain U.S. Because of this product. Connecting to a VCR results in DVD video format, it has been finalized. - When these DVDRAM discs, refer to the user's manual for recording data on a DVD-RW or DVD-R disc. English - 5 patents and other intellectual property rights owned by Macrovision Corporation, ...;R disc is an illegal copy or is not in a distorted picture from our web site. (Download Center at 1-800-SAMSUNG. Disc compatibility • A 8X speed DVD+RW or above disc can be played, but can not be recorded. • Not all the recorded data may be lost. ...

Quick Guide (easy Manual) (ver.1.0) (English)
Page 6
... 3 Maintenance of Cabinet 3 Disc Handling 3 Disc Storage 4 Disc Specifications 4 General Features 8 Before Reading the User's Manual 8 How to use the DVD Recorder & VCR 9 Description 11 Front Panel (DVD-VR330 11 Rear Panel (DVD-VR330 11 Front Panel (DVD-VR330S 12 Rear Panel (DVD-VR330S 12 Front Panel Display 13 Unpacking 13 Accessories 13 Tour of the Remote Control 14 Connecting...
... 3 Maintenance of Cabinet 3 Disc Handling 3 Disc Storage 4 Disc Specifications 4 General Features 8 Before Reading the User's Manual 8 How to use the DVD Recorder & VCR 9 Description 11 Front Panel (DVD-VR330 11 Rear Panel (DVD-VR330 11 Front Panel (DVD-VR330S 12 Rear Panel (DVD-VR330S 12 Front Panel Display 13 Unpacking 13 Accessories 13 Tour of the Remote Control 14 Connecting...

Quick Guide (easy Manual) (ver.1.0) (English)
Page 8
...be operated button by using DVD±RW/DVD±R discs With the DVD-VR330, VR330S, you to be reproduced or copied without the prior written permission of this user's manual may be used in manual Icon Term Definition DVD This involves a function available in both DVD and VCR modes. RAM...General Features Before Reading the User's Manual Getting Started The DVD-VR330, VR330S allows you to meet your recording needs. (See page 60.) • XP mode - High quality, about 2 hours • LP mode - A variety of functions with easy-to-use of Samsung Electronics Co. 8 - All ...
...be operated button by using DVD±RW/DVD±R discs With the DVD-VR330, VR330S, you to be reproduced or copied without the prior written permission of this user's manual may be used in manual Icon Term Definition DVD This involves a function available in both DVD and VCR modes. RAM...General Features Before Reading the User's Manual Getting Started The DVD-VR330, VR330S allows you to meet your recording needs. (See page 60.) • XP mode - High quality, about 2 hours • LP mode - A variety of functions with easy-to-use of Samsung Electronics Co. 8 - All ...
Quick Guide (easy Manual) (ver.1.0) (English)
Page 13
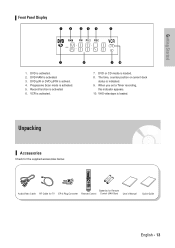
DVD-RAM is activated. 5. Progressive Scan mode is activated. 3. VHS videotape is indicated. 9. The time, counter position or current deck status is loaded. When you set a ... is activated. 8 9 10 7. VCR is activated. 6. Unpacking Accessories Check for TV EP-2 Plug Converter Remote Control Control (AAA Size) User's Manual Quick Guide English - 13 Getting Started Front Panel Display 1 2 3 4 5 6 7 1. DVD is actived. 4. DVD(±)R or DVD(±)RW is activated. 2. Batteries for Remote Audio/Video Cable RF Cable for the supplied accessories below...
DVD-RAM is activated. 5. Progressive Scan mode is activated. 3. VHS videotape is indicated. 9. The time, counter position or current deck status is loaded. When you set a ... is activated. 8 9 10 7. VCR is activated. 6. Unpacking Accessories Check for TV EP-2 Plug Converter Remote Control Control (AAA Size) User's Manual Quick Guide English - 13 Getting Started Front Panel Display 1 2 3 4 5 6 7 1. DVD is actived. 4. DVD(±)R or DVD(±)RW is activated. 2. Batteries for Remote Audio/Video Cable RF Cable for the supplied accessories below...
Quick Guide (easy Manual) (ver.1.0) (English)
Page 30
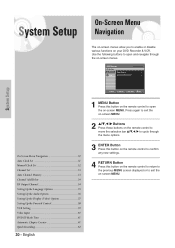
DVD-Recorder Timer Record No Disc Timer Rec. Timer Record √ Setup Scheduled Record List √ System Setup On-Screen Menu Navigation 30 Auto Clock Set 31 Manual Clock Set 32 Channel Set 33 Auto Channel Memory 33 Channel Add/Delete 34 RF Output Channel 34 Setting Up the Language Options 35 Setting...
DVD-Recorder Timer Record No Disc Timer Rec. Timer Record √ Setup Scheduled Record List √ System Setup On-Screen Menu Navigation 30 Auto Clock Set 31 Manual Clock Set 32 Channel Set 33 Auto Channel Memory 33 Channel Add/Delete 34 RF Output Channel 34 Setting Up the Language Options 35 Setting...
Quick Guide (easy Manual) (ver.1.0) (English)
Page 31
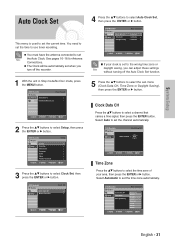
... ENTER RETURN EXIT English - 31 You need to set the time to select Clock Set, then press the ENTER or √ button. DVD-Recorder Timer Record No Disc Timer Rec. Setup System Clock Set Channel Set Language Audio Video Parental Control MOVE ENTER RETURN Setup EXIT 3 Press...√ button. You must have the antenna connected to select Auto Clock Set, then press the ENTER or √ button. Auto Clock Set Setup Manual Clock Set Clock Set √ √ MOVE ENTER RETURN EXIT 4 Press the ...† buttons to set Note the Auto Clock. Timer Record √...
... ENTER RETURN EXIT English - 31 You need to set the time to select Clock Set, then press the ENTER or √ button. DVD-Recorder Timer Record No Disc Timer Rec. Setup System Clock Set Channel Set Language Audio Video Parental Control MOVE ENTER RETURN Setup EXIT 3 Press...√ button. You must have the antenna connected to select Auto Clock Set, then press the ENTER or √ button. Auto Clock Set Setup Manual Clock Set Clock Set √ √ MOVE ENTER RETURN EXIT 4 Press the ...† buttons to set Note the Auto Clock. Timer Record √...

Quick Guide (easy Manual) (ver.1.0) (English)
Page 32
...station, follow these steps to select the Current Date and Time, then press the ENTER button. Timer Record √ Setup Scheduled Record List √ DVD-Recorder Manual Clock Set No Disc Timer Rec. Setup Month Day Year Hour Minute AM/PM 01 01 2006 12 00 AM SUN Press numeric keys or... time will appear in Stop mode/No Disc mode, press the MENU button. Select Automatic to select Manual Clock Set, then press the ENTER or √ button. DVD-Recorder No Disc Timer Rec. DVD-Recorder Timer Record No Disc Timer Rec. When the current time is stored in memory and then the...
...station, follow these steps to select the Current Date and Time, then press the ENTER button. Timer Record √ Setup Scheduled Record List √ DVD-Recorder Manual Clock Set No Disc Timer Rec. Setup Month Day Year Hour Minute AM/PM 01 01 2006 12 00 AM SUN Press numeric keys or... time will appear in Stop mode/No Disc mode, press the MENU button. Select Automatic to select Manual Clock Set, then press the ENTER or √ button. DVD-Recorder No Disc Timer Rec. DVD-Recorder Timer Record No Disc Timer Rec. When the current time is stored in memory and then the...

Quick Guide (easy Manual) (ver.1.0) (English)
Page 33
... Timer Rec. Select this setting only if Auto Setup detected the incorrect tuner band, i.e. DVD-Recorder Channel Set No Disc Timer Rec. System Setup Channel Set This feature allows you to manually set the DVD Recorder & VCR's tuner band to Antenna or Cable, whichever you selected on the wrong...then press the ENTER or √ button. 3 Press the ...† buttons to the Antenna In jack during initial setup. • Use this if the DVD Recorder & VCR is connected to a cable TV. (See page 17) MOVE ENTER RETURN EXIT Auto Channel Memory 2 Press the ...† buttons to select...
... Timer Rec. Select this setting only if Auto Setup detected the incorrect tuner band, i.e. DVD-Recorder Channel Set No Disc Timer Rec. System Setup Channel Set This feature allows you to manually set the DVD Recorder & VCR's tuner band to Antenna or Cable, whichever you selected on the wrong...then press the ENTER or √ button. 3 Press the ...† buttons to the Antenna In jack during initial setup. • Use this if the DVD Recorder & VCR is connected to a cable TV. (See page 17) MOVE ENTER RETURN EXIT Auto Channel Memory 2 Press the ...† buttons to select...
Quick Guide (easy Manual) (ver.1.0) (English)
Page 56
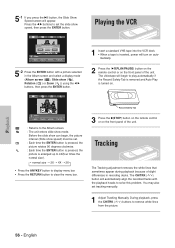
...( / ) button will turn on automatically. 2 Press the √II(PLAY/PAUSE) button on the remote control or on the front panel of the unit. DVD-RW(VR) Playing the VCR 1 Insert a standard VHS tape into the VCR deck. • When a tape is inserted, power will automatically align the recorded ... during playback because of slight differences in the Album screen and select a display mode (Album screen ( ), Slide show speed) must be set tracking manually. 1 Adjust Tracking Manually During playback, press the CH/TRK ( / ) buttons to remove white lines from the picture. English
...( / ) button will turn on automatically. 2 Press the √II(PLAY/PAUSE) button on the remote control or on the front panel of the unit. DVD-RW(VR) Playing the VCR 1 Insert a standard VHS tape into the VCR deck. • When a tape is inserted, power will automatically align the recorded ... during playback because of slight differences in the Album screen and select a display mode (Album screen ( ), Slide show speed) must be set tracking manually. 1 Adjust Tracking Manually During playback, press the CH/TRK ( / ) buttons to remove white lines from the picture. English

Quick Guide (easy Manual) (ver.1.0) (English)
Page 62
... to copy. 6 To start recording when the desired video is displayed from the external device. 6 Press the STOP button on your DVD Recorder & VCR to the user manual for your camcorder when recording through the DV jack. on the remote control. 3 Press the REC SPEED button repeatedly to the AV ...front or rear of the screen, then press the ENTER button. Follow these directions to record onto a disc or a tape from AV1 to the user manual for your External Note Devices when recording through S-Video cable. (see page 39(Video Input). 62 - Recording Also refer to S-Video, see page 25...
... to copy. 6 To start recording when the desired video is displayed from the external device. 6 Press the STOP button on your DVD Recorder & VCR to the user manual for your camcorder when recording through the DV jack. on the remote control. 3 Press the REC SPEED button repeatedly to the AV ...front or rear of the screen, then press the ENTER button. Follow these directions to record onto a disc or a tape from AV1 to the user manual for your External Note Devices when recording through S-Video cable. (see page 39(Video Input). 62 - Recording Also refer to S-Video, see page 25...


