User Manual (user Manual) (ver.1.0) (English)
Page 4
... • Before connecting other than this occurs, turn off and on these discs is licensed under this license for long periods of this user manual is highly vulnerable to the Region number of this DVD player, the DVD player cannot play the disc. • The product unit accompanying this player. SAFETY INSTRUCTIONS CAUTION THIS PRODUCT UTILIZES A LASER. DO NOT OPEN COVER AND DO NOT REPAIR YOURSELF. No...
... • Before connecting other than this occurs, turn off and on these discs is licensed under this license for long periods of this user manual is highly vulnerable to the Region number of this DVD player, the DVD player cannot play the disc. • The product unit accompanying this player. SAFETY INSTRUCTIONS CAUTION THIS PRODUCT UTILIZES A LASER. DO NOT OPEN COVER AND DO NOT REPAIR YOURSELF. No...

User Manual (user Manual) (ver.1.0) (English)
Page 6
... ...21 Connection to an Audio System (2 Channel Amplifier 21 Connection to an Audio System (Dolby digital, MPEG2 or DTS Amplifier 22 Connecting a Power Cord & Auto Setup ...23 Chapter 3: Initial Setup Selecting a Menu Language ...24 Setting the Clock ...25 Setting the Clock Automatically...25 Setting the Clock Manually ...26 Memorizing the Channels ...28 Selecting the Video Signal-source ...28 Storing Channels in Memory (Automatic Method 29 Adding and Erasing Channels (Manual Method 29 Selecting the RF Output Channel ...30 Selecting the Front Panel Display ...31 Setting the Power Off...
... ...21 Connection to an Audio System (2 Channel Amplifier 21 Connection to an Audio System (Dolby digital, MPEG2 or DTS Amplifier 22 Connecting a Power Cord & Auto Setup ...23 Chapter 3: Initial Setup Selecting a Menu Language ...24 Setting the Clock ...25 Setting the Clock Automatically...25 Setting the Clock Manually ...26 Memorizing the Channels ...28 Selecting the Video Signal-source ...28 Storing Channels in Memory (Automatic Method 29 Adding and Erasing Channels (Manual Method 29 Selecting the RF Output Channel ...30 Selecting the Front Panel Display ...31 Setting the Power Off...

User Manual (user Manual) (ver.1.0) (English)
Page 7
... Setup Menu ...58 Setting Up the Language Features ...59 Setting Up the Audio Options ...61 Setting Up the Display Options ...63 Setting Up the Parental Control ...66 DivX(R) Registration ...69 Chapter 5: VCR Operations Inserting and Ejecting a Video Cassette Tape 70 Playing a Pre-Recorded Video Cassette Tape 71 Special VCR Playback Features ...72 Using Automatic Tracking ...73 Selecting the Cassette Type ...74 Setting the Auto Play ...75 Setting the Auto Repeat ...76 Using the Tape Counter ...77 Using the Assemble Edit Function ...78 Selecting the Audio Output Mode...
... Setup Menu ...58 Setting Up the Language Features ...59 Setting Up the Audio Options ...61 Setting Up the Display Options ...63 Setting Up the Parental Control ...66 DivX(R) Registration ...69 Chapter 5: VCR Operations Inserting and Ejecting a Video Cassette Tape 70 Playing a Pre-Recorded Video Cassette Tape 71 Special VCR Playback Features ...72 Using Automatic Tracking ...73 Selecting the Cassette Type ...74 Setting the Auto Play ...75 Setting the Auto Repeat ...76 Using the Tape Counter ...77 Using the Assemble Edit Function ...78 Selecting the Audio Output Mode...
User Manual (user Manual) (ver.1.0) (English)
Page 8
... ■ Discs which cannot be played with copy protection. CDGs play MPEG4 formats within an avi file. ■ Playback MP3-CDs. IF THERE ARE QUESTIONS REGARDING YOUR TV SET COMPATIBILITY WITH THIS DVD-VCR, PLEASE CONTACT SAMSUNG'S CUSTOMER SERVICE CENTER." ■ Ability to the VCR. ■ Auto Setup instantly finds the time and runs channel search. ■ RF input and output. ■ Composite, S-Video, Component Video and HDMI outputs. ■ On-Screen Program (English/French/Spanish). Use of this...
... ■ Discs which cannot be played with copy protection. CDGs play MPEG4 formats within an avi file. ■ Playback MP3-CDs. IF THERE ARE QUESTIONS REGARDING YOUR TV SET COMPATIBILITY WITH THIS DVD-VCR, PLEASE CONTACT SAMSUNG'S CUSTOMER SERVICE CENTER." ■ Ability to the VCR. ■ Auto Setup instantly finds the time and runs channel search. ■ RF input and output. ■ Composite, S-Video, Component Video and HDMI outputs. ■ On-Screen Program (English/French/Spanish). Use of this...
User Manual (user Manual) (ver.1.0) (English)
Page 9
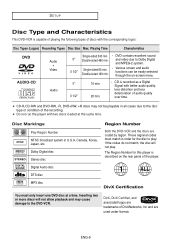
... 480 min. Dolby Digital disc STEREO Stereo disc DIGITAL SOUND Digital Audio disc DTS disc Region Number Both the DVD-VCR and the discs are trademarks of the player. DivX, DivX Certified, and associated logos are coded by region. Playing Time Characteristics DVD AUDIO-CD Audio + Video Audio 5" 3 1/2" Single-sided 240 min. If the codes do not match, the disc will not allow playback and may not be easily selected through the on the rear panel of DivXNetworks, Inc and are used under license...
... 480 min. Dolby Digital disc STEREO Stereo disc DIGITAL SOUND Digital Audio disc DTS disc Region Number Both the DVD-VCR and the discs are trademarks of the player. DivX, DivX Certified, and associated logos are coded by region. Playing Time Characteristics DVD AUDIO-CD Audio + Video Audio 5" 3 1/2" Single-sided 240 min. If the codes do not match, the disc will not allow playback and may not be easily selected through the on the rear panel of DivXNetworks, Inc and are used under license...

User Manual (user Manual) (ver.1.0) (English)
Page 10
... loaded. 5 VHS videotape is stopped. 5 (POWER) Press to turn the DVD-VCR on and off. 6 LINE IN 2 Connect to the Video/Audio output jack of your external device. 7 P.SCAN Press to select video out mode. 8 Front Panel Display Operation indicators are displayed here. 9 CHANNEL and Press to change channels. 10 DVD/VCR Press to view DVD or VCR mode. 11 HD HDMI Output resolution setup. 12 REC (VCR) Press to begin recording. 13 (Reverse/Rewind) Press to reverse/rewind a disc/video tape. 14 (STOP) Press to stop a disc/video tape during playback...
... loaded. 5 VHS videotape is stopped. 5 (POWER) Press to turn the DVD-VCR on and off. 6 LINE IN 2 Connect to the Video/Audio output jack of your external device. 7 P.SCAN Press to select video out mode. 8 Front Panel Display Operation indicators are displayed here. 9 CHANNEL and Press to change channels. 10 DVD/VCR Press to view DVD or VCR mode. 11 HD HDMI Output resolution setup. 12 REC (VCR) Press to begin recording. 13 (Reverse/Rewind) Press to reverse/rewind a disc/video tape. 14 (STOP) Press to stop a disc/video tape during playback...

User Manual (user Manual) (ver.1.0) (English)
Page 11
... device. 8 DIGITAL AUDIO OUT (OPTICAL/COAXIAL) - Use the HDMI cable to connect this jack to the HDMI jack on the front panel, interlaced scan mode will be enabled. 3. If you have a TV with Component Video in the Alt Video Out menu or by using the P.SCAN button on your television for higher picture quality. If Progressive Scan is supported, follow the TV User's Manual regarding Progressive Scan settings in the TV's menu system. ■ If Component (Progressive Scan) Output is selected in jacks. Use...
... device. 8 DIGITAL AUDIO OUT (OPTICAL/COAXIAL) - Use the HDMI cable to connect this jack to the HDMI jack on the front panel, interlaced scan mode will be enabled. 3. If you have a TV with Component Video in the Alt Video Out menu or by using the P.SCAN button on your television for higher picture quality. If Progressive Scan is supported, follow the TV User's Manual regarding Progressive Scan settings in the TV's menu system. ■ If Component (Progressive Scan) Output is selected in jacks. Use...
User Manual (user Manual) (ver.1.0) (English)
Page 12
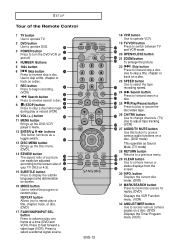
... picture. 22 Skip button Press to forward skip a disc. SETUP Tour of the Remote Control 1 TV button Use to operate TV. 2 DVD button Use to operate DVD. Œ 3 POWER button ´ Press to turn the DVD-VCR on a disc. (DVD mode) This operates as a toggle switch. 13 DISC MENU button Brings up the DVD-VCR player's menu. Ô 12 ENTER/"#$% buttons This button functions as Sound Mute. (TV mode) 28 RETURN button ® Returns to a previous menu. ∑ 29 CLEAR button µ Use to remove menus or status displays from the ¥ screen...
... picture. 22 Skip button Press to forward skip a disc. SETUP Tour of the Remote Control 1 TV button Use to operate TV. 2 DVD button Use to operate DVD. Œ 3 POWER button ´ Press to turn the DVD-VCR on a disc. (DVD mode) This operates as a toggle switch. 13 DISC MENU button Brings up the DVD-VCR player's menu. Ô 12 ENTER/"#$% buttons This button functions as Sound Mute. (TV mode) 28 RETURN button ® Returns to a previous menu. ∑ 29 CLEAR button µ Use to remove menus or status displays from the ¥ screen...

User Manual (user Manual) (ver.1.0) (English)
Page 15
... Red White Video Cable Audio Cable Yellow Red White Notes - Progressive) - Always turn off the DVD-VCR, TV, and other components. If there is one audio input terminal on the TV, connect it to the LINE OUT AUDIO OUT Left (white) terminal of the additional components (such as a TV) you press the P.SCAN button when DVD-VCR is in stop mode or no disc is inserted, the Alt Video Out mode changes in the Display setup menu is placed too close...
... Red White Video Cable Audio Cable Yellow Red White Notes - Progressive) - Always turn off the DVD-VCR, TV, and other components. If there is one audio input terminal on the TV, connect it to the LINE OUT AUDIO OUT Left (white) terminal of the additional components (such as a TV) you press the P.SCAN button when DVD-VCR is in stop mode or no disc is inserted, the Alt Video Out mode changes in the Display setup menu is placed too close...

User Manual (user Manual) (ver.1.0) (English)
Page 16
... jack connected. - The S-Video jack only outputs video from LINE OUT AUDIO or AUDIO OUT (red and white) terminals for S-Video connection. You can hear sound from the DVD player. Connecting to your TV. - Turn on the DVD-VCR and TV. 3 With the unit in the Display Setup menu (see pages 63~64) or press the P.SCAN button on the front panel until S-Video is output. 4 Press the input selector on your TV remote control until the S-Video signal...
... jack connected. - The S-Video jack only outputs video from LINE OUT AUDIO or AUDIO OUT (red and white) terminals for S-Video connection. You can hear sound from the DVD player. Connecting to your TV. - Turn on the DVD-VCR and TV. 3 With the unit in the Display Setup menu (see pages 63~64) or press the P.SCAN button on the front panel until S-Video is output. 4 Press the input selector on your TV remote control until the S-Video signal...

User Manual (user Manual) (ver.1.0) (English)
Page 17
... Display Setup menu (see pages 63~64) or press the P.SCAN button on the front panel until the Component signal from the DVDVCR appears on the TV screen. If Video output is output. CONNECTIONS Connection to 22) - Notes - To view video from the DVD player. Component video separates the picture element into black and white(Y), blue(PB), red(PR) signals to S-Video with the Component cables connected, the screen will enjoy high quality and accurate color reproduction images. Turn on the rear of the DVD-VCR...
... Display Setup menu (see pages 63~64) or press the P.SCAN button on the front panel until the Component signal from the DVDVCR appears on the TV screen. If Video output is output. CONNECTIONS Connection to 22) - Notes - To view video from the DVD player. Component video separates the picture element into black and white(Y), blue(PB), red(PR) signals to S-Video with the Component cables connected, the screen will enjoy high quality and accurate color reproduction images. Turn on the rear of the DVD-VCR...

User Manual (user Manual) (ver.1.0) (English)
Page 18
... Blue Red Audio Cable Red White Red Component Cable (not included) Blue Green 4 Press the input selector on the front panel until the Component signal from the VCR, you must have the Video Out (yellow) or RF Out jack connected. Consult your TV User's Manual to HDMI/COMPONENT (P-SCAN) in the TV's menu system. - If Progressive Scan is "Progressive Scan"? Turn on the TV screen. Note What is supported, follow the TV User's Manual regarding Progressive Scan settings in the Display Setup menu (see the progressive video output, - Progressive scan...
... Blue Red Audio Cable Red White Red Component Cable (not included) Blue Green 4 Press the input selector on the front panel until the Component signal from the VCR, you must have the Video Out (yellow) or RF Out jack connected. Consult your TV User's Manual to HDMI/COMPONENT (P-SCAN) in the TV's menu system. - If Progressive Scan is "Progressive Scan"? Turn on the TV screen. Note What is supported, follow the TV User's Manual regarding Progressive Scan settings in the Display Setup menu (see the progressive video output, - Progressive scan...

User Manual (user Manual) (ver.1.0) (English)
Page 19
... allows you set the HDMI output resolution 720p or 1080i, HDMI output provides better picture quality. - The first press of your TV. 2 Press the input selector on your TV remote control until the HDMI signal from the DVD player appears on your TV. - If HDMI or HDMI cable is plugged into TV, the DVD player's output is set the HDMI output resolution to the user's manual of your TV screen. For better picture quality, set to change the HDMI output resolution. - If you...
... allows you set the HDMI output resolution 720p or 1080i, HDMI output provides better picture quality. - The first press of your TV. 2 Press the input selector on your TV remote control until the HDMI signal from the DVD player appears on your TV. - If HDMI or HDMI cable is plugged into TV, the DVD player's output is set the HDMI output resolution to the user's manual of your TV screen. For better picture quality, set to change the HDMI output resolution. - If you...

User Manual (user Manual) (ver.1.0) (English)
Page 28
... wrong channel numbers. 1 Press the MENU button. 2 Press the "&# buttons to select Setup, then press the % or ENTER button. 3 Press the "&# buttons to select Channel, then press the % or ENTER button. 4 Press the % or ENTER button to Cable TV. - ENG-28 Cable TV: Select this if the DVD-VCR is connected to the Antenna In jack during initial setup. INITIAL SETUP Memorizing the Channels Selecting the Video Signal-source This feature allows you to manually set the DVD-VCR's tuner...
... wrong channel numbers. 1 Press the MENU button. 2 Press the "&# buttons to select Setup, then press the % or ENTER button. 3 Press the "&# buttons to select Channel, then press the % or ENTER button. 4 Press the % or ENTER button to Cable TV. - ENG-28 Cable TV: Select this if the DVD-VCR is connected to the Antenna In jack during initial setup. INITIAL SETUP Memorizing the Channels Selecting the Video Signal-source This feature allows you to manually set the DVD-VCR's tuner...

User Manual (user Manual) (ver.1.0) (English)
Page 60
... not listed. - Select "Others" if the language you want the subtitle language to be set to the language you choose. in . - Subtitle To set the Subtitle Language to your Disc Menu Language will use its original language setting. Select "Others" if the language you want the default soundtrack language to be set to your preferred language is not listed. Select "Original" if you want is selected. - Some discs may not contain the language you select as the audio language. - DVD OPERATIONS Language Function Disc Menu To set the Disc Menu Language...
... not listed. - Select "Others" if the language you want the subtitle language to be set to the language you choose. in . - Subtitle To set the Subtitle Language to your Disc Menu Language will use its original language setting. Select "Others" if the language you want the default soundtrack language to be set to your preferred language is not listed. Select "Original" if you want is selected. - Some discs may not contain the language you select as the audio language. - DVD OPERATIONS Language Function Disc Menu To set the Disc Menu Language...
User Manual (user Manual) (ver.1.0) (English)
Page 65
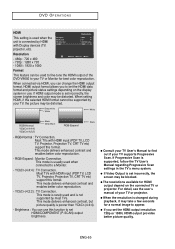
... HDMI output of your TV supports Progressive Scan. Deep white White White RGB-Normal YCbCr-(4:4:4) YCbCr-(4:2:2) Black Deep Black RGB-Expand Black - This mode delivers enhanced contrast and enables better color reproduction. - This mode is rarely used and is connected by HDMI with Display devices (TV, projector, etc). Brightness : You can use . Resolution - 480p : 720 x 480 - 720p : 1280 x 720 - 1080i : 1920 x 1080 Format This feature can change the HDMI output format. RGB-Normal : TV Connection. DVD OPERATIONS HDMI This setting is used...
... HDMI output of your TV supports Progressive Scan. Deep white White White RGB-Normal YCbCr-(4:4:4) YCbCr-(4:2:2) Black Deep Black RGB-Expand Black - This mode delivers enhanced contrast and enables better color reproduction. - This mode is rarely used and is connected by HDMI with Display devices (TV, projector, etc). Brightness : You can use . Resolution - 480p : 720 x 480 - 720p : 1280 x 720 - 1080i : 1920 x 1080 Format This feature can change the HDMI output format. RGB-Normal : TV Connection. DVD OPERATIONS HDMI This setting is used...

User Manual (user Manual) (ver.1.0) (English)
Page 82
... tape. see page 85. Power on the TV Protecting a Recorded Cassette Video cassettes have a safety tab to record the entire program. If you cannot record on the DVD-VCR - Press the SPEED button to set the record speed. (See page 84) 2 Use the Number buttons or the CH or buttons to protect a cassette, break off the tab using a small screwdriver. VCR OPERATIONS Basic Recording You can record a TV show in...
... tape. see page 85. Power on the TV Protecting a Recorded Cassette Video cassettes have a safety tab to record the entire program. If you cannot record on the DVD-VCR - Press the SPEED button to set the record speed. (See page 84) 2 Use the Number buttons or the CH or buttons to protect a cassette, break off the tab using a small screwdriver. VCR OPERATIONS Basic Recording You can record a TV show in...

User Manual (user Manual) (ver.1.0) (English)
Page 87
..., Wed, Thu, Fri]: Use this to record TV programs on and begin recording at the same time every week. ENG-87 Stop the DVD-VCR or turn on the same channel at the time you set the recording tape speed to "Auto". To stop the timer recording, press the POWER button or press the (Stop) button twice. If the length is not long enough for a timer recording in the SP mode. VCR OPERATIONS Selecting Auto Speed If the...
..., Wed, Thu, Fri]: Use this to record TV programs on and begin recording at the same time every week. ENG-87 Stop the DVD-VCR or turn on the same channel at the time you set the recording tape speed to "Auto". To stop the timer recording, press the POWER button or press the (Stop) button twice. If the length is not long enough for a timer recording in the SP mode. VCR OPERATIONS Selecting Auto Speed If the...
User Manual (user Manual) (ver.1.0) (English)
Page 89
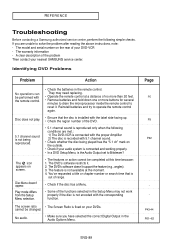
... the remote control. • Check the batteries in the Audio Options Menu. REFERENCE Troubleshooting Before contacting a Samsung authorized service center, perform the following conditions are unable to solve the problem after reading the above instructions, note: - Identifying DVD Problems Problem Action No operations can be performed with the corresponding function. They may not work properly if the disc is fixed on screen. cannot be completed at a distance of the DVD. 5.1 channel sound is...
... the remote control. • Check the batteries in the Audio Options Menu. REFERENCE Troubleshooting Before contacting a Samsung authorized service center, perform the following conditions are unable to solve the problem after reading the above instructions, note: - Identifying DVD Problems Problem Action No operations can be performed with the corresponding function. They may not work properly if the disc is fixed on screen. cannot be completed at a distance of the DVD. 5.1 channel sound is...

User Manual (user Manual) (ver.1.0) (English)
Page 90
...; Check the DVD-VCR antenna/cable connections. • Is the DVD-VCR tuner properly set? • Check if the safety tab is intact on the condition of cassettes, the video heads may have been cancelled. When cleaning the video heads, read all instructions provided with no disc in the unit. REFERENCE Problem The screen is blocked Forgot password If you experience other problems. The picture is noisy or...
...; Check the DVD-VCR antenna/cable connections. • Is the DVD-VCR tuner properly set? • Check if the safety tab is intact on the condition of cassettes, the video heads may have been cancelled. When cleaning the video heads, read all instructions provided with no disc in the unit. REFERENCE Problem The screen is blocked Forgot password If you experience other problems. The picture is noisy or...


