User Manual (user Manual) (ver.1.0) (English, French)
Page 90
...prong. The wide blade or the third prong are provided for your outlet, consult an electrician for replacement of the obsolete outlet. 10) Protect the power cord from being walked on or pinched particularly at plugs, convenience receptacles, and the point where they exit from tip-over. 14) Refer all ...instructions. 5) Do not use this apparatus. Servicing is required when the apparatus has been damaged in any way, such as power-supply cord or plug is used, use caution when moving the cart/apparatus combination to rain or moisture, does not operate normally, or has been...
...prong. The wide blade or the third prong are provided for your outlet, consult an electrician for replacement of the obsolete outlet. 10) Protect the power cord from being walked on or pinched particularly at plugs, convenience receptacles, and the point where they exit from tip-over. 14) Refer all ...instructions. 5) Do not use this apparatus. Servicing is required when the apparatus has been damaged in any way, such as power-supply cord or plug is used, use caution when moving the cart/apparatus combination to rain or moisture, does not operate normally, or has been...
User Manual (user Manual) (ver.1.0) (English, French)
Page 92
... DO NOT REPAIR YOURSELF. REFER SERVICING TO QUALIFIED PERSONNEL. If the Region number of Cabinet For safety reasons, be used only where the power supply is designed and manufactured to respond to the ISO/IEC 11172-3 or ISO/IEC 13818-3. The license does not cover any unlicensed product...remove the disc and turn off the player after use. • Disconnect the AC power cord from the inside to the environment. • Do not keep under certain intellectual property rights of this DVD player, the DVD player cannot play the disc. • The product unit accompanying this product is ...
... DO NOT REPAIR YOURSELF. REFER SERVICING TO QUALIFIED PERSONNEL. If the Region number of Cabinet For safety reasons, be used only where the power supply is designed and manufactured to respond to the ISO/IEC 11172-3 or ISO/IEC 13818-3. The license does not cover any unlicensed product...remove the disc and turn off the player after use. • Disconnect the AC power cord from the inside to the environment. • Do not keep under certain intellectual property rights of this DVD player, the DVD player cannot play the disc. • The product unit accompanying this product is ...
User Manual (user Manual) (ver.1.0) (English, French)
Page 94
... Control...12 Chapter 2: Connections Connecting the Antenna Cable ...13 Method1: Antenna + DVD-VCR + TV: No Cable box 13 Method2: Antenna + DVD-VCR + TV: Cable box with many scrambled channels 14 Method3: Antenna + DVD-VCR + TV: Cable box with a few scrambled channels 14 Before Connecting the...19 Connection to an Audio System (2 Channel Amplifier 19 Connection to an Audio System (Dolby digital, MPEG2 or DTS Amplifier 20 Connecting a Power Cord & Auto Setup ...21 Chapter 3: Initial Setup Selecting a Menu Language ...22 Setting the Clock ...23 Setting the Clock Automatically...23 Setting...
... Control...12 Chapter 2: Connections Connecting the Antenna Cable ...13 Method1: Antenna + DVD-VCR + TV: No Cable box 13 Method2: Antenna + DVD-VCR + TV: Cable box with many scrambled channels 14 Method3: Antenna + DVD-VCR + TV: Cable box with a few scrambled channels 14 Before Connecting the...19 Connection to an Audio System (2 Channel Amplifier 19 Connection to an Audio System (Dolby digital, MPEG2 or DTS Amplifier 20 Connecting a Power Cord & Auto Setup ...21 Chapter 3: Initial Setup Selecting a Menu Language ...22 Setting the Clock ...23 Setting the Clock Automatically...23 Setting...

User Manual (user Manual) (ver.1.0) (English, French)
Page 98
... activated. 2 The time, counter position, time remaining or current deck status is indicated. 3 VCR is activated. 4 DVD or VCD/CD media is loaded. 5 VHS videotape is stopped. 4 (POWER) Press to turn the DVD-VCR on and off. 5 LINE IN 2 Connect to the Video/Audio output jack of your external device. 6 P.SCAN...to open and close the disc tray. 8 Front Panel Display Operation indicators are displayed here. 9 CHANNEL and Press to change channels. 10 DVD/VCR Press to view DVD or VCR mode. 11 EZ VIEW The aspect ratio of a picture can easily be adjusted to your TV's screen size. 12 REC ...
... activated. 2 The time, counter position, time remaining or current deck status is indicated. 3 VCR is activated. 4 DVD or VCD/CD media is loaded. 5 VHS videotape is stopped. 4 (POWER) Press to turn the DVD-VCR on and off. 5 LINE IN 2 Connect to the Video/Audio output jack of your external device. 6 P.SCAN...to open and close the disc tray. 8 Front Panel Display Operation indicators are displayed here. 9 CHANNEL and Press to change channels. 10 DVD/VCR Press to view DVD or VCR mode. 11 EZ VIEW The aspect ratio of a picture can easily be adjusted to your TV's screen size. 12 REC ...
User Manual (user Manual) (ver.1.0) (English, French)
Page 100
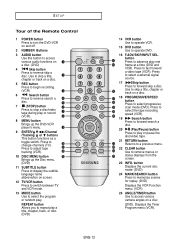
... forward search a disc. 20 (Play/Pause) button Press to play one Æ frame at a time (DVD and VCR). SETUP Tour of the Remote Control 1 POWER button Press to turn the DVD-VCR on and off. 2 NUMBER Buttons 3 AUDIO button Use this button to access various audio functions on a... disc (DVD). Press to adjust tape ˝ Ô tracking (VCR). 10 DISC MENU button Ò Brings up the DVD-VCR player's menu. ...
... forward search a disc. 20 (Play/Pause) button Press to play one Æ frame at a time (DVD and VCR). SETUP Tour of the Remote Control 1 POWER button Press to turn the DVD-VCR on and off. 2 NUMBER Buttons 3 AUDIO button Use this button to access various audio functions on a... disc (DVD). Press to adjust tape ˝ Ô tracking (VCR). 10 DISC MENU button Ò Brings up the DVD-VCR player's menu. ...

User Manual (user Manual) (ver.1.0) (English, French)
Page 103
...TV screen. Connection to a TV (Video) 1 Using video/audio cables, connect the VIDEO (yellow)/AUDIO (red and white) OUT terminals on the rear of the DVD-VCR to the VIDEO (yellow)/AUDIO (red and white) IN terminals of the additional components (such as a TV) you press the P.SCAN button when... appears on those particular components. If you connect or disconnect any cables. - Refer to the power cable. - Noise may vary depending on the TV, connect it to the user's manual of the DVD-VCR. - Please refer to the LINE OUT AUDIO OUT Left (white) terminal of your TV set. If there ...
...TV screen. Connection to a TV (Video) 1 Using video/audio cables, connect the VIDEO (yellow)/AUDIO (red and white) OUT terminals on the rear of the DVD-VCR to the VIDEO (yellow)/AUDIO (red and white) IN terminals of the additional components (such as a TV) you press the P.SCAN button when... appears on those particular components. If you connect or disconnect any cables. - Refer to the power cable. - Noise may vary depending on the TV, connect it to the user's manual of the DVD-VCR. - Please refer to the LINE OUT AUDIO OUT Left (white) terminal of your TV set. If there ...
User Manual (user Manual) (ver.1.0) (English, French)
Page 109
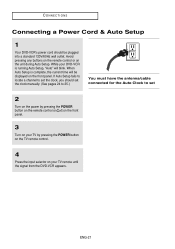
...channel to set the clock, you should be displayed on your TV by pressing the POWER button on the TV remote control. 4 Press the input selector on the front panel. CONNECTIONS Connecting a Power Cord & Auto Setup 1 Your DVD-VCR's power cord should set the clock manually. (See pages 24 to 25.) You must have... antenna/cable connected for the Auto Clock to set 2 Turn on the power by pressing the POWER button on the remote control or on the front panel. 3 Turn on your TV remote until the signal from the DVD-VCR appears. ENG-21 Avoid pressing any buttons on the remote control or...
...channel to set the clock, you should be displayed on your TV by pressing the POWER button on the TV remote control. 4 Press the input selector on the front panel. CONNECTIONS Connecting a Power Cord & Auto Setup 1 Your DVD-VCR's power cord should set the clock manually. (See pages 24 to 25.) You must have... antenna/cable connected for the Auto Clock to set 2 Turn on the power by pressing the POWER button on the remote control or on the front panel. 3 Turn on your TV remote until the signal from the DVD-VCR appears. ENG-21 Avoid pressing any buttons on the remote control or...
User Manual (user Manual) (ver.1.0) (English, French)
Page 115
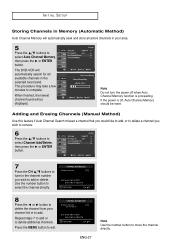
... press [%] to ADD press [$] to DELETE RETURN CH "# ENG-27 Note Use the number button to add or delete. If the power is proceeding. Note Do not turn the power off when Auto Channel Memory function is off, Auto Channel Memory should be displayed. INITIAL SETUP Storing Channels in Memory (Automatic Method... all available channels in the selected tuner band. Repeat steps 7 to add or to select Auto Channel Memory, then press the % or ENTER button. The DVD-VCR will automatically search for all active channels in your channel list or to select the channel directly.
... press [%] to ADD press [$] to DELETE RETURN CH "# ENG-27 Note Use the number button to add or delete. If the power is proceeding. Note Do not turn the power off when Auto Channel Memory function is off, Auto Channel Memory should be displayed. INITIAL SETUP Storing Channels in Memory (Automatic Method... all available channels in the selected tuner band. Repeat steps 7 to add or to select Auto Channel Memory, then press the % or ENTER button. The DVD-VCR will automatically search for all active channels in your channel list or to select the channel directly.
User Manual (user Manual) (ver.1.0) (English, French)
Page 117
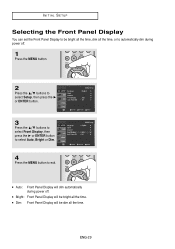
... Front Panel Display You can set the Front Panel Display to be bright all the time, dim all the time, or to automatically dim during power off. 1 Press the MENU button. 2 Press the "&# buttons to select Setup, then press the % or ENTER button. 3 Press the "&# buttons to select Front Display, then... the % or ENTER button to select Auto, Bright or Dim. 4 Press the MENU button to exit. ■ Auto: Front Panel Display will dim automatically during power off. ■ Bright: Front Panel Display will be bright all the time. ■ Dim: Front Panel Display will be dim all the time.
... Front Panel Display You can set the Front Panel Display to be bright all the time, dim all the time, or to automatically dim during power off. 1 Press the MENU button. 2 Press the "&# buttons to select Setup, then press the % or ENTER button. 3 Press the "&# buttons to select Front Display, then... the % or ENTER button to select Auto, Bright or Dim. 4 Press the MENU button to exit. ■ Auto: Front Panel Display will dim automatically during power off. ■ Bright: Front Panel Display will be bright all the time. ■ Dim: Front Panel Display will be dim all the time.
User Manual (user Manual) (ver.1.0) (English, French)
Page 118
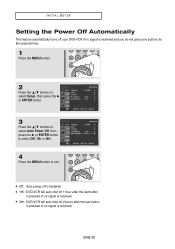
... press the % or ENTER button. 3 Press the "&# buttons to select Auto Power Off, then press the % or ENTER button to select Off, 1Hr or 2Hr. 4 Press the MENU button to exit. ■ Off: Auto power off is disabled. ■ 1Hr: DVD-VCR will auto shut off 1 hour after the last button is pressed... or no signal is received. ■ 2Hr: DVD-VCR will auto shut off 2 hours after the last button is pressed or...
... press the % or ENTER button. 3 Press the "&# buttons to select Auto Power Off, then press the % or ENTER button to select Off, 1Hr or 2Hr. 4 Press the MENU button to exit. ■ Off: Auto power off is disabled. ■ 1Hr: DVD-VCR will auto shut off 1 hour after the last button is pressed... or no signal is received. ■ 2Hr: DVD-VCR will auto shut off 2 hours after the last button is pressed or...
User Manual (user Manual) (ver.1.0) (English, French)
Page 153
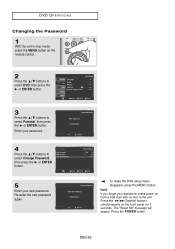
...0~9 4 Press the "#$ buttons to select Parental, then press the % or ENTER button. To make the DVD setup menu disappear, press the MENU button. The "Reset OK" message will appear. DVD OPERATIONS Changing the Password 1 With the unit in stop mode, press the MENU button on from a cold ..., then press the % or ENTER button. 5 Enter your password, press power on the remote control. 2 Press the "#$ buttons to select DVD, then press the % or ENTER button. Note If you forgot your new password. Press the POWER button. Press the / (Search) buttons simultaneously on the front panel for ...
...0~9 4 Press the "#$ buttons to select Parental, then press the % or ENTER button. To make the DVD setup menu disappear, press the MENU button. The "Reset OK" message will appear. DVD OPERATIONS Changing the Password 1 With the unit in stop mode, press the MENU button on from a cold ..., then press the % or ENTER button. 5 Enter your password, press power on the remote control. 2 Press the "#$ buttons to select DVD, then press the % or ENTER button. Note If you forgot your new password. Press the POWER button. Press the / (Search) buttons simultaneously on the front panel for ...

User Manual (user Manual) (ver.1.0) (English, French)
Page 166
... not cover this tab has been removed, you wish to record over a protected cassette (safety tab broken), cover the hole with a small piece of tape. Power on the TV Protecting a Recorded Cassette Video cassettes have a safety tab to 4 hours by inserting a blank tape and pressing the REC button. button to select... time in progress by pressing the REC button repeatedly; If you cannot record on the tape. Note Be sure your videotape has a Record Safety Tab. Power on the DVD-VCR - Recording 1 Insert a blank VHS tape into the VCR deck.
... not cover this tab has been removed, you wish to record over a protected cassette (safety tab broken), cover the hole with a small piece of tape. Power on the TV Protecting a Recorded Cassette Video cassettes have a safety tab to 4 hours by inserting a blank tape and pressing the REC button. button to select... time in progress by pressing the REC button repeatedly; If you cannot record on the tape. Note Be sure your videotape has a Record Safety Tab. Power on the DVD-VCR - Recording 1 Insert a blank VHS tape into the VCR deck.

User Manual (user Manual) (ver.1.0) (English, French)
Page 170
... Number Press the % button, then press the "$# buttons to leave the Record Safety Tab intact. Power On your TV. 1 Press the MENU button on the remote control. 2 Press the "$# buttons to a month in advance. Power On your DVD-VCR. - Note You can program up to 7 events at a time to record up to select...
... Number Press the % button, then press the "$# buttons to leave the Record Safety Tab intact. Power On your TV. 1 Press the MENU button on the remote control. 2 Press the "$# buttons to a month in advance. Power On your DVD-VCR. - Note You can program up to 7 events at a time to record up to select...

User Manual (user Manual) (ver.1.0) (English, French)
Page 171
Recording will start in the SP mode, set . Stop the DVD-VCR or turn on and begin recording at the time you set the recording tape speed to finish setting the timer recording. ENG-83 Daily [... mode. VCR OPERATIONS Selecting Auto Speed If the length of the videotape is not long enough, the tape speed will automatically turn the power off. Then the DVD-VCR will automatically change from SP mode to record TV programs on the same channel at the same time every day Monday through Friday...
Recording will start in the SP mode, set . Stop the DVD-VCR or turn on and begin recording at the time you set the recording tape speed to finish setting the timer recording. ENG-83 Daily [... mode. VCR OPERATIONS Selecting Auto Speed If the length of the videotape is not long enough, the tape speed will automatically turn the power off. Then the DVD-VCR will automatically change from SP mode to record TV programs on the same channel at the same time every day Monday through Friday...

User Manual (user Manual) (ver.1.0) (English, French)
Page 173
...factory settings. • From a cold start /stop time settings. • If there was unsuccessful • Check the DVD-VCR antenna/cable connections. • Is the DVD-VCR tuner properly set? • Check if the safety tab is intact on tuner. Incorrect head cleaning can only be solved...slow motion to see • Check the tuner or external setting. Identifying VCR Problems Problem Action No power You cannot insert a video cassette • Check that the power plug is connected to the contents and find the section of the instruction book that contains the explanations ...
...factory settings. • From a cold start /stop time settings. • If there was unsuccessful • Check the DVD-VCR antenna/cable connections. • Is the DVD-VCR tuner properly set? • Check if the safety tab is intact on tuner. Incorrect head cleaning can only be solved...slow motion to see • Check the tuner or external setting. Identifying VCR Problems Problem Action No power You cannot insert a video cassette • Check that the power plug is connected to the contents and find the section of the instruction book that contains the explanations ...

User Manual (user Manual) (ver.1.0) (English, French)
Page 174
...;, 1Vp-p RF Antenna or CATV Input, F-Connector, 75Ω AUDIO 1 Stereo audio outputs, RCA Connector, -8dbm, 1.5KΩ AUDIO (DVD only) 1 Digital audio output (1 coaxial) 1 pair Stereo audio outputs Outputs VIDEO VIDEO (DVD only) 1 Composite video output, RCA Connector, 75Ω, 1Vp-p 1 S-Video output, S-Connector, 75Ω, Y=1.0Vp-p, C=0.286Vp-p 1 Component video output...
...;, 1Vp-p RF Antenna or CATV Input, F-Connector, 75Ω AUDIO 1 Stereo audio outputs, RCA Connector, -8dbm, 1.5KΩ AUDIO (DVD only) 1 Digital audio output (1 coaxial) 1 pair Stereo audio outputs Outputs VIDEO VIDEO (DVD only) 1 Composite video output, RCA Connector, 75Ω, 1Vp-p 1 S-Video output, S-Connector, 75Ω, Y=1.0Vp-p, C=0.286Vp-p 1 Component video output...

User Manual (user Manual) (ver.1.0) (English)
Page 2
...than the other apparatus (including amplifiers) that produce heat. 9) Do not defeat the safety purpose of the obsolete outlet. 10) Protect the power cord from being walked on or pinched particularly at plugs, convenience receptacles, and the point where they exit from tip-over. 14) Refer ...Unplug this apparatus near water. 6) Clean only with dry cloth. 7) Do not block any ventilation openings, Install in any heat sources such as power-supply cord or plug is required when the apparatus has been damaged in accordance with the manufacturer's instructions. 8) Do not install near any way,...
...than the other apparatus (including amplifiers) that produce heat. 9) Do not defeat the safety purpose of the obsolete outlet. 10) Protect the power cord from being walked on or pinched particularly at plugs, convenience receptacles, and the point where they exit from tip-over. 14) Refer ...Unplug this apparatus near water. 6) Clean only with dry cloth. 7) Do not block any ventilation openings, Install in any heat sources such as power-supply cord or plug is required when the apparatus has been damaged in accordance with the manufacturer's instructions. 8) Do not install near any way,...
User Manual (user Manual) (ver.1.0) (English)
Page 4
... can affect normal operation of Cabinet For safety reasons, be used only where the power supply is highly vulnerable to the ISO/IEC 11172-3 or ISO/IEC 13818-3. It cannot be used elsewhere. • This DVD player is designed and manufactured to respond to ISO/IEC 11172-3 or ISO/IEC ... for cleaning. • Wipe the cabinet with the POWER button, or disconnect and then reconnect the AC power cord to the outside of the disc. If the Region number of a DVD disc does not correspond to the Region number of this DVD player, the DVD player cannot play the disc. • The product ...
... can affect normal operation of Cabinet For safety reasons, be used only where the power supply is highly vulnerable to the ISO/IEC 11172-3 or ISO/IEC 13818-3. It cannot be used elsewhere. • This DVD player is designed and manufactured to respond to ISO/IEC 11172-3 or ISO/IEC ... for cleaning. • Wipe the cabinet with the POWER button, or disconnect and then reconnect the AC power cord to the outside of the disc. If the Region number of a DVD disc does not correspond to the Region number of this DVD player, the DVD player cannot play the disc. • The product ...
User Manual (user Manual) (ver.1.0) (English)
Page 6
... Control...12 Chapter 2: Connections Connecting the Antenna Cable ...13 Method1: Antenna + DVD-VCR + TV: No Cable box 13 Method2: Antenna + DVD-VCR + TV: Cable box with many scrambled channels 14 Method3: Antenna + DVD-VCR + TV: Cable box with a few scrambled channels 14 Before Connecting the...19 Connection to an Audio System (2 Channel Amplifier 19 Connection to an Audio System (Dolby digital, MPEG2 or DTS Amplifier 20 Connecting a Power Cord & Auto Setup ...21 Chapter 3: Initial Setup Selecting a Menu Language ...22 Setting the Clock ...23 Setting the Clock Automatically...23 Setting...
... Control...12 Chapter 2: Connections Connecting the Antenna Cable ...13 Method1: Antenna + DVD-VCR + TV: No Cable box 13 Method2: Antenna + DVD-VCR + TV: Cable box with many scrambled channels 14 Method3: Antenna + DVD-VCR + TV: Cable box with a few scrambled channels 14 Before Connecting the...19 Connection to an Audio System (2 Channel Amplifier 19 Connection to an Audio System (Dolby digital, MPEG2 or DTS Amplifier 20 Connecting a Power Cord & Auto Setup ...21 Chapter 3: Initial Setup Selecting a Menu Language ...22 Setting the Clock ...23 Setting the Clock Automatically...23 Setting...

User Manual (user Manual) (ver.1.0) (English)
Page 10
... activated. 2 The time, counter position, time remaining or current deck status is indicated. 3 VCR is activated. 4 DVD or CD media is loaded. 5 VHS videotape is stopped. 4 (POWER) Press to turn the DVD-VCR on and off. 5 LINE IN 2 Connect to the Video/Audio output jack of your external device. 6 P.SCAN Press...to open and close the disc tray. 8 Front Panel Display Operation indicators are displayed here. 9 CHANNEL and Press to change channels. 10 DVD/VCR Press to view DVD or VCR mode. 11 EZ VIEW The aspect ratio of a picture can easily be adjusted to your TV's screen size. 12 REC (...
... activated. 2 The time, counter position, time remaining or current deck status is indicated. 3 VCR is activated. 4 DVD or CD media is loaded. 5 VHS videotape is stopped. 4 (POWER) Press to turn the DVD-VCR on and off. 5 LINE IN 2 Connect to the Video/Audio output jack of your external device. 6 P.SCAN Press...to open and close the disc tray. 8 Front Panel Display Operation indicators are displayed here. 9 CHANNEL and Press to change channels. 10 DVD/VCR Press to view DVD or VCR mode. 11 EZ VIEW The aspect ratio of a picture can easily be adjusted to your TV's screen size. 12 REC (...
