
Quick Guide (easy Manual) (English)
Page 1
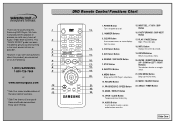
... of Audio / Video Entertainment. This 2 "QUICK START" guide has been included to get you up and running in the least amount of time as a toggle 19 8. PLAY / PAUSE Button Use to a previous menu. 16 6. INFO. VCR Select Button Displays the current disc mode. 15 5. RETURN Button Returns to remove menus or status displays Begin / Pause disc play. ENTER / DIRECTION Buttons 17 7. RECORD Button 22. MODE / REPEAT Button 13. CLEAR Button 17. AUDIO Button Use this 1 Samsung DVD-Player. REWIND / SKIP BACK Button 20. ANGLE / TIMER Button...
... of Audio / Video Entertainment. This 2 "QUICK START" guide has been included to get you up and running in the least amount of time as a toggle 19 8. PLAY / PAUSE Button Use to a previous menu. 16 6. INFO. VCR Select Button Displays the current disc mode. 15 5. RETURN Button Returns to remove menus or status displays Begin / Pause disc play. ENTER / DIRECTION Buttons 17 7. RECORD Button 22. MODE / REPEAT Button 13. CLEAR Button 17. AUDIO Button Use this 1 Samsung DVD-Player. REWIND / SKIP BACK Button 20. ANGLE / TIMER Button...
User Manual (user Manual) (ver.1.0) (English)
Page 4
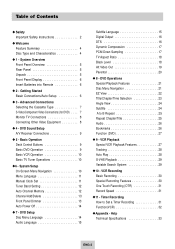
... Help Technical Specifications 33 ENG-3 Getting Started Basic Connections/Auto Setup 6 3 - Timer Recording How to B Repeat 25 Repeat Chapter/Title 25 Audio 26 Bookmarks 26 Function (DVD 27 9 - DVD Sound Setup A/V Receiver Connections 9 5 - Basic Operation Deck Control Buttons 9 Basic DVD Operation 9 Basic VCR Operation 10 Basic TV Tuner Operations 10 6 - System Overview Front Panel Overview 5 Rear Panel 5 Unpack 5 Front Panel Display 6 Insert Batteries into Remote 6 2 - VCR Playback Special VCR Playback Features 27 Tracking 28 Auto Play 28 S-VHS Playback 29...
... Help Technical Specifications 33 ENG-3 Getting Started Basic Connections/Auto Setup 6 3 - Timer Recording How to B Repeat 25 Repeat Chapter/Title 25 Audio 26 Bookmarks 26 Function (DVD 27 9 - DVD Sound Setup A/V Receiver Connections 9 5 - Basic Operation Deck Control Buttons 9 Basic DVD Operation 9 Basic VCR Operation 10 Basic TV Tuner Operations 10 6 - System Overview Front Panel Overview 5 Rear Panel 5 Unpack 5 Front Panel Display 6 Insert Batteries into Remote 6 2 - VCR Playback Special VCR Playback Features 27 Tracking 28 Auto Play 28 S-VHS Playback 29...
User Manual (user Manual) (ver.1.0) (English)
Page 5
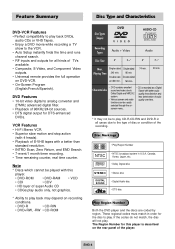
... play . functions can be played with better audio Dolby Digital and MPEG-2 quality, less distortion and system. screen menu.. * It may depend on the rear panel of the player. The Region Number for the disc to analog converter and 27MHz advanced digital filter. • Playback of TVs available. • Composite, S-Video, and Component Video outputs. • Universal remote provides the full operation on - Note * Discs which cannot be easily selected through the on DVD-VCR. • On-Screen Program (English...
... play . functions can be played with better audio Dolby Digital and MPEG-2 quality, less distortion and system. screen menu.. * It may depend on the rear panel of the player. The Region Number for the disc to analog converter and 27MHz advanced digital filter. • Playback of TVs available. • Composite, S-Video, and Component Video outputs. • Universal remote provides the full operation on - Note * Discs which cannot be easily selected through the on DVD-VCR. • On-Screen Program (English...
User Manual (user Manual) (ver.1.0) (English)
Page 6
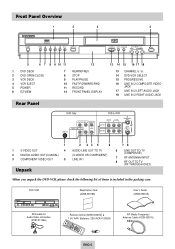
... Frequency) Antenna Cable (AC39-42001J) ENG-5 Front Panel Overview 1 2 3 4 5 6 7 8 9 10 11 12 1 DVD DECK 2 DVD OPEN/CLOSE 3 VCR DECK 4 VCR EJECT 5 POWER 6 EZ VIEW 7 REWIND/REV 8 STOP 9 PLAY/PAUSE 10 FAST-FORWARD/FWD 11 RECORD 12 FRONT PANEL DISPLAY Rear Panel 13 14 15 16 17 18 13 CHANNEL / 14 DVD-VCR SELECT 15 PROGRESSIVE 16 LINE IN 2 COMPOSITE VIDEO JACK 17 LINE IN 2 LEFT AUDIO JACK 18 LINE IN 2 RIGHT AUDIO JACK 1 1 S-VIDEO OUT 4 2 DIGITAL AUDIO OUT(COAXIAL) 3 COMPONENT VIDEO OUT 5 Unpack...
... Frequency) Antenna Cable (AC39-42001J) ENG-5 Front Panel Overview 1 2 3 4 5 6 7 8 9 10 11 12 1 DVD DECK 2 DVD OPEN/CLOSE 3 VCR DECK 4 VCR EJECT 5 POWER 6 EZ VIEW 7 REWIND/REV 8 STOP 9 PLAY/PAUSE 10 FAST-FORWARD/FWD 11 RECORD 12 FRONT PANEL DISPLAY Rear Panel 13 14 15 16 17 18 13 CHANNEL / 14 DVD-VCR SELECT 15 PROGRESSIVE 16 LINE IN 2 COMPOSITE VIDEO JACK 17 LINE IN 2 LEFT AUDIO JACK 18 LINE IN 2 RIGHT AUDIO JACK 1 1 S-VIDEO OUT 4 2 DIGITAL AUDIO OUT(COAXIAL) 3 COMPONENT VIDEO OUT 5 Unpack...
User Manual (user Manual) (ver.1.0) (English)
Page 7
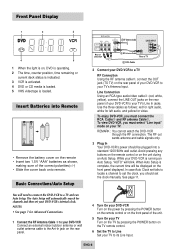
... connect the DVD-VCR to its Line Input. Line Connection Using an RCA-type audio/video cable➂ (red, white, yellow), connect the LINE OUT jacks on the front panel displayed. Avoid pressing any buttons on the remote control or on , DVD is operating. 2 The time, counter position, time remaining or current deck status is indicated. 3 VCR is activated. 4 DVD or CD media is loaded. 5 VHS videotape is loaded. The Auto Setup will be plugged into Remote • Remove the battery...
... connect the DVD-VCR to its Line Input. Line Connection Using an RCA-type audio/video cable➂ (red, white, yellow), connect the LINE OUT jacks on the front panel displayed. Avoid pressing any buttons on the remote control or on , DVD is operating. 2 The time, counter position, time remaining or current deck status is indicated. 3 VCR is activated. 4 DVD or CD media is loaded. 5 VHS videotape is loaded. The Auto Setup will be plugged into Remote • Remove the battery...
User Manual (user Manual) (ver.1.0) (English)
Page 8
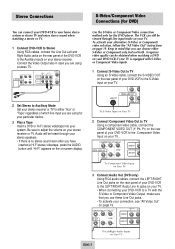
... AUDIO button until "Hi-Fi" appears on the on page 19. Be sure to adjust the volume on your alternative (S-Video or Component) video selection, follow the "Alt Video Out" instructions on -screen display. ENG-7 To Left/Right Audio Inputs on your stereo receiver. To Component Video Input on Your TV 3 Connect Audio Out (DVD only) Using RCA audio cables, connect the LEFT/RIGHT Line Out jacks on the rear panel of your DVD-VCR to the LEFT/RIGHT Audio...
... AUDIO button until "Hi-Fi" appears on the on page 19. Be sure to adjust the volume on your alternative (S-Video or Component) video selection, follow the "Alt Video Out" instructions on -screen display. ENG-7 To Left/Right Audio Inputs on your stereo receiver. To Component Video Input on Your TV 3 Connect Audio Out (DVD only) Using RCA audio cables, connect the LEFT/RIGHT Line Out jacks on the rear panel of your DVD-VCR to the LEFT/RIGHT Audio...
User Manual (user Manual) (ver.1.0) (English)
Page 9
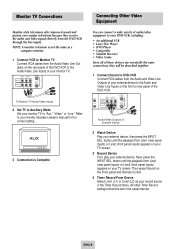
... television owner's manual for the correct setting. 3 Connection is not the same as your record source in the usual manner. button until the playback from Line1 (rear panel inputs) or Line2 (front panel inputs) appears on your TV screen. 3 Record Device First, play your external device. All other Timer Record settings should be described together. 1 Connect Device to DVD-VCR Connect RCA cables from the Audio and Video Line Outputs of your external device to the Audio and Video Line Inputs on the rear panel...
... television owner's manual for the correct setting. 3 Connection is not the same as your record source in the usual manner. button until the playback from Line1 (rear panel inputs) or Line2 (front panel inputs) appears on your TV screen. 3 Record Device First, play your external device. All other Timer Record settings should be described together. 1 Connect Device to DVD-VCR Connect RCA cables from the Audio and Video Line Outputs of your external device to the Audio and Video Line Inputs on the rear panel...
User Manual (user Manual) (ver.1.0) (English)
Page 10
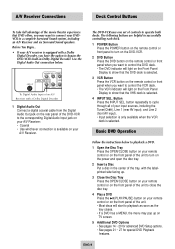
... an A/V Receiver and six Surround Sound speakers. Before You Begin... • If your A/V receiver is selected. The following buttons are helpful in successfully controlling each deck. 1 POWER Button Press the POWER button on the remote control or front panel to turn on the power and open the disc tray. 2 Insert a Disc Put a disc in Dolby Digital Decoder. The DVD-VCR uses one set of controls to operate both decks. Basic DVD Operation Follow the instructions below . button repeatedly to cycle through all of your input sources...
... an A/V Receiver and six Surround Sound speakers. Before You Begin... • If your A/V receiver is selected. The following buttons are helpful in successfully controlling each deck. 1 POWER Button Press the POWER button on the remote control or front panel to turn on the power and open the disc tray. 2 Insert a Disc Put a disc in Dolby Digital Decoder. The DVD-VCR uses one set of controls to operate both decks. Basic DVD Operation Follow the instructions below . button repeatedly to cycle through all of your input sources...

User Manual (user Manual) (ver.1.0) (English)
Page 11
... buttons to select the desired channel directly. • Press the button number one for Timer Recording features. When watching TV using the DVD-VCR's built-in DVD and VCR mode. This function is turned on -screen menus. Language : English Front Display Auto Power Off : Auto : Off 1 MENU Button Press this button while the DVD is missing the Record Safety Tab. See page 28. 3 Stop Playback Press the s (STOP) button on the remote control or on -screen MENU all together. Button Press this button to return to the last MENU screen displayed...
... buttons to select the desired channel directly. • Press the button number one for Timer Recording features. When watching TV using the DVD-VCR's built-in DVD and VCR mode. This function is turned on -screen menus. Language : English Front Display Auto Power Off : Auto : Off 1 MENU Button Press this button while the DVD is missing the Record Safety Tab. See page 28. 3 Stop Playback Press the s (STOP) button on the remote control or on -screen MENU all together. Button Press this button to return to the last MENU screen displayed...

User Manual (user Manual) (ver.1.0) (English)
Page 12
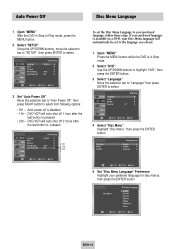
Language : English Front Display Auto Power Off : Auto : Off 4 Select "Manual Clock" Move the highlight to "Manual Clock", then press the ENTER button. • The Clock Set/Adjust menu will change the on-screen MENU language to English, French or Spanish, follow these steps. 1 Open "MENU" Press the MENU button while the DVD is in Stop or Play mode. 2 Select "SETUP" Using the UP/DOWN buttons, move the selection bar to "SETUP" then press ENTER to select. 3 Select "Clock" Use the UP/DOWN buttons to highlight "Clock " then press the ENTER button. Set the...
Language : English Front Display Auto Power Off : Auto : Off 4 Select "Manual Clock" Move the highlight to "Manual Clock", then press the ENTER button. • The Clock Set/Adjust menu will change the on-screen MENU language to English, French or Spanish, follow these steps. 1 Open "MENU" Press the MENU button while the DVD is in Stop or Play mode. 2 Select "SETUP" Using the UP/DOWN buttons, move the selection bar to "SETUP" then press ENTER to select. 3 Select "Clock" Use the UP/DOWN buttons to highlight "Clock " then press the ENTER button. Set the...
User Manual (user Manual) (ver.1.0) (English)
Page 13
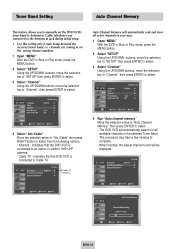
... Auto Setup detected the incorrect tuner band, i.e. Language : English Front Display Auto Power Off : Auto : Off 4 Run "Auto channel memory" Move the selection arrow to "Auto Channel Memory," then press ENTER to select from the following options: • Antenna - Language : English Front Display Auto Power Off : Auto : Off 4 Select "Ant./Cable" Move the selection arrow to "Ant./Cable" then press RIGHT button to select. • The DVD-VCR will automatically seek and store all available channels in Stop or Play mode, press the MENU button. 2 Select "SETUP" Using...
... Auto Setup detected the incorrect tuner band, i.e. Language : English Front Display Auto Power Off : Auto : Off 4 Run "Auto channel memory" Move the selection arrow to "Auto Channel Memory," then press ENTER to select from the following options: • Antenna - Language : English Front Display Auto Power Off : Auto : Off 4 Select "Ant./Cable" Move the selection arrow to "Ant./Cable" then press RIGHT button to select. • The DVD-VCR will automatically seek and store all available channels in Stop or Play mode, press the MENU button. 2 Select "SETUP" Using...
User Manual (user Manual) (ver.1.0) (English)
Page 15
DVD-VCR will auto shut off 1 hour after the last button is disabled. • 1Hr - Language : English Off Front Display : Auto 1Hr Auto Power Off : Off 2Hr To set to select. If your preferred language is available on a DVD, your preferred language, follow these steps. Auto power off 2 hours after the last button is in Stop or Play mode, press the MENU button. 2 Select "SETUP" Using the UP/DOWN buttons, move the selection bar to "SETUP" then press ENTER to the...
DVD-VCR will auto shut off 1 hour after the last button is disabled. • 1Hr - Language : English Off Front Display : Auto 1Hr Auto Power Off : Off 2Hr To set to select. If your preferred language is available on a DVD, your preferred language, follow these steps. Auto power off 2 hours after the last button is in Stop or Play mode, press the MENU button. 2 Select "SETUP" Using the UP/DOWN buttons, move the selection bar to "SETUP" then press ENTER to the...

User Manual (user Manual) (ver.1.0) (English)
Page 19
... most important part of the picture visible) wide screen movies to view the full 16:9 picture on a standard 4:3 television. This is in Stop mode. 2 Select "DVD" Use the UP/DOWN buttons to highlight "DVD " then press the ENTER button. 3 Select "Display" Highlight "Display", then press the ENTER button. 4 Set "TV Aspect" Highlight "TV Aspect" then press the RIGHT button to select one of the following options: • On - Display Setup 4 Set "Black Level" Highlight "Black Level," then...
... most important part of the picture visible) wide screen movies to view the full 16:9 picture on a standard 4:3 television. This is in Stop mode. 2 Select "DVD" Use the UP/DOWN buttons to highlight "DVD " then press the ENTER button. 3 Select "Display" Highlight "Display", then press the ENTER button. 4 Set "TV Aspect" Highlight "TV Aspect" then press the RIGHT button to select one of the following options: • On - Display Setup 4 Set "Black Level" Highlight "Black Level," then...
User Manual (user Manual) (ver.1.0) (English)
Page 20
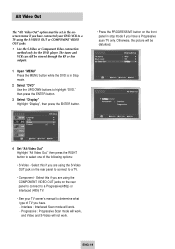
... tuner and VCR can still be set in stop mode if you have connected your TV owner's manual to select one of TV you have a Progressive scan TV only. Progressive : Progressive Scan mode will work, and Video and S-Video will not work . - Display Setup On 4 Set "Alt Video Out" Highlight "Alt Video Out," then press the RIGHT button to determine what type of the following options: • S-Video - Select this if you are using the COMPONENT VIDEO OUT jacks on the rear panel...
... tuner and VCR can still be set in stop mode if you have connected your TV owner's manual to select one of TV you have a Progressive scan TV only. Progressive : Progressive Scan mode will work, and Video and S-Video will not work . - Display Setup On 4 Set "Alt Video Out" Highlight "Alt Video Out," then press the RIGHT button to determine what type of the following options: • S-Video - Select this if you are using the COMPONENT VIDEO OUT jacks on the rear panel...

User Manual (user Manual) (ver.1.0) (English)
Page 24
.... button on the remote control. 2 Select title Use the UP/DOWN and LEFT/RIGHT buttons to select Title, then press the numeric buttons or LEFT/RIGHT buttons to enter the desired counter position in English 5.1CH. In the Audio example, the soundtrack is played in the format H:MM:SS (H = Hours, M = Minutes, S = Seconds). A DVD disc can quickly find a specific passage. The Information screen can have up to the subtitle languages...
.... button on the remote control. 2 Select title Use the UP/DOWN and LEFT/RIGHT buttons to select Title, then press the numeric buttons or LEFT/RIGHT buttons to enter the desired counter position in English 5.1CH. In the Audio example, the soundtrack is played in the format H:MM:SS (H = Hours, M = Minutes, S = Seconds). A DVD disc can quickly find a specific passage. The Information screen can have up to the subtitle languages...

User Manual (user Manual) (ver.1.0) (English)
Page 28
... forward or backward at two speeds: • Picture Search - Jet Search. Press and release to review the last 15 seconds of special playback features, including Still, Frame Advance, Skip, Repeat, and more. Information Highlight "Information", then press the ENTER button. - Picture Search - Function (DVD) Special VCR Playback Features Use this feature to check your DVD. 1 Open "MENU" With the DVD in Play mode, press the MENU button. 2 Select "FUNCTION" Use the UP/DOWN buttons...
... forward or backward at two speeds: • Picture Search - Jet Search. Press and release to review the last 15 seconds of special playback features, including Still, Frame Advance, Skip, Repeat, and more. Information Highlight "Information", then press the ENTER button. - Picture Search - Function (DVD) Special VCR Playback Features Use this feature to check your DVD. 1 Open "MENU" With the DVD in Play mode, press the MENU button. 2 Select "FUNCTION" Use the UP/DOWN buttons...
User Manual (user Manual) (ver.1.0) (English)
Page 31
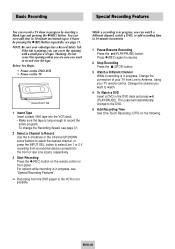
... in progress by pressing the (REC)button repeatedly; Before You Begin... • Power on the DVD-VCR • Power on the remote control or front panel. Press (REC) again to the DVD. 5 Add Recording Time See One-Touch Recording (OTR) on the following. see page 31. button to select Line 1 or 2 if recording from the DVD player to the VCR is long enough to the front or rear Line inputs, respectively. 3 Start Recording...
... in progress by pressing the (REC)button repeatedly; Before You Begin... • Power on the DVD-VCR • Power on the remote control or front panel. Press (REC) again to the DVD. 5 Add Recording Time See One-Touch Recording (OTR) on the following. see page 31. button to select Line 1 or 2 if recording from the DVD player to the VCR is long enough to the front or rear Line inputs, respectively. 3 Start Recording...

User Manual (user Manual) (ver.1.0) (English)
Page 33
How to Set a Timer Recording Function (VCR) 4 Set "Time/Date/Speed" Repeat Step 3 above to set the recording tape speed to "AUTO". Date can be set for a timer recording in the SP mode. Stop the VCR or turn on the same channel at the same time every day Monday through Friday. If you set the timer program, press the ENTER key Timer Program 1 Open "MENU" In the DVD in Stop or Play mode, press the MENU button. 2 Select "FUNCTION" Use the UP/DOWN buttons to highlight "FUNCTION" then press...
How to Set a Timer Recording Function (VCR) 4 Set "Time/Date/Speed" Repeat Step 3 above to set the recording tape speed to "AUTO". Date can be set for a timer recording in the SP mode. Stop the VCR or turn on the same channel at the same time every day Monday through Friday. If you set the timer program, press the ENTER key Timer Program 1 Open "MENU" In the DVD in Stop or Play mode, press the MENU button. 2 Select "FUNCTION" Use the UP/DOWN buttons to highlight "FUNCTION" then press...
User Manual (user Manual) (ver.1.0) (English)
Page 34
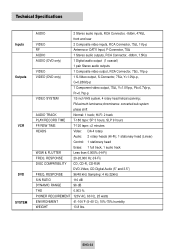
...;, front and rear VIDEO 2 Composite video inputs, RCA Connector, 75Ω, 1Vp-p RF Antenna or CATV Input, F-Connector, 75Ω AUDIO 1 Stereo audio outputs, RCA Connector, -8dbm, 1.5KΩ AUDIO (DVD only) 1 Digital audio output (1 coaxial) 1 pair Stereo audio outputs VIDEO 1 Composite video output, RCA Connector, 75Ω, 1Vp-p VIDEO (DVD only) 1 S-Video output, S-Connector, 75Ω, Y=1.0Vp-p, C=0.286Vp-p 1 Component video output, 75Ω, Y=1.0Vp-p, Pb=0.7Vp-p, Pr=0.7Vp-p VIDEO SYSTEM 1/2-inch VHS system, 4 rotary head helical scanning;
...;, front and rear VIDEO 2 Composite video inputs, RCA Connector, 75Ω, 1Vp-p RF Antenna or CATV Input, F-Connector, 75Ω AUDIO 1 Stereo audio outputs, RCA Connector, -8dbm, 1.5KΩ AUDIO (DVD only) 1 Digital audio output (1 coaxial) 1 pair Stereo audio outputs VIDEO 1 Composite video output, RCA Connector, 75Ω, 1Vp-p VIDEO (DVD only) 1 S-Video output, S-Connector, 75Ω, Y=1.0Vp-p, C=0.286Vp-p 1 Component video output, 75Ω, Y=1.0Vp-p, Pb=0.7Vp-p, Pr=0.7Vp-p VIDEO SYSTEM 1/2-inch VHS system, 4 rotary head helical scanning;
User Manual (user Manual) (ver.1.0) (English)
Page 35
... SOLD BY SAMSUNG NOT CAUSED DIRECTLY BY THE NEGLIGENCE OF SAMSUNG. This warranty gives you specific legal rights, and you . Warranty service can only be defective during the limited warranty period specified above limitations or exclusions may not apply to noise, echo, interference or other signal transmission and delivery problems. SAMSUNG does not warrant uninterrupted or error-free operation of the purchaser. All replaced parts and...
... SOLD BY SAMSUNG NOT CAUSED DIRECTLY BY THE NEGLIGENCE OF SAMSUNG. This warranty gives you specific legal rights, and you . Warranty service can only be defective during the limited warranty period specified above limitations or exclusions may not apply to noise, echo, interference or other signal transmission and delivery problems. SAMSUNG does not warrant uninterrupted or error-free operation of the purchaser. All replaced parts and...


