
User Manual (user Manual) (ver.1.0) (English)
Page 3
...Search System 54 5 Table of Contents x 5 - DVD Sound Setup 35 s A/V Receiver Connections 35 x 7 - Basic Operation 14 s Deck Control Buttons 14 s Basic DVD Operation 14 s Basic VCR Operation 15 s Basic TV Tuner Operations 16 x 4 - DVD Operations 36 s Special Playback Features 36 s Disc Menu...CD Playback 48 s 3D Sound 50 s Function (DVD 51 x 8 - System Overview 9 s Front Panel Overview 9 s Rear Panel 10 s Front Panel Display 10 s Remote Control Overview 11 s Insert Batteries into Remote 11 s Using the TV Buttons on the Remote Control 12 x 2 - System Setup 16 s On-Screen...
...Search System 54 5 Table of Contents x 5 - DVD Sound Setup 35 s A/V Receiver Connections 35 x 7 - Basic Operation 14 s Deck Control Buttons 14 s Basic DVD Operation 14 s Basic VCR Operation 15 s Basic TV Tuner Operations 16 x 4 - DVD Operations 36 s Special Playback Features 36 s Disc Menu...CD Playback 48 s 3D Sound 50 s Function (DVD 51 x 8 - System Overview 9 s Front Panel Overview 9 s Rear Panel 10 s Front Panel Display 10 s Remote Control Overview 11 s Insert Batteries into Remote 11 s Using the TV Buttons on the Remote Control 12 x 2 - System Setup 16 s On-Screen...
User Manual (user Manual) (ver.1.0) (English)
Page 4
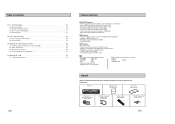
... inputs and outputs for Audio/Video connection (AC99-10500H) RF (Radio Frequency) Antenna Cable (AC39-42001J) Remote Control (AK59-00008A) 1.5V "AAA" Batteries- 2EA (AC43-12002H) OPEN/CLOSE POWER 7 Help 64 s Technical Specifications 64 6 Feature Summary DVD+VCR Features • Perfect compatibility to Set a Timer Recording 58 s Function(VCR 59 x Appendix A - Note *Discs...
... inputs and outputs for Audio/Video connection (AC99-10500H) RF (Radio Frequency) Antenna Cable (AC39-42001J) Remote Control (AK59-00008A) 1.5V "AAA" Batteries- 2EA (AC43-12002H) OPEN/CLOSE POWER 7 Help 64 s Technical Specifications 64 6 Feature Summary DVD+VCR Features • Perfect compatibility to Set a Timer Recording 58 s Function(VCR 59 x Appendix A - Note *Discs...
User Manual (user Manual) (ver.1.0) (English)
Page 6
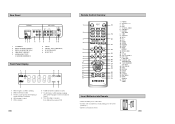
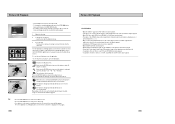
.... 27 RETURN 28 ENTER 29 RIGHT 30 EZ VIEW 31 DISC MENU 32 MARK SEARCH 33 ANGLE TIMER Insert Batteries into Remote • Remove the battery cover on , DVD is operating. 2 DVD or CD media is loaded. 3 The time, counter position, time remaining or current deck status is indicated. 4 VHS videotape is loaded... videotape is playing (The current TV program or video is broadcast in Stereo.) 8 Timer Recording is activated. It also blinks when you pause VCR. 10 Remote Control Overview POWER 1 2 3 4 5 6 7 8 9 10 11 12 13 14 15 16 17 OPEN/CLOSE 18 19 20 21 22 23 24 25 26 27 28 29 30...
.... 27 RETURN 28 ENTER 29 RIGHT 30 EZ VIEW 31 DISC MENU 32 MARK SEARCH 33 ANGLE TIMER Insert Batteries into Remote • Remove the battery cover on , DVD is operating. 2 DVD or CD media is loaded. 3 The time, counter position, time remaining or current deck status is indicated. 4 VHS videotape is loaded... videotape is playing (The current TV program or video is broadcast in Stereo.) 8 Timer Recording is activated. It also blinks when you pause VCR. 10 Remote Control Overview POWER 1 2 3 4 5 6 7 8 9 10 11 12 13 14 15 16 17 OPEN/CLOSE 18 19 20 21 22 23 24 25 26 27 28 29 30...

User Manual (user Manual) (ver.1.0) (English)
Page 7
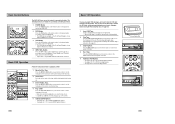
...remote control will work on the front panel. POWER OPEN/CLOSE To determine whether your DVD-VCR to run Auto compatible brands. Use the three cables as follows: red for right MITSUBISHI 13 TELEFUNKEN 26 audio, white for left audio, and yellow for Advanced Connections. 1 1 Switch your television on the rear panel. 3 SAMSUNG... 01, 14, 15, 23 LOEWE 28 2 Connect your television is compatible with the 3 Plug In remote control. Avoid pressing any buttons on the remote control or on the back panel of the following ...
...remote control will work on the front panel. POWER OPEN/CLOSE To determine whether your DVD-VCR to run Auto compatible brands. Use the three cables as follows: red for right MITSUBISHI 13 TELEFUNKEN 26 audio, white for left audio, and yellow for Advanced Connections. 1 1 Switch your television on the rear panel. 3 SAMSUNG... 01, 14, 15, 23 LOEWE 28 2 Connect your television is compatible with the 3 Plug In remote control. Avoid pressing any buttons on the remote control or on the back panel of the following ...
User Manual (user Manual) (ver.1.0) (English)
Page 8
... Put a disc in successfully controlling each deck. 1 POWER Button Press the POWER button on the remote control or front panel to turn on the DVD-VCR. 2 DVD Button Press the DVD button on the remote control or front panel when you want to control the DVD deck. • The DVD indicator will light on the Front... 51 for Timer Recording features. Deck Control Buttons POWER 1 2 OPEN/CLOSE 3 4 The DVD-VCR uses one set of controls to show that the DVD deck is selected. 3 VCR Button Press the VCR button on the remote control or front panel when you want to control the VCR deck. • The ...
... Put a disc in successfully controlling each deck. 1 POWER Button Press the POWER button on the remote control or front panel to turn on the DVD-VCR. 2 DVD Button Press the DVD button on the remote control or front panel when you want to control the DVD deck. • The DVD indicator will light on the Front... 51 for Timer Recording features. Deck Control Buttons POWER 1 2 OPEN/CLOSE 3 4 The DVD-VCR uses one set of controls to show that the DVD deck is selected. 3 VCR Button Press the VCR button on the remote control or front panel when you want to control the VCR deck. • The ...
User Manual (user Manual) (ver.1.0) (English)
Page 18
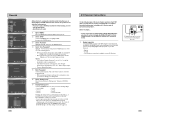
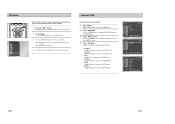
... to view the Rating Level. No additional settings are rated. 1 Open "MENU" Press the MENU button while the DVD is in Stop mode. 2 Select "DVD" Use the UP/DOWN buttons to highlight "DVD " then press the ENTER button. 3 Select "Parental" Highlight "Parental", then press the ENTER button. 4 Select "... on their corresponding Digital Audio Input jacks on your A/V Receiver: • Optical • Coaxial • Use whichever connection is available on the remote control to enter the 4-digit password. • Write your password down, and keep it in a safe place in case you need it to change ...
... to view the Rating Level. No additional settings are rated. 1 Open "MENU" Press the MENU button while the DVD is in Stop mode. 2 Select "DVD" Use the UP/DOWN buttons to highlight "DVD " then press the ENTER button. 3 Select "Parental" Highlight "Parental", then press the ENTER button. 4 Select "... on their corresponding Digital Audio Input jacks on your A/V Receiver: • Optical • Coaxial • Use whichever connection is available on the remote control to enter the 4-digit password. • Write your password down, and keep it in a safe place in case you need it to change ...
User Manual (user Manual) (ver.1.0) (English)
Page 19
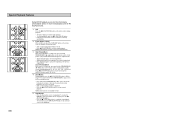
... Playback Features During DVD/CD playback you press ❿ll (PLAY/PAUSE), the disc will start over from the beginning. 36 To resume normal playback, press the ❿ll (Play/Pause) button. 2 1 1 Still Press the ❿ll (PLAY/PAUSE) button on the remote control to advance one frame... at a time. • Audio is muted during Frame Advance mode. • Press ❿ll (PLAY/PAUSE) to resume normal playback. 3 3 NOTE: Frame Advance operates only in the forward direction. 3 Skip Forward/Back While a CD or DVD disc is not ...
... Playback Features During DVD/CD playback you press ❿ll (PLAY/PAUSE), the disc will start over from the beginning. 36 To resume normal playback, press the ❿ll (Play/Pause) button. 2 1 1 Still Press the ❿ll (PLAY/PAUSE) button on the remote control to advance one frame... at a time. • Audio is muted during Frame Advance mode. • Press ❿ll (PLAY/PAUSE) to resume normal playback. 3 3 NOTE: Frame Advance operates only in the forward direction. 3 Skip Forward/Back While a CD or DVD disc is not ...
User Manual (user Manual) (ver.1.0) (English)
Page 21
... stretched. 3 If you are cut off and the full screen appears. For 4:3 aspect ratio discs • Normal Screen Displays the content of the DVD title in the disc. Refers to enter the desired counter position. ➢ To make the screen disappear, press the INFO button again. EZ View ...the screen in Title the disc. Subtitle You will be able to enter the desired counter position in English 5.1CH. button during DVD playback. button on the remote control. 2 Select title Use the UP/DOWN and LEFT/RIGHT buttons to select Title, then press the ENTER button to change among ...
... stretched. 3 If you are cut off and the full screen appears. For 4:3 aspect ratio discs • Normal Screen Displays the content of the DVD title in the disc. Refers to enter the desired counter position. ➢ To make the screen disappear, press the INFO button again. EZ View ...the screen in Title the disc. Subtitle You will be able to enter the desired counter position in English 5.1CH. button during DVD playback. button on the remote control. 2 Select title Use the UP/DOWN and LEFT/RIGHT buttons to select Title, then press the ENTER button to change among ...

User Manual (user Manual) (ver.1.0) (English)
Page 23
... as Dolby Digital 5.1, Dolby Pro Logic, or LPCM 2 Channel audio, are available on the remote control. 2 Select DVD Audio Track Use the LEFT/RIGHT buttons to B Repeat 4 1 DVD Off Chapter Title A - A to select the desired language/audio setup on the DVD. • Languages are represented by abbreviations, e.g. You can repeat a single chapter or a complete title...
... as Dolby Digital 5.1, Dolby Pro Logic, or LPCM 2 Channel audio, are available on the remote control. 2 Select DVD Audio Track Use the LEFT/RIGHT buttons to B Repeat 4 1 DVD Off Chapter Title A - A to select the desired language/audio setup on the DVD. • Languages are represented by abbreviations, e.g. You can repeat a single chapter or a complete title...
User Manual (user Manual) (ver.1.0) (English)
Page 24
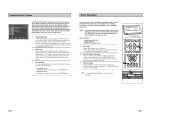
... Play When an MP3/WMA Disc is inserted into the DVD player, the first song file of the screen. Press ENTER to one of your favorite scene or song. 1 Open Bookmark Menu During playback, press the MARK button on the remote controller is playing, the music folder menu will be displayed at...song file. CLEAR Up to three Bookmarks can be highlighted. 3 Set the Bookmark Keep on playing the DVD up on the right side of the first folder plays. • If more information on the remote control. • Use the LEFT/RIGHT buttons to move to begin playback of file extensions. MP3/WMA Play...
... Play When an MP3/WMA Disc is inserted into the DVD player, the first song file of the screen. Press ENTER to one of your favorite scene or song. 1 Open Bookmark Menu During playback, press the MARK button on the remote controller is playing, the music folder menu will be displayed at...song file. CLEAR Up to three Bookmarks can be highlighted. 3 Set the Bookmark Keep on playing the DVD up on the right side of the first folder plays. • If more information on the remote control. • Use the LEFT/RIGHT buttons to move to begin playback of file extensions. MP3/WMA Play...
User Manual (user Manual) (ver.1.0) (English)
Page 26
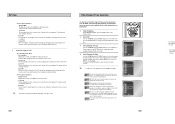
... in the multisession disc, the disc can be played only up to the blank segment. • A maximum of 500 images can be stored on the remote controller pressed for 60 seconds, the menu will disappear and the selected item will disappear. Picture CD Playback ALBUM PHOTO: 1 /215 PHOTO: 1 /215 PHOTO:...longer to view a Photo CD. • To change automatically with the labeled side up. 3. Press the Up/Down or Left/Right buttons on the remote controller to display the menu again. 48 Picture CD Playback CD-R JPEG Discs • Only files with the ".jpg" and ".JPG" extensions can be ...
... in the multisession disc, the disc can be played only up to the blank segment. • A maximum of 500 images can be stored on the remote controller pressed for 60 seconds, the menu will disappear and the selected item will disappear. Picture CD Playback ALBUM PHOTO: 1 /215 PHOTO: 1 /215 PHOTO:...longer to view a Photo CD. • To change automatically with the labeled side up. 3. Press the Up/Down or Left/Right buttons on the remote controller to display the menu again. 48 Picture CD Playback CD-R JPEG Discs • Only files with the ".jpg" and ".JPG" extensions can be ...
User Manual (user Manual) (ver.1.0) (English)
Page 27
button again. Repeat Highlight "Repeat", then press the ENTER button. - Function (DVD) Use this feature to select. 4 Select "Title Menu" Highlight "Title Menu", then press the ENTER button. - button on the remote control. 2 Set 3D Sound Use the UP/DOWN buttons to select "3D Sound" item. 3 Use the... LEFT/RIGHT buttons to confirm your DVD. 1 Open "MENU" With the DVD in Play mode, press the MENU button. 2 Select "FUNCTION" Use...
button again. Repeat Highlight "Repeat", then press the ENTER button. - Function (DVD) Use this feature to select. 4 Select "Title Menu" Highlight "Title Menu", then press the ENTER button. - button on the remote control. 2 Set 3D Sound Use the UP/DOWN buttons to select "3D Sound" item. 3 Use the... LEFT/RIGHT buttons to confirm your DVD. 1 Open "MENU" With the DVD in Play mode, press the MENU button. 2 Select "FUNCTION" Use...

User Manual (user Manual) (ver.1.0) (English)
Page 28
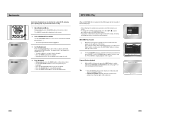
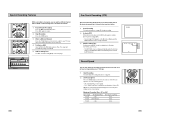
Press the Play button again to resume normal playback. 1 Still From Play mode, press Play/Pause to still a single frame. 2 Frame Advance From still mode, press F.ADV/SKIP to advance to the next frame. 3 Cue/Review From Play mode, press F.Forward (❿❿) or Rewind (➛➛) to cue/review at 7 times normal speed. 4 Skip From Play mode, press F.ADV/SKIP to cue ahead exactly 30 seconds. Special VCR Playback Features PLAY 0:00:00 SP Press the INFO. button to advance the tape forward or backward at 5 times normal speed. • Jet Search - Press and hold to Jet ...
Press the Play button again to resume normal playback. 1 Still From Play mode, press Play/Pause to still a single frame. 2 Frame Advance From still mode, press F.ADV/SKIP to advance to the next frame. 3 Cue/Review From Play mode, press F.Forward (❿❿) or Rewind (➛➛) to cue/review at 7 times normal speed. 4 Skip From Play mode, press F.ADV/SKIP to cue ahead exactly 30 seconds. Special VCR Playback Features PLAY 0:00:00 SP Press the INFO. button to advance the tape forward or backward at 5 times normal speed. • Jet Search - Press and hold to Jet ...
User Manual (user Manual) (ver.1.0) (English)
Page 29
... is stopped, press the ENTER button. If the tab is probably because the cassette was recorded on the remote control or front panel. button to select Line 1 or 2 if recording from the DVD player to stop mode. When a program is recorded, the starting point is stopped, press ENTER button.... trouble finding a mark, it is missing, you want to set your videotape has a Record Safety Tab. While a cassette is not possible. 3 1 3 2 DVD/VCR PROGRESSIVE 54 55 The VCR will rewind or fast forward, searching for easy location. Reverse Intro Scan Highlight "Reverse Intro Scan", then press the...
... is stopped, press the ENTER button. If the tab is probably because the cassette was recorded on the remote control or front panel. button to select Line 1 or 2 if recording from the DVD player to stop mode. When a program is recorded, the starting point is stopped, press ENTER button.... trouble finding a mark, it is missing, you want to set your videotape has a Record Safety Tab. While a cassette is not possible. 3 1 3 2 DVD/VCR PROGRESSIVE 54 55 The VCR will rewind or fast forward, searching for easy location. Reverse Intro Scan Highlight "Reverse Intro Scan", then press the...
User Manual (user Manual) (ver.1.0) (English)
Page 30
...Start Recording Follow the Basic Recording instructions on page 55. 2 Set Record Speed 2 Press the SPEED button on your television. 4 To Watch a DVD Insert a DVD in 30-minute increments. 1 1 Pause/Resume Recording Press the ❿ll (PLAY/PAUSE) button. Standard Play, for maximum recording time (3 times ...2 2 Stop Recording Press the STOP button. 3 Watch a Different Channel Press the TV/VCR button on the remote to switch to your TV tuner, 3 then select a different channel on the remote control to set the Record Speed to fit six hours of the following options: • SP -
...Start Recording Follow the Basic Recording instructions on page 55. 2 Set Record Speed 2 Press the SPEED button on your television. 4 To Watch a DVD Insert a DVD in 30-minute increments. 1 1 Pause/Resume Recording Press the ❿ll (PLAY/PAUSE) button. Standard Play, for maximum recording time (3 times ...2 2 Stop Recording Press the STOP button. 3 Watch a Different Channel Press the TV/VCR button on the remote to switch to your TV tuner, 3 then select a different channel on the remote control to set the Record Speed to fit six hours of the following options: • SP -


