
User Manual (user Manual) (ver.1.0) (English)
Page 1
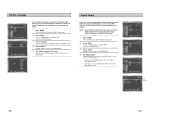
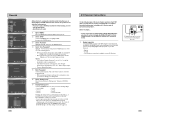
Instruction Manual DVD-V3500 DVD/VCR PROGRESSIVE EJECT POWER OPEN/CLOSE www.samsungusa.com
Instruction Manual DVD-V3500 DVD/VCR PROGRESSIVE EJECT POWER OPEN/CLOSE www.samsungusa.com
User Manual (user Manual) (ver.1.0) (English)
Page 3
...Compression 29 s PCM Down Sampling 30 s TV Aspect Ratio 31 s Black Level 32 s Alt Video Out 33 s Parental 34 x 6 - DVD Operations 36 s Special Playback Features 36 s Disc Menu Navigation 37 s EZ View 37 s Title/Chapter/Time Selection 39 s Angle View 40 ... Characteristics 8 x 1 - VCR Playback 52 s Special VCR Playback Features 52 s Tracking 52 s Auto Play 53 s S-VHS Playback 53 s Variable Search System 54 5 DVD Sound Setup 35 s A/V Receiver Connections 35 x 7 - Getting Started 13 s Basic Connections/Auto Setup 13 x 3 - Table of Contents x 5 - System Overview 9...
...Compression 29 s PCM Down Sampling 30 s TV Aspect Ratio 31 s Black Level 32 s Alt Video Out 33 s Parental 34 x 6 - DVD Operations 36 s Special Playback Features 36 s Disc Menu Navigation 37 s EZ View 37 s Title/Chapter/Time Selection 39 s Angle View 40 ... Characteristics 8 x 1 - VCR Playback 52 s Special VCR Playback Features 52 s Tracking 52 s Auto Play 53 s S-VHS Playback 53 s Variable Search System 54 5 DVD Sound Setup 35 s A/V Receiver Connections 35 x 7 - Getting Started 13 s Basic Connections/Auto Setup 13 x 3 - Table of Contents x 5 - System Overview 9...
User Manual (user Manual) (ver.1.0) (English)
Page 4
...slow motion and stop action (with 4 heads). • Playback of Contents x 9 - Note *Discs which cannot be played with this player. • DVD-ROM • DVD-RAM • CD-ROM • CDV • CDI • VCD • HD layer of Super Audio CD • CDGs play audio only,... s Special Recording Features 56 s One Touch Recording (OTR 57 s Record Speed 57 x 10 - Help 64 s Technical Specifications 64 6 Feature Summary DVD+VCR Features • Perfect compatibility to the VCR. • Auto Setup instantly finds the time and runs channel search. • RF inputs and outputs...
...slow motion and stop action (with 4 heads). • Playback of Contents x 9 - Note *Discs which cannot be played with this player. • DVD-ROM • DVD-RAM • CD-ROM • CDV • CDI • VCD • HD layer of Super Audio CD • CDGs play audio only,... s Special Recording Features 56 s One Touch Recording (OTR 57 s Record Speed 57 x 10 - Help 64 s Technical Specifications 64 6 Feature Summary DVD+VCR Features • Perfect compatibility to the VCR. • Auto Setup instantly finds the time and runs channel search. • RF inputs and outputs...
User Manual (user Manual) (ver.1.0) (English)
Page 5
... and audio functions can be easily selected through the onscreen menu. • CD is recorded as a Digital Signal with the corresponding logos: Disc Types (Logos) DVD V I D E O AUDIO-CD Recording Types Audio + Video Disc Size 5" 31/2" Max. These regional codes must match in U.S.A, Canada, Korea, Japan, ... disc STEREO • Stereo disc DIGITAL SOUND • Digital Audio disc • DTS disc • MP3 disc Play Region Number Both the DVD player and the discs are coded by region. Double-sided 480 min. Single-sided 80 min. Disc Markings ~ • Play Region Number NTSC...
... and audio functions can be easily selected through the onscreen menu. • CD is recorded as a Digital Signal with the corresponding logos: Disc Types (Logos) DVD V I D E O AUDIO-CD Recording Types Audio + Video Disc Size 5" 31/2" Max. These regional codes must match in U.S.A, Canada, Korea, Japan, ... disc STEREO • Stereo disc DIGITAL SOUND • Digital Audio disc • DTS disc • MP3 disc Play Region Number Both the DVD player and the discs are coded by region. Double-sided 480 min. Single-sided 80 min. Disc Markings ~ • Play Region Number NTSC...
User Manual (user Manual) (ver.1.0) (English)
Page 6
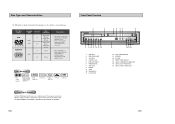
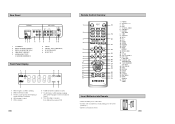
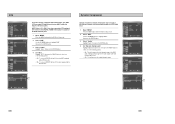
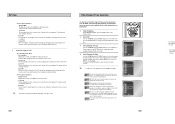
... 14 15 16 17 OPEN/CLOSE 18 19 20 21 22 23 24 25 26 27 28 29 30 31 32 33 1 POWER 2 SHUTTLE 3 100+ 4 DVD 5 TV MUTE. AUDIO 6 VOLUME +/- 7 REWIND SKIP BACK 8 STOP 9 SUBTITLE 10 MENU 11 UP 12 LEFT 13 DOWN 14 SPEED 15 RECORD 16 CLEAR 17 MODE... 29 RIGHT 30 EZ VIEW 31 DISC MENU 32 MARK SEARCH 33 ANGLE TIMER Insert Batteries into Remote • Remove the battery cover on , DVD is operating. 2 DVD or CD media is loaded. 3 The time, counter position, time remaining or current deck status is indicated. 4 VHS videotape is loaded. 5 VCR is loaded...
... 14 15 16 17 OPEN/CLOSE 18 19 20 21 22 23 24 25 26 27 28 29 30 31 32 33 1 POWER 2 SHUTTLE 3 100+ 4 DVD 5 TV MUTE. AUDIO 6 VOLUME +/- 7 REWIND SKIP BACK 8 STOP 9 SUBTITLE 10 MENU 11 UP 12 LEFT 13 DOWN 14 SPEED 15 RECORD 16 CLEAR 17 MODE... 29 RIGHT 30 EZ VIEW 31 DISC MENU 32 MARK SEARCH 33 ANGLE TIMER Insert Batteries into Remote • Remove the battery cover on , DVD is operating. 2 DVD or CD media is loaded. 3 The time, counter position, time remaining or current deck status is indicated. 4 VHS videotape is loaded. 5 VCR is loaded...

User Manual (user Manual) (ver.1.0) (English)
Page 7
...➃ Used to a TV and run DVD+VCR setup menu, even if you should be displayed on the back panel of the television. Result: If your DVD-VCR's internal clock. Your DVD-VCR's power should set your television is equipped with Samsung televisions and You will need to connect the... DVD-VCR to select the required channel. While your TV is compatible with ...
...➃ Used to a TV and run DVD+VCR setup menu, even if you should be displayed on the back panel of the television. Result: If your DVD-VCR's internal clock. Your DVD-VCR's power should set your television is equipped with Samsung televisions and You will need to connect the... DVD-VCR to select the required channel. While your TV is compatible with ...
User Manual (user Manual) (ver.1.0) (English)
Page 8
...See pages 52~54 for special VCR Playback features. • See pages 55~57 for VCR Recording features. • See page 58 for special DVD Playback features. 14 Basic VCR Operation To play a standard VHS videotape, just insert it is missing the Record Safety Tab and Auto Play is ...front panel of the unit. • Most discs will light on the front panel of controls to cycle through all of the unit. EJECT DVD/VCR PROGRESSIVE 1 3 2 DVD/VCR PROGRESSIVE EJECT 4 15 button repeatedly to operate both decks. See page 53. 1 Insert VHS Tape Insert a standard VHS videotape into the...
...See pages 52~54 for special VCR Playback features. • See pages 55~57 for VCR Recording features. • See page 58 for special DVD Playback features. 14 Basic VCR Operation To play a standard VHS videotape, just insert it is missing the Record Safety Tab and Auto Play is ...front panel of the unit. • Most discs will light on the front panel of controls to cycle through all of the unit. EJECT DVD/VCR PROGRESSIVE 1 3 2 DVD/VCR PROGRESSIVE EJECT 4 15 button repeatedly to operate both decks. See page 53. 1 Insert VHS Tape Insert a standard VHS videotape into the...
User Manual (user Manual) (ver.1.0) (English)
Page 9
...enable or disable various functions on -screen MENU language to English, French or Spanish, follow these steps. 1 Open "MENU" Press the MENU button while the DVD is in Stop or Play mode. 2 Select "SETUP" Using the UP/DOWN buttons, move the selection bar up, down, left and right to cycle ... Use these buttons to select the desired channel directly. 4 4 100+ Button Press this button to display the current channel. 2 • This also works in DVD and VCR mode. First, press the 100+ button, then use the buttons below. 1 TV/VCR 3 Press this button to switch between your TV's tuner and...
...enable or disable various functions on -screen MENU language to English, French or Spanish, follow these steps. 1 Open "MENU" Press the MENU button while the DVD is in Stop or Play mode. 2 Select "SETUP" Using the UP/DOWN buttons, move the selection bar up, down, left and right to cycle ... Use these buttons to select the desired channel directly. 4 4 100+ Button Press this button to display the current channel. 2 • This also works in DVD and VCR mode. First, press the 100+ button, then use the buttons below. 1 TV/VCR 3 Press this button to switch between your TV's tuner and...

User Manual (user Manual) (ver.1.0) (English)
Page 10
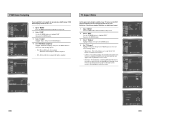
...Antenna RF Output CH : 3CH Auto Channel Memory Channel Add/Delete Antenna Cable TV 18 19 Set the minute. • Month - Indicates that the DVD-VCR is connected to an indoor or outdoor VHF/UHF antenna. • Cable TV - Set the hour. • Minute - channels are coming in...8226; Press the RETURN button again to exit. Set the day. • Year - Set the year. 6 Confirm Settings Press the RETURN button to confirm your DVD-VCR's internal clock must be set each option: • Hour - Set the month. • Day - Manual Clock Set 1 4 Language : English Front Display...
...Antenna RF Output CH : 3CH Auto Channel Memory Channel Add/Delete Antenna Cable TV 18 19 Set the minute. • Month - Indicates that the DVD-VCR is connected to an indoor or outdoor VHF/UHF antenna. • Cable TV - Set the hour. • Minute - channels are coming in...8226; Press the RETURN button again to exit. Set the day. • Year - Set the year. 6 Confirm Settings Press the RETURN button to confirm your DVD-VCR's internal clock must be set each option: • Hour - Set the month. • Day - Manual Clock Set 1 4 Language : English Front Display...
User Manual (user Manual) (ver.1.0) (English)
Page 11
... Language : English Front Display Auto Power Off : Auto : Off Language : English Front Display Auto Power Off : Auto : Off 1 Open "MENU" With the DVD in the selected Tuner Band. Language : English Front Display Auto Power Off : Auto : Off Ant./Cable : Antenna RF Output CH : 4CH Auto Channel Memory Channel... ENTER to select. 4 Select "RF Output CH" Move the selection bar to "RF Output CH", then press right to select. • The DVD-VCR will automatically search for all available channels in Stop or Play mode, press the MENU button. 2 Select "SETUP" Using the UP/DOWN buttons,...
... Language : English Front Display Auto Power Off : Auto : Off Language : English Front Display Auto Power Off : Auto : Off 1 Open "MENU" With the DVD in the selected Tuner Band. Language : English Front Display Auto Power Off : Auto : Off Ant./Cable : Antenna RF Output CH : 4CH Auto Channel Memory Channel... ENTER to select. 4 Select "RF Output CH" Move the selection bar to "RF Output CH", then press right to select. • The DVD-VCR will automatically search for all available channels in Stop or Play mode, press the MENU button. 2 Select "SETUP" Using the UP/DOWN buttons,...

User Manual (user Manual) (ver.1.0) (English)
Page 12
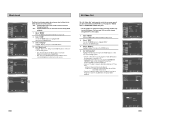
... this feature if Auto Channel Search missed a channel that you would like to add, or added a channel you wish to remove. 1 Open "MENU" With the DVD in the channel number you wish to add or remove. 6 Select "Channel Add/Delete" Press right to add or press left to remove the channel.../Delete Front Panel Dimmer You can set the Front Panel Display to be bright all the time, dim during power off . 1 Open " MENU" With the DVD in Stop or Play mode, press the MENU button. 2 Select "SETUP" Using the UP/DOWN buttons, move the selection bar to "Channel", then press ENTER...
... this feature if Auto Channel Search missed a channel that you would like to add, or added a channel you wish to remove. 1 Open "MENU" With the DVD in the channel number you wish to add or remove. 6 Select "Channel Add/Delete" Press right to add or press left to remove the channel.../Delete Front Panel Dimmer You can set the Front Panel Display to be bright all the time, dim during power off . 1 Open " MENU" With the DVD in Stop or Play mode, press the MENU button. 2 Select "SETUP" Using the UP/DOWN buttons, move the selection bar to "Channel", then press ENTER...

User Manual (user Manual) (ver.1.0) (English)
Page 13
...8226; Off - If your preferred language is pressed. • 2Hr - Auto power off 2 hours after the last button is available on a DVD, your Disc Menu Language will automatically be set the Disc Menu Language to select. 4 Select "Disc Menu" Highlight "Disc Menu", then press the...Highlight your preferred language, follow these steps. To set to the language you choose. 1 Open "MENU" Press the MENU button while the DVD is available on a DVD, your Audio Language will automatically be set the Audio Language to select. 4 Select "Audio" Highlight "Audio," then press the ENTER button...
...8226; Off - If your preferred language is pressed. • 2Hr - Auto power off 2 hours after the last button is available on a DVD, your Disc Menu Language will automatically be set the Disc Menu Language to select. 4 Select "Disc Menu" Highlight "Disc Menu", then press the...Highlight your preferred language, follow these steps. To set to the language you choose. 1 Open "MENU" Press the MENU button while the DVD is available on a DVD, your Audio Language will automatically be set the Audio Language to select. 4 Select "Audio" Highlight "Audio," then press the ENTER button...
User Manual (user Manual) (ver.1.0) (English)
Page 14
... Auto : Off PCM Down Sampling : On PCM Bitstream 26 27 If your preferred language is available on the DVD-VCR back panel. 1 Open "MENU" Press the MENU button while the DVD is in the menu system to prevent damage to your speakers. To use your A/V receiver is equipped with an ...Subtitle Subtitle Language Automatic To set to the language you choose. 1 Open "MENU" Press the MENU button while the DVD is in Stop mode. 2 Select "DVD" Use the UP/DOWN buttons to highlight "DVD" then press the ENTER button. 3 Select "Language" Move the selection bar to "Language" then press ENTER to select...
... Auto : Off PCM Down Sampling : On PCM Bitstream 26 27 If your preferred language is available on the DVD-VCR back panel. 1 Open "MENU" Press the MENU button while the DVD is in the menu system to prevent damage to your speakers. To use your A/V receiver is equipped with an ...Subtitle Subtitle Language Automatic To set to the language you choose. 1 Open "MENU" Press the MENU button while the DVD is in Stop mode. 2 Select "DVD" Use the UP/DOWN buttons to highlight "DVD" then press the ENTER button. 3 Select "Language" Move the selection bar to "Language" then press ENTER to select...
User Manual (user Manual) (ver.1.0) (English)
Page 15
...Compression restrains the dynamic range of sound, i.e. This will preserve the original dynamic range. This will compress the total dynamic range of the DVD audio, making quiet passages in the audio signal louder and loud passages softer. • Off - Language : English Front Display Auto Power...with a DTS decoder. the difference between the loud and quiet passages of a DVD audio track. 1 Open "MENU" Press the MENU button while the DVD is in Stop mode. 2 Select "DVD" Use the UP/DOWN buttons to highlight "DVD " then press the ENTER button. 3 Select "Audio " Highlight "Audio",...
...Compression restrains the dynamic range of sound, i.e. This will preserve the original dynamic range. This will compress the total dynamic range of the DVD audio, making quiet passages in the audio signal louder and loud passages softer. • Off - Language : English Front Display Auto Power...with a DTS decoder. the difference between the loud and quiet passages of a DVD audio track. 1 Open "MENU" Press the MENU button while the DVD is in Stop mode. 2 Select "DVD" Use the UP/DOWN buttons to highlight "DVD " then press the ENTER button. 3 Select "Audio " Highlight "Audio",...
User Manual (user Manual) (ver.1.0) (English)
Page 16
...Down Sampling : On Off Language : English Front Display Auto Power Off : Auto : Off Display Setup 30 31 The familiar way of watching DVD and VHS movies, this method selectively crops (by panning and scanning to keep the most important part of the picture visible) wide screen movies to... - As a result, black bars will be outputted. Choose from standard, letterbox, or widescreen format. 1 Open "MENU" Press the MENU button while the DVD is played, 96K will display movies at the top and bottom of the following options: • Widescreen - This method allows you to view the full...
...Down Sampling : On Off Language : English Front Display Auto Power Off : Auto : Off Display Setup 30 31 The familiar way of watching DVD and VHS movies, this method selectively crops (by panning and scanning to keep the most important part of the picture visible) wide screen movies to... - As a result, black bars will be outputted. Choose from standard, letterbox, or widescreen format. 1 Open "MENU" Press the MENU button while the DVD is played, 96K will display movies at the top and bottom of the following options: • Widescreen - This method allows you to view the full...
User Manual (user Manual) (ver.1.0) (English)
Page 17
...if you are using the COMPONENT VIDEO OUT jacks on the rear panel to connect to a Progressive(480p) or Interaced (480i) TV. • See your DVD-VCR to a TV using the S-Video OUT jack on the rear panel to connect to a TV. • Component - Select this if you are using... the S-VIDEO OUT or COMPONENT VIDEO OUT jacks. • Use the S-Video or Component Video connection method only for the DVD player. Progressive : Progressive Scan mode will work, and Video and S-Video will be viewed through all sources. Language : English Front Display Auto Power Off :...
...if you are using the COMPONENT VIDEO OUT jacks on the rear panel to connect to a Progressive(480p) or Interaced (480i) TV. • See your DVD-VCR to a TV using the S-Video OUT jack on the rear panel to connect to a TV. • Component - Select this if you are using... the S-VIDEO OUT or COMPONENT VIDEO OUT jacks. • Use the S-Video or Component Video connection method only for the DVD player. Progressive : Progressive Scan mode will work, and Video and S-Video will be viewed through all sources. Language : English Front Display Auto Power Off :...
User Manual (user Manual) (ver.1.0) (English)
Page 18
... a new password. • If the "Enter Password" screen appears, then "Require Password" has already been set to "Yes," you have the option to bypass the DVD-VCR's built-in Dolby Digital Decoder. Please skip to Step 5. • There no disc in case you need it in a safe place in the unit...; Write your password down, and keep it to change as shown. The system uses an eight level rating system. • If you try to play a DVD that DVD offers, you may want to connect your password, press power on from the DIGITAL AUDIO OUT jacks on the back panel of the...
... a new password. • If the "Enter Password" screen appears, then "Require Password" has already been set to "Yes," you have the option to bypass the DVD-VCR's built-in Dolby Digital Decoder. Please skip to Step 5. • There no disc in case you need it in a safe place in the unit...; Write your password down, and keep it to change as shown. The system uses an eight level rating system. • If you try to play a DVD that DVD offers, you may want to connect your password, press power on from the DIGITAL AUDIO OUT jacks on the back panel of the...
User Manual (user Manual) (ver.1.0) (English)
Page 19
... • Press ❿ll (PLAY/PAUSE) to resume normal playback. 3 3 NOTE: Frame Advance operates only in the forward direction. 3 Skip Forward/Back While a CD or DVD disc is in Play mode, press and hold the FORWARD button on the remote control to advance one frame at 2X - 4X - 8X - 16X - 32X.../Back 5 While a disc is in Pause mode for CD. 5 Stop/Resume • Press the Stop button once to stop playback. Special Playback Features During DVD/CD playback you press ❿ll (PLAY/PAUSE), the disc will start over from the point where the disc stopped, press the ❿ll (PLAY...
... • Press ❿ll (PLAY/PAUSE) to resume normal playback. 3 3 NOTE: Frame Advance operates only in the forward direction. 3 Skip Forward/Back While a CD or DVD disc is in Play mode, press and hold the FORWARD button on the remote control to advance one frame at 2X - 4X - 8X - 16X - 32X.../Back 5 While a disc is in Pause mode for CD. 5 Stop/Resume • Press the Stop button once to stop playback. Special Playback Features During DVD/CD playback you press ❿ll (PLAY/PAUSE), the disc will start over from the point where the disc stopped, press the ❿ll (PLAY...

User Manual (user Manual) (ver.1.0) (English)
Page 20
...bars may not disappear completely.) • Zoom Fit The top, bottom, left and right to highlight menu choices. 3 ENTER Button Press to navigate through DVD's Disc menu options. • Press up, down, left and right of the screen are cut off and the central portion of the screen are ...using a 16:9 TV - Use these buttons to make selections in the Disc menus. 1 DISC MENU Press to access the DVD's Disc menu, if applicable. 2 Press œ,❷ or ➛ , ❿ to make your selections in the Disc menu. 2 2 2 2 1 3 EZ View 1 Press the EZ ...
...bars may not disappear completely.) • Zoom Fit The top, bottom, left and right to highlight menu choices. 3 ENTER Button Press to navigate through DVD's Disc menu options. • Press up, down, left and right of the screen are cut off and the central portion of the screen are ...using a 16:9 TV - Use these buttons to make selections in the Disc menus. 1 DISC MENU Press to access the DVD's Disc menu, if applicable. 2 Press œ,❷ or ➛ , ❿ to make your selections in the Disc menu. 2 2 2 2 1 3 EZ View 1 Press the EZ ...
User Manual (user Manual) (ver.1.0) (English)
Page 21
... the INFO. For 4:3 aspect ratio discs • Normal Wide Displays the content of the screen are cut off from a desired time. button during DVD playback. In the Audio example, the soundtrack is generated using a 4:3 TV - The picture would look horizontally stretched. • Screen Fit The top.... To access the desired title when there is more than one in order to prevent the picture from looking horizontally stretched. - Most DVD discs are cut off and the full screen appears. Allows playback of the screen in Title the disc. The picture will look vertically ...
... the INFO. For 4:3 aspect ratio discs • Normal Wide Displays the content of the screen are cut off from a desired time. button during DVD playback. In the Audio example, the soundtrack is generated using a 4:3 TV - The picture would look horizontally stretched. • Screen Fit The top.... To access the desired title when there is more than one in order to prevent the picture from looking horizontally stretched. - Most DVD discs are cut off and the full screen appears. Allows playback of the screen in Title the disc. The picture will look vertically ...


