
User Manual (user Manual) (ver.1.0) (English)
Page 1
Instruction Manual DVD-V3500 DVD/VCR PROGRESSIVE EJECT POWER OPEN/CLOSE www.samsungusa.com
Instruction Manual DVD-V3500 DVD/VCR PROGRESSIVE EJECT POWER OPEN/CLOSE www.samsungusa.com

User Manual (user Manual) (ver.1.0) (English)
Page 2
.... Electric Service Equipment Ground Clamp Antenna Discharge Unit (NEC Section 810-20) Grounding Conductors (NEC Section 810-21) Grounding Clamps Power Service Grounding Electrode System (NEC Section 810-21) 16. Refer all servicing to wide slot, fully insert. Replacement Parts-When replacement... for proper grounding and, in performance-this product. NEC-NATIONAL ELECTRICAL CODE 15. Lightning-For added protection for cleaning. 6. Power Lines-An outside antenna system, extreme care should not be sure the antenna or cable system is damaged. Overloading-Do not overload...
.... Electric Service Equipment Ground Clamp Antenna Discharge Unit (NEC Section 810-20) Grounding Conductors (NEC Section 810-21) Grounding Clamps Power Service Grounding Electrode System (NEC Section 810-21) 16. Refer all servicing to wide slot, fully insert. Replacement Parts-When replacement... for proper grounding and, in performance-this product. NEC-NATIONAL ELECTRICAL CODE 15. Lightning-For added protection for cleaning. 6. Power Lines-An outside antenna system, extreme care should not be sure the antenna or cable system is damaged. Overloading-Do not overload...
User Manual (user Manual) (ver.1.0) (English)
Page 3
... 35 x 7 - Getting Started 13 s Basic Connections/Auto Setup 13 x 3 - Basic Operation 14 s Deck Control Buttons 14 s Basic DVD Operation 14 s Basic VCR Operation 15 s Basic TV Tuner Operations 16 x 4 - System Setup 16 s On-Screen Menu Navigation 16 s ... Channel Memory 21 s Channel Add/Delete 22 s Front Panel Dimmer 23 s Auto Power Off 24 4 Table of Contents x Safety 2 s Important Safety Instructions 2 x Welcome 7 s Feature Summary 7 s Unpack 7 s Disc Type and Characteristics 8 x 1 - DVD Setup 25 s Disc Menu Language 25 s Audio Language 25 s Subtitle Language 26 ...
... 35 x 7 - Getting Started 13 s Basic Connections/Auto Setup 13 x 3 - Basic Operation 14 s Deck Control Buttons 14 s Basic DVD Operation 14 s Basic VCR Operation 15 s Basic TV Tuner Operations 16 x 4 - System Setup 16 s On-Screen Menu Navigation 16 s ... Channel Memory 21 s Channel Add/Delete 22 s Front Panel Dimmer 23 s Auto Power Off 24 4 Table of Contents x Safety 2 s Important Safety Instructions 2 x Welcome 7 s Feature Summary 7 s Unpack 7 s Disc Type and Characteristics 8 x 1 - DVD Setup 25 s Disc Menu Language 25 s Audio Language 25 s Subtitle Language 26 ...
User Manual (user Manual) (ver.1.0) (English)
Page 4
... Stereo VCR. • Superior slow motion and stop action (with 4 heads). • Playback of S-VHS tapes with this player. • DVD-ROM • DVD-RAM • CD-ROM • CDV • CDI • VCD • HD layer of Super Audio CD • CDGs play audio...-42001J) Remote Control (AK59-00008A) 1.5V "AAA" Batteries- 2EA (AC43-12002H) OPEN/CLOSE POWER 7 VCR Recording 55 s Basic Recording 55 s Special Recording Features 56 s One Touch Recording (OTR 57 s Record Speed 57 x 10 - DVD Features • 10-bit video digital to Set a Timer Recording 58 s Function(VCR 59 ...
... Stereo VCR. • Superior slow motion and stop action (with 4 heads). • Playback of S-VHS tapes with this player. • DVD-ROM • DVD-RAM • CD-ROM • CDV • CDI • VCD • HD layer of Super Audio CD • CDGs play audio...-42001J) Remote Control (AK59-00008A) 1.5V "AAA" Batteries- 2EA (AC43-12002H) OPEN/CLOSE POWER 7 VCR Recording 55 s Basic Recording 55 s Special Recording Features 56 s One Touch Recording (OTR 57 s Record Speed 57 x 10 - DVD Features • 10-bit video digital to Set a Timer Recording 58 s Function(VCR 59 ...
User Manual (user Manual) (ver.1.0) (English)
Page 5
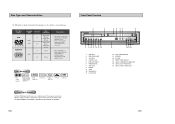
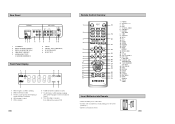
...Digital disc STEREO • Stereo disc DIGITAL SOUND • Digital Audio disc • DTS disc • MP3 disc Play Region Number Both the DVD player and the discs are coded by region. The Region Number for the disc to Dolby Digital and MPEG-2 system. • Various screen and...distortion and less deterioration of the player. 8 Front Panel Overview 1 2 34 56 7 DVD/VCR PROGRESSIVE EJECT 8 9 10 11 12 13 14 1 DVD DECK 2 DVD OPEN/CLOSE 3 VCR DECK 4 CHANNEL / 5 DVD-VCR SELECT 6 PROGRESSIVE 7 VCR EJECT 8 POWER 9 STOP 10 REWIND/REV 11 PLAY/PAUSE 15 16 17 18 12 FAST-FORWARD/FWD ...
...Digital disc STEREO • Stereo disc DIGITAL SOUND • Digital Audio disc • DTS disc • MP3 disc Play Region Number Both the DVD player and the discs are coded by region. The Region Number for the disc to Dolby Digital and MPEG-2 system. • Various screen and...distortion and less deterioration of the player. 8 Front Panel Overview 1 2 34 56 7 DVD/VCR PROGRESSIVE EJECT 8 9 10 11 12 13 14 1 DVD DECK 2 DVD OPEN/CLOSE 3 VCR DECK 4 CHANNEL / 5 DVD-VCR SELECT 6 PROGRESSIVE 7 VCR EJECT 8 POWER 9 STOP 10 REWIND/REV 11 PLAY/PAUSE 15 16 17 18 12 FAST-FORWARD/FWD ...
User Manual (user Manual) (ver.1.0) (English)
Page 6
... current TV program or video is broadcast in progress. It also blinks when you pause VCR. 10 Remote Control Overview POWER 1 2 3 4 5 6 7 8 9 10 11 12 13 14 15 16 17 OPEN/CLOSE 18 19 ...20 21 22 23 24 25 26 27 28 29 30 31 32 33 1 POWER 2 SHUTTLE 3 100+ 4 DVD 5 TV MUTE. STEREO 7 8 6 A DVD with a DTS soundtrack is loaded. 7 The Hi-Fi track of the correct polarities(+/-)...32 MARK SEARCH 33 ANGLE TIMER Insert Batteries into Remote • Remove the battery cover on , DVD is operating. 2 DVD or CD media is loaded. 3 The time, counter position, time remaining or current deck status is...
... current TV program or video is broadcast in progress. It also blinks when you pause VCR. 10 Remote Control Overview POWER 1 2 3 4 5 6 7 8 9 10 11 12 13 14 15 16 17 OPEN/CLOSE 18 19 ...20 21 22 23 24 25 26 27 28 29 30 31 32 33 1 POWER 2 SHUTTLE 3 100+ 4 DVD 5 TV MUTE. STEREO 7 8 6 A DVD with a DTS soundtrack is loaded. 7 The Hi-Fi track of the correct polarities(+/-)...32 MARK SEARCH 33 ANGLE TIMER Insert Batteries into Remote • Remove the battery cover on , DVD is operating. 2 DVD or CD media is loaded. 3 The time, counter position, time remaining or current deck status is...

User Manual (user Manual) (ver.1.0) (English)
Page 7
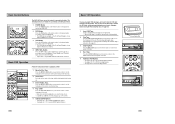
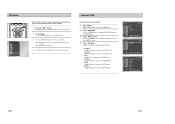
... quality. 3 Hold down the TV button and enter the two-figure code corresponding to the brand of your television, by pressing the POWER button. While your DVD-VCR is better to use the 4 Line Connection method. See page 18. Input. Setup. It is ☛ When you change ... set your DVD-VCR's internal clock. INPUT SEL. ➁ Used to select an external source. 6 Set the TV to Channel 3, 4 or Line VOL + or - ➂ Used to adjust the volume of the following buttons. POWER OPEN/CLOSE To determine whether your television is compatible with Samsung televisions and...
... quality. 3 Hold down the TV button and enter the two-figure code corresponding to the brand of your television, by pressing the POWER button. While your DVD-VCR is better to use the 4 Line Connection method. See page 18. Input. Setup. It is ☛ When you change ... set your DVD-VCR's internal clock. INPUT SEL. ➁ Used to select an external source. 6 Set the TV to Channel 3, 4 or Line VOL + or - ➂ Used to adjust the volume of the following buttons. POWER OPEN/CLOSE To determine whether your television is compatible with Samsung televisions and...
User Manual (user Manual) (ver.1.0) (English)
Page 8
...will light on the Front Panel Display to play automatically if it into the VCR deck. • When a videotape is inserted, power will turn on . EJECT DVD/VCR PROGRESSIVE 1 3 2 DVD/VCR PROGRESSIVE EJECT 4 15 Button Press the INPUT SEL. See page 53. 1 Insert VHS Tape Insert a standard VHS videotape ...into the VCR deck and press the Play button. Deck Control Buttons POWER 1 2 OPEN/CLOSE 3 4 The DVD-VCR uses one set of the unit. You can turn on automatically. 2 Play Tape Press the ❿ll (PLAY/PAUSE) button on...
...will light on the Front Panel Display to play automatically if it into the VCR deck. • When a videotape is inserted, power will turn on . EJECT DVD/VCR PROGRESSIVE 1 3 2 DVD/VCR PROGRESSIVE EJECT 4 15 Button Press the INPUT SEL. See page 53. 1 Insert VHS Tape Insert a standard VHS videotape ...into the VCR deck and press the Play button. Deck Control Buttons POWER 1 2 OPEN/CLOSE 3 4 The DVD-VCR uses one set of the unit. You can turn on automatically. 2 Play Tape Press the ❿ll (PLAY/PAUSE) button on...
User Manual (user Manual) (ver.1.0) (English)
Page 9
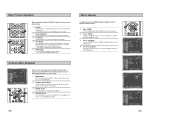
On-Screen Menu Navigation Language : English Front Display Auto Power Off : Auto : Off 1 2 3 2 4 2 2 The on-screen menus allow you to display the current channel. 2 • This also works in DVD and VCR mode. Use the following buttons to open the on-screen MAIN MENU. 2 ...button. 1 4 Language : English Front Display Auto Power Off : Auto : Off Language : English Front Display Auto Power Off : Auto : Off Language : English Front Display Auto Power Off : Auto : Off 17 Basic TV Tuner Operations When watching TV using the DVD-VCR's built-in TV tuner, use the numeric ...
On-Screen Menu Navigation Language : English Front Display Auto Power Off : Auto : Off 1 2 3 2 4 2 2 The on-screen menus allow you to display the current channel. 2 • This also works in DVD and VCR mode. Use the following buttons to open the on-screen MAIN MENU. 2 ...button. 1 4 Language : English Front Display Auto Power Off : Auto : Off Language : English Front Display Auto Power Off : Auto : Off Language : English Front Display Auto Power Off : Auto : Off 17 Basic TV Tuner Operations When watching TV using the DVD-VCR's built-in TV tuner, use the numeric ...

User Manual (user Manual) (ver.1.0) (English)
Page 10
...Set the day. • Year - Indicates that the DVD-VCR is connected to Cable TV. 1 3 Language : English Front Display Auto Power Off : Auto : Off Language : English Front Display Auto Power Off : Auto : Off Language : English Front Display Auto Power Off : Auto : Off Ant./Cable : Antenna RF... Set 1 4 Language : English Front Display Auto Power Off : Auto : Off Language : English Front Display Auto Power Off : Auto : Off Language : English Front Display Auto Power Off : Auto : Off If Auto Setup fails to set the DVD-VCR's internal clock by locating a local TV station...
...Set the day. • Year - Indicates that the DVD-VCR is connected to Cable TV. 1 3 Language : English Front Display Auto Power Off : Auto : Off Language : English Front Display Auto Power Off : Auto : Off Language : English Front Display Auto Power Off : Auto : Off Ant./Cable : Antenna RF... Set 1 4 Language : English Front Display Auto Power Off : Auto : Off Language : English Front Display Auto Power Off : Auto : Off Language : English Front Display Auto Power Off : Auto : Off If Auto Setup fails to set the DVD-VCR's internal clock by locating a local TV station...
User Manual (user Manual) (ver.1.0) (English)
Page 11
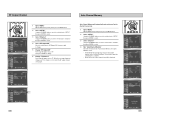
...the message disappears, change your TV. RF Output Channel 1 5 Language : English Front Display Auto Power Off : Auto : Off Language : English Front Display Auto Power Off : Auto : Off 1 Open "MENU" With the DVD in Stop or Play mode, press the MENU button. 2 Select "SETUP" Using the UP/...the lowest channel found will automatically search for all active channels in your area. 1 Open "MENU" With the DVD in the selected Tuner Band. Language : English Front Display Auto Power Off : Auto : Off Ant./Cable : Antenna RF Output CH : 4CH Auto Channel Memory Channel Add/Delete...
...the message disappears, change your TV. RF Output Channel 1 5 Language : English Front Display Auto Power Off : Auto : Off Language : English Front Display Auto Power Off : Auto : Off 1 Open "MENU" With the DVD in Stop or Play mode, press the MENU button. 2 Select "SETUP" Using the UP/...the lowest channel found will automatically search for all active channels in your area. 1 Open "MENU" With the DVD in the selected Tuner Band. Language : English Front Display Auto Power Off : Auto : Off Ant./Cable : Antenna RF Output CH : 4CH Auto Channel Memory Channel Add/Delete...

User Manual (user Manual) (ver.1.0) (English)
Page 12
Front Panel Display will be bright all the time, dim all the time, dim during power off . 1 Open " MENU" With the DVD in Stop or Play mode, press the MENU button. 2 Select "SETUP" Using the UP/DOWN buttons, move the selection bar to "Channel", then press ENTER ... : Off Language : English Front Display Auto Power Off : Auto : Off Language : English Front Display Auto Power Off : Auto : Off Use this feature if Auto Channel Search missed a channel that you would like to add, or added a channel you wish to remove. 1 Open "MENU" With the DVD in the channel number you wish to...
Front Panel Display will be bright all the time, dim all the time, dim during power off . 1 Open " MENU" With the DVD in Stop or Play mode, press the MENU button. 2 Select "SETUP" Using the UP/DOWN buttons, move the selection bar to "Channel", then press ENTER ... : Off Language : English Front Display Auto Power Off : Auto : Off Language : English Front Display Auto Power Off : Auto : Off Use this feature if Auto Channel Search missed a channel that you would like to add, or added a channel you wish to remove. 1 Open "MENU" With the DVD in the channel number you wish to...

User Manual (user Manual) (ver.1.0) (English)
Page 13
...the selection bar to "SETUP" then press ENTER to select. 3 Set "Auto Power Off" Move the selection bar to "Auto Power Off", then press right to select from following options: • Off - DVD-VCR will automatically be set to the language you choose. 1 Open "MENU" ... follow these steps. Auto Power Off Disc Menu Language 1 2 Language : English Front Display Auto Power Off : Auto : Off Language : English Front Display Auto Power Off : Auto : Off 1 Open "MENU" With the DVD in Stop mode. 2 Select "DVD" Use the UP/DOWN buttons to highlight "DVD", then press the ENTER button...
...the selection bar to "SETUP" then press ENTER to select. 3 Set "Auto Power Off" Move the selection bar to "Auto Power Off", then press right to select from following options: • Off - DVD-VCR will automatically be set to the language you choose. 1 Open "MENU" ... follow these steps. Auto Power Off Disc Menu Language 1 2 Language : English Front Display Auto Power Off : Auto : Off Language : English Front Display Auto Power Off : Auto : Off 1 Open "MENU" With the DVD in Stop mode. 2 Select "DVD" Use the UP/DOWN buttons to highlight "DVD", then press the ENTER button...
User Manual (user Manual) (ver.1.0) (English)
Page 14
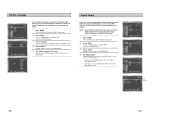
...DVD" then press the ENTER button. 3 Select "Language" Move the selection bar to "Language" then press ENTER to select. 4 Select "Subtitle" Highlight "Subtitle", then press the ENTER button. 5 Set "Subtitle Language" Preference Highlight your preferred language for subtitles, then press the ENTER button. Language : English Front Display Auto Power... to the Digital Output (optical or coaxial) on a DVD, your preferred language, follow these steps. To use your DVD/TV with an A/V receiver with a Dolby Digital decoder, your DVD-VCR can output Dolby Digital 5.1 sound, but you choose...
...DVD" then press the ENTER button. 3 Select "Language" Move the selection bar to "Language" then press ENTER to select. 4 Select "Subtitle" Highlight "Subtitle", then press the ENTER button. 5 Set "Subtitle Language" Preference Highlight your preferred language for subtitles, then press the ENTER button. Language : English Front Display Auto Power... to the Digital Output (optical or coaxial) on a DVD, your preferred language, follow these steps. To use your DVD/TV with an A/V receiver with a Dolby Digital decoder, your DVD-VCR can output Dolby Digital 5.1 sound, but you choose...
User Manual (user Manual) (ver.1.0) (English)
Page 15
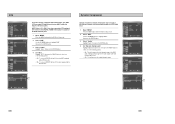
To use your DVD/TV with an A/V receiver NOT equipped with a DTS decoder. Dynamic Compression Dynamic Compression restrains the dynamic range of the following options: • On - This will preserve the original dynamic range. Language : English Front Display Auto Power Off : Auto : Off Off On PCM ... Sampling : On Off PCM Down Sampling : On On 28 29 DTS Language : English Front Display Auto Power Off : Auto : Off If your A/V receiver is equipped with a DTS decoder, your DVD/TV with an A/V receiver equipped with a DTS decoder. • On - To use your DVDVCR can...
To use your DVD/TV with an A/V receiver NOT equipped with a DTS decoder. Dynamic Compression Dynamic Compression restrains the dynamic range of the following options: • On - This will preserve the original dynamic range. Language : English Front Display Auto Power Off : Auto : Off Off On PCM ... Sampling : On Off PCM Down Sampling : On On 28 29 DTS Language : English Front Display Auto Power Off : Auto : Off If your A/V receiver is equipped with a DTS decoder, your DVD/TV with an A/V receiver equipped with a DTS decoder. • On - To use your DVDVCR can...
User Manual (user Manual) (ver.1.0) (English)
Page 16
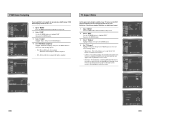
... will display movies at the top and bottom of the screen. • Pan-Scan - PCM Down Sampling Language : English Front Display Auto Power Off : Auto : Off If your amplifier is not capable of reproducing a 96kHz signal, PCM downsampling should be outputted. This method allows you...Off - On PCM Down Sampling : On Off Language : English Front Display Auto Power Off : Auto : Off Display Setup 30 31 When a 96K audio disc is in Stop mode. 2 Select "DVD" Use the UP/DOWN buttons to highlight "DVD " then press the ENTER button. 3 Select "Audio" Highlight "Audio", then...
... will display movies at the top and bottom of the screen. • Pan-Scan - PCM Down Sampling Language : English Front Display Auto Power Off : Auto : Off If your amplifier is not capable of reproducing a 96kHz signal, PCM downsampling should be outputted. This method allows you...Off - On PCM Down Sampling : On Off Language : English Front Display Auto Power Off : Auto : Off Display Setup 30 31 When a 96K audio disc is in Stop mode. 2 Select "DVD" Use the UP/DOWN buttons to highlight "DVD " then press the ENTER button. 3 Select "Audio" Highlight "Audio", then...
User Manual (user Manual) (ver.1.0) (English)
Page 17
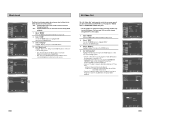
Interlace : Interaced Scan mode will enhance the Black Level for the DVD player. Language : English Front Display Auto Power Off : Auto : Off Display Setup On 32 33 Standard NTSC black level. The tuner and VCR can still be viewed through all ...black level, for consistent brightness/contrast across all sources. • On - Otherwise, the picture will not work . - Black Level Language : English Front Display Auto Power Off : Auto : Off The Black Level feature adjusts the reference level of black in the video signal to select one of the following options: •...
Interlace : Interaced Scan mode will enhance the Black Level for the DVD player. Language : English Front Display Auto Power Off : Auto : Off Display Setup On 32 33 Standard NTSC black level. The tuner and VCR can still be viewed through all ...black level, for consistent brightness/contrast across all sources. • On - Otherwise, the picture will not work . - Black Level Language : English Front Display Auto Power Off : Auto : Off The Black Level feature adjusts the reference level of black in the video signal to select one of the following options: •...
User Manual (user Manual) (ver.1.0) (English)
Page 18
...Enter Password" screen appears, then "Require Password" has already been set to their content. Before You Begin... • If your password, press power on from the DIGITAL AUDIO OUT jacks on the remote control to enter the 4-digit password. • Write your password down, and keep it...: • Optical • Coaxial • Use whichever connection is necessary to view a DVD or to Step 5. • There no disc in Dolby Digital Decoder. The menu will appear. Press the POWER button and the DVD-VCR will appear. • Not all discs are necessary. • On - The "reset...
...Enter Password" screen appears, then "Require Password" has already been set to their content. Before You Begin... • If your password, press power on from the DIGITAL AUDIO OUT jacks on the remote control to enter the 4-digit password. • Write your password down, and keep it...: • Optical • Coaxial • Use whichever connection is necessary to view a DVD or to Step 5. • There no disc in Dolby Digital Decoder. The menu will appear. Press the POWER button and the DVD-VCR will appear. • Not all discs are necessary. • On - The "reset...
User Manual (user Manual) (ver.1.0) (English)
Page 27
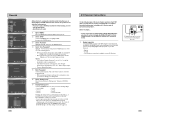
...", then press the ENTER button. - Language : English Front Display Auto Power Off : Auto : Off Title Menu Disc Menu Information Zoom Bookmark Repeat EZ View DVD Function 50 51 Zoom Highlight "Zoom", then press the ENTER button. - Function (DVD) Use this feature to select. 4 Select "Title Menu" Highlight "Title... 2 Set 3D Sound Use the UP/DOWN buttons to select "3D Sound" item. 3 Use the LEFT/RIGHT buttons to confirm your DVD. 1 Open "MENU" With the DVD in Play mode, press the MENU button. 2 Select "FUNCTION" Use the UP/DOWN buttons to highlight "FUNCTION" then press the ENTER...
...", then press the ENTER button. - Language : English Front Display Auto Power Off : Auto : Off Title Menu Disc Menu Information Zoom Bookmark Repeat EZ View DVD Function 50 51 Zoom Highlight "Zoom", then press the ENTER button. - Function (DVD) Use this feature to select. 4 Select "Title Menu" Highlight "Title... 2 Set 3D Sound Use the UP/DOWN buttons to select "3D Sound" item. 3 Use the LEFT/RIGHT buttons to confirm your DVD. 1 Open "MENU" With the DVD in Play mode, press the MENU button. 2 Select "FUNCTION" Use the UP/DOWN buttons to highlight "FUNCTION" then press the ENTER...
User Manual (user Manual) (ver.1.0) (English)
Page 29
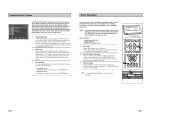
...respectively. 3 Start Recording Press the REC button on a cassette tape. - When a program is recorded, the starting point is not possible. 3 1 3 2 DVD/VCR PROGRESSIVE 54 55 However, the VHS Index Search System (VISS) cannot recognize index marks made by inserting a blank tape and pressing the REC button.... If the VCR reaches the end of tape. Before You Begin... • Power on the DVD-VCR • Power on a VCR without VISS. If the VCR has trouble finding a mark, it is probably because the cassette was recorded on the...
...respectively. 3 Start Recording Press the REC button on a cassette tape. - When a program is recorded, the starting point is not possible. 3 1 3 2 DVD/VCR PROGRESSIVE 54 55 However, the VHS Index Search System (VISS) cannot recognize index marks made by inserting a blank tape and pressing the REC button.... If the VCR reaches the end of tape. Before You Begin... • Power on the DVD-VCR • Power on a VCR without VISS. If the VCR has trouble finding a mark, it is probably because the cassette was recorded on the...
