

User Manual (user Manual) (ver.1.0) (English)
Page 2
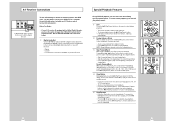
... apparatus near any heat sources such as power-supply cord or plug is responsible for your outlet, consult an electrician for replacement of important operating and maintenance instructions in any ventilation openings. When a cart is protected by method claims of this (polarized) plug with one wider than the other rights owners. Copy Notification Federal law provides severe civil...
... apparatus near any heat sources such as power-supply cord or plug is responsible for your outlet, consult an electrician for replacement of important operating and maintenance instructions in any ventilation openings. When a cart is protected by method claims of this (polarized) plug with one wider than the other rights owners. Copy Notification Federal law provides severe civil...
User Manual (user Manual) (ver.1.0) (English)
Page 3
...s Disc Menu Navigation 34 s Screen Fit Playback 34 s Title/Chapter/Time Selection 35 s Zoom 36 s Angle 36 s Subtitle 37 s Digest Playback 37 s A-B Repeat 38 s Repeat Chapter/Title 39 s Audio 39 s Bookmarks 40 s Programmed Playback 41 s Random Playback 42 s MP3 Playback 42 s 3D Sound 43 4 5 Table of Contents x 5 - DVD Sound Setup 32 s A/V Receiver Connections 32 x 7 - System Overview 9 s Front Panel Overview 9 s Rear Panel 10 s Front Panel Display 10 s Remote Control Overview 11 s Insert Remote Control Batteries 11 s Using the TV Buttons on the Remote Control...
...s Disc Menu Navigation 34 s Screen Fit Playback 34 s Title/Chapter/Time Selection 35 s Zoom 36 s Angle 36 s Subtitle 37 s Digest Playback 37 s A-B Repeat 38 s Repeat Chapter/Title 39 s Audio 39 s Bookmarks 40 s Programmed Playback 41 s Random Playback 42 s MP3 Playback 42 s 3D Sound 43 4 5 Table of Contents x 5 - DVD Sound Setup 32 s A/V Receiver Connections 32 x 7 - System Overview 9 s Front Panel Overview 9 s Rear Panel 10 s Front Panel Display 10 s Remote Control Overview 11 s Insert Remote Control Batteries 11 s Using the TV Buttons on the Remote Control...
User Manual (user Manual) (ver.1.0) (English)
Page 4
...DVD and VCR decks. • Composite, S-Video and Component video outputs for high connectivity and optimum performance. • RF inputs and outputs for Audio/Video connection (AC99-10500H) • RF (Radio Frequency) Antenna Cable (AC39-42001J) • Remote Control (AC59-00058K) • 1.5V "AA" Batteries - 2EA (AC43-12002J) POWER OPEN/CLOSE CHANNEL EJECT DVD SELECT VCR REC VIDEO L AUDIO R LINE IN 1 POWER OPEN/CLOSE SCREEN FIT 4 MODE 2 SHUTTLE 5 3 TV/VCR 6 CLOCK/ COUNTER REPEAT 7 DIGEST 3D SOUND TV MUTE 100+ DVD 8 9 ANGLE CLEAR 0 INPUT SEL. Timer Recording...
...DVD and VCR decks. • Composite, S-Video and Component video outputs for high connectivity and optimum performance. • RF inputs and outputs for Audio/Video connection (AC99-10500H) • RF (Radio Frequency) Antenna Cable (AC39-42001J) • Remote Control (AC59-00058K) • 1.5V "AA" Batteries - 2EA (AC43-12002J) POWER OPEN/CLOSE CHANNEL EJECT DVD SELECT VCR REC VIDEO L AUDIO R LINE IN 1 POWER OPEN/CLOSE SCREEN FIT 4 MODE 2 SHUTTLE 5 3 TV/VCR 6 CLOCK/ COUNTER REPEAT 7 DIGEST 3D SOUND TV MUTE 100+ DVD 8 9 ANGLE CLEAR 0 INPUT SEL. Timer Recording...
User Manual (user Manual) (ver.1.0) (English)
Page 5
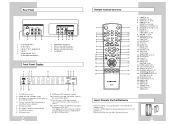
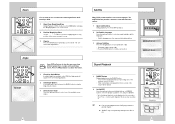
... sound and video due to play . Audio + Video 5" 31/2" 74 min. 20 min. Front Panel Overview 1 2 3 45 6 7 POWER OPEN/CLOSE 8 9 10 11 12 13 CHANNEL EJECT DVD SELECT VCR REC VIDEO L AUDIO R LINE IN 2 14 15 16 1 DVD DECK (p.14) 2 DVD OPEN/CLOSE (p.14) 3 VCR DECK (p.15) 4 CHANNEL "/❷ (p.16) 5 RECORD (p.46) 6 DVD-VCR SELECT (p.14) 7 VCR EJECT (p.15) 8 POWER (p.14) 9 STOP (p.33) 10 REWIND/REV (p.33, 44) 11 PLAY/PAUSE (p.14, 15, 33, 44) 12 FAST-FORWARD/FWD (p.33, 44) 13 FRONT PANEL DISPLAY...
... sound and video due to play . Audio + Video 5" 31/2" 74 min. 20 min. Front Panel Overview 1 2 3 45 6 7 POWER OPEN/CLOSE 8 9 10 11 12 13 CHANNEL EJECT DVD SELECT VCR REC VIDEO L AUDIO R LINE IN 2 14 15 16 1 DVD DECK (p.14) 2 DVD OPEN/CLOSE (p.14) 3 VCR DECK (p.15) 4 CHANNEL "/❷ (p.16) 5 RECORD (p.46) 6 DVD-VCR SELECT (p.14) 7 VCR EJECT (p.15) 8 POWER (p.14) 9 STOP (p.33) 10 REWIND/REV (p.33, 44) 11 PLAY/PAUSE (p.14, 15, 33, 44) 12 FAST-FORWARD/FWD (p.33, 44) 13 FRONT PANEL DISPLAY...
User Manual (user Manual) (ver.1.0) (English)
Page 6
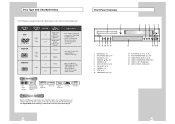
... in progress, and blinks when the VCR is programmed or in Pause mode. 10 Remote Control Overview POWER 1 OPEN/CLOSE 18 2 3 2 SCREEN FIT SHUTTLE TV/VCR 3 4 M O D E / 5 6 REPEAT AUDIO 4 7 8 9 5 ZOOM 3D SOUND ANGLE CLEAR 6 TV MUTE 100+ 0 INPUT SEL. Rear Panel DVD & VCR DVD Only 1 2 3 4 1 RF ANTENNA INPUT 2 RF OUT TO TV 3 LINE OUT TO TV (COMPOSITE) 4 LINE IN 1 5 AUDIO LINE OUT TO TV (S-VIDEO OR COMPONENT) 5 6 78 9 6 COMPONENT VIDEO OUT 7 DIGITAL AUDIO OUT(COAXIAL) 8 DIGITAL AUDIO OUT(OPTICAL) 9 S-VIDEO OUT Front Panel Display...
... in progress, and blinks when the VCR is programmed or in Pause mode. 10 Remote Control Overview POWER 1 OPEN/CLOSE 18 2 3 2 SCREEN FIT SHUTTLE TV/VCR 3 4 M O D E / 5 6 REPEAT AUDIO 4 7 8 9 5 ZOOM 3D SOUND ANGLE CLEAR 6 TV MUTE 100+ 0 INPUT SEL. Rear Panel DVD & VCR DVD Only 1 2 3 4 1 RF ANTENNA INPUT 2 RF OUT TO TV 3 LINE OUT TO TV (COMPOSITE) 4 LINE IN 1 5 AUDIO LINE OUT TO TV (S-VIDEO OR COMPONENT) 5 6 78 9 6 COMPONENT VIDEO OUT 7 DIGITAL AUDIO OUT(COAXIAL) 8 DIGITAL AUDIO OUT(OPTICAL) 9 S-VIDEO OUT Front Panel Display...
User Manual (user Manual) (ver.1.0) (English)
Page 7
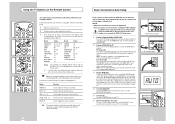
... you used the Line Connection, set the clock manually; Don't press any buttons on the Remote Control POWER OPEN/CLOSE 1 SCREEN FIT 4 M O D E / REPEAT 2 SHUTTLE 5 7 8 3 TV/VCR 6 AUDIO 9 ZOOM 3D SOUND TV MUTE 100+ DVD ANGLE CLEAR 0 INPUT SEL. 2 VCR SELECT TV 3 VIEW DIGEST + VOL F.ADV/SKIP 3 - You can set your TV to your television's Antenna Input; CH/TRK DISPLAY DVD VCR SELECT TV DIGEST VIEW 4+ VOL F.ADV/SKIP - 4 CH/TRK DISPLAY REC DISC MENU 7 ZOOM 3D SOUND TV MUTE 100+ 5 DVD 8 9 ANGLE CLEAR 0 INPUT...
... you used the Line Connection, set the clock manually; Don't press any buttons on the Remote Control POWER OPEN/CLOSE 1 SCREEN FIT 4 M O D E / REPEAT 2 SHUTTLE 5 7 8 3 TV/VCR 6 AUDIO 9 ZOOM 3D SOUND TV MUTE 100+ DVD ANGLE CLEAR 0 INPUT SEL. 2 VCR SELECT TV 3 VIEW DIGEST + VOL F.ADV/SKIP 3 - You can set your TV to your television's Antenna Input; CH/TRK DISPLAY DVD VCR SELECT TV DIGEST VIEW 4+ VOL F.ADV/SKIP - 4 CH/TRK DISPLAY REC DISC MENU 7 ZOOM 3D SOUND TV MUTE 100+ 5 DVD 8 9 ANGLE CLEAR 0 INPUT...
User Manual (user Manual) (ver.1.0) (English)
Page 8
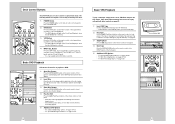
.../TRK DISPLAY 3REC 2 DISC MENU SETUP /ENTER CHANNEL EJECT 4DVD SELECT VCR REC VIDEO L AUDIO R LINE IN 2 15 Button Press the INPUT SEL. If the disc has two sides, orient the disc with the label side of the disc facing up . 3 Close Disc Drawer Press the OPEN/CLOSE button on the remote control or front panel to cycle through all of controls to operate both decks. Deck Control Buttons POWER OPEN/CLOSE 1 SCREEN FIT 4 M O D E / REPEAT 2 SHUTTLE 5 3 TV/VCR 6 AUDIO 7 8 9 ZOOM ANGLE 3D SOUND CLEAR TV...
.../TRK DISPLAY 3REC 2 DISC MENU SETUP /ENTER CHANNEL EJECT 4DVD SELECT VCR REC VIDEO L AUDIO R LINE IN 2 15 Button Press the INPUT SEL. If the disc has two sides, orient the disc with the label side of the disc facing up . 3 Close Disc Drawer Press the OPEN/CLOSE button on the remote control or front panel to cycle through all of controls to operate both decks. Deck Control Buttons POWER OPEN/CLOSE 1 SCREEN FIT 4 M O D E / REPEAT 2 SHUTTLE 5 3 TV/VCR 6 AUDIO 7 8 9 ZOOM ANGLE 3D SOUND CLEAR TV...
User Manual (user Manual) (ver.1.0) (English)
Page 10
.... 1 Open "SETUP MENU" With the DVD in stop mode, press the SETUP button. 2 Select "Clock" Using the up/down buttons. • Set Month - Manual Clock Set REC DISC MENU SETUP /ENTER 1,3 RETURN TITLE SUBTITLE MARK SPEED TIMER SEARCH MAIN MENU DVD VCR Option Language Program Clock Channel Exit Clock Set/Adjust RETURN ENTER CLOCK SET/ADJUST Auto ❿ Manual RETURN ENTER If Auto Setup was unable to find a local TV station to set the DVDVCR's internal clock, follow these instructions to set the DVD-VCR's tuner band to Antenna or Cable, whichever you to manually set...
.... 1 Open "SETUP MENU" With the DVD in stop mode, press the SETUP button. 2 Select "Clock" Using the up/down buttons. • Set Month - Manual Clock Set REC DISC MENU SETUP /ENTER 1,3 RETURN TITLE SUBTITLE MARK SPEED TIMER SEARCH MAIN MENU DVD VCR Option Language Program Clock Channel Exit Clock Set/Adjust RETURN ENTER CLOCK SET/ADJUST Auto ❿ Manual RETURN ENTER If Auto Setup was unable to find a local TV station to set the DVDVCR's internal clock, follow these instructions to set the DVD-VCR's tuner band to Antenna or Cable, whichever you to manually set...
User Manual (user Manual) (ver.1.0) (English)
Page 14
... Program Clock Channel Exit DVD Setup RETURN ENTER Disc Menu Audio Subtitle Parental Audio Options Display Options DVD SETUP English English Automatic Unlocked RETURN ENTER AUDIO OPTIONS Digital Output ➛!!❿ PCM DTS off Dynamic Compression on the front panel for 5 seconds. Press the power button and the DVD-VCR will appear. The "reset ok" message will go to the "Auto Setup" mode. (See page 13) Digital Output If your A/V receiver is equipped with no password is required to view any DVD disc or to change your DVD-VCR can output Dolby Digital 5.1 sound...
... Program Clock Channel Exit DVD Setup RETURN ENTER Disc Menu Audio Subtitle Parental Audio Options Display Options DVD SETUP English English Automatic Unlocked RETURN ENTER AUDIO OPTIONS Digital Output ➛!!❿ PCM DTS off Dynamic Compression on the front panel for 5 seconds. Press the power button and the DVD-VCR will appear. The "reset ok" message will go to the "Auto Setup" mode. (See page 13) Digital Output If your A/V receiver is equipped with no password is required to view any DVD disc or to change your DVD-VCR can output Dolby Digital 5.1 sound...

User Manual (user Manual) (ver.1.0) (English)
Page 16
... MENU DVD VCR Option Language Program Clock Channel Exit DVD Setup RETURN ENTER Disc Menu Audio Subtitle Parental Audio Options Display Options DVD SETUP English English Automatic Unlocked RETURN ENTER TV Aspect Black Level Alt Video Out DISPLAY OPTION Wide Low Component RETURN ENTER Set the aspect ratio (length x width) of your TV screen so the DVD player will display movies at the top and bottom of the screen. • 4:3 Pan-Scan - As a result, black bars will appear at the appropriate size for increased contrast during DVD playback. 1 Open "SETUP MENU...
... MENU DVD VCR Option Language Program Clock Channel Exit DVD Setup RETURN ENTER Disc Menu Audio Subtitle Parental Audio Options Display Options DVD SETUP English English Automatic Unlocked RETURN ENTER TV Aspect Black Level Alt Video Out DISPLAY OPTION Wide Low Component RETURN ENTER Set the aspect ratio (length x width) of your TV screen so the DVD player will display movies at the top and bottom of the screen. • 4:3 Pan-Scan - As a result, black bars will appear at the appropriate size for increased contrast during DVD playback. 1 Open "SETUP MENU...
User Manual (user Manual) (ver.1.0) (English)
Page 17
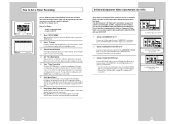
... your A/V Receiver. Press and hold the Forward/Back buttons on the back panel of the DVD-VCR to activate slow motion playback. CH/TRK DISPLAY 1 REC F.ADV/SKIP - CH/TRK DISPLAY REC DISC MENU 5 SETUP /ENTER 32 33 Use the DIGITAL AUDIO OUT connection below. 1 Digital Audio Out Connect EITHER an optical cable OR a digital coaxial cable from the beginning. Special Playback Features During DVD/CD playback you press ❿ll (Play/Pause), the disc will stop automatically...
... your A/V Receiver. Press and hold the Forward/Back buttons on the back panel of the DVD-VCR to activate slow motion playback. CH/TRK DISPLAY 1 REC F.ADV/SKIP - CH/TRK DISPLAY REC DISC MENU 5 SETUP /ENTER 32 33 Use the DIGITAL AUDIO OUT connection below. 1 Digital Audio Out Connect EITHER an optical cable OR a digital coaxial cable from the beginning. Special Playback Features During DVD/CD playback you press ❿ll (Play/Pause), the disc will stop automatically...

User Manual (user Manual) (ver.1.0) (English)
Page 18
..." icon will work when a DVD has been recorded in multiple screen format discs. x This function does not work when Screen Fit is active. (you can select Titles, Chapters, Audio Tracks, Subtitles, and special disc features, such as shortcut to select any Title, Chapter/Track, or counter position on the disc. 1 View DVD/CD Display Press the DISPLAY button on the remote control during DVD playback, you can also use the number buttons (0-9) to access the DVD's Title menu, if applicable...
..." icon will work when a DVD has been recorded in multiple screen format discs. x This function does not work when Screen Fit is active. (you can select Titles, Chapters, Audio Tracks, Subtitles, and special disc features, such as shortcut to select any Title, Chapter/Track, or counter position on the disc. 1 View DVD/CD Display Press the DISPLAY button on the remote control during DVD playback, you can also use the number buttons (0-9) to access the DVD's Title menu, if applicable...
User Manual (user Manual) (ver.1.0) (English)
Page 19
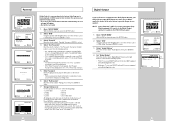
... /down buttons and left /right buttons to turn subtitles On or Off. • The default subtitle setting is present, press the ANGLE button to view the Angle Selection menu. 3 Select Screen Angle Press the up/down buttons to select one of the available screen angles. 36 Subtitle Many DVDs provide subtitles in use. Angle 4 M O D E / 5 6 REPEAT AUDIO 7 8 9 ZOOM ANGLE 3D SOUND TV MUTE 100+ 0 CLEAR INPUT SEL. 1 DVD VCR SELECT TV DIGEST VIEW + VOL CH/TRK DISPLAY Some DVDs allow you...
... /down buttons and left /right buttons to turn subtitles On or Off. • The default subtitle setting is present, press the ANGLE button to view the Angle Selection menu. 3 Select Screen Angle Press the up/down buttons to select one of the available screen angles. 36 Subtitle Many DVDs provide subtitles in use. Angle 4 M O D E / 5 6 REPEAT AUDIO 7 8 9 ZOOM ANGLE 3D SOUND TV MUTE 100+ 0 CLEAR INPUT SEL. 1 DVD VCR SELECT TV DIGEST VIEW + VOL CH/TRK DISPLAY Some DVDs allow you...

User Manual (user Manual) (ver.1.0) (English)
Page 21
... the disc, the bookmark function may not work. 4 Play Bookmark • During playback, press the MARK button on the remote control to bookmark, then press the ENTER button. The placeholder will highlight. 3 Set the Bookmark Play the DVD to the scene you want to cancel Programmed Play. The disc will appear on the remote control. SCREEN FIT 4 M O D E / REPEAT SHUTTLE 5 3 TV/VCR 6 AUDIO ZOOM 71 3D SOUND TV MUTE 100+ DVD 8 9 ANGLE CLEAR 0 INPUT SEL...
... the disc, the bookmark function may not work. 4 Play Bookmark • During playback, press the MARK button on the remote control to bookmark, then press the ENTER button. The placeholder will highlight. 3 Set the Bookmark Play the DVD to the scene you want to cancel Programmed Play. The disc will appear on the remote control. SCREEN FIT 4 M O D E / REPEAT SHUTTLE 5 3 TV/VCR 6 AUDIO ZOOM 71 3D SOUND TV MUTE 100+ DVD 8 9 ANGLE CLEAR 0 INPUT SEL...

User Manual (user Manual) (ver.1.0) (English)
Page 23
... 3 DISC MENU 3 SETUP /ENTER While a videotape is playing, you can enjoy a variety of the VCR deck, as well as the tape counter position and record speed. Press Skip repeatedly up to 4 times to cue ahead 2 minutes. 5 Repeat From Play mode, press Repeat to review the last 5 seconds of tape (SP mode). 6 Shuttle From Play mode, Shuttle >> gradually increases the cue speed from Double-Speed playback to Picture Search...
... 3 DISC MENU 3 SETUP /ENTER While a videotape is playing, you can enjoy a variety of the VCR deck, as well as the tape counter position and record speed. Press Skip repeatedly up to 4 times to cue ahead 2 minutes. 5 Repeat From Play mode, press Repeat to review the last 5 seconds of tape (SP mode). 6 Shuttle From Play mode, Shuttle >> gradually increases the cue speed from Double-Speed playback to Picture Search...
User Manual (user Manual) (ver.1.0) (English)
Page 24
... to search for a blank position to record a program on a cassette tape. • Press right arrow for forward scan or left arrow for reverse scan. • The display will rewind or fast forward, searching for about five seconds. • Press the PLAY button to select the desired channel, or press the INPUT SEL. Before You Begin... • Power on the DVD-VCR • Power on the remote control or front panel.
... to search for a blank position to record a program on a cassette tape. • Press right arrow for forward scan or left arrow for reverse scan. • The display will rewind or fast forward, searching for about five seconds. • Press the PLAY button to select the desired channel, or press the INPUT SEL. Before You Begin... • Power on the DVD-VCR • Power on the remote control or front panel.
User Manual (user Manual) (ver.1.0) (English)
Page 26
... S-Video cable from the S-VIDEO OUT on the back panel of the DVD-VCR to the S-Video Input on your television. 2 Connect Component Video Out to TV Connect a component video cable from the Left/Right Line Out jacks on the TV 1 Open "SETUP MENU" With the DVD in the SP tape speed, set the recording tape speed to set for the DVD player. If the tape length is long enough for timer program recording in stop a timer recording, press the POWER button...
... S-Video cable from the S-VIDEO OUT on the back panel of the DVD-VCR to the S-Video Input on your television. 2 Connect Component Video Out to TV Connect a component video cable from the Left/Right Line Out jacks on the TV 1 Open "SETUP MENU" With the DVD in the SP tape speed, set the recording tape speed to set for the DVD player. If the tape length is long enough for timer program recording in stop a timer recording, press the POWER button...

User Manual (user Manual) (ver.1.0) (English)
Page 27
... TV Connections Monitor-style televisions offer improved sound and picture over regular televisions because they receive the audio and video signals directly from the Audio/Video Line Out jacks on the back panel of the DVD-VCR to the Audio/Video Line Inputs of the DVD-VCR to your monitor television owner's manual for your particular device. 3 Play a Tape Insert a DVD or Hi-Fi stereo videotape in your system and adjust the volume on -screen display. If...
... TV Connections Monitor-style televisions offer improved sound and picture over regular televisions because they receive the audio and video signals directly from the Audio/Video Line Out jacks on the back panel of the DVD-VCR to the Audio/Video Line Inputs of the DVD-VCR to your monitor television owner's manual for your particular device. 3 Play a Tape Insert a DVD or Hi-Fi stereo videotape in your system and adjust the volume on -screen display. If...
User Manual (user Manual) (ver.1.0) (English)
Page 28
... cables from the Audio and Video Line Outputs of your external device to the Audio and Video Line Inputs on your external device, then press the Input Sel. Then press Record on your TV screen. 3 Record Device First, play your record source in the usual manner. Connecting Other Video Equipment DVD & VCR TV Audio/Video Outputs of the DVD-VCR. 2 Watch Device Play your TV screen. button until the playback from LINE1 (rear panel inputs) or LINE2 (front panel inputs) appears on the VCR deck. 4 Timer Record From Device Select...
... cables from the Audio and Video Line Outputs of your external device to the Audio and Video Line Inputs on your external device, then press the Input Sel. Then press Record on your TV screen. 3 Record Device First, play your record source in the usual manner. Connecting Other Video Equipment DVD & VCR TV Audio/Video Outputs of the DVD-VCR. 2 Watch Device Play your TV screen. button until the playback from LINE1 (rear panel inputs) or LINE2 (front panel inputs) appears on the VCR deck. 4 Timer Record From Device Select...

User Manual (user Manual) (ver.1.0) (English)
Page 29
.... This warranty gives you specific legal rights, and you . Transportation of the product to and from state to state. All replaced parts and products become the property of SAMSUNG and must be performed by SAMSUNG under the SAMSUNG brand name are set forth in the applicable end user license agreement. THERE ARE NO EXPRESS WARRANTIES OTHER THAN THOSE LISTED AND DESCRIBED...
.... This warranty gives you specific legal rights, and you . Transportation of the product to and from state to state. All replaced parts and products become the property of SAMSUNG and must be performed by SAMSUNG under the SAMSUNG brand name are set forth in the applicable end user license agreement. THERE ARE NO EXPRESS WARRANTIES OTHER THAN THOSE LISTED AND DESCRIBED...


