
User Manual (user Manual) (ver.1.0) (English)
Page 1
01547A DVD-V1000/XAA-Eng1 5/16/02 3:32 PM Page 1 DVD-V1000 Instruction Manual POWER SELECT OPEN/CLOSE EJECT CHANNEL LINE IN 1 REC VIDEO L AUDIO R COPY POWER OPEN/CLOSE TRK- ZOOM MUTE 4 MODE AUTO 2 SHUTTLE 5 TRK+ 3 DISPLAY 6 CLOCK/ COUNTER REPEAT 7 SKIP 3D SOUND F.ADV 100+ DVD 8 A.DUB 0 9 TV/VCR CLEAR SELECT VCR TV TV VIEW + VOL INPUT - ANGLE CH PREV.CH REC DISC MENU SETUP /ENTER TITLE SUBTITLE AUDIO MARK SP/SLP SET TIMER RETURN SEARCH/INDEX www.samsungasc.com
01547A DVD-V1000/XAA-Eng1 5/16/02 3:32 PM Page 1 DVD-V1000 Instruction Manual POWER SELECT OPEN/CLOSE EJECT CHANNEL LINE IN 1 REC VIDEO L AUDIO R COPY POWER OPEN/CLOSE TRK- ZOOM MUTE 4 MODE AUTO 2 SHUTTLE 5 TRK+ 3 DISPLAY 6 CLOCK/ COUNTER REPEAT 7 SKIP 3D SOUND F.ADV 100+ DVD 8 A.DUB 0 9 TV/VCR CLEAR SELECT VCR TV TV VIEW + VOL INPUT - ANGLE CH PREV.CH REC DISC MENU SETUP /ENTER TITLE SUBTITLE AUDIO MARK SP/SLP SET TIMER RETURN SEARCH/INDEX www.samsungasc.com
User Manual (user Manual) (ver.1.0) (English)
Page 2
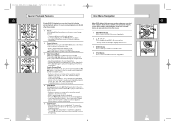
... this DVD-VCR from the DVD-VCR. 13. This DVD-VCR may be connected to the grounding system of the building, as close to the point of the unit should follow the manufacturer's instructions and should be followed. 5. POWER-CORD PROTECTION - household) current. Para prevenir electrochoque, no serviceable parts inside. Diríjase solamente a personal calificado cuando requiera servicio. The safety and operating instructions should use...
... this DVD-VCR from the DVD-VCR. 13. This DVD-VCR may be connected to the grounding system of the building, as close to the point of the unit should follow the manufacturer's instructions and should be followed. 5. POWER-CORD PROTECTION - household) current. Para prevenir electrochoque, no serviceable parts inside. Diríjase solamente a personal calificado cuando requiera servicio. The safety and operating instructions should use...
User Manual (user Manual) (ver.1.0) (English)
Page 3
... the operating instructions. f. REPLACEMENT PARTS - System Setup 16 s On-Screen Menu Navigation 16 s Menu Language 17 s Manual Clock Set 18 s Daylight Savings Time 19 s Time Zone 20 s Auto Clock Set Channel 21 s Tuner Band Setting 22 s Auto Channel Search 23 s Add/Remove Channels 24 s Show Weak Channels 25 s Tuner Audio 26 s Child Lock 26 s Front Panel Dimmer 27 x 5 - Should spillage occur, unplug the DVD-VCR and have fallen into this can fall into such power lines or circuits. SERVICING - x Safety 3 s Important Safety Instructions 3 x Welcome...
... the operating instructions. f. REPLACEMENT PARTS - System Setup 16 s On-Screen Menu Navigation 16 s Menu Language 17 s Manual Clock Set 18 s Daylight Savings Time 19 s Time Zone 20 s Auto Clock Set Channel 21 s Tuner Band Setting 22 s Auto Channel Search 23 s Add/Remove Channels 24 s Show Weak Channels 25 s Tuner Audio 26 s Child Lock 26 s Front Panel Dimmer 27 x 5 - Should spillage occur, unplug the DVD-VCR and have fallen into this can fall into such power lines or circuits. SERVICING - x Safety 3 s Important Safety Instructions 3 x Welcome...
User Manual (user Manual) (ver.1.0) (English)
Page 4
...s Subtitle 42 s A-B Repeat 43 s Repeat Chapter/Title 44 s Audio 44 s Bookmarks 45 s Programmed Playback 46 s Random Playback 47 s MP3 Playback 47 s 3D Sound 48 x 8 - Timer Recording 59 s How to 0:00:00 66 x Appendix A - DVD Sound Setup 35 s A/V Receiver Connections 35 s Dolby Digital Decoder Setting 36 s DTS Decoder Setting 37 x 7 - Advanced Connections 67 s S-Video/Component Video Connections (for DVD 67 s Alt Video Out Setting 68 s Stereo Connections 69 s Monitor TV Connections 70 s Connecting Other Video Equipment 71 s Using the TV Buttons on the Remote Control 72...
...s Subtitle 42 s A-B Repeat 43 s Repeat Chapter/Title 44 s Audio 44 s Bookmarks 45 s Programmed Playback 46 s Random Playback 47 s MP3 Playback 47 s 3D Sound 48 x 8 - Timer Recording 59 s How to 0:00:00 66 x Appendix A - DVD Sound Setup 35 s A/V Receiver Connections 35 s Dolby Digital Decoder Setting 36 s DTS Decoder Setting 37 x 7 - Advanced Connections 67 s S-Video/Component Video Connections (for DVD 67 s Alt Video Out Setting 68 s Stereo Connections 69 s Monitor TV Connections 70 s Connecting Other Video Equipment 71 s Using the TV Buttons on the Remote Control 72...
User Manual (user Manual) (ver.1.0) (English)
Page 5
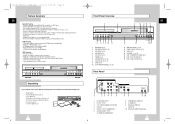
...(1) • Remote Control (1) • 1.5V "AA" Batteries (2) POWER SELECT OPEN/CLOSE EJECT CHANNEL LINE IN 1 REC VIDEO L AUDIO R COPY POWER OPEN/CLOSE TRK- ZOOM MUTE 4 MODE AUTO 2 SHUTTLE 5 TRK+ 3 DISPLAY 6 CLOCK/ COUNTER REPEAT 7 SKIP 3D SOUND F.ADV 100+ DVD 8 A.DUB 0 9 TV/VCR CLEAR SELECT VCR TV TV VIEW + VOL INPUT - ANGLE CH PREV.CH REC DISC MENU SETUP /ENTER TITLE SUBTITLE AUDIO MARK SP/SLP SET TIMER RETURN SEARCH/INDEX 8 Front Panel Overview 1 2 GB 3 14 4 15 5 POWER SELECT OPEN/CLOSE EJECT CHANNEL LINE IN 1 REC VIDEO L AUDIO R COPY...
...(1) • Remote Control (1) • 1.5V "AA" Batteries (2) POWER SELECT OPEN/CLOSE EJECT CHANNEL LINE IN 1 REC VIDEO L AUDIO R COPY POWER OPEN/CLOSE TRK- ZOOM MUTE 4 MODE AUTO 2 SHUTTLE 5 TRK+ 3 DISPLAY 6 CLOCK/ COUNTER REPEAT 7 SKIP 3D SOUND F.ADV 100+ DVD 8 A.DUB 0 9 TV/VCR CLEAR SELECT VCR TV TV VIEW + VOL INPUT - ANGLE CH PREV.CH REC DISC MENU SETUP /ENTER TITLE SUBTITLE AUDIO MARK SP/SLP SET TIMER RETURN SEARCH/INDEX 8 Front Panel Overview 1 2 GB 3 14 4 15 5 POWER SELECT OPEN/CLOSE EJECT CHANNEL LINE IN 1 REC VIDEO L AUDIO R COPY...
User Manual (user Manual) (ver.1.0) (English)
Page 6
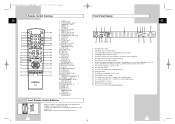
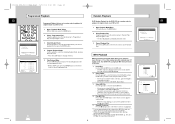
... DISPLAY 4 MUTE 4 5 6 CLOCK/ MODE COUNTER 5 REPEAT 7 8 9 6 SKIP 3D SOUND A.DUB CLEAR TV/VCR 7 F.ADV 100+ 0 8 DVD SELECT VCR TV 20 21 22 23 24 25 9 26 TV VIEW + ANGLE 10 VOL CH 27 INPUT - If blinking there is graphically displayed 11 01547A DVD-V1000/XAA-Eng1 5/16/02 3:32 PM Page 10 Remote Control Overview GB POWER OPEN/CLOSE 1 TRK- or p.m. 18 DVD to VHS copy is in Pause mode. 9 The VCR Record Speed is set...
... DISPLAY 4 MUTE 4 5 6 CLOCK/ MODE COUNTER 5 REPEAT 7 8 9 6 SKIP 3D SOUND A.DUB CLEAR TV/VCR 7 F.ADV 100+ 0 8 DVD SELECT VCR TV 20 21 22 23 24 25 9 26 TV VIEW + ANGLE 10 VOL CH 27 INPUT - If blinking there is graphically displayed 11 01547A DVD-V1000/XAA-Eng1 5/16/02 3:32 PM Page 10 Remote Control Overview GB POWER OPEN/CLOSE 1 TRK- or p.m. 18 DVD to VHS copy is in Pause mode. 9 The VCR Record Speed is set...
User Manual (user Manual) (ver.1.0) (English)
Page 7
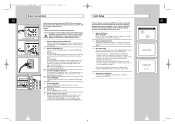
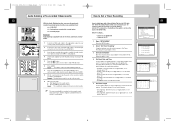
... all active channels and set the clock. 1 Set the On-Screen Menu Language Press 1, 2, or 3 to select English, French, or Spanish. AUTO T ZOOM MUTE 4 MODE 2 SHUTTLE 5 REPEAT 7 8 SKIP 3D SOUND A DUB TV/ 1 Connect Antenna/Cable to DVD-VCR Connect the RF antenna cable from your indoor/outdoor antenna or cable wall outlet to the IN (FROM ANT.) jack on -screen menu language and connect an Antenna or Cable. Sets the DVD-VCR's internal clock. DVD & VCR 2 3 To TV's Antenna Input 2 4 POWER 5 POWER 5 TRK- Please...
... all active channels and set the clock. 1 Set the On-Screen Menu Language Press 1, 2, or 3 to select English, French, or Spanish. AUTO T ZOOM MUTE 4 MODE 2 SHUTTLE 5 REPEAT 7 8 SKIP 3D SOUND A DUB TV/ 1 Connect Antenna/Cable to DVD-VCR Connect the RF antenna cable from your indoor/outdoor antenna or cable wall outlet to the IN (FROM ANT.) jack on -screen menu language and connect an Antenna or Cable. Sets the DVD-VCR's internal clock. DVD & VCR 2 3 To TV's Antenna Input 2 4 POWER 5 POWER 5 TRK- Please...
User Manual (user Manual) (ver.1.0) (English)
Page 8
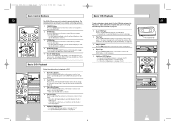
... (Play/Pause) button on the remote control or front panel. ZOOM MUTE 4 MODE AUTO 2 SHUTTLE 5 TRK+ 3 DISPLAY 6 CLOCK/ COUNTER 3D SOUND F.ADV 100+ DVD A.DUB 0 TV/VCR SELECT VCR TV 2 TV VIEW + VOL 5 INPUT - 3 ANGLE CH PREV.CH REC DISC MENU 1 POWER Button Press the POWER button on the Front Panel Display to operate both decks. GB OPEN/CLOSE EJECT LINE IN 1 CHANNEL REC VIDEO L AUDIO R COPY 1 TV VIEW + VOL INPUT - 01547A DVD-V1000/XAA-Eng2 5/16/02 3:38 PM Page 14 Deck Control Buttons GB The DVD-VCR uses one...
... (Play/Pause) button on the remote control or front panel. ZOOM MUTE 4 MODE AUTO 2 SHUTTLE 5 TRK+ 3 DISPLAY 6 CLOCK/ COUNTER 3D SOUND F.ADV 100+ DVD A.DUB 0 TV/VCR SELECT VCR TV 2 TV VIEW + VOL 5 INPUT - 3 ANGLE CH PREV.CH REC DISC MENU 1 POWER Button Press the POWER button on the Front Panel Display to operate both decks. GB OPEN/CLOSE EJECT LINE IN 1 CHANNEL REC VIDEO L AUDIO R COPY 1 TV VIEW + VOL INPUT - 01547A DVD-V1000/XAA-Eng2 5/16/02 3:38 PM Page 14 Deck Control Buttons GB The DVD-VCR uses one...

User Manual (user Manual) (ver.1.0) (English)
Page 9
... the program you are watching. • Also works in DVD and VCR mode. 7 Display Press to display the channel you to set all functions for your TV's tuner and the VCR's internal tuner. 2 Channel Up/Down Press to change the on certain screens. First, press the 100+ button, then press the remaining digits using the 0-9 buttons. 5 Previous Channel Press to jump directly to the previously viewed channel. 6 Volume Press to switch between your DVD-VCR. ZOOM MUTE 4 MODE AUTO 2 SHUTTLE 5 REPEAT...
... the program you are watching. • Also works in DVD and VCR mode. 7 Display Press to display the channel you to set all functions for your TV's tuner and the VCR's internal tuner. 2 Channel Up/Down Press to change the on certain screens. First, press the 100+ button, then press the remaining digits using the 0-9 buttons. 5 Previous Channel Press to jump directly to the previously viewed channel. 6 Volume Press to switch between your DVD-VCR. ZOOM MUTE 4 MODE AUTO 2 SHUTTLE 5 REPEAT...
User Manual (user Manual) (ver.1.0) (English)
Page 11
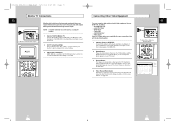
.... 1 Open "SETUP MENU" Press the SETUP button. 2 Select "Set Clock" Using the up /down , move the selection arrow to "Set Clock," then push right to select. 3 Turn On "Auto Clock Set" Move the selection arrow to "Auto Clock Set," then push right to the front Line 1 inputs. • Line 2 - Central Standard Time. • Mountain - Sets the DVD-VCR to set the channel. • Line 1 - 01547A DVD-V1000/XAA-Eng2 5/16/02 3:38 PM Page 20 Time Zone GB REC DISC MENU SETUP /ENTER 1 TITLE SUBTITLE AUDIO...
.... 1 Open "SETUP MENU" Press the SETUP button. 2 Select "Set Clock" Using the up /down , move the selection arrow to "Set Clock," then push right to select. 3 Turn On "Auto Clock Set" Move the selection arrow to "Auto Clock Set," then push right to the front Line 1 inputs. • Line 2 - Central Standard Time. • Mountain - Sets the DVD-VCR to set the channel. • Line 1 - 01547A DVD-V1000/XAA-Eng2 5/16/02 3:38 PM Page 20 Time Zone GB REC DISC MENU SETUP /ENTER 1 TITLE SUBTITLE AUDIO...
User Manual (user Manual) (ver.1.0) (English)
Page 12
... DISC MENU SETUP /ENTER 1 TITLE SUBTITLE AUDIO MARK SP/SLP SET TIMER RETURN SEARCH/INDEX This feature allows you to manually set the DVD-VCR's tuner band to Antenna or Cable, whichever you connected to select from the following options: • Auto - Indicates that the DVD-VCR is connected to complete. • When finished, the lowest channel found will automatically search for all active channels in on the wrong channel numbers. 1 Open "SETUP MENU" Press the SETUP button. 2 Select "VCR & Channel Setup" Using...
... DISC MENU SETUP /ENTER 1 TITLE SUBTITLE AUDIO MARK SP/SLP SET TIMER RETURN SEARCH/INDEX This feature allows you to manually set the DVD-VCR's tuner band to Antenna or Cable, whichever you connected to select from the following options: • Auto - Indicates that the DVD-VCR is connected to complete. • When finished, the lowest channel found will automatically search for all active channels in on the wrong channel numbers. 1 Open "SETUP MENU" Press the SETUP button. 2 Select "VCR & Channel Setup" Using...
User Manual (user Manual) (ver.1.0) (English)
Page 14
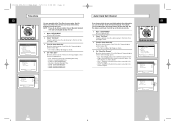
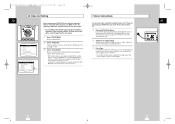
... set the Front Panel Display to a Mono output device, such as a monitor. • Stereo - Optional audio signal, often used to Mono. • SAP - This method displays the full width of 10:00 p.m. Second Audio Program. Front Panel Display will dim automatically during DVD playback, and between the hours of the widescreen movie on a widescreen television. Use when connecting the VCR to be operated with the remote control. 1 Open the "SETUP MENU" Press the SETUP button. 2 Select "Child Lock" Using...
... set the Front Panel Display to a Mono output device, such as a monitor. • Stereo - Optional audio signal, often used to Mono. • SAP - This method displays the full width of 10:00 p.m. Second Audio Program. Front Panel Display will dim automatically during DVD playback, and between the hours of the widescreen movie on a widescreen television. Use when connecting the VCR to be operated with the remote control. 1 Open the "SETUP MENU" Press the SETUP button. 2 Select "Child Lock" Using...
User Manual (user Manual) (ver.1.0) (English)
Page 17
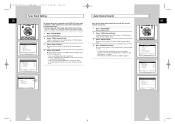
... the selection arrow to "DVD Setup," then push right to select. 3 Select "Language/Audio Setup" Move the selection arrow to "Language/Audio Setup," then push right to select. 4 Set "Dynamic Compression" Move the selection arrow to "Dynamic Compression," then push right to change Rating Control options. This is required to view any DVD disc or to select from the following options: • No - Please skip to Step 5. 5 Enter Password Enter a 4-digit password using the 0-9 buttons on...
... the selection arrow to "DVD Setup," then push right to select. 3 Select "Language/Audio Setup" Move the selection arrow to "Language/Audio Setup," then push right to select. 4 Set "Dynamic Compression" Move the selection arrow to "Dynamic Compression," then push right to change Rating Control options. This is required to view any DVD disc or to select from the following options: • No - Please skip to Step 5. 5 Enter Password Enter a 4-digit password using the 0-9 buttons on...

User Manual (user Manual) (ver.1.0) (English)
Page 18
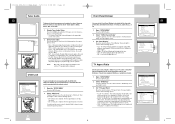
... OR To Digital Audio Input of the movie theater experience that DVD offers, you may want to confirm your A/V Receiver. 01547A DVD-V1000/XAA-Eng2 5/16/02 3:38 PM Page 34 Changing the Rating Control Password GB RATING CONTROL Enter New Password ---- Use 0-9 Keys RETURN To Go Back CHANGE PASSWORD Enter New Password ---- Press the RETURN button to continue. • Press the RETURN button repeatedly to a complete Surround Sound system, including...
... OR To Digital Audio Input of the movie theater experience that DVD offers, you may want to confirm your A/V Receiver. 01547A DVD-V1000/XAA-Eng2 5/16/02 3:38 PM Page 34 Changing the Rating Control Password GB RATING CONTROL Enter New Password ---- Use 0-9 Keys RETURN To Go Back CHANGE PASSWORD Enter New Password ---- Press the RETURN button to continue. • Press the RETURN button repeatedly to a complete Surround Sound system, including...
User Manual (user Manual) (ver.1.0) (English)
Page 20
... playback to resume normal playback. Use these buttons to make your selections in Pause mode, press the SKIP/F.ADV button on the remote control or front panel to jump forward and backward through DVD's Disc menu options. • Push up, down, left in Pause mode for 2 minutes, it will mute. • To resume playback, press the ❿ll (Play/Pause) button. • If the player is muted during playback. • The picture...
... playback to resume normal playback. Use these buttons to make your selections in Pause mode, press the SKIP/F.ADV button on the remote control or front panel to jump forward and backward through DVD's Disc menu options. • Push up, down, left in Pause mode for 2 minutes, it will mute. • To resume playback, press the ❿ll (Play/Pause) button. • If the player is muted during playback. • The picture...
User Manual (user Manual) (ver.1.0) (English)
Page 24
... a number. • Press the Return button to back up and select another folder. 4 Play MP3 File Press either the ENTER button on the remote control to play back in the custom programmed order. • While in STOP mode, press the POWER button on the remote control to cancel Programmed Play. 46 Random Playback DVD Random Playback lets the DVD-VCR set a custom order for playback of chapters/tracks on a DVD or CD. 1 Open Playback Mode Menu In Stop mode, press the MODE button. 2 Select Random Play Using...
... a number. • Press the Return button to back up and select another folder. 4 Play MP3 File Press either the ENTER button on the remote control to play back in the custom programmed order. • While in STOP mode, press the POWER button on the remote control to cancel Programmed Play. 46 Random Playback DVD Random Playback lets the DVD-VCR set a custom order for playback of chapters/tracks on a DVD or CD. 1 Open Playback Mode Menu In Stop mode, press the MODE button. 2 Select Random Play Using...
User Manual (user Manual) (ver.1.0) (English)
Page 30
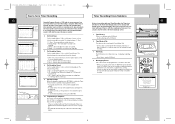
... DVD-VCR • Power on the TV DVD & VCR 2 2 ZOOM MUTE 4 MODE SHUTTLE 5 DISPLAY 6 CLOCK/ COUNTER REPEAT 7 SKIP 3D SOUND F.ADV 100+ DVD 8 A.DUB 0 9 TV/VCR CLEAR 6 SELECT VCR TV TV VIEW + ANGLE A.Dub 1 Connect an RCA audio cable to the appropriate output on your DVD-VCR. 3 Insert the pre-recorded videocassette on the Hi-Fi sound track. 1 Open "SETUP MENU" Press the SETUP button. 2 Select "Set Timer Recording" Using the up/down buttons to set to a year in the Audio dubbing still mode. 7 Press the TV VIEW button...
... DVD-VCR • Power on the TV DVD & VCR 2 2 ZOOM MUTE 4 MODE SHUTTLE 5 DISPLAY 6 CLOCK/ COUNTER REPEAT 7 SKIP 3D SOUND F.ADV 100+ DVD 8 A.DUB 0 9 TV/VCR CLEAR 6 SELECT VCR TV TV VIEW + ANGLE A.Dub 1 Connect an RCA audio cable to the appropriate output on your DVD-VCR. 3 Insert the pre-recorded videocassette on the Hi-Fi sound track. 1 Open "SETUP MENU" Press the SETUP button. 2 Select "Set Timer Recording" Using the up/down buttons to set to a year in the Audio dubbing still mode. 7 Press the TV VIEW button...
User Manual (user Manual) (ver.1.0) (English)
Page 31
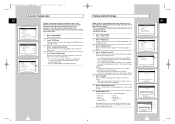
... view a summary of event, i.e. Records from the rear line inputs. 8 Set Recording Speed Use the number buttons (1-3) to set the Record Source. Delivers maximum recording time. When Auto is Auto. 1 Auto - The event will be recorded. 1 N/CLOSE GB CHANNEL LINE REC VIDEO COPY TV VIEW + VOL INPUT - 3 ANGLE CH PREV.CH REC DISC MENU SETUP /ENTER 61 Complete Program Record (see page 61. • The VCR will automatically turn on when the Timer Recording begins. 60 Timer Recording Errors/Solutions If there is a problem with the Record...
... view a summary of event, i.e. Records from the rear line inputs. 8 Set Recording Speed Use the number buttons (1-3) to set the Record Source. Delivers maximum recording time. When Auto is Auto. 1 Auto - The event will be recorded. 1 N/CLOSE GB CHANNEL LINE REC VIDEO COPY TV VIEW + VOL INPUT - 3 ANGLE CH PREV.CH REC DISC MENU SETUP /ENTER 61 Complete Program Record (see page 61. • The VCR will automatically turn on when the Timer Recording begins. 60 Timer Recording Errors/Solutions If there is a problem with the Record...
User Manual (user Manual) (ver.1.0) (English)
Page 35
... stereo sound, press the Audio button until "Stereo" appears on the on-screen display. If you are using the S-Video Out jack on the rear panel to connect to your TV. • Component - GB DVD & VCR 68 69 01547A DVD-V1000/XAA-Eng5 5/16/02 3:47 PM Page 68 Alt Video Out Setting GB REC 1 SETUP /ENTER DISC MENU TITLE SUBTITLE AUDIO MARK SP/SLP SET TIMER RETURN SEARCH/INDEX If you connected your DVD-VCR to...
... stereo sound, press the Audio button until "Stereo" appears on the on-screen display. If you are using the S-Video Out jack on the rear panel to connect to your TV. • Component - GB DVD & VCR 68 69 01547A DVD-V1000/XAA-Eng5 5/16/02 3:47 PM Page 68 Alt Video Out Setting GB REC 1 SETUP /ENTER DISC MENU TITLE SUBTITLE AUDIO MARK SP/SLP SET TIMER RETURN SEARCH/INDEX If you connected your DVD-VCR to...
User Manual (user Manual) (ver.1.0) (English)
Page 36
... or back panel of these devices use essentially the same connections, they receive the audio and video signals directly from the Audio and Video Line Outputs of your external device to the Audio and Video Line Inputs on the VCR deck. 4 Timer Record From Device Select Line 1 or Line 2 as a computer monitor. 01547A DVD-V1000/XAA-Eng5 5/16/02 3:47 PM Page 70 Monitor TV Connections GB Monitor-style televisions offer improved sound and picture over...
... or back panel of these devices use essentially the same connections, they receive the audio and video signals directly from the Audio and Video Line Outputs of your external device to the Audio and Video Line Inputs on the VCR deck. 4 Timer Record From Device Select Line 1 or Line 2 as a computer monitor. 01547A DVD-V1000/XAA-Eng5 5/16/02 3:47 PM Page 70 Monitor TV Connections GB Monitor-style televisions offer improved sound and picture over...


