User Manual
Page 2
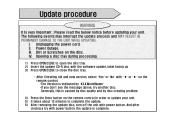
... 3) Press OPEN/CLOSE to close the disc tray. → After Checking old and new version, select "Yes" or "No" with "◀" or "▶" on the remote control. *The Version is indicated by "XX.X.ModelName" *If you don't see the message above, try with power button, the update is caused by disc... quality and by disc creating problem. 4) Press the Enter button on the remote control in order to update your unit. 5) It takes about 12 minutes to complete the update. 6) After removing the update disc, turn off the unit...
... 3) Press OPEN/CLOSE to close the disc tray. → After Checking old and new version, select "Yes" or "No" with "◀" or "▶" on the remote control. *The Version is indicated by "XX.X.ModelName" *If you don't see the message above, try with power button, the update is caused by disc... quality and by disc creating problem. 4) Press the Enter button on the remote control in order to update your unit. 5) It takes about 12 minutes to complete the update. 6) After removing the update disc, turn off the unit...

Quick Guide (easy Manual) (ver.1.0) (English)
Page 6
...9632; General Features 8 ■ Before Reading the Instruction Manual 9 ■ How to use the DVD Recorder 9 ■ Unpacking 10 Accessories 10 Preparing the Remote Control 10 Tour of the Remote Control 12 ■ Description 13 Front Panel 13 Front Panel Display 13 Rear Panel 14 Connecting & ...35 Changing the Password 35 Recording ■ Recordable discs 36 Compatibility between Samsung and Other manufacturer's Recorders 36 ■ Recording Formats 37 DVD-RW(Video mode)/-R 37 DVD-RAM/-RW(VR mode 37 DVD+RW 37 ■ Recording Mode 38 ■ Unrecordable video 38 About ...
...9632; General Features 8 ■ Before Reading the Instruction Manual 9 ■ How to use the DVD Recorder 9 ■ Unpacking 10 Accessories 10 Preparing the Remote Control 10 Tour of the Remote Control 12 ■ Description 13 Front Panel 13 Front Panel Display 13 Rear Panel 14 Connecting & ...35 Changing the Password 35 Recording ■ Recordable discs 36 Compatibility between Samsung and Other manufacturer's Recorders 36 ■ Recording Formats 37 DVD-RW(Video mode)/-R 37 DVD-RAM/-RW(VR mode 37 DVD+RW 37 ■ Recording Mode 38 ■ Unrecordable video 38 About ...

Quick Guide (easy Manual) (ver.1.0) (English)
Page 10
... Size) (AC43-12002H) Instruction Manual (AK68-01318A) Quick Guide (AK68-01321A) ▌Preparing the Remote Control Install Batteries in the Remote Control • Open the battery cover on DVD+RWs and edit them in the household trash. ■ You can finalize automatically using the Chapter...compatible component, a finalized disc should be used for the supplied accessories below. If the remote control does not operate properly: • Check the polarity + - When using a DVD±R disc You should finalize the disc to enable playback on the disc once it has...
... Size) (AC43-12002H) Instruction Manual (AK68-01318A) Quick Guide (AK68-01321A) ▌Preparing the Remote Control Install Batteries in the Remote Control • Open the battery cover on DVD+RWs and edit them in the household trash. ■ You can finalize automatically using the Chapter...compatible component, a finalized disc should be used for the supplied accessories below. If the remote control does not operate properly: • Check the polarity + - When using a DVD±R disc You should finalize the disc to enable playback on the disc once it has...
Quick Guide (easy Manual) (ver.1.0) (English)
Page 11
.... Button Function POWER Used to switch the television on and off. 0~9 Used to operate with the remote control, it will switch off . Used to select the desired channel. TV VOL +/- CBC/TV CH... the following buttons. INPUT SEL. Getting Started To determine whether your television is compatible with the remote control. ■ If several codes are indicated for your television brand, try each one in ... RADIOMARELLI 57 RCA 45, 46 REX 74 BRAND BUTTON SABA 57, 72, 73, 74, 75 SALORA 74 SAMSUNG 01,02,03,04,05,06,07,08,09 SANYO 41, 42, 43, 44, 48 SCHNEIDER 06 SELECO...
.... Button Function POWER Used to switch the television on and off. 0~9 Used to operate with the remote control, it will switch off . Used to select the desired channel. TV VOL +/- CBC/TV CH... the following buttons. INPUT SEL. Getting Started To determine whether your television is compatible with the remote control. ■ If several codes are indicated for your television brand, try each one in ... RADIOMARELLI 57 RCA 45, 46 REX 74 BRAND BUTTON SABA 57, 72, 73, 74, 75 SALORA 74 SAMSUNG 01,02,03,04,05,06,07,08,09 SANYO 41, 42, 43, 44, 48 SCHNEIDER 06 SELECO...
Quick Guide (easy Manual) (ver.1.0) (English)
Page 12
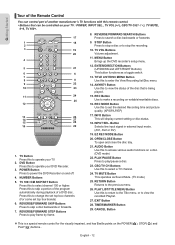
.... 23. STOP Button Press to stop a disc or to view the recorded Playlist. 27. INPUT SEL. AUDIO Button Use this remote control. • Buttons that is a special remote control for the visually impaired, and has Braille points on and off. 4. RETURN Button Returns to select channel 100 or higher. ...(XP/SP/LP/EP) 17. REC MODE Button Use this to the previous menu. 26. Getting Started ▌Tour of the Remote Control You can be controlled on a disc. (DVD mode) 22. TV Button Press this to set top box brands) 6. NUMBER Buttons 5. Press this to play frame by frame. ...
.... 23. STOP Button Press to stop a disc or to view the recorded Playlist. 27. INPUT SEL. AUDIO Button Use this remote control. • Buttons that is a special remote control for the visually impaired, and has Braille points on and off. 4. RETURN Button Returns to select channel 100 or higher. ...(XP/SP/LP/EP) 17. REC MODE Button Use this to the previous menu. 26. Getting Started ▌Tour of the Remote Control You can be controlled on a disc. (DVD mode) 22. TV Button Press this to set top box brands) 6. NUMBER Buttons 5. Press this to play frame by frame. ...
Quick Guide (easy Manual) (ver.1.0) (English)
Page 15
... another channel. Find and Connect the included IR Blaster cable into the Cable Box Control jack of the sensor. 3. B. Remember the location of the DVD Recorder. 2. Move the remote across the front while pressing the power button On and Off (Figure 2). ■ You must select a cable box brand from the table on... the Set Top Box Control menu. (See pages 27~28) ■ The DVD-R160 does not have found in 2. Be sure that it touches the front of the device (see Figure 1). When the cable box powers On, you move the remote; Use the double-sided tape to secure the IR Blaster. Find the...
... another channel. Find and Connect the included IR Blaster cable into the Cable Box Control jack of the sensor. 3. B. Remember the location of the DVD Recorder. 2. Move the remote across the front while pressing the power button On and Off (Figure 2). ■ You must select a cable box brand from the table on... the Set Top Box Control menu. (See pages 27~28) ■ The DVD-R160 does not have found in 2. Be sure that it touches the front of the device (see Figure 1). When the cable box powers On, you move the remote; Use the double-sided tape to secure the IR Blaster. Find the...
Quick Guide (easy Manual) (ver.1.0) (English)
Page 16
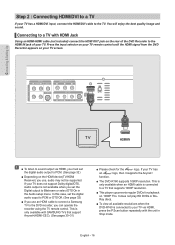
In this case, set the digital audio ouput to PCM or DTS Off. (See page 32) ■ If you use an HDMI cable to connect a Samsung TV to PCM. (See page 32) ■ Depending on 1080P TVs. This is connected to your TV via HDMI, you can operate the recorder using ... upconverts regular DVDs for the logo. If your TV. Press the input selector on your TV remote control until the HDMI signal from the DVD Recorder appears on the rear of the DVD Recorder to the HDMI IN jack of your TV has an logo, then it supports the Anynet+ function. ■ The DVD-R160 supports...
In this case, set the digital audio ouput to PCM or DTS Off. (See page 32) ■ If you use an HDMI cable to connect a Samsung TV to PCM. (See page 32) ■ Depending on 1080P TVs. This is connected to your TV via HDMI, you can operate the recorder using ... upconverts regular DVDs for the logo. If your TV. Press the input selector on your TV remote control until the HDMI signal from the DVD Recorder appears on the rear of the DVD Recorder to the HDMI IN jack of your TV has an logo, then it supports the Anynet+ function. ■ The DVD-R160 supports...
Quick Guide (easy Manual) (ver.1.0) (English)
Page 17
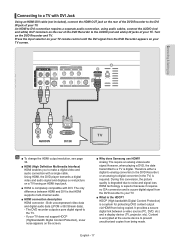
Press the input selector on your TV remote control until the DVI signal from the DVD recorder to your TV. ■ What is the HDCP? HDMI technology is superior because it requires no D/A conversion and is encrypted at the source device ... outputs a pure digital signal to a TV is a system for protecting DVD content output via HDMI from being copied. It provides a secure digital link between HDMI and DVI is required. English - 17 Turn on the screen. ■ Why does Samsung use HDMI? An HDMI to DVI connection requires a separate audio connection, using audio...
Press the input selector on your TV remote control until the DVI signal from the DVD recorder to your TV. ■ What is the HDCP? HDMI technology is superior because it requires no D/A conversion and is encrypted at the source device ... outputs a pure digital signal to a TV is a system for protecting DVD content output via HDMI from being copied. It provides a secure digital link between HDMI and DVI is required. English - 17 Turn on the screen. ■ Why does Samsung use HDMI? An HDMI to DVI connection requires a separate audio connection, using audio...
Quick Guide (easy Manual) (ver.1.0) (English)
Page 25
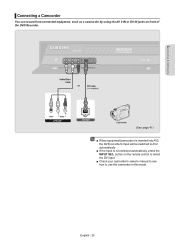
button on front of the DVD Recorder. (See page 41) ■ When equipment(camcorder) is not selected automatically, press the INPUT SEL. Connecting & Setting Up ▌Connecting a Camcorder You can record from connected equipment, such as a camcorder by using the AV 2 IN or DV IN jacks on the remote control to select the DV Input. ■ Check your camcorder's owner's manual to see how to AV2 automatically. ■ If the Input is inserted into AV2, the DVD recorder's Input will be switched to use the camcorder in this mode. English - 25
button on front of the DVD Recorder. (See page 41) ■ When equipment(camcorder) is not selected automatically, press the INPUT SEL. Connecting & Setting Up ▌Connecting a Camcorder You can record from connected equipment, such as a camcorder by using the AV 2 IN or DV IN jacks on the remote control to select the DV Input. ■ Check your camcorder's owner's manual to see how to AV2 automatically. ■ If the Input is inserted into AV2, the DVD recorder's Input will be switched to use the camcorder in this mode. English - 25
Quick Guide (easy Manual) (ver.1.0) (English)
Page 26
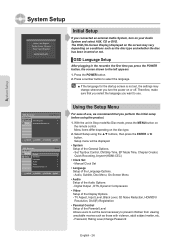
... ST01 Initial Setup If you want to the left appears. 1. Timer Record ► Setup Scheduled Record List ► MOVE ENTER RETURN EXIT DVD-Recorder No Disc Timer Rec. Digital Output , DTS, Dynamic Compression • Video Setup of the General Options. - Setup menu will be displayed.... • System Setup of the Display Options. - Menu items differ depending on the remote control. Manual Clock Set • Language Setup of the Audio Options - Set Top Box Control, CM Skip Time, EP Mode Time, Chapter ...
... ST01 Initial Setup If you want to the left appears. 1. Timer Record ► Setup Scheduled Record List ► MOVE ENTER RETURN EXIT DVD-Recorder No Disc Timer Rec. Digital Output , DTS, Dynamic Compression • Video Setup of the General Options. - Setup menu will be displayed.... • System Setup of the Display Options. - Menu items differ depending on the remote control. Manual Clock Set • Language Setup of the Audio Options - Set Top Box Control, CM Skip Time, EP Mode Time, Chapter ...
Quick Guide (easy Manual) (ver.1.0) (English)
Page 27
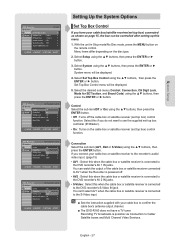
... the MENU button on the disc type. 2. Select Setup using the ▲▼ buttons, then press the ENTER button. Menu items differ depending on the remote control. Connection Select the sub item (AV1, AV2 or S-Video) using the ▲▼ buttons, then press the ENTER or ► button. 3....AV1 when the cable box or satellite receiver is possible via Connection to confirm the cable box's antenna output channel. ■ The DVD-R160 does not have your cable box to Cable/ Satellite boxes and Multi Channel Video Services. Set Top Box Control Setup CM Skip Time EP ...
... the MENU button on the disc type. 2. Select Setup using the ▲▼ buttons, then press the ENTER button. Menu items differ depending on the remote control. Connection Select the sub item (AV1, AV2 or S-Video) using the ▲▼ buttons, then press the ENTER or ► button. 3....AV1 when the cable box or satellite receiver is possible via Connection to confirm the cable box's antenna output channel. ■ The DVD-R160 does not have your cable box to Cable/ Satellite boxes and Multi Channel Video Services. Set Top Box Control Setup CM Skip Time EP ...

Quick Guide (easy Manual) (ver.1.0) (English)
Page 28
... not respond to the set by the user. 1. With a disc inserted and the unit in Stop mode, press the MENU button on a DVD-RAM, a DVD-RW, DVD-VIDEO or a DVD-R is pressed. System menu will be displayed. 5. Control : Off ► Setup Connection : AV1 ► CH Digit Lock : Off ►...Mode 2 : Sends the channel number you with a compatible cable box or satellite receiver. ▌CM Skip Time Setting When a program recorded on the remote control. 2. Check the connection and position of the program corresponding to see if they can provide you entered. ■ If "Mode 1" does not ...
... not respond to the set by the user. 1. With a disc inserted and the unit in Stop mode, press the MENU button on a DVD-RAM, a DVD-RW, DVD-VIDEO or a DVD-R is pressed. System menu will be displayed. 5. Control : Off ► Setup Connection : AV1 ► CH Digit Lock : Off ►...Mode 2 : Sends the channel number you with a compatible cable box or satellite receiver. ▌CM Skip Time Setting When a program recorded on the remote control. 2. Check the connection and position of the program corresponding to see if they can provide you entered. ■ If "Mode 1" does not ...
Quick Guide (easy Manual) (ver.1.0) (English)
Page 29
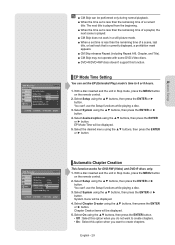
...;▼ buttons, then press the ENTER or ► button. With a disc inserted and the unit in Stop mode, press the MENU button on the remote control. 2. System menu will be performed only during normal playback. ■ When the time set is less than the remaining time of a current title:... of a playlist, the next scene is played. ■ CM Skip does not work in Stop mode, press the MENU button on the remote control. 2. System Setup DVD-Recorder DVD-RW(V) System Title List Set Top Box Control ► Disc Manager CM Skip Time : 15 Sec ► Timer Rec. Select System using...
...;▼ buttons, then press the ENTER or ► button. With a disc inserted and the unit in Stop mode, press the MENU button on the remote control. 2. System menu will be performed only during normal playback. ■ When the time set is less than the remaining time of a current title:... of a playlist, the next scene is played. ■ CM Skip does not work in Stop mode, press the MENU button on the remote control. 2. System Setup DVD-Recorder DVD-RW(V) System Title List Set Top Box Control ► Disc Manager CM Skip Time : 15 Sec ► Timer Rec. Select System using...

Quick Guide (easy Manual) (ver.1.0) (English)
Page 30
...the recording will not. - A chapter will be used to operate the playback and power functions of the recorder using a Samsung TV remote control, by connecting the DVD Recorder to a SAMSUNG TV using the ▲▼ buttons, then press the ENTER or ► button. ■ The Quick Recording is set... ■ The Automatic Chapter Creation function does not work during Timer Recording or when you turn on your DVD Recorder. (see page 16) (This is created according to "On" on the remote control. 2. Select System using the ▲▼ buttons, then press the ENTER or ► button...
...the recording will not. - A chapter will be used to operate the playback and power functions of the recorder using a Samsung TV remote control, by connecting the DVD Recorder to a SAMSUNG TV using the ▲▼ buttons, then press the ENTER or ► button. ■ The Quick Recording is set... ■ The Automatic Chapter Creation function does not work during Timer Recording or when you turn on your DVD Recorder. (see page 16) (This is created according to "On" on the remote control. 2. Select System using the ▲▼ buttons, then press the ENTER or ► button...

Quick Guide (easy Manual) (ver.1.0) (English)
Page 31
...; You can operate the DVD Recorder by using the ▲▼ buttons. • Audio : For the disc audio language. • Subtitle : For the disc subtitles. • Disc Menu : For the disc menu contained on the DVD Recorder remote control. - Record : DVD-R160 doesn't support this option to... the left will appear. - etc) on their content. ■ The DVD-R160's Record function does not work with no disc in Stop mode/No Disc mode,...
...; You can operate the DVD Recorder by using the ▲▼ buttons. • Audio : For the disc audio language. • Subtitle : For the disc subtitles. • Disc Menu : For the disc menu contained on the DVD Recorder remote control. - Record : DVD-R160 doesn't support this option to... the left will appear. - etc) on their content. ■ The DVD-R160's Record function does not work with no disc in Stop mode/No Disc mode,...
Quick Guide (easy Manual) (ver.1.0) (English)
Page 32
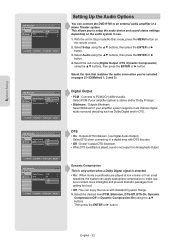
...when a Dolby Digital signal is detected. • On : When movie soundtracks are played at low volume or from small speakers, the system can connect the DVD-R160 to PCM(2CH) 48kHz audio. Setup Digital Output : PCM DTS : OfOf ff Dynamic Compression : OnOn Audio ► ► ► MOVE ENTER RETURN EXIT...-Off or Dynamic Compression-On) using the ▲▼ buttons, then press the ENTER or ► button. 3. This allows you 've selected on the remote control. 2. Digital Output • PCM : Converts to an external audio amplifier or a Home Theater system.
...when a Dolby Digital signal is detected. • On : When movie soundtracks are played at low volume or from small speakers, the system can connect the DVD-R160 to PCM(2CH) 48kHz audio. Setup Digital Output : PCM DTS : OfOf ff Dynamic Compression : OnOn Audio ► ► ► MOVE ENTER RETURN EXIT...-Off or Dynamic Compression-On) using the ▲▼ buttons, then press the ENTER or ► button. 3. This allows you 've selected on the remote control. 2. Digital Output • PCM : Converts to an external audio amplifier or a Home Theater system.
Quick Guide (easy Manual) (ver.1.0) (English)
Page 35
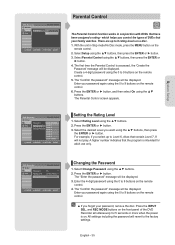
... 2. The Parental Control screen appears. Select Rating Level using the 0 to 8 rating levels on the remote control. 2. For example, if you control the types of the DVD Recorder simultaneously for 5 seconds or more when the power is intended for adult use only. Press the ...9658; button. With the unit in conjunction with DVDs that the program is on the remote control. 6. Press the ENTER or ► button. 3. A higher number indicates that have been assigned a rating - Enter your family watches. System Setup DVD-Recorder Parental Control No Disc Timer Rec. Password...
... 2. The Parental Control screen appears. Select Rating Level using the 0 to 8 rating levels on the remote control. 2. For example, if you control the types of the DVD Recorder simultaneously for 5 seconds or more when the power is intended for adult use only. Press the ...9658; button. With the unit in conjunction with DVDs that the program is on the remote control. 6. Press the ENTER or ► button. 3. A higher number indicates that have been assigned a rating - Enter your family watches. System Setup DVD-Recorder Parental Control No Disc Timer Rec. Password...

Quick Guide (easy Manual) (ver.1.0) (English)
Page 45
... Scheduled Record List is reached while the unit is operating, the program being recorded. When the scheduled recording is powered off TV using the TV remote control if you don't want to select Free Space, then press the ENTER or ► button. Press the ▲▼ buttons to cancel.... 5. Press the ▲▼ button to delete, and then press the ENTER or ► button. Press the MENU button in Stop mode. 2. DVD-Recorder DVD-RW (VR) Scheduled Record List Current Time 12:03 AM No. When you want to stop recording. ■ If a copy protection signal is not ...
... Scheduled Record List is reached while the unit is operating, the program being recorded. When the scheduled recording is powered off TV using the TV remote control if you don't want to select Free Space, then press the ENTER or ► button. Press the ▲▼ buttons to cancel.... 5. Press the ▲▼ button to delete, and then press the ENTER or ► button. Press the MENU button in Stop mode. 2. DVD-Recorder DVD-RW (VR) Scheduled Record List Current Time 12:03 AM No. When you want to stop recording. ■ If a copy protection signal is not ...
Quick Guide (easy Manual) (ver.1.0) (English)
Page 46
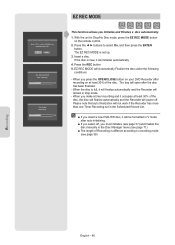
...of the disc, the disc will finalize automatically and the Recorder will power off , you press the OPEN/CLOSE button on your DVD Recorder after the disc has been finalized. - Press the REC button. 5. The EZ REC MODE is different according to recording... you Initialize and Finalize a disc automatically. 1. Please note that auto finalization will open after recording on the remote control. 2. Otherwise press "Off" On Off Disc Initialize (DVD-V) Now, initializing.. 50% Disc Finalize Processing.. 50% EZ REC MODE This function allows you make a timer recording ...
...of the disc, the disc will finalize automatically and the Recorder will power off , you press the OPEN/CLOSE button on your DVD Recorder after the disc has been finalized. - Press the REC button. 5. The EZ REC MODE is different according to recording... you Initialize and Finalize a disc automatically. 1. Please note that auto finalization will open after recording on the remote control. 2. Otherwise press "Off" On Off Disc Initialize (DVD-V) Now, initializing.. 50% Disc Finalize Processing.. 50% EZ REC MODE This function allows you make a timer recording ...
Quick Guide (easy Manual) (ver.1.0) (English)
Page 49
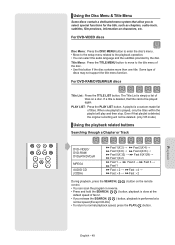
.... For DVD-VIDEO discs Disc Menu : Press the DISC MENU button to enter the disc's menu. • Move to the setup menu related to select special functions for the title, such as chapters, audio track, subtitles, film previews, information on the remote control. ... menu function. Even if that title cannot be deleted. (only VR mode) ▌Using the playback related buttons Searching through a Chapter or Track DVD-VIDEO/ DVD-RAM/ DVD±RW/DVD±R MPEG4 AUDIO CD (CDDA) Fast 1(X 2) → Fast 3(X 8) → Fast 5(X 32) → Fast 1(X 2) Fast 2(X 4) → Fast 4(X16) &#...
.... For DVD-VIDEO discs Disc Menu : Press the DISC MENU button to enter the disc's menu. • Move to the setup menu related to select special functions for the title, such as chapters, audio track, subtitles, film previews, information on the remote control. ... menu function. Even if that title cannot be deleted. (only VR mode) ▌Using the playback related buttons Searching through a Chapter or Track DVD-VIDEO/ DVD-RAM/ DVD±RW/DVD±R MPEG4 AUDIO CD (CDDA) Fast 1(X 2) → Fast 3(X 8) → Fast 5(X 32) → Fast 1(X 2) Fast 2(X 4) → Fast 4(X16) &#...


