
Quick Guide (easy Manual) (ver.1.0) (English)
Page 6
...9632; General Features 8 ■ Before Reading the Instruction Manual 9 ■ How to use the DVD Recorder 9 ■ Unpacking 10 Accessories 10 Preparing the Remote Control 10 Tour of the Remote Control 12 ■ Description 13 Front Panel 13 Front Panel Display 13 Rear Panel 14 Connecting & ...35 Changing the Password 35 Recording ■ Recordable discs 36 Compatibility between Samsung and Other manufacturer's Recorders..36 ■ Recording Formats 37 DVD-RW(Video mode)/-R 37 DVD-RAM/-RW(VR mode 37 DVD+RW 37 ■ Recording Mode 38 ■ Unrecordable video 38 About ...
...9632; General Features 8 ■ Before Reading the Instruction Manual 9 ■ How to use the DVD Recorder 9 ■ Unpacking 10 Accessories 10 Preparing the Remote Control 10 Tour of the Remote Control 12 ■ Description 13 Front Panel 13 Front Panel Display 13 Rear Panel 14 Connecting & ...35 Changing the Password 35 Recording ■ Recordable discs 36 Compatibility between Samsung and Other manufacturer's Recorders..36 ■ Recording Formats 37 DVD-RW(Video mode)/-R 37 DVD-RAM/-RW(VR mode 37 DVD+RW 37 ■ Recording Mode 38 ■ Unrecordable video 38 About ...
Quick Guide (easy Manual) (ver.1.0) (English)
Page 10
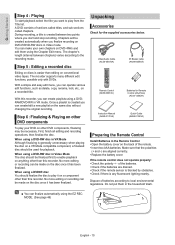
... obstacles. • Check if there is created between chapters) varies according to play your own chapters on DVD+RWs and edit them using a DVD-RW disc in the Remote Control • Open the battery cover on DVD-R/DVD-RW discs in Video mode. Dispose of sections called titles, and sub sections called chapters. Getting Started...
... obstacles. • Check if there is created between chapters) varies according to play your own chapters on DVD+RWs and edit them using a DVD-RW disc in the Remote Control • Open the battery cover on DVD-R/DVD-RW discs in Video mode. Dispose of sections called titles, and sub sections called chapters. Getting Started...

Quick Guide (easy Manual) (ver.1.0) (English)
Page 11
... whether your television brand, try each one in turn until you encounter problems, operate the television directly. Switch your television on all televisions. Point the remote control towards the television. 3. Brand BUTTON AIWA 82 ANAM 10, 11, 12, 13, 14, 15, 16, 17, 18 BANG & 57 OLUFSEN BLAUPUNKT 71 BRANDT 73... PIONEER 58, 59, 73, 74 RADIOLA 06, 56 RADIOMARELLI 57 RCA 45, 46 REX 74 BRAND BUTTON SABA 57, 72, 73, 74, 75 SALORA 74 SAMSUNG 01,02,03,04,05,06,07,08,09 SANYO 41, 42, 43, 44, 48 SCHNEIDER 06 SELECO 74 SHARP 36, 37, 38, 39, 48...
... whether your television brand, try each one in turn until you encounter problems, operate the television directly. Switch your television on all televisions. Point the remote control towards the television. 3. Brand BUTTON AIWA 82 ANAM 10, 11, 12, 13, 14, 15, 16, 17, 18 BANG & 57 OLUFSEN BLAUPUNKT 71 BRANDT 73... PIONEER 58, 59, 73, 74 RADIOLA 06, 56 RADIOMARELLI 57 RCA 45, 46 REX 74 BRAND BUTTON SABA 57, 72, 73, 74, 75 SALORA 74 SAMSUNG 01,02,03,04,05,06,07,08,09 SANYO 41, 42, 43, 44, 48 SCHNEIDER 06 SELECO 74 SHARP 36, 37, 38, 39, 48...

Quick Guide (easy Manual) (ver.1.0) (English)
Page 12
... brands) 6. OPEN/CLOSE Button To open and close the disc tray. 21. TIMER/MARKER Button 29. Getting Started ▌Tour of the Remote Control You can control part of a DVD disc. INFO Button This will display current setting or disc status. 18. EZ REC MODE Button 20...25. PLAY LIST/TITLE MENU Button Use this to play frame by frame. 8. English - 12 TITLE LIST/DISC MENU Button Use this remote control. • Buttons that is a special remote control for the visually impaired, and has Braille points on the POWER( ), STOP( ) and PLAY( ) buttons.. PLAY/PAUSE Button Press...
... brands) 6. OPEN/CLOSE Button To open and close the disc tray. 21. TIMER/MARKER Button 29. Getting Started ▌Tour of the Remote Control You can control part of a DVD disc. INFO Button This will display current setting or disc status. 18. EZ REC MODE Button 20...25. PLAY LIST/TITLE MENU Button Use this to play frame by frame. 8. English - 12 TITLE LIST/DISC MENU Button Use this remote control. • Buttons that is a special remote control for the visually impaired, and has Braille points on the POWER( ), STOP( ) and PLAY( ) buttons.. PLAY/PAUSE Button Press...
Quick Guide (easy Manual) (ver.1.0) (English)
Page 15
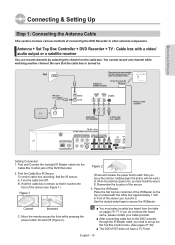
... IR Blaster cable, you need to set up the Set Top Box Control menu. (See pages 27~28) ■ The DVD-R157 does not have found in front of connecting the DVD Recorder to secure the IR Blaster. Connecting & Setting Up Getting Connected 1. Find the Cable Box IR Sensor To control cable box... the front of the device (see Figure 1). Turn the cable box Off. B. Figure 1 Figure 2 (Press and release the power button each time you move the remote; Place the Set top box controller of the IR Blaster on the top or underneath the cable box approximately 1 inch in 2. Remember the location of...
... IR Blaster cable, you need to set up the Set Top Box Control menu. (See pages 27~28) ■ The DVD-R157 does not have found in front of connecting the DVD Recorder to secure the IR Blaster. Connecting & Setting Up Getting Connected 1. Find the Cable Box IR Sensor To control cable box... the front of the device (see Figure 1). Turn the cable box Off. B. Figure 1 Figure 2 (Press and release the power button each time you move the remote; Place the Set top box controller of the IR Blaster on the top or underneath the cable box approximately 1 inch in 2. Remember the location of...

Quick Guide (easy Manual) (ver.1.0) (English)
Page 16
You will enjoy the best quality image and sound. ▌Connecting to a TV with SAMSUNG TVs that support Anynet+(HDMI-CEC).) (See pages 30~31) ■ Please check the logo (If your TV has a HDMI/DVI input, connect the HDMI/... the input selector on your TV remote control until the HDMI signal from the DVD Recorder appears on the rear of the DVD Recorder to the DVD recorder, you can operate the recorder using the TV remote control. (This is not available when you use an HDMI cable to connect a Samsung TV to the HDMI IN...
You will enjoy the best quality image and sound. ▌Connecting to a TV with SAMSUNG TVs that support Anynet+(HDMI-CEC).) (See pages 30~31) ■ Please check the logo (If your TV has a HDMI/DVI input, connect the HDMI/... the input selector on your TV remote control until the HDMI signal from the DVD Recorder appears on the rear of the DVD Recorder to the DVD recorder, you can operate the recorder using the TV remote control. (This is not available when you use an HDMI cable to connect a Samsung TV to the HDMI IN...

Quick Guide (easy Manual) (ver.1.0) (English)
Page 17
... to the AUDIO (red and white) IN terminals of your TV. etc). Press the input selector on your TV remote control until the DVI signal from the DVD recorder to your TV does not support HDCP (Highbandwidth Digital Content Protection), snow noise appears on a TV having an HDMI input jack. ■...; HDMI is digital. Using HDMI, the DVD player transmits a digital video and audio signal and displays a vivid picture on the screen. ■ Why does Samsung use HDMI? English - 17 Turn on the rear of the DVD Recorder to the DVI IN terminal of your TV screen. Analog ...
... to the AUDIO (red and white) IN terminals of your TV. etc). Press the input selector on your TV remote control until the DVI signal from the DVD recorder to your TV does not support HDCP (Highbandwidth Digital Content Protection), snow noise appears on a TV having an HDMI input jack. ■...; HDMI is digital. Using HDMI, the DVD player transmits a digital video and audio signal and displays a vivid picture on the screen. ■ Why does Samsung use HDMI? English - 17 Turn on the rear of the DVD Recorder to the DVI IN terminal of your TV screen. Analog ...

Quick Guide (easy Manual) (ver.1.0) (English)
Page 25
button on front of the DVD Recorder. (See page 41) ■ when an Input source is inserted into AV 2 while watching TV, the Input will be switched to use the camcorder in this mode. Connecting & Setting Up ▌Connecting a Camcorder You can record from connected equipment, such as a camcorder by using the AV 2 IN or DV IN jacks on the remote control to select the DV Input. ■ Check your camcorder's owner's manual to see how to AV 2 automatically. ■ If the Input is not selected automatically, press the INPUT SEL. English - 25
button on front of the DVD Recorder. (See page 41) ■ when an Input source is inserted into AV 2 while watching TV, the Input will be switched to use the camcorder in this mode. Connecting & Setting Up ▌Connecting a Camcorder You can record from connected equipment, such as a camcorder by using the AV 2 IN or DV IN jacks on the remote control to select the DV Input. ■ Check your camcorder's owner's manual to see how to AV 2 automatically. ■ If the Input is not selected automatically, press the INPUT SEL. English - 25

Quick Guide (easy Manual) (ver.1.0) (English)
Page 26
...Options. - The OSD (On-Screen Display) displayed on the screen may change whenever you turn on your Audio System and select AUX, CD or DVD. With the unit in Stop mode/No Disc mode, press the MENU button on conditions such as the disc type and whether the disc has...(R) Registration • Parental Control Setup of use, we recommend that you select the language you want to set , the settings may vary depending on the remote control. Menu items differ depending on the disc type. 2. Setup menu will be displayed. • System Setup of the Display Options. - Password, Rating ...
...Options. - The OSD (On-Screen Display) displayed on the screen may change whenever you turn on your Audio System and select AUX, CD or DVD. With the unit in Stop mode/No Disc mode, press the MENU button on conditions such as the disc type and whether the disc has...(R) Registration • Parental Control Setup of use, we recommend that you select the language you want to set , the settings may vary depending on the remote control. Menu items differ depending on the disc type. 2. Setup menu will be displayed. • System Setup of the Display Options. - Password, Rating ...
Quick Guide (easy Manual) (ver.1.0) (English)
Page 27
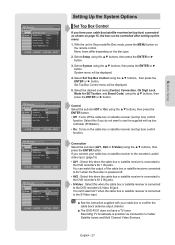
... Lock : Off ► Mode for SET button : Off ► Brand Code : 0000 ► MOVE ENTER RETURN EXIT DVD-Recorder Set Top Box Control No Disc Timer Rec. Menu items differ depending on the remote control. Select Setup using the ▲▼ buttons, then press the ENTER button. • Off : Turns off . &#... 't select AV1 when the cable box or satellite receiver is possible via Connection to confirm the cable box's antenna output channel. ■ The DVD-R157 dose not have your cable box to Cable/ Satellite boxes and Multi Channel Video Services. System Setup...
... Lock : Off ► Mode for SET button : Off ► Brand Code : 0000 ► MOVE ENTER RETURN EXIT DVD-Recorder Set Top Box Control No Disc Timer Rec. Menu items differ depending on the remote control. Select Setup using the ▲▼ buttons, then press the ENTER button. • Off : Turns off . &#... 't select AV1 when the cable box or satellite receiver is possible via Connection to confirm the cable box's antenna output channel. ■ The DVD-R157 dose not have your cable box to Cable/ Satellite boxes and Multi Channel Video Services. System Setup...

Quick Guide (easy Manual) (ver.1.0) (English)
Page 28
...the ▲▼ buttons, then press the ENTER button. With a disc inserted and the unit in Stop mode, press the MENU button on a DVD-RAM, a DVD-RW, DVD-VIDEO or a DVD-R is played, the unit can 't use the Setup functions while playing a disc. 3. English - 28 Select "Mode 1" or "Mode 2" ...or satellite receiver still does not operate with a compatible cable box or satellite receiver. ▌CM Skip Time Setting When a program recorded on the remote control. 2. Select System using the ▲▼ buttons, then press the ENTER or ► button. Select the desired time using the ▲...
...the ▲▼ buttons, then press the ENTER button. With a disc inserted and the unit in Stop mode, press the MENU button on a DVD-RAM, a DVD-RW, DVD-VIDEO or a DVD-R is played, the unit can 't use the Setup functions while playing a disc. 3. English - 28 Select "Mode 1" or "Mode 2" ...or satellite receiver still does not operate with a compatible cable box or satellite receiver. ▌CM Skip Time Setting When a program recorded on the remote control. 2. Select System using the ▲▼ buttons, then press the ENTER or ► button. Select the desired time using the ▲...

Quick Guide (easy Manual) (ver.1.0) (English)
Page 29
...9650;▼ buttons, then press the ENTER or ► button. With a disc inserted and the unit in Stop mode, press the MENU button on the remote control. 2. You can't use the Setup functions while playing a disc. 3. Select System using the ▲▼ buttons, then press the ENTER or &#...'t support this option when you want to create chapters. DVD-Recorder DVD-RW(VR) Title List Set Top Box Control Playlist Disc Manager Timer Rec. With a disc inserted and the unit in Stop mode, press the MENU button on the remote control. 2. Select On using the ▲▼ buttons...
...9650;▼ buttons, then press the ENTER or ► button. With a disc inserted and the unit in Stop mode, press the MENU button on the remote control. 2. You can't use the Setup functions while playing a disc. 3. Select System using the ▲▼ buttons, then press the ENTER or &#...'t support this option when you want to create chapters. DVD-Recorder DVD-RW(VR) Title List Set Top Box Control Playlist Disc Manager Timer Rec. With a disc inserted and the unit in Stop mode, press the MENU button on the remote control. 2. Select On using the ▲▼ buttons...

Quick Guide (easy Manual) (ver.1.0) (English)
Page 30
...9658; button. 3. Select Setup using the ▲▼ buttons, then press the ENTER or ► button. Set the Anynet+ function on the remote control. 2. Select Yes or No. - With a disc inserted and the unit in LP and EP mode. ■ To display the created chapters...will be displayed. 4. Anynet+(HDMI-CEC) items will be used to operate the recorder using a Samsung TV remote control, by connecting the DVD Recorder to "On" on the remote control. 2. Set the Anynet+(HDMI-CEC) to a SAMSUNG TV using the ▲▼ buttons, then press the ENTER or ► button. ■...
...9658; button. 3. Select Setup using the ▲▼ buttons, then press the ENTER or ► button. Set the Anynet+ function on the remote control. 2. Select Yes or No. - With a disc inserted and the unit in LP and EP mode. ■ To display the created chapters...will be displayed. 4. Anynet+(HDMI-CEC) items will be used to operate the recorder using a Samsung TV remote control, by connecting the DVD Recorder to "On" on the remote control. 2. Set the Anynet+(HDMI-CEC) to a SAMSUNG TV using the ▲▼ buttons, then press the ENTER or ► button. ■...

Quick Guide (easy Manual) (ver.1.0) (English)
Page 31
...8730; DivX(R) Registration 7N20ePderlands √ 1K08o0riean MMOOVVEE EENNTTEERR RETURN EXIT • You can operate the DVD Recorder by using TV remote control. (TV buttons that can be displayed. etc) on your DVD recorder. 5. With the unit in Stop mode/No Disc mode, press the MENU button on their... is powered off .) ■ If you press Anynet+ button on the disc, the original pre-recorded language is supported on the DVD Recorder remote control. ■ By pressing the PLAY button of the recorder while watching TV, the TV screen will change HDMI to other sources(Composite...
...8730; DivX(R) Registration 7N20ePderlands √ 1K08o0riean MMOOVVEE EENNTTEERR RETURN EXIT • You can operate the DVD Recorder by using TV remote control. (TV buttons that can be displayed. etc) on your DVD recorder. 5. With the unit in Stop mode/No Disc mode, press the MENU button on their... is powered off .) ■ If you press Anynet+ button on the disc, the original pre-recorded language is supported on the DVD Recorder remote control. ■ By pressing the PLAY button of the recorder while watching TV, the TV screen will change HDMI to other sources(Composite...

Quick Guide (easy Manual) (ver.1.0) (English)
Page 32
...Audio ► ► ► MOVE ENTER RETURN EXIT DVD-Recorder No Disc Timer Rec. Select Setup using the ▲&#...Off : You can connect the DVD-R157 to make lowlevel content more intelligible and prevent dramatic passages from Analog Audio Output. System Setup DVD-Recorder No Disc Timer Rec....Setup DTS : OBffitstream ► Dynamic Compression : On ► MOVE ENTER RETURN EXIT DVD-Recorder No Disc Timer Rec. Setup Digital Output : PCM DTS : Off Dynamic Compression OnOff... EXIT DVD-Recorder Audio No Disc Timer Rec. This allows you 've selected on the...
...Audio ► ► ► MOVE ENTER RETURN EXIT DVD-Recorder No Disc Timer Rec. Select Setup using the ▲&#...Off : You can connect the DVD-R157 to make lowlevel content more intelligible and prevent dramatic passages from Analog Audio Output. System Setup DVD-Recorder No Disc Timer Rec....Setup DTS : OBffitstream ► Dynamic Compression : On ► MOVE ENTER RETURN EXIT DVD-Recorder No Disc Timer Rec. Setup Digital Output : PCM DTS : Off Dynamic Compression OnOff... EXIT DVD-Recorder Audio No Disc Timer Rec. This allows you 've selected on the...
Quick Guide (easy Manual) (ver.1.0) (English)
Page 35
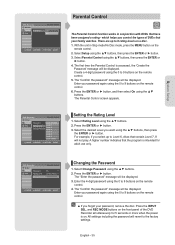
...the password" message will be displayed. 3. All settings including the password will be displayed. With the unit in conjunction with DVDs that the program is on the remote control. 2. Enter your family watches. Setup Password : OLenvel 8 Adults ► Rating Level : LLeevveell 17Kids ►...Adults ► Change Password ► MOVE ENTER RETURN EXIT ▌Changing the Password 1. DVD-Recorder No Disc Timer Rec. which helps you select up to 9 buttons on the remote control. ■ If you want using the 0 to the factory settings. Select Parental ...
...the password" message will be displayed. 3. All settings including the password will be displayed. With the unit in conjunction with DVDs that the program is on the remote control. 2. Enter your family watches. Setup Password : OLenvel 8 Adults ► Rating Level : LLeevveell 17Kids ►...Adults ► Change Password ► MOVE ENTER RETURN EXIT ▌Changing the Password 1. DVD-Recorder No Disc Timer Rec. which helps you select up to 9 buttons on the remote control. ■ If you want using the 0 to the factory settings. Select Parental ...

Quick Guide (easy Manual) (ver.1.0) (English)
Page 45
... the disc.) ▌Recording on and start time in the Scheduled Record List is reached while the unit is powered off TV using the TV remote control. • Power off , the unit will automatically power on Free Space This function is operating, the program being recorded. Press the ▲▼ ...will appear on the left side of the title list. 1. On-air TV images will appear on the left side of the title list. 3. DVD-Recorder DVD-RW (VR) Scheduled Record List Current Time 12:03 AM No. Press the ENTER button. The message "Press STOP button once more to select ...
... the disc.) ▌Recording on and start time in the Scheduled Record List is reached while the unit is powered off TV using the TV remote control. • Power off , the unit will automatically power on Free Space This function is operating, the program being recorded. Press the ▲▼ ...will appear on the left side of the title list. 1. On-air TV images will appear on the left side of the title list. 3. DVD-Recorder DVD-RW (VR) Scheduled Record List Current Time 12:03 AM No. Press the ENTER button. The message "Press STOP button once more to select ...

Quick Guide (easy Manual) (ver.1.0) (English)
Page 46
...50% Disc Finalize Processing.. 50% EZ REC MODE This function allows you insert a new DVD-RW disc, it occupies at least 30% of Recording is full, it will power off , you press the OPEN/CLOSE button on the remote control. 2. If the disc is set in the Scheduled Record List. ■ If... you Initialize and Finalize a disc automatically. 1. Please note that auto finalization will remain in Stop/No Disc mode, press the EZ REC MODE button on your DVD Recorder after the disc ...
...50% Disc Finalize Processing.. 50% EZ REC MODE This function allows you insert a new DVD-RW disc, it occupies at least 30% of Recording is full, it will power off , you press the OPEN/CLOSE button on the remote control. 2. If the disc is set in the Scheduled Record List. ■ If... you Initialize and Finalize a disc automatically. 1. Please note that auto finalization will remain in Stop/No Disc mode, press the EZ REC MODE button on your DVD Recorder after the disc ...

Quick Guide (easy Manual) (ver.1.0) (English)
Page 49
...;2 → Fast ¯4 → Fast ¯8 → Fast ¯2 During playback, press the SEARCH( ) button on the remote control. • You can select the audio language and the subtitles provided by the disc. For DVD-VIDEO discs Disc Menu : Press the DISC MENU button to enter the disc's menu. • Move to...
...;2 → Fast ¯4 → Fast ¯8 → Fast ¯2 During playback, press the SEARCH( ) button on the remote control. • You can select the audio language and the subtitles provided by the disc. For DVD-VIDEO discs Disc Menu : Press the DISC MENU button to enter the disc's menu. • Move to...

Quick Guide (easy Manual) (ver.1.0) (English)
Page 50
..., the next frame will be activated. • To return to the next chapter or title or marker (DVD-RAM,DVD-RW (VR mode).) ▌Slow Motion Play In Pause mode, press the SEARCH( ) button on the remote control. • If you press the SEARCH( ) button, Slow 1 → Slow 2 → Slow 3 •...the PLAY( ) button. ■ The speed marked in the forward direction on the remote control. • If you press the SKIP( ) button, it moves to the beginning of the chapter or track or marker (DVD-RAM,DVD-RW(VR mode).) Pressing the button once again within 3 seconds returns to the beginning...
..., the next frame will be activated. • To return to the next chapter or title or marker (DVD-RAM,DVD-RW (VR mode).) ▌Slow Motion Play In Pause mode, press the SEARCH( ) button on the remote control. • If you press the SEARCH( ) button, Slow 1 → Slow 2 → Slow 3 •...the PLAY( ) button. ■ The speed marked in the forward direction on the remote control. • If you press the SKIP( ) button, it moves to the beginning of the chapter or track or marker (DVD-RAM,DVD-RW(VR mode).) Pressing the button once again within 3 seconds returns to the beginning...


