
Quick Guide (easy Manual) (ver.1.0) (English)
Page 2
... AND DO NOT REPAIR YOURSELF. If the Region number of a DVD disc does not correspond to this DVD Recorder, the DVD Recorder cannot play the disc. ■ This device is connected. • Consult the dealer or an experienced radio/TV technician for connections. patents: 5,060,220 5,457,669 5,561... symbol indicates that interference will not occur in fire or electric shock hazard, do not expose this unit. CAUTION : DVD RECORDERS USE AN INVISIBLE LASER BEAM WHICH CAN CAUSE HAZARDOUS RADIATION EXPOSURE IF DIRECTED. USE OF CONTROLS OR ADJUSTMENTS OR PERFORMANCE OF PROCEDURES OTHER...
... AND DO NOT REPAIR YOURSELF. If the Region number of a DVD disc does not correspond to this DVD Recorder, the DVD Recorder cannot play the disc. ■ This device is connected. • Consult the dealer or an experienced radio/TV technician for connections. patents: 5,060,220 5,457,669 5,561... symbol indicates that interference will not occur in fire or electric shock hazard, do not expose this unit. CAUTION : DVD RECORDERS USE AN INVISIBLE LASER BEAM WHICH CAN CAUSE HAZARDOUS RADIATION EXPOSURE IF DIRECTED. USE OF CONTROLS OR ADJUSTMENTS OR PERFORMANCE OF PROCEDURES OTHER...

Quick Guide (easy Manual) (ver.1.0) (English)
Page 3
...;xed with exposed tape adhesive or leftover peeled-off stickers.) • Do not use scratch-proof protectors or covers. • Do not use this DVD Recorder may be damaged. • Do not put your safety. Also, do not use volatile chemicals, such as a disconnect device and shall stay readily ... has been spilled or objects have fallen into the apparatus. A groundingtype plug has two blades and a third grounding prong. DVD-Video, Audio CD • Wipe off the recorder after use. • Disconnect the AC power cord from the AC outlet when you don't intend to use caution when moving...
...;xed with exposed tape adhesive or leftover peeled-off stickers.) • Do not use scratch-proof protectors or covers. • Do not use this DVD Recorder may be damaged. • Do not put your safety. Also, do not use volatile chemicals, such as a disconnect device and shall stay readily ... has been spilled or objects have fallen into the apparatus. A groundingtype plug has two blades and a third grounding prong. DVD-Video, Audio CD • Wipe off the recorder after use. • Disconnect the AC power cord from the AC outlet when you don't intend to use caution when moving...

Quick Guide (easy Manual) (ver.1.0) (English)
Page 4
... out too many times. • Playback may become available. It is erased or not. • It takes about 30 seconds for recording, whether the recording is equipped with a Samsung DVD video recorder. Once an area on a DVD-R is recorded on a DVD-RW disc. If you may experience a delay in out. • Playable bitrate range is not supported. •...
... out too many times. • Playback may become available. It is erased or not. • It takes about 30 seconds for recording, whether the recording is equipped with a Samsung DVD video recorder. Once an area on a DVD-R is recorded on a DVD-RW disc. If you may experience a delay in out. • Playable bitrate range is not supported. •...
Quick Guide (easy Manual) (ver.1.0) (English)
Page 5
...65 "Disc Protection" ✻ DVD-RAM/DVD-RW/DVD-R discs that are encoded with this unit may also not be displayed. • If your TV, not to the recorder. Use of recorded or edited materials or damage to a VCR. Getting Started • DVD-RW (Video mode) - ... CD-G, CD-I, CD-ROM and DVD-ROM discs should only connect your DVD Recorder directly to protect the contents of the disc." If a disc that is prohibited. Otherwise, this unit. • DVD-RAM discs recorded on DVD recording compatibility, consult your recorder, contact the Call Center at 1-800-SAMSUNG.
...65 "Disc Protection" ✻ DVD-RAM/DVD-RW/DVD-R discs that are encoded with this unit may also not be displayed. • If your TV, not to the recorder. Use of recorded or edited materials or damage to a VCR. Getting Started • DVD-RW (Video mode) - ... CD-G, CD-I, CD-ROM and DVD-ROM discs should only connect your DVD Recorder directly to protect the contents of the disc." If a disc that is prohibited. Otherwise, this unit. • DVD-RAM discs recorded on DVD recording compatibility, consult your recorder, contact the Call Center at 1-800-SAMSUNG.
Quick Guide (easy Manual) (ver.1.0) (English)
Page 6
...Clock Set 29 ■ Language Setting 29 ■ Setting Up the Audio Options 30 ■ Video(Display) Setting 31 TV Aspect 31 Input Level 31 Black Level 31 3D Noise Reduction 31 HDMI/DVI Resolution 32 ■ Parental Control 32 Setting ...23 Connecting a Camcorder 24 Recording ■ Recordable discs 34 Compatibility between Samsung and Other manufacturer's Recorders 34 ■ Recording Formats 35 DVD-RW(Video mode)/-R 35 DVD-RAM/-RW(VR mode 35 ■ Recording Mode 35 ■ Unrecordable Video 36 About the INFO Button 37 ■ Recording from External Equipment 38 ...
...Clock Set 29 ■ Language Setting 29 ■ Setting Up the Audio Options 30 ■ Video(Display) Setting 31 TV Aspect 31 Input Level 31 Black Level 31 3D Noise Reduction 31 HDMI/DVI Resolution 32 ■ Parental Control 32 Setting ...23 Connecting a Camcorder 24 Recording ■ Recordable discs 34 Compatibility between Samsung and Other manufacturer's Recorders 34 ■ Recording Formats 35 DVD-RW(Video mode)/-R 35 DVD-RAM/-RW(VR mode 35 ■ Recording Mode 35 ■ Unrecordable Video 36 About the INFO Button 37 ■ Recording from External Equipment 38 ...
Quick Guide (easy Manual) (ver.1.0) (English)
Page 8
... to 15-hours on a dual-layer 8.5GB DVD-R disc, and up to 8-hours on a 4.7 GB DVD-RAM/DVD-RW/DVD-R disc, depending on 4.7 GB DVD-RW/DVD-R or 8.5GB DVD-R discs. Selectable Record Mode You can be recorded onto the free disc space. (See pages 41~42) Tunerless DVD Recorder The DVD-R155 does not have a TV tuner. Recording TV broadcasts is adjusted automatically so that lets...
... to 15-hours on a dual-layer 8.5GB DVD-R disc, and up to 8-hours on a 4.7 GB DVD-RAM/DVD-RW/DVD-R disc, depending on 4.7 GB DVD-RW/DVD-R or 8.5GB DVD-R discs. Selectable Record Mode You can be recorded onto the free disc space. (See pages 41~42) Tunerless DVD Recorder The DVD-R155 does not have a TV tuner. Recording TV broadcasts is adjusted automatically so that lets...
Quick Guide (easy Manual) (ver.1.0) (English)
Page 9
... 2 ~ 5) 2) If a problem occurs, check the Troubleshooting section. (See pages 68 ~69) Copyright ©2007 Samsung Electronics Co. When using a DVD-R disc, only V mode recording is possible and no initialization is inserted. JPEG This involves a function available with DVD or DVD-R/DVD-RW(V) discs that will be used in either the VR or Video mode on other...
... 2 ~ 5) 2) If a problem occurs, check the Troubleshooting section. (See pages 68 ~69) Copyright ©2007 Samsung Electronics Co. When using a DVD-R disc, only V mode recording is possible and no initialization is inserted. JPEG This involves a function available with DVD or DVD-R/DVD-RW(V) discs that will be used in either the VR or Video mode on other...
Quick Guide (easy Manual) (ver.1.0) (English)
Page 10
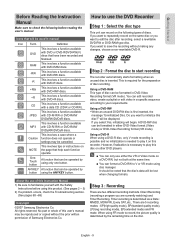
... used for the supplied accessories below. ▌Step 5 : Editing a recorded disc Editing a DVD disc is created between two points where you can create playlists using a DVD-RW disc in the household trash. During recording, a title is easier than editing on conventional video tapes. Chapters will ... remote sensor is blocked by obstacles. • Check if there is created you want to local environmental regulations. With this recorder, you finalize recording on DVD-R/DVD-RW discs in VR mode. of the remote. • Insert two AAA batteries. Getting Started ▌Step 4 : ...
... used for the supplied accessories below. ▌Step 5 : Editing a recorded disc Editing a DVD disc is created between two points where you can create playlists using a DVD-RW disc in the household trash. During recording, a title is easier than editing on conventional video tapes. Chapters will ... remote sensor is blocked by obstacles. • Check if there is created you want to local environmental regulations. With this recorder, you finalize recording on DVD-R/DVD-RW discs in VR mode. of the remote. • Insert two AAA batteries. Getting Started ▌Step 4 : ...
Quick Guide (easy Manual) (ver.1.0) (English)
Page 12
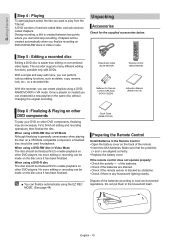
.... 9. Getting Started ▌Tour of the Remote Control You can be controlled on your DVD Recoder. 3. POWER Button Press to skip a disc backwards or forwards. 7. REVERSE/FORWARD SKIP Buttons Press to power the DVD Recorder on the POWER( ), STOP( ) and PLAY( ) buttons. EXIT Button Exit the ...current menu. 28. TITLE LIST/DISC MENU Button Use this to return to the Title menu, or to enter the View Recording list/Disc menu. 14. TV MUTE Button This operates...
.... 9. Getting Started ▌Tour of the Remote Control You can be controlled on your DVD Recoder. 3. POWER Button Press to skip a disc backwards or forwards. 7. REVERSE/FORWARD SKIP Buttons Press to power the DVD Recorder on the POWER( ), STOP( ) and PLAY( ) buttons. EXIT Button Exit the ...current menu. 28. TITLE LIST/DISC MENU Button Use this to return to the Title menu, or to enter the View Recording list/Disc menu. 14. TV MUTE Button This operates...
Quick Guide (easy Manual) (ver.1.0) (English)
Page 13
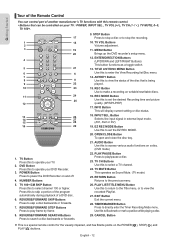
.... 6. SKIP Buttons Goes to the next title/chapter/track, or go back to accept a disc. 5. Lights when a DVD-RAM/DVD±RW/DVD±R disc is loaded. 2. DISPLAY Displays the playing status, time, etc. 8. Lights in the record mode. 3. Getting Started Description ▌Front Panel 1. AV 2 IN Connects external equipment. 3. DV-IN Connects external...
.... 6. SKIP Buttons Goes to the next title/chapter/track, or go back to accept a disc. 5. Lights when a DVD-RAM/DVD±RW/DVD±R disc is loaded. 2. DISPLAY Displays the playing status, time, etc. 8. Lights in the record mode. 3. Getting Started Description ▌Front Panel 1. AV 2 IN Connects external equipment. 3. DV-IN Connects external...
Quick Guide (easy Manual) (ver.1.0) (English)
Page 15
...control until the HDMI signal from the DVD Recorder appears on the rear of your TV. If your TV does not support Dolby digital/DTS, Audio output is not available when you set the Digital output to the DVD recorder, you can operate the recorder using the TV's remote control. (This is only ...available with an HDMI Jack Using an HDMI- In this case, set the digital audio output to a TV with SAMSUNG TVs that support Anynet+(HDMI-CEC).) (See page 28)...
...control until the HDMI signal from the DVD Recorder appears on the rear of your TV. If your TV does not support Dolby digital/DTS, Audio output is not available when you set the Digital output to the DVD recorder, you can operate the recorder using the TV's remote control. (This is only ...available with an HDMI Jack Using an HDMI- In this case, set the digital audio output to a TV with SAMSUNG TVs that support Anynet+(HDMI-CEC).) (See page 28)...
Quick Guide (easy Manual) (ver.1.0) (English)
Page 16
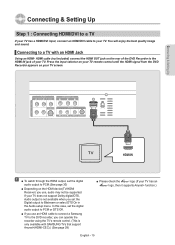
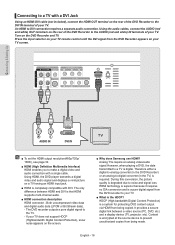
... required. ▌Connecting to a TV with a single cable. If your TV. HDCP (High-bandwidth Digital Content Protection) is encrypted at the source device to prevent unauthorized copies from the DVD recorder to your TV screen. Content is a system for protecting DVD content output via HDMI from the DVD Recorder appears on the DVD Recorder and TV. Both uncompressed video data and...
... required. ▌Connecting to a TV with a single cable. If your TV. HDCP (High-bandwidth Digital Content Protection) is encrypted at the source device to prevent unauthorized copies from the DVD recorder to your TV screen. Content is a system for protecting DVD content output via HDMI from the DVD Recorder appears on the DVD Recorder and TV. Both uncompressed video data and...
Quick Guide (easy Manual) (ver.1.0) (English)
Page 17
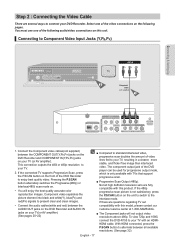
...to present clear and clean images. • Connect the audio cables(white and red) between the COMPONENT OUT(Y,PB,PR) jacks on the DVD Recorder and COMPONENT IN(Y,PB,PR) jacks on the unit to switch to the Interlace mode. This connection outputs the 480i or 480p resolution to ... at 1-800-SAMSUNG. ■ The Component jacks will enjoy the best quality accurate color reproduction images. If the connected TV supports Progressive Scan, press the P.SCAN button on . • You will not output video resolutions above 480p. To view 720p and 1080i, connect the DVD-R155 to your TV (or AV ...
...to present clear and clean images. • Connect the audio cables(white and red) between the COMPONENT OUT(Y,PB,PR) jacks on the DVD Recorder and COMPONENT IN(Y,PB,PR) jacks on the unit to switch to the Interlace mode. This connection outputs the 480i or 480p resolution to ... at 1-800-SAMSUNG. ■ The Component jacks will enjoy the best quality accurate color reproduction images. If the connected TV supports Progressive Scan, press the P.SCAN button on . • You will not output video resolutions above 480p. To view 720p and 1080i, connect the DVD-R155 to your TV (or AV ...

Quick Guide (easy Manual) (ver.1.0) (English)
Page 18
...18 ▌ Connecting to an S-Video Input Jack Connect an S-Video cable(not supplied) between the AUDIO OUT jacks on the DVD Recorder and AUDIO IN jacks on your TV (or AV amplifier). This connection outputs the 480i resolution to present clearer images than regular video input mode. S-Video ...separates the picture element into black and white (Y) and color (C) signals to your TV. • Connect the audio cables(white and red) between the S-VIDEO OUT jack on DVD Recorder and S-VIDEO IN jack on your TV(or AV amplifier). (See pages 20~22) ■ S-Video or Component ...
...18 ▌ Connecting to an S-Video Input Jack Connect an S-Video cable(not supplied) between the AUDIO OUT jacks on the DVD Recorder and AUDIO IN jacks on your TV (or AV amplifier). This connection outputs the 480i resolution to present clearer images than regular video input mode. S-Video ...separates the picture element into black and white (Y) and color (C) signals to your TV. • Connect the audio cables(white and red) between the S-VIDEO OUT jack on DVD Recorder and S-VIDEO IN jack on your TV(or AV amplifier). (See pages 20~22) ■ S-Video or Component ...

Quick Guide (easy Manual) (ver.1.0) (English)
Page 19
This connection outputs the 480i resolution to a Video Input Jack Connect a video(yellow) cable between the AUDIO OUT jacks on the DVD Recorder and AUDIO IN jacks on the TV (or AV amplifier). • You will enjoy normal quality images. Connecting & Setting Up ▌Connecting to your TV. • Connect the audio cables(white and red) between the VIDEO(yellow) OUT jack on DVD Recorder and VIDEO(yellow) IN jack on your TV(or AV amplifier). (See pages 20~22) English - 19
This connection outputs the 480i resolution to a Video Input Jack Connect a video(yellow) cable between the AUDIO OUT jacks on the DVD Recorder and AUDIO IN jacks on the TV (or AV amplifier). • You will enjoy normal quality images. Connecting & Setting Up ▌Connecting to your TV. • Connect the audio cables(white and red) between the VIDEO(yellow) OUT jack on DVD Recorder and VIDEO(yellow) IN jack on your TV(or AV amplifier). (See pages 20~22) English - 19
Quick Guide (easy Manual) (ver.1.0) (English)
Page 23
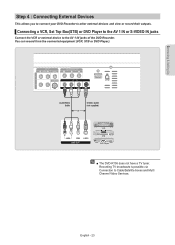
English - 23 Connecting & Setting Up Step 4 : Connecting External Devices This allows you to connect your DVD Recorder to other external devices and view or record their outputs. ▌Connecting a VCR, Set Top Box(STB) or DVD Player to the AV 1 IN or S-VIDEO IN jacks Connect the VCR or external device to Cable/Satellite boxes and Multi Channel Video Services. Recording TV broadcasts is possible via Connection to the AV 1 IN jacks of the DVD Recorder. You can record from the connected equipment (VCR, STB or DVD Player). ■ The DVD-R155 does not have a TV tuner.
English - 23 Connecting & Setting Up Step 4 : Connecting External Devices This allows you to connect your DVD Recorder to other external devices and view or record their outputs. ▌Connecting a VCR, Set Top Box(STB) or DVD Player to the AV 1 IN or S-VIDEO IN jacks Connect the VCR or external device to Cable/Satellite boxes and Multi Channel Video Services. Recording TV broadcasts is possible via Connection to the AV 1 IN jacks of the DVD Recorder. You can record from the connected equipment (VCR, STB or DVD Player). ■ The DVD-R155 does not have a TV tuner.

Quick Guide (easy Manual) (ver.1.0) (English)
Page 24
Connecting & Setting Up ▌Connecting a Camcorder You can record from connected equipment, such as a camcorder by using the AV 2 IN or DV IN jacks on the remote control to select the DV Input. ■ Check your camcorder's owner's manual to see how to AV 2 automatically. ■ If the Input is not selected automatically, press the INPUT SEL. button on front of the DVD Recorder. (See page 39) ■ When an Input source is inserted into AV 2 while watching TV, the Input will be switched to use the camcorder in this mode. English - 24
Connecting & Setting Up ▌Connecting a Camcorder You can record from connected equipment, such as a camcorder by using the AV 2 IN or DV IN jacks on the remote control to select the DV Input. ■ Check your camcorder's owner's manual to see how to AV 2 automatically. ■ If the Input is not selected automatically, press the INPUT SEL. button on front of the DVD Recorder. (See page 39) ■ When an Input source is inserted into AV 2 while watching TV, the Input will be switched to use the camcorder in this mode. English - 24

Quick Guide (easy Manual) (ver.1.0) (English)
Page 25
..., Subtitle, Disc Menu, On-Screen Menu • Audio Setup of the Display Options. - Password, Rating Level,Change Password English - 25 TV Aspect, Input Level, Black Level, 3D Noise Reduction, HDMI/DVI Resolution • Parental Control Setup of use, we recommend that you select ...the remote control. Setup menu will be displayed. • System Setup of the Language Options. - Timer Record ► Setup Scheduled Record List ► MOVE ENTER RETURN EXIT DVD-Recorder No Disc Timer Rec. Select Setup using the product. 1. System Setup System Setup Press 1 for the ...
..., Subtitle, Disc Menu, On-Screen Menu • Audio Setup of the Display Options. - Password, Rating Level,Change Password English - 25 TV Aspect, Input Level, Black Level, 3D Noise Reduction, HDMI/DVI Resolution • Parental Control Setup of use, we recommend that you select ...the remote control. Setup menu will be displayed. • System Setup of the Language Options. - Timer Record ► Setup Scheduled Record List ► MOVE ENTER RETURN EXIT DVD-Recorder No Disc Timer Rec. Select Setup using the product. 1. System Setup System Setup Press 1 for the ...

Quick Guide (easy Manual) (ver.1.0) (English)
Page 26
...CM Skip does not work in Stop mode, press the MENU button on a DVD-RAM, a DVD-RW, DVD-VIDEO or a DVD-R is played. ■ CM Skip can 't use the Setup functions while playing a disc. 3. System Setup DVD-Recorder DVD-RW(VR) Title List CM Skip Time :1155SeScec Playlist EP Mode Time :360... SHeocurs Disc Manager Chapter Creator :6O0 Sffec Quick Recording : Off Timer Rec. English - 26 With a disc inserted and the unit in...
...CM Skip does not work in Stop mode, press the MENU button on a DVD-RAM, a DVD-RW, DVD-VIDEO or a DVD-R is played. ■ CM Skip can 't use the Setup functions while playing a disc. 3. System Setup DVD-Recorder DVD-RW(VR) Title List CM Skip Time :1155SeScec Playlist EP Mode Time :360... SHeocurs Disc Manager Chapter Creator :6O0 Sffec Quick Recording : Off Timer Rec. English - 26 With a disc inserted and the unit in...

Quick Guide (easy Manual) (ver.1.0) (English)
Page 27
...using the ▲▼ buttons, then press the ENTER or ► button. Stopping the recording will be displayed. 5. message appears for DVD-RW (Video) and DVD-R discs only. 1. English - 27 System Setup DVD-Recorder DVD-RW(V) System Title List CM Skip Time : 15 Sec ► Disc Manager EP Mode... The Automatic Chapter Creation function does not work during Timer Recording or when you want to create chapters. ■ Set the chapter creator to the selected recording mode. System menu will be displayed. 4. DVD-Recorder DVD-RW(VR) Title List CM Skip Time : 15 Sec ...
...using the ▲▼ buttons, then press the ENTER or ► button. Stopping the recording will be displayed. 5. message appears for DVD-RW (Video) and DVD-R discs only. 1. English - 27 System Setup DVD-Recorder DVD-RW(V) System Title List CM Skip Time : 15 Sec ► Disc Manager EP Mode... The Automatic Chapter Creation function does not work during Timer Recording or when you want to create chapters. ■ Set the chapter creator to the selected recording mode. System menu will be displayed. 4. DVD-Recorder DVD-RW(VR) Title List CM Skip Time : 15 Sec ...