
Quick Guide (easy Manual) (ver.1.0) (English)
Page 3
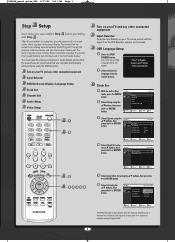
...use, we recommend that carries a time signal and sets your TV and any other connected equipment Input Selector Press the Input Selector on your TV remote control until the signal from the DVD Recorder appears on your time zone and daylight saving(if applicable). 3 Clock Set Setup Channel ...for a channel that you complete Step before using the DVD Recorder. Select the desired language using the No Disc Auto Clock Set - .../† buttons, then Timer Rec. Turn on your TV and any other connected equipment Input Selector OSD(On-Screen Display) Language Setup Clock Set Channel...
...use, we recommend that carries a time signal and sets your TV and any other connected equipment Input Selector Press the Input Selector on your TV remote control until the signal from the DVD Recorder appears on your time zone and daylight saving(if applicable). 3 Clock Set Setup Channel ...for a channel that you complete Step before using the DVD Recorder. Select the desired language using the No Disc Auto Clock Set - .../† buttons, then Timer Rec. Turn on your TV and any other connected equipment Input Selector OSD(On-Screen Display) Language Setup Clock Set Channel...
Quick Guide (easy Manual) (ver.1.0) (English)
Page 4
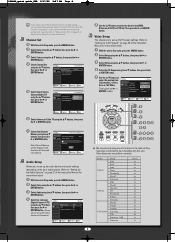
...No Disc Audio (Digital Output or DTS) using the .../† buttons, then press the √ or ENTER button. Media DVD-R DVD-R DVD-RAM Brand TDK Beall Sony That's Mitsubishi Maxell Panasonic TDK Maxell Optodisc JVC Mitsubishi Radius Verbatim Maxell Maxell Fujifilm Panasonic TDK Panasonic ... Use the .../† buttons to select the desired item(PCM, Bitstream, DTS-Off or DTS-On). MOVE SELECT RETURN EXIT - Setup TV Aspect Input Level Black Level 3D Noise Reduction Front Display : 146:3:9LWetitdeerBox √ : 4D:a3rPkaenr-Scan √ : 176.5:9IRWEide √ : Off ...
...No Disc Audio (Digital Output or DTS) using the .../† buttons, then press the √ or ENTER button. Media DVD-R DVD-R DVD-RAM Brand TDK Beall Sony That's Mitsubishi Maxell Panasonic TDK Maxell Optodisc JVC Mitsubishi Radius Verbatim Maxell Maxell Fujifilm Panasonic TDK Panasonic ... Use the .../† buttons to select the desired item(PCM, Bitstream, DTS-Off or DTS-On). MOVE SELECT RETURN EXIT - Setup TV Aspect Input Level Black Level 3D Noise Reduction Front Display : 146:3:9LWetitdeerBox √ : 4D:a3rPkaenr-Scan √ : 176.5:9IRWEide √ : Off ...
Quick Guide (easy Manual) (ver.1.0) (English)
Page 6
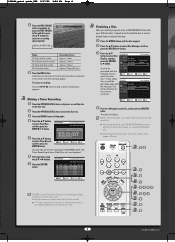
... the record list. DVD-RW(VR) Title List Disc Name Playlist Disc Protection Disc manager Disc Format Disc Finalize Timer Rec. MOVE SELECT RETURN EXIT Press the œ/√buttons to close the disc tray. I After being recorded is set. The Timer Record Input items (Date/Time etc... the .../† buttons) to select Disc Finalize, and then press the ENTER or √ button. Information concerning the channel being finalized, the DVD-R/DVD-RW(Video mode) operates in progress. To stop recording Press the STOP (I If FR mode is selected, the video quality is finalized, you ...
... the record list. DVD-RW(VR) Title List Disc Name Playlist Disc Protection Disc manager Disc Format Disc Finalize Timer Rec. MOVE SELECT RETURN EXIT Press the œ/√buttons to close the disc tray. I After being recorded is set. The Timer Record Input items (Date/Time etc... the .../† buttons) to select Disc Finalize, and then press the ENTER or √ button. Information concerning the channel being finalized, the DVD-R/DVD-RW(Video mode) operates in progress. To stop recording Press the STOP (I If FR mode is selected, the video quality is finalized, you ...
Quick Guide (easy Manual) (ver.1.0) (English)
Page 6
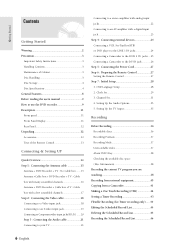
... box with many scrambled channels 16 Antenna + DVD Recorder + Cable box +TV : Cable box with a few scrambled channels 17 Step 2 : Connecting the Video cable 18 Connecting to a Video input jack 18 Connecting to an S-video input jack 19 Connecting to Component video input jacks(Y,PB,PR) ......20 Step 3 : ... Connecting to your TV 21 Connecting to a stereo amplifier with analog input jacks 22 Connecting to an AV amplifier with a digital input jack 23 Step 4 : Connecting external devices 24 Connecting a VCR, Set-Top Box(STB) or DVD player to the LINE 1 IN jacks 24 Connecting a Camcorder to...
... box with many scrambled channels 16 Antenna + DVD Recorder + Cable box +TV : Cable box with a few scrambled channels 17 Step 2 : Connecting the Video cable 18 Connecting to a Video input jack 18 Connecting to an S-video input jack 19 Connecting to Component video input jacks(Y,PB,PR) ......20 Step 3 : ... Connecting to your TV 21 Connecting to a stereo amplifier with analog input jacks 22 Connecting to an AV amplifier with a digital input jack 23 Step 4 : Connecting external devices 24 Connecting a VCR, Set-Top Box(STB) or DVD player to the LINE 1 IN jacks 24 Connecting a Camcorder to...

Quick Guide (easy Manual) (ver.1.0) (English)
Page 8
... adjusted automatically so that lets you record with a 4.7 GB DVD-RAM/DVD-RW/DVD-R disc, depending on the disc in timer recording. Copying data from a digital camcorder using a DV input jack Record digital camcorder video onto DVD-RAM or DVD-RW, DVD-R discs using DVD-RW/DVD-R disc With a DVD-R120, create your requirements. High quality progressive scan Progressive scanning provides...
... adjusted automatically so that lets you record with a 4.7 GB DVD-RAM/DVD-RW/DVD-R disc, depending on the disc in timer recording. Copying data from a digital camcorder using a DV input jack Record digital camcorder video onto DVD-RAM or DVD-RW, DVD-R discs using DVD-RW/DVD-R disc With a DVD-R120, create your requirements. High quality progressive scan Progressive scanning provides...
Quick Guide (easy Manual) (ver.1.0) (English)
Page 12
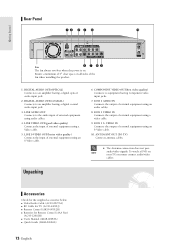
LINE VIDEO OUT(good video quality) Connects the input of external equipment using audio cables. 4. s The Antenna connection does not pass NOTE audio/video signals. To watch a DVD on . Unpacking Accessories Check for Remote Control (AAA Size) (AC43-12002H) q User's Manual (AK68-00683A) q Quick ...cables. COMPONENT VIDEO OUT(best video quality) Connects to an amplifier having a digital optical audio input jack. 2. LINE 1 S- LINE AUDIO OUT Connects to an amplifier having Component video input jacks. 7. LINE 1 AUDIO IN Connects the output of external equipment using a Video cable....
LINE VIDEO OUT(good video quality) Connects the input of external equipment using audio cables. 4. s The Antenna connection does not pass NOTE audio/video signals. To watch a DVD on . Unpacking Accessories Check for Remote Control (AAA Size) (AC43-12002H) q User's Manual (AK68-00683A) q Quick ...cables. COMPONENT VIDEO OUT(best video quality) Connects to an amplifier having a digital optical audio input jack. 2. LINE 1 S- LINE AUDIO OUT Connects to an amplifier having Component video input jacks. 7. LINE 1 AUDIO IN Connects the output of external equipment using a Video cable....
Quick Guide (easy Manual) (ver.1.0) (English)
Page 13
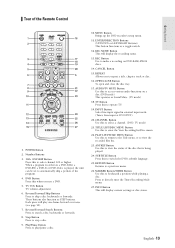
... disc that is played, the unit can be set to search a disc backwards or forwards. 8. When a program recorded on a DVD-RAM, a DVD-RW, a DVD-R or DVD-Video is being played. 24. Each press will display the recording status. 13. Reverse/Forward Search Buttons Press to automatically skip a portion...Sound Mute. (TV mode) 18. REC Button Use to stop a disc. 9. REPEAT Allows you use a DVD. 5. INPUT Button Select line input signal in external input mode (Tuner, Line input or DV INPUT) 20. TITLE LIST/DISC MENU Button Use this to skip a disc backwards or forwards. SUBTITLE Button Press this ...
... disc that is played, the unit can be set to search a disc backwards or forwards. 8. When a program recorded on a DVD-RAM, a DVD-RW, a DVD-R or DVD-Video is being played. 24. Each press will display the recording status. 13. Reverse/Forward Search Buttons Press to automatically skip a portion...Sound Mute. (TV mode) 18. REC Button Use to stop a disc. 9. REPEAT Allows you use a DVD. 5. INPUT Button Select line input signal in external input mode (Tuner, Line input or DV INPUT) 20. TITLE LIST/DISC MENU Button Use this to skip a disc backwards or forwards. SUBTITLE Button Press this ...
Quick Guide (easy Manual) (ver.1.0) (English)
Page 18
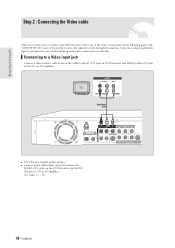
.... It does not output audio/video signals. q Connect audio cables(white and red) between the VIDEO(yellow) OUT jack on DVD Recorder and VIDEO(yellow) IN jack on the TV (or AV amplifier). You must use one of this unit. Connecting & Setting UP Step 2 : Connecting the ...Video cable There are several ways to a Video input jack Connect a video(yellow) cable between the AUDIO OUT jacks on the DVD Recorder and AUDIO IN jacks on TV(or AV amplifier). (See pages 21 ~ 23) 18- English The VHF/UHF...
.... It does not output audio/video signals. q Connect audio cables(white and red) between the VIDEO(yellow) OUT jack on DVD Recorder and VIDEO(yellow) IN jack on the TV (or AV amplifier). You must use one of this unit. Connecting & Setting UP Step 2 : Connecting the ...Video cable There are several ways to a Video input jack Connect a video(yellow) cable between the AUDIO OUT jacks on the DVD Recorder and AUDIO IN jacks on TV(or AV amplifier). (See pages 21 ~ 23) 18- English The VHF/UHF...
Quick Guide (easy Manual) (ver.1.0) (English)
Page 19
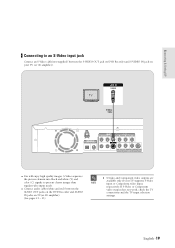
... and white (Y) and color (C) signals to an S-Video input jack Connect an S-Video cable(not supplied) between the AUDIO OUT jacks on the DVD Recorder and AUDIO IN jacks on your TV supports S-Video NOTE input or Component video input, respectively. q You will enjoy high quality images. If ...S-Video or Component video output does not work, check the TV connections and the TV input selection settings. Connecting &...
... and white (Y) and color (C) signals to an S-Video input jack Connect an S-Video cable(not supplied) between the AUDIO OUT jacks on the DVD Recorder and AUDIO IN jacks on your TV supports S-Video NOTE input or Component video input, respectively. q You will enjoy high quality images. If ...S-Video or Component video output does not work, check the TV connections and the TV input selection settings. Connecting &...

Quick Guide (easy Manual) (ver.1.0) (English)
Page 20
...Output (480p) "Consumers should note that you switch the connection to Progressive input, To deactivate, press [STOP] key." The message "Please set compatibility with this model, please contact our customer service center at 1-800-SAMSUNG. If you experience 480p progressive scan picture problems, it is recommended that...free, and clear image than interlaced video. English q Connect audio cables(white and red) between the COMPONENT OUT(Y,PB,PR) jacks on DVD Recorder and COMPONENT IN(Y,PB,PR) jacks on the front of NOTE video lines fed to present clear and clean images. 20- If...
...Output (480p) "Consumers should note that you switch the connection to Progressive input, To deactivate, press [STOP] key." The message "Please set compatibility with this model, please contact our customer service center at 1-800-SAMSUNG. If you experience 480p progressive scan picture problems, it is recommended that...free, and clear image than interlaced video. English q Connect audio cables(white and red) between the COMPONENT OUT(Y,PB,PR) jacks on DVD Recorder and COMPONENT IN(Y,PB,PR) jacks on the front of NOTE video lines fed to present clear and clean images. 20- If...

Quick Guide (easy Manual) (ver.1.0) (English)
Page 22
Connecting & Setting UP Connecting to a stereo amplifier with analog input jacks If your stereo amplifier only has AUDIO INPUT jacks(L and R), use the AUDIO OUT jacks. English Front(L)speaker Front(R)speaker 22-
Connecting & Setting UP Connecting to a stereo amplifier with analog input jacks If your stereo amplifier only has AUDIO INPUT jacks(L and R), use the AUDIO OUT jacks. English Front(L)speaker Front(R)speaker 22-

Quick Guide (easy Manual) (ver.1.0) (English)
Page 23
"Dolby" and the double-D symbol are trademarks of Dolby Laboratories. Connecting & Setting UP Connecting to set up the audio settings. (See pages 33 ~ 34) Manufactured under license from Dolby Laboratories. To enjoy Dolby Digital or DTS sound, you will need to an AV amplifier with a digital input jack If your AV amplifier has a Dolby Digital or DTS decoder and a digital input jack, use this connection. English -23 "DTS" and "DTS Digital Out" are trademarks of Digital Theater Systems, Inc.
"Dolby" and the double-D symbol are trademarks of Dolby Laboratories. Connecting & Setting UP Connecting to set up the audio settings. (See pages 33 ~ 34) Manufactured under license from Dolby Laboratories. To enjoy Dolby Digital or DTS sound, you will need to an AV amplifier with a digital input jack If your AV amplifier has a Dolby Digital or DTS decoder and a digital input jack, use this connection. English -23 "DTS" and "DTS Digital Out" are trademarks of Digital Theater Systems, Inc.
Quick Guide (easy Manual) (ver.1.0) (English)
Page 25
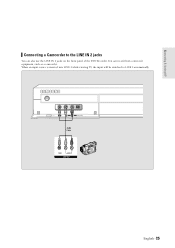
English -25 You can also use the LINE IN 2 jacks on the front panel of the DVD Recorder. When an input source is inserted into LINE 2 while viewing TV, the input will be switched to the LINE IN 2 jacks You can record from connected equipment, such as a camcorder. Connecting & Setting UP Connecting a Camcorder to LINE 2 automatically.
English -25 You can also use the LINE IN 2 jacks on the front panel of the DVD Recorder. When an input source is inserted into LINE 2 while viewing TV, the input will be switched to the LINE IN 2 jacks You can record from connected equipment, such as a camcorder. Connecting & Setting UP Connecting a Camcorder to LINE 2 automatically.
Quick Guide (easy Manual) (ver.1.0) (English)
Page 26
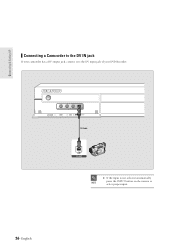
Connecting & Setting UP Connecting a Camcorder to the DV IN jack If your camcorder has a DV output jack, connect it to select proper input. English s If the input is not selected automatically, NOTE press the INPUT button on the remote to the DV input jack of your DVD Recorder. 26-
Connecting & Setting UP Connecting a Camcorder to the DV IN jack If your camcorder has a DV output jack, connect it to select proper input. English s If the input is not selected automatically, NOTE press the INPUT button on the remote to the DV input jack of your DVD Recorder. 26-
Quick Guide (easy Manual) (ver.1.0) (English)
Page 27
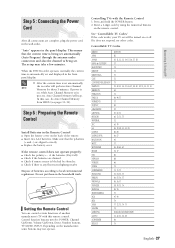
When the DVD Recorder operates normally, the current time is blocked by using the numerical buttons on the... panel display. Control function buttons involve: POWER, Channel Up/Down, Volume Up/Down, Direct Number buttons, TV MUTE, INPUT. Depending on the back of another manufacturer's TV with the Remote Control 1. Press and hold the POWER button. 2. If... LOEWE OPTA MAGNAVOX METZ MITSUBISHI MIVAR NEC NEWSAN NOBLEX NOKIA NORDMENDE PANASONIC PHILIPS PHONOLA PIONEER RADIOLA RADIOMARELLI RCA REX SABA SALORA SAMSUNG SANYO SCHNEIDER SELECO BUTTON 82 10, 11, 12, 13, 14, 15, 16, 17, 18 57 71 73 ...
When the DVD Recorder operates normally, the current time is blocked by using the numerical buttons on the... panel display. Control function buttons involve: POWER, Channel Up/Down, Volume Up/Down, Direct Number buttons, TV MUTE, INPUT. Depending on the back of another manufacturer's TV with the Remote Control 1. Press and hold the POWER button. 2. If... LOEWE OPTA MAGNAVOX METZ MITSUBISHI MIVAR NEC NEWSAN NOBLEX NOKIA NORDMENDE PANASONIC PHILIPS PHONOLA PIONEER RADIOLA RADIOMARELLI RCA REX SABA SALORA SAMSUNG SANYO SCHNEIDER SELECO BUTTON 82 10, 11, 12, 13, 14, 15, 16, 17, 18 57 71 73 ...

Quick Guide (easy Manual) (ver.1.0) (English)
Page 28
... If you plug in the recorder, the first time you press the POWER button, this screen comes up initial settings before using the DVD Recorder. 1. Audio Setup † DVD TV INPUT 5. Therefore, make sure that you select the language you set up . (This screen will only appear when you connected an external Audio...
... If you plug in the recorder, the first time you press the POWER button, this screen comes up initial settings before using the DVD Recorder. 1. Audio Setup † DVD TV INPUT 5. Therefore, make sure that you select the language you set up . (This screen will only appear when you connected an external Audio...

Quick Guide (easy Manual) (ver.1.0) (English)
Page 35
... bars will appear at the top and bottom of movie picture will be cut off.) If you want to see the total 16:9 ratio screen DVD supplies, even though you to set up the TV screen settings. 1 With the unit in Stop mode/No Disc mode, press the MENU button.... EXIT 2 Select Setup using the ...† buttons, then press the ENTER or √ button. No Disc Timer Rec. No Disc Timer Rec. Setup TV Aspect Input Level Black Level 3D Noise Reduction Front Display Video : 16:9 Wide √ : Darker √ : 7.5 IRE √ : Off √ : Auto Dim √ MOVE SELECT RETURN ...
... bars will appear at the top and bottom of movie picture will be cut off.) If you want to see the total 16:9 ratio screen DVD supplies, even though you to set up the TV screen settings. 1 With the unit in Stop mode/No Disc mode, press the MENU button.... EXIT 2 Select Setup using the ...† buttons, then press the ENTER or √ button. No Disc Timer Rec. No Disc Timer Rec. Setup TV Aspect Input Level Black Level 3D Noise Reduction Front Display Video : 16:9 Wide √ : Darker √ : 7.5 IRE √ : Off √ : Auto Dim √ MOVE SELECT RETURN ...
Quick Guide (easy Manual) (ver.1.0) (English)
Page 38
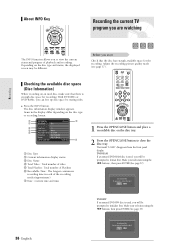
... ME KEY KEY The INFO function allows you to view the current status and progress of the recording modes(approximate) & Date : Current date and time DVD TV INPUT TITLE LIST PLAY LIST NU ANY DISC MENU TITLE MENU 1 Press the OPEN/CLOSE button and place a recordable disc on the disc tray. 2 Press... the OPEN/CLOSE button to close the disc tray. With DVD-RWs or DVD-RAMs, you start Check that there is enough disc space for the recording. The...
... ME KEY KEY The INFO function allows you to view the current status and progress of the recording modes(approximate) & Date : Current date and time DVD TV INPUT TITLE LIST PLAY LIST NU ANY DISC MENU TITLE MENU 1 Press the OPEN/CLOSE button and place a recordable disc on the disc tray. 2 Press... the OPEN/CLOSE button to close the disc tray. With DVD-RWs or DVD-RAMs, you start Check that there is enough disc space for the recording. The...

Quick Guide (easy Manual) (ver.1.0) (English)
Page 40
...; SP © LP © EP © XP Record Mode SP (02:12) 40- s Recording will be asked first. (See page 37) 3 Press the INPUT button to select the input source according to stop automatically if there is used , whether to format or not will be asked first. (See page 37) If an... unused DVD-RW disc is no free space left for the recording. Wait until "LOAD" disappears from external equipment 5 Press the REC button. English The...
...; SP © LP © EP © XP Record Mode SP (02:12) 40- s Recording will be asked first. (See page 37) 3 Press the INPUT button to select the input source according to stop automatically if there is used , whether to format or not will be asked first. (See page 37) If an... unused DVD-RW disc is no free space left for the recording. Wait until "LOAD" disappears from external equipment 5 Press the REC button. English The...

Quick Guide (easy Manual) (ver.1.0) (English)
Page 41
... -41 Wait until "LOAD" disappears from a Camcorder You may control the Camcorder using DVD-RAM/DVD-RW/DVD-R discs, the message 'Updating the information of the screen. You can not change the recording mode and NOTE input source while recording. Please wait for a moment' is no free space left for the... appears on the disc tray. 2 Press the OPEN/CLOSE button to playback the camcorder. 6 To start recording. Recording 4 Press the INPUT button to record. If an unused DVD-RAM disc is used , whether to initialize or not will be asked first. (See page 37) 3 Press the REC MODE button ...
... -41 Wait until "LOAD" disappears from a Camcorder You may control the Camcorder using DVD-RAM/DVD-RW/DVD-R discs, the message 'Updating the information of the screen. You can not change the recording mode and NOTE input source while recording. Please wait for a moment' is no free space left for the... appears on the disc tray. 2 Press the OPEN/CLOSE button to playback the camcorder. 6 To start recording. Recording 4 Press the INPUT button to record. If an unused DVD-RAM disc is used , whether to initialize or not will be asked first. (See page 37) 3 Press the REC MODE button ...