User Manual (ENGLISH)
Page 4
... Cautions • Before connecting other components to the AC power outlet. REFER SERVICING TO QUALIFIED PERSONNEL. If the Region number of a DVD disc does not correspond to the Region number of the disc. DO NOT OPEN COVER AND DO NOT REPAIR YOURSELF. The player will operate normally. • Be sure to remove the disc and turn the player off the player after use. • Disconnect the AC power cord from the AC outlet...
... Cautions • Before connecting other components to the AC power outlet. REFER SERVICING TO QUALIFIED PERSONNEL. If the Region number of a DVD disc does not correspond to the Region number of the disc. DO NOT OPEN COVER AND DO NOT REPAIR YOURSELF. The player will operate normally. • Be sure to remove the disc and turn the player off the player after use. • Disconnect the AC power cord from the AC outlet...

User Manual (ENGLISH)
Page 6
... Instructions 2 Precautions 3 Before you start 5 Chapter 1: Setup General Features 7 Disc Type and Characteristics 8 Description 9 Tour of the Remote Control 11 Chapter 2: Connections Choosing a Connection 12 Chapter 3: Basic Functions Playing a Disc 20 Using the Search and Skip Functions 22 Using the Display Function 23 Using the Disc and Title Menu 24 Using the Function Menu 25 Repeat Play 26 Slow Play 27 Chapter 4: Advanced Functions Adjusting the Aspect Ratio (EZ View 28 Selecting the Audio Language 30 Selecting the Subtitle Language 31 Changing the Camera Angle 32 Using...
... Instructions 2 Precautions 3 Before you start 5 Chapter 1: Setup General Features 7 Disc Type and Characteristics 8 Description 9 Tour of the Remote Control 11 Chapter 2: Connections Choosing a Connection 12 Chapter 3: Basic Functions Playing a Disc 20 Using the Search and Skip Functions 22 Using the Display Function 23 Using the Disc and Title Menu 24 Using the Function Menu 25 Repeat Play 26 Slow Play 27 Chapter 4: Advanced Functions Adjusting the Aspect Ratio (EZ View 28 Selecting the Audio Language 30 Selecting the Subtitle Language 31 Changing the Camera Angle 32 Using...
User Manual (ENGLISH)
Page 7
... a pure digital video/audio signal path from the player to your TV, not to match your TV. IF THERE ARE QUESTIONS REGARDING YOUR TV SET COMPATIBILITY WITH THIS MODEL 525p DVD PLAYER, PLEASE CONTACT SAMSUNG'S CUSTOMER SERVICE CENTER." EZ VIEW (DVD) Easy View enables picture adjustment to a VCR. Ability to the disc type or recording conditions. Instant Replay (DVD) This function is intended for home and other rights owners. HDMI (High Definition Multimedia Interface) HDMI reduces picture noise...
... a pure digital video/audio signal path from the player to your TV, not to match your TV. IF THERE ARE QUESTIONS REGARDING YOUR TV SET COMPATIBILITY WITH THIS MODEL 525p DVD PLAYER, PLEASE CONTACT SAMSUNG'S CUSTOMER SERVICE CENTER." EZ VIEW (DVD) Easy View enables picture adjustment to a VCR. Ability to the disc type or recording conditions. Instant Replay (DVD) This function is intended for home and other rights owners. HDMI (High Definition Multimedia Interface) HDMI reduces picture noise...

User Manual (ENGLISH)
Page 8
... for this player is described on -screen menu. Audio 5" 3 1/2" 74 min. 20 min. - CD is recorded as a Digital Signal with better audio quality, less distortion and less deterioration of discs with the corresponding logos: Disc Types (Logos) DVD AUDIO-CD Recording Types Audio + Video Disc Size Max. Dolby Digital disc STEREO Stereo disc DIGITAL SOUND Digital Audio disc DTS disc MP3 disc You must match in U.S.A, Canada, Korea, Japan, etc. Region Number Both the DVD player and the discs are coded by region. ENG-8 Playing Time Characteristics 5" 3 1/2" Single...
... for this player is described on -screen menu. Audio 5" 3 1/2" 74 min. 20 min. - CD is recorded as a Digital Signal with better audio quality, less distortion and less deterioration of discs with the corresponding logos: Disc Types (Logos) DVD AUDIO-CD Recording Types Audio + Video Disc Size Max. Dolby Digital disc STEREO Stereo disc DIGITAL SOUND Digital Audio disc DTS disc MP3 disc You must match in U.S.A, Canada, Korea, Japan, etc. Region Number Both the DVD player and the discs are coded by region. ENG-8 Playing Time Characteristics 5" 3 1/2" Single...
User Manual (ENGLISH)
Page 10
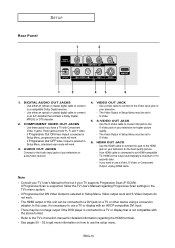
... for higher picture quality. - If Progressive Out ON Video Output is selected in jacks. The HDMI output of this jack to use the setup menu. Refer to use a TV or display with Component Video in Setup Menu, progressive scan mode will work. 3. Use the S-Video cable to connect this case, it is not compatible with the above format. - If you have a TV with an HDCP-compatible DVI input. - See pages 50 ~ 52 to use a Video, S-Video or Component Output, unplug HDMI cable. AUDIO OUT JACKS Connect to...
... for higher picture quality. - If Progressive Out ON Video Output is selected in jacks. The HDMI output of this jack to use the setup menu. Refer to use a TV or display with Component Video in Setup Menu, progressive scan mode will work. 3. Use the S-Video cable to connect this case, it is not compatible with the above format. - If you have a TV with an HDCP-compatible DVI input. - See pages 50 ~ 52 to use a Video, S-Video or Component Output, unplug HDMI cable. AUDIO OUT JACKS Connect to...
User Manual (ENGLISH)
Page 11
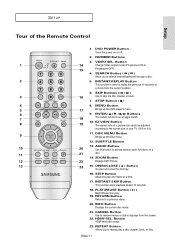
... Button This function skips playback ahead 10 seconds. 18. CANCEL Button Use to search forward/backward through a disc. 2 5. REPEAT Button Allows you to remove menus or status displays from the current position. 6. SETUP Setup Tour of your TV (16:9 or 4:3). 9 11. EZ VIEW Button The aspect ratio of a picture can easily be adjusted according to access various audio functions on or off. 2. Button HDMI resolution setup. 23. VIDEO SEL. SUBTITLE Button 10 13. INFO Button Displays the current disc mode. 21. HDMI SEL. Button 1 14 Change Video output mode (Progressive...
... Button This function skips playback ahead 10 seconds. 18. CANCEL Button Use to search forward/backward through a disc. 2 5. REPEAT Button Allows you to remove menus or status displays from the current position. 6. SETUP Setup Tour of your TV (16:9 or 4:3). 9 11. EZ VIEW Button The aspect ratio of a picture can easily be adjusted according to access various audio functions on or off. 2. Button HDMI resolution setup. 23. VIDEO SEL. SUBTITLE Button 10 13. INFO Button Displays the current disc mode. 21. HDMI SEL. Button 1 14 Change Video output mode (Progressive...
User Manual (ENGLISH)
Page 12
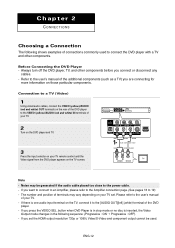
..., the Video Output mode changes in stop mode or no disc is one audio input terminal on those particular components. Connection to a TV (Video) 1 Using video/audio cables, connect the VIDEO (yellow)/AUDIO (red and white) OUT terminals on the rear of the DVD player to the [AUDIO OUT][left] (white) terminal of your TV. 2 Turn on the DVD player and TV. 3 Press the input selector on your TV remote control until the Video signal from the DVD player appears on your TV. - button when DVD Player is...
..., the Video Output mode changes in stop mode or no disc is one audio input terminal on those particular components. Connection to a TV (Video) 1 Using video/audio cables, connect the VIDEO (yellow)/AUDIO (red and white) OUT terminals on the rear of the DVD player to the [AUDIO OUT][left] (white) terminal of your TV. 2 Turn on the DVD player and TV. 3 Press the input selector on your TV remote control until the Video signal from the DVD player appears on your TV. - button when DVD Player is...

User Manual (ENGLISH)
Page 13
... user's manual of your TV remote control until the SVideo signal from the DVD player appears on the TV set the HDMI output resolution 720p or 1080i, Video/S-Video and component output cannot be used. Please do not connect S-Video and Component Video (Y, Pb, Pr) output simultaneously, as they may vary depending on your TV screen. 4 Set the Video Output to S-Video in the Display Setup menu. (See pages 50 to the AUDIO (red and white) IN terminals of your TV. 2 Using...
... user's manual of your TV remote control until the SVideo signal from the DVD player appears on the TV set the HDMI output resolution 720p or 1080i, Video/S-Video and component output cannot be used. Please do not connect S-Video and Component Video (Y, Pb, Pr) output simultaneously, as they may vary depending on your TV screen. 4 Set the Video Output to S-Video in the Display Setup menu. (See pages 50 to the AUDIO (red and white) IN terminals of your TV. 2 Using...

User Manual (ENGLISH)
Page 14
...) - button to a TV (Interlace) - Turn on the DVD player and TV. 3 Press the input selector on your TV remote control until the Component signal from the DVD player appears on the rear of your TV. The component terminal of your TV. 2 Using the audio cables, connect the AUDIO (red and white) OUT terminals on the TV screen. 4 Set the Video Output to Progressive Out OFF in the Display Setup menu. (See pages 50 to the AUDIO (red and white...
...) - button to a TV (Interlace) - Turn on the DVD player and TV. 3 Press the input selector on your TV remote control until the Component signal from the DVD player appears on the rear of your TV. The component terminal of your TV. 2 Using the audio cables, connect the AUDIO (red and white) OUT terminals on the TV screen. 4 Set the Video Output to Progressive Out OFF in the Display Setup menu. (See pages 50 to the AUDIO (red and white...

User Manual (ENGLISH)
Page 15
Turn on the DVD player and TV. 3 Press the input selector on your TV remote control until the Component signal from the illustration above. Consult your TV User's Manual to change the Video Output mode. (See page 12) RED BLUE GREEN RED WHITE Audio Cable RED WHITE RED BLUE GREEN Component cable (not included) To see the progressive video output, - If Progressive Scan is "Progressive Scan"? button to find out if your TV supports Progressive Scan. ENG-15 Connections CONNECTIONS Connection to a TV (Progressive) 1 Using component video cables (not included), connect the ...
Turn on the DVD player and TV. 3 Press the input selector on your TV remote control until the Component signal from the illustration above. Consult your TV User's Manual to change the Video Output mode. (See page 12) RED BLUE GREEN RED WHITE Audio Cable RED WHITE RED BLUE GREEN Component cable (not included) To see the progressive video output, - If Progressive Scan is "Progressive Scan"? button to find out if your TV supports Progressive Scan. ENG-15 Connections CONNECTIONS Connection to a TV (Progressive) 1 Using component video cables (not included), connect the ...
User Manual (ENGLISH)
Page 16
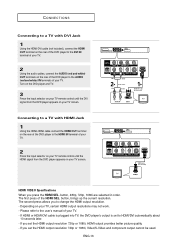
... TV screen. RED WHITE Audio Cable RED WHITE HDMI-DVI cable (Not Included) HDMI cable (Not Included) HDMI VIDEO Specifications When you to change the HDMI output resolution. - If HDMI or HDMI-DVI cable is plugged into TV, the DVD player's output is set to the user's manual of the HDMI SEL. If you set the HDMI output resolution 720p or 1080i, HDMI output provides better picture quality. - Turn on the DVD player and TV. 3 Press the input selector on your TV remote control until the HDMI signal from the DVD player appears...
... TV screen. RED WHITE Audio Cable RED WHITE HDMI-DVI cable (Not Included) HDMI cable (Not Included) HDMI VIDEO Specifications When you to change the HDMI output resolution. - If HDMI or HDMI-DVI cable is plugged into TV, the DVD player's output is set to the user's manual of the HDMI SEL. If you set the HDMI output resolution 720p or 1080i, HDMI output provides better picture quality. - Turn on the DVD player and TV. 3 Press the input selector on your TV remote control until the HDMI signal from the DVD player appears...
User Manual (ENGLISH)
Page 18
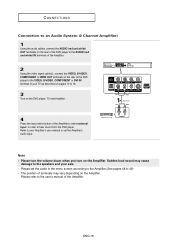
... to 16. 3 Turn on the DVD player, TV, and Amplifier. Please set the Amplifier's audio input. 2-Channel stereo amp Note - CONNECTIONS Connection to an Audio System (2 Channel Amplifier) 1 Using the audio cables, connect the AUDIO (red and white) OUT terminals on the rear of the DVD player to the AUDIO (red and white) IN terminals of the Amplifier. 2 Using the video signal cable(s), connect the VIDEO, S-VIDEO, COMPONENT or HDMI OUT terminals on the rear of the DVD player to the VIDEO, S-VIDEO, COMPONENT or DVI IN...
... to 16. 3 Turn on the DVD player, TV, and Amplifier. Please set the Amplifier's audio input. 2-Channel stereo amp Note - CONNECTIONS Connection to an Audio System (2 Channel Amplifier) 1 Using the audio cables, connect the AUDIO (red and white) OUT terminals on the rear of the DVD player to the AUDIO (red and white) IN terminals of the Amplifier. 2 Using the video signal cable(s), connect the VIDEO, S-VIDEO, COMPONENT or HDMI OUT terminals on the rear of the DVD player to the VIDEO, S-VIDEO, COMPONENT or DVI IN...
User Manual (ENGLISH)
Page 19
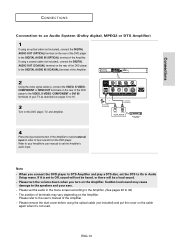
... on the cable again when it is set the audio in order to hear sound from the DVD player. Connections CONNECTIONS Connection to an Audio System (Dolby digital, MPEG2 or DTS Amplifier) 1 If using an optical cable (not included), connect the DIGITAL AUDIO OUT (OPTICAL) terminal on the Amplifier. Please set to DTS Amplifier and play a DTS disc, set the Amplifier's audio input. Please turn the volume down when you connect the DVD player to Off, sound will not...
... on the cable again when it is set the audio in order to hear sound from the DVD player. Connections CONNECTIONS Connection to an Audio System (Dolby digital, MPEG2 or DTS Amplifier) 1 If using an optical cable (not included), connect the DIGITAL AUDIO OUT (OPTICAL) terminal on the Amplifier. Please set to DTS Amplifier and play a DTS disc, set the Amplifier's audio input. Please turn the volume down when you connect the DVD player to Off, sound will not...
User Manual (ENGLISH)
Page 20
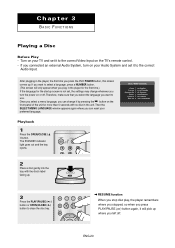
... unit. Once you select a menu language, you connected an external Audio System, turn the power on your preferred language. Then the SELECT MENU LANGUAGE window appears again where you want to select a language, press a NUMBER button. (This screen will pick up . 3 Press the PLAY/PAUSE ( ) button or OPEN/CLOSE ( ) button to the correct Audio Input. Playback 1 Press the OPEN/CLOSE ( ) button. ENG-20 Therefore, make sure that you select the language you can change whenever you left off . Turn on the TV's remote control. -
... unit. Once you select a menu language, you connected an external Audio System, turn the power on your preferred language. Then the SELECT MENU LANGUAGE window appears again where you want to select a language, press a NUMBER button. (This screen will pick up . 3 Press the PLAY/PAUSE ( ) button or OPEN/CLOSE ( ) button to the correct Audio Input. Playback 1 Press the OPEN/CLOSE ( ) button. ENG-20 Therefore, make sure that you select the language you can change whenever you left off . Turn on the TV's remote control. -
User Manual (ENGLISH)
Page 39
... of the player to read the files). - Sound quality with WMA files basically depends on the rate of compression/decompression you choose. Do not try recording copyright protected MP3 files. ISO 9660 format and Joliet MP3 or WMA files are encrypted and code protected to prevent illegal copying. General name format : Title.mp3. or Title.wma. Getting CD audio sound requires an analog/digital sampling...
... of the player to read the files). - Sound quality with WMA files basically depends on the rate of compression/decompression you choose. Do not try recording copyright protected MP3 files. ISO 9660 format and Joliet MP3 or WMA files are encrypted and code protected to prevent illegal copying. General name format : Title.mp3. or Title.wma. Getting CD audio sound requires an analog/digital sampling...
User Manual (ENGLISH)
Page 51
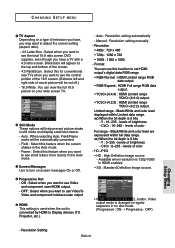
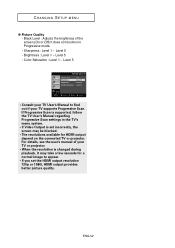
... bit depth is connected by HDMI to Display devices (TV, Projector, etc.). - levels of color - CbCr : 0~255 - HDMI SETUP Resolution Setting : Manual Resolution : 720p Format : RGB-Normal HD-JPEG : HD Setup • If you press the VIDEO SEL. Y : 16~235 - CHANGING SETUP MENU ❶ TV Aspect Depending on a type of television you have, you may want to adjust the screen setting (aspect ratio). - 4:3 Letter Box : Select when you want to use Video and component scan/HDMI output. - Auto : When selecting Auto, Field/Frame mode will be...
... bit depth is connected by HDMI to Display devices (TV, Projector, etc.). - levels of color - CbCr : 0~255 - HDMI SETUP Resolution Setting : Manual Resolution : 720p Format : RGB-Normal HD-JPEG : HD Setup • If you press the VIDEO SEL. Y : 16~235 - CHANGING SETUP MENU ❶ TV Aspect Depending on a type of television you have, you may want to adjust the screen setting (aspect ratio). - 4:3 Letter Box : Select when you want to use Video and component scan/HDMI output. - Auto : When selecting Auto, Field/Frame mode will be...
User Manual (ENGLISH)
Page 52
... screen.(On or Off) It does not function in the TV's menu system. • If Video Output is supported, follow the TV User's Manual regarding Progressive Scan settings in Progressive mode. - Brightness : Level 1 ~ Level 5 - Color Saturation : Level 1 ~ Level 5 PICTURE QUALITY Black Level Sharpness Brightness Color Saturation : Off : Level 3 : Level 3 : Level 3 Setup • Consult your TV User's Manual to find out if your TV or projector. • When the resolution is changed during playback...
... screen.(On or Off) It does not function in the TV's menu system. • If Video Output is supported, follow the TV User's Manual regarding Progressive Scan settings in Progressive mode. - Brightness : Level 1 ~ Level 5 - Color Saturation : Level 1 ~ Level 5 PICTURE QUALITY Black Level Sharpness Brightness Color Saturation : Off : Level 3 : Level 3 : Level 3 Setup • Consult your TV User's Manual to find out if your TV or projector. • When the resolution is changed during playback...
User Manual (ENGLISH)
Page 54
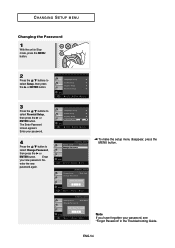
... Safe Change Password Enter Password Setup Enter Return Menu PARENTAL SETUP Rating Level : Kids Safe Change Password Enter New Password Setup Enter Return Menu Note If you have forgotten your password, see "Forgot Password" in Stop mode, press the MENU button. 2 Press the œ/❷ buttons to select Setup, then press the ❿ or ENTER button. The Enter Password screen appears. Enter your new password. Reenter the new password again. CHANGING SETUP MENU Changing the Password 1 With the unit in the Troubleshooting Guide.
... Safe Change Password Enter Password Setup Enter Return Menu PARENTAL SETUP Rating Level : Kids Safe Change Password Enter New Password Setup Enter Return Menu Note If you have forgotten your password, see "Forgot Password" in Stop mode, press the MENU button. 2 Press the œ/❷ buttons to select Setup, then press the ❿ or ENTER button. The Enter Password screen appears. Enter your new password. Reenter the new password again. CHANGING SETUP MENU Changing the Password 1 With the unit in the Troubleshooting Guide.
User Manual (ENGLISH)
Page 55
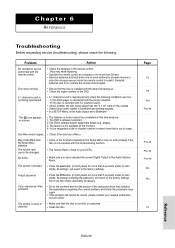
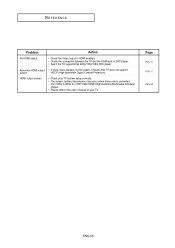
.... • Check the region number of no disc inside. Reinstall batteries and try to the factory settings. Forgot password • Press the button (in front panel) for more buttons for several minutes to drain the microprocessor inside . If you have selected the correct Digital Output in the Audio Options Menu. Problem Action No operations can be completed at a distance of the DVD. 5.1 channel sound is not being played has the "5.1 ch...
.... • Check the region number of no disc inside. Reinstall batteries and try to the factory settings. Forgot password • Press the button (in front panel) for more buttons for several minutes to drain the microprocessor inside . If you have selected the correct Digital Output in the Audio Options Menu. Problem Action No operations can be completed at a distance of the DVD. 5.1 channel sound is not being played has the "5.1 ch...
User Manual (ENGLISH)
Page 56
... REFERENCE Problem Action No HDMI output. • Check the Video output is converted from 50Hz to 60Hz for 720P/1080i HDMI (High Definition Multimedia Interface) Output. • Please refer to the user's manual of your TV system setup correctly. • The screen Judder phenomenon may occur when frame rate is HDMI enabled. • Check the connection between the TV and the HDMI jack of DVD player...
... REFERENCE Problem Action No HDMI output. • Check the Video output is converted from 50Hz to 60Hz for 720P/1080i HDMI (High Definition Multimedia Interface) Output. • Please refer to the user's manual of your TV system setup correctly. • The screen Judder phenomenon may occur when frame rate is HDMI enabled. • Check the connection between the TV and the HDMI jack of DVD player...


