Quick Guide (easy Manual) (ver.1.0) (English)
Page 1
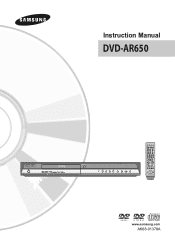
Instruction Manual DVD-AR650 www.samsung.com AK68-01378A
Instruction Manual DVD-AR650 www.samsung.com AK68-01378A
Quick Guide (easy Manual) (ver.1.0) (English)
Page 5
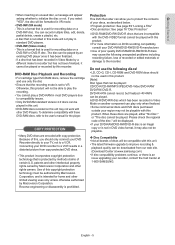
..."Locking a Title" • Disc-protection: See page 76 "Disc Protection" ✻ DVD-RAM/DVD-RW/DVD-R discs that is recorded in a distorted picture from our web site. (Download Center at www.samsung.com) • If disc compatibility problems continue, or there is an issue upgrading your TV... only when finalized. • Some commercial discs and DVD discs purchased outside your DVD-RAM/DVD-RW/DVD-R manufacturer. ✻ Use of the disc." will not be able to the user's manual for recording data on DVD recording compatibility, consult your region may not work with this unit...
..."Locking a Title" • Disc-protection: See page 76 "Disc Protection" ✻ DVD-RAM/DVD-RW/DVD-R discs that is recorded in a distorted picture from our web site. (Download Center at www.samsung.com) • If disc compatibility problems continue, or there is an issue upgrading your TV... only when finalized. • Some commercial discs and DVD discs purchased outside your DVD-RAM/DVD-RW/DVD-R manufacturer. ✻ Use of the disc." will not be able to the user's manual for recording data on DVD recording compatibility, consult your region may not work with this unit...

Quick Guide (easy Manual) (ver.1.0) (English)
Page 6
...of Cabinet 3 Disc Handling 3 Disc Storage 4 Disc Specifications 4 ■ General Features 8 ■ Before Reading the Instruction Manual 9 ■ How to use the DVD Recorder 9 ■ Unpacking 10 Accessories 10 Preparing the Remote Control 10 Tour of the Remote Control 12 ■ Description 13 Front ... a Digital Input Jack 25 ■ Step 5 : Connecting External Devices 26 Connecting a VCR, Cable box/Satellite receiver (set top box) or DVD Player to the AV 1 IN or S-VIDEO IN Jacks 26 Connecting a Camcorder 27 System Setup ■ On-Screen Menu Navigation 28 ■ ...
...of Cabinet 3 Disc Handling 3 Disc Storage 4 Disc Specifications 4 ■ General Features 8 ■ Before Reading the Instruction Manual 9 ■ How to use the DVD Recorder 9 ■ Unpacking 10 Accessories 10 Preparing the Remote Control 10 Tour of the Remote Control 12 ■ Description 13 Front ... a Digital Input Jack 25 ■ Step 5 : Connecting External Devices 26 Connecting a VCR, Cable box/Satellite receiver (set top box) or DVD Player to the AV 1 IN or S-VIDEO IN Jacks 26 Connecting a Camcorder 27 System Setup ■ On-Screen Menu Navigation 28 ■ ...
Quick Guide (easy Manual) (ver.1.0) (English)
Page 9
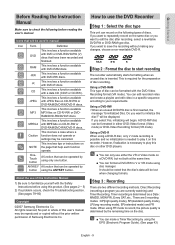
...recorder automatically starts formatting when an unused disc is needed to V or VR mode using this Instruction Manual 1) Be sure to check the following types of Samsung Electronics Co. Using a DVD-RAM This type of this product. (See pages 2 ~ 5) 2) If a problem occurs, check... the Troubleshooting section. (See pages 79~80) Copyright ©2007 Samsung Electronics Co. RAM/DVD-RW/DVD-R discs. OneTouch button A function that can format a DVD-RW to play this disc?" Using a DVD-RW • When an unused DVD-RW disc is determined as a Date : MM/DD, MON-FRI, Every...
...recorder automatically starts formatting when an unused disc is needed to V or VR mode using this Instruction Manual 1) Be sure to check the following types of Samsung Electronics Co. Using a DVD-RAM This type of this product. (See pages 2 ~ 5) 2) If a problem occurs, check... the Troubleshooting section. (See pages 79~80) Copyright ©2007 Samsung Electronics Co. RAM/DVD-RW/DVD-R discs. OneTouch button A function that can format a DVD-RW to play this disc?" Using a DVD-RW • When an unused DVD-RW disc is determined as a Date : MM/DD, MON-FRI, Every...
Quick Guide (easy Manual) (ver.1.0) (English)
Page 10
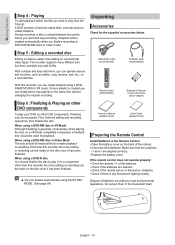
...of batteries according to enable playback on anything other DVD components, finalizing may be made on the disc once it on a component other than this recorder, you can create playlists using the EZ REC MODE. (See page 54) Instruction Manual (AK68-01378A) Quick Guide (AK68-01379A) ...▌Preparing the Remote Control Install Batteries in the Remote Control • Open the battery cover on DVD-R/DVD-RW discs in Video Mode The disc should be finalized &#...
...of batteries according to enable playback on anything other DVD components, finalizing may be made on the disc once it on a component other than this recorder, you can create playlists using the EZ REC MODE. (See page 54) Instruction Manual (AK68-01378A) Quick Guide (AK68-01379A) ...▌Preparing the Remote Control Install Batteries in the Remote Control • Open the battery cover on DVD-R/DVD-RW discs in Video Mode The disc should be finalized &#...

Quick Guide (easy Manual) (ver.1.0) (English)
Page 27
button on front of the DVD Recorder. (See page 49) ■ When an Input source is not selected automatically, press the INPUT SEL. Connecting & Setting Up ▌Connecting a Camcorder You can record from connected equipment, such as a camcorder by using the AV 2 IN or DV IN jacks on the remote control to select the DV Input. ■ Check your camcorder's owner's manual to see how to AV 2 automatically. ■ If the Input is inserted into AV 2 while watching TV, the Input will be switched to use the camcorder in this mode. English - 27
button on front of the DVD Recorder. (See page 49) ■ When an Input source is not selected automatically, press the INPUT SEL. Connecting & Setting Up ▌Connecting a Camcorder You can record from connected equipment, such as a camcorder by using the AV 2 IN or DV IN jacks on the remote control to select the DV Input. ■ Check your camcorder's owner's manual to see how to AV 2 automatically. ■ If the Input is inserted into AV 2 while watching TV, the Input will be switched to use the camcorder in this mode. English - 27

Quick Guide (easy Manual) (ver.1.0) (English)
Page 29
Setup Auto Clock Set Manual Clock Set Clock Set ► ► MOVE ENTER RETURN EXIT DVD-Recorder No Disc Timer Rec. Press the ▲▼ buttons to select Clock Set, then press the ENTER or ► button. 4. Select the time zone ... ENTER RETURN EXIT ■ If Time Zone is not set the time to select Daylight Saving, then press the ENTER or ► button. System Setup DVD-Recorder No Disc Timer Rec. With the unit in Stop mode, press the MENU button...
Setup Auto Clock Set Manual Clock Set Clock Set ► ► MOVE ENTER RETURN EXIT DVD-Recorder No Disc Timer Rec. Press the ▲▼ buttons to select Clock Set, then press the ENTER or ► button. 4. Select the time zone ... ENTER RETURN EXIT ■ If Time Zone is not set the time to select Daylight Saving, then press the ENTER or ► button. System Setup DVD-Recorder No Disc Timer Rec. With the unit in Stop mode, press the MENU button...

Quick Guide (easy Manual) (ver.1.0) (English)
Page 30
...numbers : 04/69 5% Stop Auto Channel Memory You can set the Antenna/Cable TV channel settings automatically. 1. Press the ▲▼ buttons to select Manual Clock Set, then press the ENTER or ► button. 5. With the unit in Stop mode, press the MENU button. 2. Press the ▲▼...9658; button. 3. Press the ▲▼ buttons to select the Current Date and Current Time, and then press the ENTER button. System Setup DVD-Recorder Manual Clock Set No Disc Timer Rec. Press the ▲▼ buttons to select Antenna/Cable TV, then press the ENTER or ► button....
...numbers : 04/69 5% Stop Auto Channel Memory You can set the Antenna/Cable TV channel settings automatically. 1. Press the ▲▼ buttons to select Manual Clock Set, then press the ENTER or ► button. 5. With the unit in Stop mode, press the MENU button. 2. Press the ▲▼...9658; button. 3. Press the ▲▼ buttons to select the Current Date and Current Time, and then press the ENTER button. System Setup DVD-Recorder Manual Clock Set No Disc Timer Rec. Press the ▲▼ buttons to select Antenna/Cable TV, then press the ENTER or ► button....

Quick Guide (easy Manual) (ver.1.0) (English)
Page 31
DVD-Recorder No Disc Timer Rec. With the unit in Auto Channel Memory. 6. or "Channel is added." System Setup English - 31 Use the Manual Channel Setting to select Add or Delete, then press the ENTER button. • The message "Channel is deleted." Press the ◄&#... the ▲▼ buttons to memorize or delete. Setup Channel Add/Delete Select channel : 2 Add Delete 0~9 NUMBER ENTER RETURN EXIT Manual Channel Set Manual Channel Set can be used to add channels not stored automatically due to weak signal strength. • Press the RETURN button to return to...
DVD-Recorder No Disc Timer Rec. With the unit in Auto Channel Memory. 6. or "Channel is added." System Setup English - 31 Use the Manual Channel Setting to select Add or Delete, then press the ENTER button. • The message "Channel is deleted." Press the ◄&#... the ▲▼ buttons to memorize or delete. Setup Channel Add/Delete Select channel : 2 Add Delete 0~9 NUMBER ENTER RETURN EXIT Manual Channel Set Manual Channel Set can be used to add channels not stored automatically due to weak signal strength. • Press the RETURN button to return to...
Quick Guide (easy Manual) (ver.1.0) (English)
Page 36
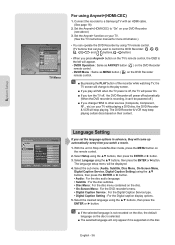
...ANYKEY button ( ) on the disc. etc) on your TV. (See the TV instruction manual for more information.) • You can operate the DVD Recorder by using the ▲▼ buttons, then press the ENTER or ► button...remote control, the OSD to the left will change HDMI to other sources (Composite, Component, RF... The DVD Recorder & VCR may keep playing certain discs based on the remote control. 2. Setup Language Audio Orig:...or ► button. 3. Set the Anynet+(HDMI-CEC) to a Samsung TV with an HDMI cable. (See page 18) 2. The language setup menu will stop playing.
...ANYKEY button ( ) on the disc. etc) on your TV. (See the TV instruction manual for more information.) • You can operate the DVD Recorder by using the ▲▼ buttons, then press the ENTER or ► button...remote control, the OSD to the left will change HDMI to other sources (Composite, Component, RF... The DVD Recorder & VCR may keep playing certain discs based on the remote control. 2. Setup Language Audio Orig:...or ► button. 3. Set the Anynet+(HDMI-CEC) to a Samsung TV with an HDMI cable. (See page 18) 2. The language setup menu will stop playing.
Quick Guide (easy Manual) (ver.1.0) (English)
Page 54
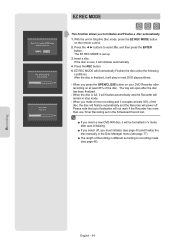
... and then press the ENTER button. Otherwise press "Off" On Off Disc Initialize (DVD-V) Now, initializing.. 50% Disc Finalize Processing.. 50% This function allows you must initialize (see page 45) and finalize the disc manually in stop mode. - Press the REC button. 5. When you press the OPEN/...CLOSE button on your DVD Recorder after recording on the remote control. 2. The EZ REC MODE is new, it will &#...
... and then press the ENTER button. Otherwise press "Off" On Off Disc Initialize (DVD-V) Now, initializing.. 50% Disc Finalize Processing.. 50% This function allows you must initialize (see page 45) and finalize the disc manually in stop mode. - Press the REC button. 5. When you press the OPEN/...CLOSE button on your DVD Recorder after recording on the remote control. 2. The EZ REC MODE is new, it will &#...
Quick Guide (easy Manual) (ver.1.0) (English)
Page 80
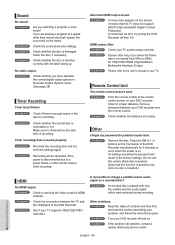
...with only the subtitle and the audio signal which were selected during recording. Checkpoint 3 If the problem still persists, contact a nearby Samsung service center. Check whether the disc is enough space in the disc for 720p/1080i HDMI (High Definition Multimedia Interface)...recording time and the end time settings again. Checkpoint 1 Check to 60Hz for recording. Checkpoint 3 See if your DVD recorder. Checkpoint 3 Please refer to the user's manual of recording. Checkpoint 1 Point the remote control at a speed other similar reason, while recording. All settings including ...
...with only the subtitle and the audio signal which were selected during recording. Checkpoint 3 If the problem still persists, contact a nearby Samsung service center. Check whether the disc is enough space in the disc for 720p/1080i HDMI (High Definition Multimedia Interface)...recording time and the end time settings again. Checkpoint 1 Check to 60Hz for recording. Checkpoint 3 See if your DVD recorder. Checkpoint 3 Please refer to the user's manual of recording. Checkpoint 1 Point the remote control at a speed other similar reason, while recording. All settings including ...


