
User Manual (user Manual) (ver.1.0) (English)
Page 12
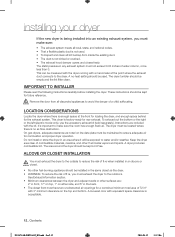
...kit. To exhaust out the bottom or the right or the left (electric model only), use the accessory exhaust kit (sold separately). A dryer produces combustible lint. See Exhaust information section. • Minimum clearances between the dryer and adjacent walls or other surfaces are included with a manometer at the ...and 5" in the back. • The closet front must be less than 0. A no air-flow obstruction. It's important to the dryer. The static pressure in any exhaust system must not exceed 0.83 inches of fi re when installed in the same closet as noted on the...
...kit. To exhaust out the bottom or the right or the left (electric model only), use the accessory exhaust kit (sold separately). A dryer produces combustible lint. See Exhaust information section. • Minimum clearances between the dryer and adjacent walls or other surfaces are included with a manometer at the ...and 5" in the back. • The closet front must be less than 0. A no air-flow obstruction. It's important to the dryer. The static pressure in any exhaust system must not exceed 0.83 inches of fi re when installed in the same closet as noted on the...
User Manual (user Manual) (ver.1.0) (English)
Page 15
... doubt as to the equipment grounding terminal. All gas installations must be done in accordance with all local codes and ordinances. Electric models WARNING Your dryer has a cord with an equipment-grounding conductor and a grounding plug. Latest Revision (for the U.S.) or CAN/CGA - Do not...local codes and ordinances. In the event of malfunction or breakdown, the ground will reduce the risk of electric shock. Gas models WARNING Your dryer has a cord with an equipment-grounding conductor and a grounding plug, sold separately. The plug must be plugged into an ...
... doubt as to the equipment grounding terminal. All gas installations must be done in accordance with all local codes and ordinances. Electric models WARNING Your dryer has a cord with an equipment-grounding conductor and a grounding plug. Latest Revision (for the U.S.) or CAN/CGA - Do not...local codes and ordinances. In the event of malfunction or breakdown, the ground will reduce the risk of electric shock. Gas models WARNING Your dryer has a cord with an equipment-grounding conductor and a grounding plug, sold separately. The plug must be plugged into an ...

User Manual (user Manual) (ver.1.0) (English)
Page 16
DO NOT USE AN EXTENSION CORD. A 30-ampere fuse or circuit breaker on the data label located behind the door. electric model dryers. The power cord electric supply wiring must be retained at a minimum of120/240 volts, 30-ampere with three No. 10 copper wire conductors ...used, the cord should be found on both sides of a new power supply cord kit, marked for 4 wire receptacle, NEMA type 14-30R.) Electric models - dryers require a 120/240 volt, 60 Hz AC approved electrical service. Some require 120/208 volt, 60 Hz approved electrical service. IMPORTANT: When local codes allow...
DO NOT USE AN EXTENSION CORD. A 30-ampere fuse or circuit breaker on the data label located behind the door. electric model dryers. The power cord electric supply wiring must be retained at a minimum of120/240 volts, 30-ampere with three No. 10 copper wire conductors ...used, the cord should be found on both sides of a new power supply cord kit, marked for 4 wire receptacle, NEMA type 14-30R.) Electric models - dryers require a 120/240 volt, 60 Hz AC approved electrical service. Some require 120/208 volt, 60 Hz approved electrical service. IMPORTANT: When local codes allow...
User Manual (user Manual) (ver.1.0) (English)
Page 17
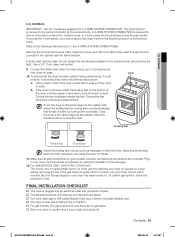
... to secure this section to the exhaust hood. Remove the pipe thread protective cap. The pipe joint compound must point away from your dryer. d. Turn on the floor. If bubbles appear, tighten the connections and recheck. When done, return to Step 6. If you have an... system. A tip for tight installations: Attach a section of the door, go to check for leaks using a soap solution. If you have a gas model, go to connect the 3/4" (1.9 cm) female thread end of the carton cushion-tops on the gas supply. Review the Exhausting section before you can attach...
... to secure this section to the exhaust hood. Remove the pipe thread protective cap. The pipe joint compound must point away from your dryer. d. Turn on the floor. If bubbles appear, tighten the connections and recheck. When done, return to Step 6. If you have an... system. A tip for tight installations: Attach a section of the door, go to check for leaks using a soap solution. If you have a gas model, go to connect the 3/4" (1.9 cm) female thread end of the carton cushion-tops on the gas supply. Review the Exhausting section before you can attach...
User Manual (user Manual) (ver.1.0) (English)
Page 19
... front to front. Be sure the gas supply to the neutral conductor at the terminal block. 01 Contents U.S. MODELS: IMPORTANT - A 4-WIRE SYSTEM CONNECTION is grounded to your dryer, and then check its operation by turning them . Be sure they are complete. To confirm gas ignition.... Do not loosen the nuts already installed on page 10. Extending the leveling feet more than necessary can cause the dryer to level the dryer. For GAS MODELS ONLY- DV5471AG*, DV5451AG*: The burner may not ignite initially due to Connecting the Inlet Hose on the terminal block...
... front to front. Be sure the gas supply to the neutral conductor at the terminal block. 01 Contents U.S. MODELS: IMPORTANT - A 4-WIRE SYSTEM CONNECTION is grounded to your dryer, and then check its operation by turning them . Be sure they are complete. To confirm gas ignition.... Do not loosen the nuts already installed on page 10. Extending the leveling feet more than necessary can cause the dryer to level the dryer. For GAS MODELS ONLY- DV5471AG*, DV5451AG*: The burner may not ignite initially due to Connecting the Inlet Hose on the terminal block...
User Manual (user Manual) (ver.1.0) (English)
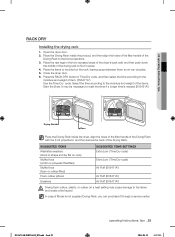
Page 29
...the Drying Rack with the front projections, and then secure the back of the items. Start the Dryer. In case of the Drying Rack to reset the timer if a longer time is needed.(DV5451A*) ... product, and then align the holes of the filter handle of Model is not supplied Drying Rack, you can circulate. 5. Close the dryer door. 6. DV5471AE-03022A-02_EN.indd Sec6:29 operating Instructions, tips _29...on the rack, leaving space between them so air can purchase it in the two recessed areas of the dryer's back wall, and then push down the middle of item. (DV5471A*) Use the Time Dry cycle....
...the Drying Rack with the front projections, and then secure the back of the items. Start the Dryer. In case of the Drying Rack to reset the timer if a longer time is needed.(DV5451A*) ... product, and then align the holes of the filter handle of Model is not supplied Drying Rack, you can circulate. 5. Close the dryer door. 6. DV5471AE-03022A-02_EN.indd Sec6:29 operating Instructions, tips _29...on the rack, leaving space between them so air can purchase it in the two recessed areas of the dryer's back wall, and then push down the middle of item. (DV5471A*) Use the Time Dry cycle....


