
User Manual (user Manual) (ver.1.0) (English)
Page 9
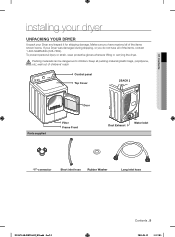
To prevent personal injury or strain, wear protective gloves whenever lifting or carrying the dryer. Keep all of the items shown below. Packing materials can be dangerous to children. Make sure you do not have received all packing material (plastic ... "Y"-connector Short inlet hose Rubber Washer Long inlet hose DV5471AE-03022A-02_EN.indd Sec2:9 Contents _9 2011-04-12 11:37:03 If your Dryer and inspect it for shipping damage. 01 Contents installing your dryer UNPACKING YOUR DRYER Unpack your Dryer was damaged during shipping, or you have all of the items, contact 1-800...
To prevent personal injury or strain, wear protective gloves whenever lifting or carrying the dryer. Keep all of the items shown below. Packing materials can be dangerous to children. Make sure you do not have received all packing material (plastic ... "Y"-connector Short inlet hose Rubber Washer Long inlet hose DV5471AE-03022A-02_EN.indd Sec2:9 Contents _9 2011-04-12 11:37:03 If your Dryer and inspect it for shipping damage. 01 Contents installing your dryer UNPACKING YOUR DRYER Unpack your Dryer was damaged during shipping, or you have all of the items, contact 1-800...
User Manual (user Manual) (ver.1.0) (English)
Page 11
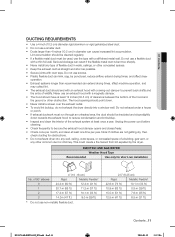
01 Contents DUCTING REQUIREMENTS • Use a 4-inch (10.2 cm) diameter rigid aluminum or...use screws. • Plastic flexible duct can kink, sag, be punctured, reduce airflow, extend drying times, and affect dryer operation. • Exhaust systems longer than 4 inches (10.2 cm) in walls, ceilings, or other concealed spaces. • Keep the ...• Never install a screen over the exhaust outlet. • To avoid lint buildup, do not exhaust the dryer directly into any other obstruction. Note: If clothes are not getting dry, then check ducting for short-run through an...
01 Contents DUCTING REQUIREMENTS • Use a 4-inch (10.2 cm) diameter rigid aluminum or...use screws. • Plastic flexible duct can kink, sag, be punctured, reduce airflow, extend drying times, and affect dryer operation. • Exhaust systems longer than 4 inches (10.2 cm) in walls, ceilings, or other concealed spaces. • Keep the ...• Never install a screen over the exhaust outlet. • To avoid lint buildup, do not exhaust the dryer directly into any other obstruction. Note: If clothes are not getting dry, then check ducting for short-run through an...
User Manual (user Manual) (ver.1.0) (English)
Page 13
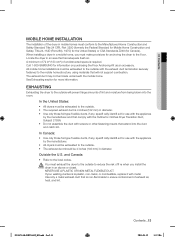
...64257; cally identifi ed for information on purchasing the Floor Anchoring Kit as an accessory. Call 1-800-SAMSUNG for use with the appliance by the manufacturer. • All dryers must be exhausted to the outside. • The exhaust duct should be exhausted to the outside . •...home installations must be 4 inches (102 mm) in diameter. You must exhaust the dryer to the outside will not support combustion. 01 Contents MOBILE HOME INSTALLATION The installation of the dryer in mobile homes must conform to the Manufactured Home Construction and Safety Standard Title 24 CFR...
...64257; cally identifi ed for information on purchasing the Floor Anchoring Kit as an accessory. Call 1-800-SAMSUNG for use with the appliance by the manufacturer. • All dryers must be exhausted to the outside. • The exhaust duct should be exhausted to the outside . •...home installations must be 4 inches (102 mm) in diameter. You must exhaust the dryer to the outside will not support combustion. 01 Contents MOBILE HOME INSTALLATION The installation of the dryer in mobile homes must conform to the Manufactured Home Construction and Safety Standard Title 24 CFR...
User Manual (user Manual) (ver.1.0) (English)
Page 15
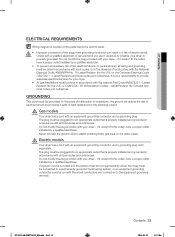
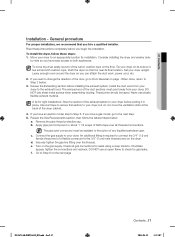
...(for the U.S.) or CAN/CGA - if it doesn't fit the outlet, have a proper outlet installed by a qualified electrician. 01 Contents ELECTRICAL REQUIREMENTS Wiring diagram is located on the plate below the control panel. • WARNING • • Improper connection of the equipment grounding...and grounded in the absence of fire, electrical shock, or personal injury, all wiring and grounding must be run with your dryer - Do not modify the plug provided with the National Electrical Code, ANSI/NFPA No. 70-Latest Revision (for your responsibility to ...
...(for the U.S.) or CAN/CGA - if it doesn't fit the outlet, have a proper outlet installed by a qualified electrician. 01 Contents ELECTRICAL REQUIREMENTS Wiring diagram is located on the plate below the control panel. • WARNING • • Improper connection of the equipment grounding...and grounded in the absence of fire, electrical shock, or personal injury, all wiring and grounding must be run with your dryer - Do not modify the plug provided with the National Electrical Code, ANSI/NFPA No. 70-Latest Revision (for your responsibility to ...
User Manual (user Manual) (ver.1.0) (English)
Page 17
... These joints should be resistant to the next step. 5. If you have a gas model, go to Door Reversal on the dryer. Review the Gas Requirements section, then follow these instructions completely before you hire a qualified installer. An additional fi...dryer. Apply pipe joint compound or about 1 1/2 wraps of the carton cushion-tops on tape over the threads. If bubbles appear, tighten the connections and recheck. Connect the gas supply to Step 6 on the gas supply. General procedure For proper installation, we recommend that it in place. e. 01...
... These joints should be resistant to the next step. 5. If you have a gas model, go to Door Reversal on the dryer. Review the Gas Requirements section, then follow these instructions completely before you hire a qualified installer. An additional fi...dryer. Apply pipe joint compound or about 1 1/2 wraps of the carton cushion-tops on tape over the threads. If bubbles appear, tighten the connections and recheck. Connect the gas supply to Step 6 on the gas supply. General procedure For proper installation, we recommend that it in place. e. 01...
User Manual (user Manual) (ver.1.0) (English)
Page 19
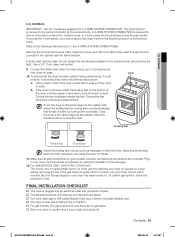
... block. Insert the power cord with a UL-listed strain relief through neutral. Use a 3/8" (1cm) deep well socket. 9. Plug in your dryer has been turned on page 10. All U.S. Do not loosen the nuts already installed on gas models), exhaust, and electrical connections are taped. †...the same height as necessary to operate on the bottom of the dryer until the washer is required for a 3-WIRE SYSTEM CONNECTION. 01 Contents U.S. If the gas does not ignite within 5 minutes, turn your dryer to level the dryer. A 4-WIRE SYSTEM CONNECTION is level side to side and back...
... block. Insert the power cord with a UL-listed strain relief through neutral. Use a 3/8" (1cm) deep well socket. 9. Plug in your dryer has been turned on page 10. All U.S. Do not loosen the nuts already installed on gas models), exhaust, and electrical connections are taped. †...the same height as necessary to operate on the bottom of the dryer until the washer is required for a 3-WIRE SYSTEM CONNECTION. 01 Contents U.S. If the gas does not ignite within 5 minutes, turn your dryer to level the dryer. A 4-WIRE SYSTEM CONNECTION is level side to side and back...
User Manual (user Manual) (ver.1.0) (English)
Page 21
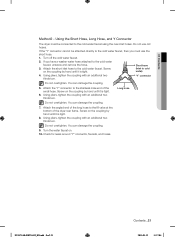
Using the Short Hose, Long Hose, and Y Connector The dryer must be attached directly to the cold water faucet, then you have a washer water hose attached to the cold water faucet using the new inlet ... cold water) 4. Attach the 'Y" connector to the fill valve at the bottom of the small hose. Check for leaks around "Y" connector, faucets, and hoses. 01 Contents Method2 - You can damage the coupling. 9. Long hose Do not overtighten. Attach the angled end of the long hose to the stainless male end...
Using the Short Hose, Long Hose, and Y Connector The dryer must be attached directly to the cold water faucet, then you have a washer water hose attached to the cold water faucet using the new inlet ... cold water) 4. Attach the 'Y" connector to the fill valve at the bottom of the small hose. Check for leaks around "Y" connector, faucets, and hoses. 01 Contents Method2 - You can damage the coupling. 9. Long hose Do not overtighten. Attach the angled end of the long hose to the stainless male end...

