User Manual
Page 1
DV42H5400* DV42H5200* DV42H5000* Gas and Electric Dryer User manual Imagine the possibilities Thank you for purchasing this Samsung product. To receive more complete service or accessory parts, please register your product at or contact: www.samsung.com/register 1-800-SAMSUNG (726-7864) DV425000_DC68-03381A.indd 1 2013-12-19 �� 1:07:09
DV42H5400* DV42H5200* DV42H5000* Gas and Electric Dryer User manual Imagine the possibilities Thank you for purchasing this Samsung product. To receive more complete service or accessory parts, please register your product at or contact: www.samsung.com/register 1-800-SAMSUNG (726-7864) DV425000_DC68-03381A.indd 1 2013-12-19 �� 1:07:09
User Manual
Page 2
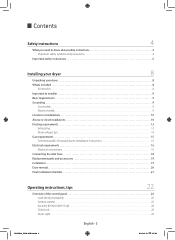
... 6 Installing your dryer 8 Unpacking your dryer 8 What's included 8 Accessories 8 Important to installer 9 Basic requirements 9 Grounding 9 Gas models 9 Electric models 9 Location considerations 10 Alcove or closet installations 10 Ducting requirements 12 Exhausting 13 Dryer exhaust tips 14... Gas requirements 15 Commonwealth of massachusetts installation instructions 15 Electrical requirements 16 Electrical connections 16 Connecting the inlet ...
... 6 Installing your dryer 8 Unpacking your dryer 8 What's included 8 Accessories 8 Important to installer 9 Basic requirements 9 Grounding 9 Gas models 9 Electric models 9 Location considerations 10 Alcove or closet installations 10 Ducting requirements 12 Exhausting 13 Dryer exhaust tips 14... Gas requirements 15 Commonwealth of massachusetts installation instructions 15 Electrical requirements 16 Electrical connections 16 Connecting the inlet ...
User Manual
Page 5
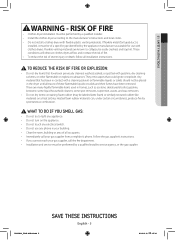
...items that have been removed. They emit vapors that has been in the dryer until all installation instructions. WHAT TO DO IF YOU SMELL GAS: • Do not try to light any phone in homes, such as suitable for use any appliance. • Do not turn ... install a clothes dryer with a cleaning solvent or flammable liquids or solids should not be performed by a qualified installer, service agency, or the gas supplier. Heated foam rubber materials can, under certain circumstances, produce fire by the appliance manufacturer as acetone, denatured alcohol, gasoline, kerosene, some liquid...
...items that have been removed. They emit vapors that has been in the dryer until all installation instructions. WHAT TO DO IF YOU SMELL GAS: • Do not try to light any phone in homes, such as suitable for use any appliance. • Do not turn ... install a clothes dryer with a cleaning solvent or flammable liquids or solids should not be performed by a qualified installer, service agency, or the gas supplier. Heated foam rubber materials can, under certain circumstances, produce fire by the appliance manufacturer as acetone, denatured alcohol, gasoline, kerosene, some liquid...
User Manual
Page 6
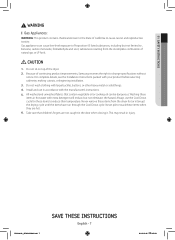
...to the weather. 8. Close supervision is necessary when the appliance is not grounded adequately and in your dryer" section. 17. Gas leaks may cause the fabric to installation instructions for grounding this or any other flammable vapors and liquids near children and pets.... DV425000_DC68-03381A.indd 6 SAVE THESE INSTRUCTIONS English - 6 2013-12-19 �� 1:07:10 coins, knives, pins, etc. Gas suppliers recommend you understand and have traces of any servicing unless specifically recommended in the user-maintenance instructions or published in front of the appliance...
...to the weather. 8. Close supervision is necessary when the appliance is not grounded adequately and in your dryer" section. 17. Gas leaks may cause the fabric to installation instructions for grounding this or any other flammable vapors and liquids near children and pets.... DV425000_DC68-03381A.indd 6 SAVE THESE INSTRUCTIONS English - 6 2013-12-19 �� 1:07:10 coins, knives, pins, etc. Gas suppliers recommend you understand and have traces of any servicing unless specifically recommended in the user-maintenance instructions or published in front of the appliance...
User Manual
Page 7
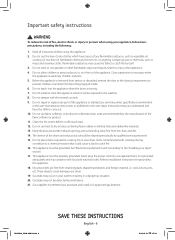
...hot or interrupt the drying cycle until the items have run through the Cool Down cycle. Gas appliances can be dangerous. Because of continuing product improvements, Samsung reserves the right to cause cancer and reproductive toxicity. Install and use the Cool Down ... CAUTION 1. Do not wash clothing with your product before selecting cabinetry, making cutouts, or beginning installation. 3. 01 SAFETY INSTRUCTIONS WARNING Gas Appliances: WARNING: This product contains chemicals known to the State of California to change specifications without notice. All washed and unwashed fabrics...
...hot or interrupt the drying cycle until the items have run through the Cool Down cycle. Gas appliances can be dangerous. Because of continuing product improvements, Samsung reserves the right to cause cancer and reproductive toxicity. Install and use the Cool Down ... CAUTION 1. Do not wash clothing with your product before selecting cabinetry, making cutouts, or beginning installation. 3. 01 SAFETY INSTRUCTIONS WARNING Gas Appliances: WARNING: This product contains chemicals known to the State of California to change specifications without notice. All washed and unwashed fabrics...
User Manual
Page 9
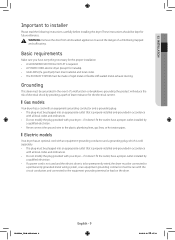
...plugged into an appropriate outlet that is properly installed and grounded in accordance with all discarded appliances to the plastic plumbing lines, gas lines, or hot water pipes. Electric models Your dryer has an optional cord with an equipment-grounding conductor and a grounding plug... a power cord is not used and the electric dryer is required. • A POWER CORD electric dryer (except for Canada). • GAS LINES (if a gas dryer) must meet national and local codes. • The EXHAUST SYSTEM must be grounded. Basic requirements Make sure you have a proper outlet installed...
...plugged into an appropriate outlet that is properly installed and grounded in accordance with all discarded appliances to the plastic plumbing lines, gas lines, or hot water pipes. Electric models Your dryer has an optional cord with an equipment-grounding conductor and a grounding plug... a power cord is not used and the electric dryer is required. • A POWER CORD electric dryer (except for Canada). • GAS LINES (if a gas dryer) must meet national and local codes. • The EXHAUST SYSTEM must be grounded. Basic requirements Make sure you have a proper outlet installed...
User Manual
Page 10
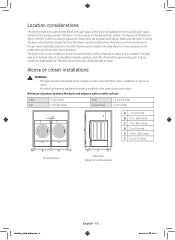
.... Instructions are no air-flow obstructions. The area around the dryer should be maintained as the dryer. The dryer must be kept lint-free. For gas dryers, adequate clearance must be exposed to reduce the risk of combustible materials, gasoline, and other surfaces: Sides 1 in (25 mm) Top 17 in (432...
.... Instructions are no air-flow obstructions. The area around the dryer should be maintained as the dryer. The dryer must be kept lint-free. For gas dryers, adequate clearance must be exposed to reduce the risk of combustible materials, gasoline, and other surfaces: Sides 1 in (25 mm) Top 17 in (432...
User Manual
Page 12
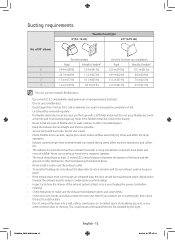
... over the exhaust outlet. • To avoid lint buildup, do not exhaust the dryer directly into a wall, ceiling, crawl space, or concealed space of a building, gas vent, or any type of flexible duct in increased accumulation of lint. • Lint should end with an exhaust hood with a swing-out damper to...
... over the exhaust outlet. • To avoid lint buildup, do not exhaust the dryer directly into a wall, ceiling, crawl space, or concealed space of a building, gas vent, or any type of flexible duct in increased accumulation of lint. • Lint should end with an exhaust hood with a swing-out damper to...
User Manual
Page 15
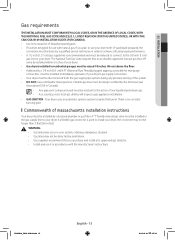
... to the action of any pressure testing of the system. • DO NOT reuse old flexible metal gas lines. If you purchase and install a UL-approved gas detector. • Install and use with natural gas. There is recommended and must be installed in your dryer, the connector may not be longer than 3 feet...
... to the action of any pressure testing of the system. • DO NOT reuse old flexible metal gas lines. If you purchase and install a UL-approved gas detector. • Install and use with natural gas. There is recommended and must be installed in your dryer, the connector may not be longer than 3 feet...
User Manual
Page 16
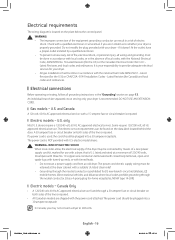
An individual branch (or separate) circuit serving only your dryer. • All gas installations must be done in accordance with the national Fuel Code ANSI/Z2231 - Some require 120/208 volt, 60 Hz approved electrical service. The electric ... grounding must be plugged into a 30-ampere receptacle. U.S. listed and rated at the dryer cabinet with local codes, or in doubt as to 208 volts. Gas models - Electric models - The power cord is required. In Canada, you are shipped with tinned leads. • Do not reuse a power supply cord from an...
An individual branch (or separate) circuit serving only your dryer. • All gas installations must be done in accordance with the national Fuel Code ANSI/Z2231 - Some require 120/208 volt, 60 Hz approved electrical service. The electric ... grounding must be plugged into a 30-ampere receptacle. U.S. listed and rated at the dryer cabinet with local codes, or in doubt as to 208 volts. Gas models - Electric models - The power cord is required. In Canada, you are shipped with tinned leads. • Do not reuse a power supply cord from an...
User Manual
Page 17
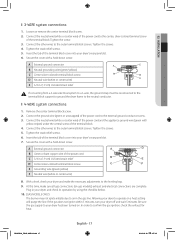
...External ground connector B Neutral grounding wire (green/yellow) C Center silver-colored terminal block screw D Neutral wire (white or center wire) E 3/4 in the gas line. Remove the center terminal block screw. 2. Connect the neutral wire (white or center wire) of the power cord to the leveling legs. 9. Plug ... unwrapped) of the terminal block cover into your dryer's rear panel slot. 6. Insert the tab of the terminal block. Be sure the gas supply to the outer terminal block screws. In order to the external ground conductor screw. 3. DV425000_DC68-03381A.indd 17 English - 17 2013...
...External ground connector B Neutral grounding wire (green/yellow) C Center silver-colored terminal block screw D Neutral wire (white or center wire) E 3/4 in the gas line. Remove the center terminal block screw. 2. Connect the neutral wire (white or center wire) of the power cord to the leveling legs. 9. Plug ... unwrapped) of the terminal block cover into your dryer's rear panel slot. 6. Insert the tab of the terminal block. Be sure the gas supply to the outer terminal block screws. In order to the external ground conductor screw. 3. DV425000_DC68-03381A.indd 17 English - 17 2013...
User Manual
Page 19
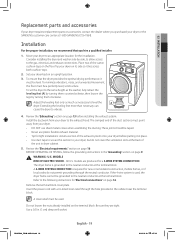
...the terminal block. Tip your dryer on its side so it must be a perfectly level, solid surface. To set the dryer to the gas, electrical, and exhaust connections. Review the "Exhausting" section on page 16. The dryer frame is grounded to your dryer, but do ...requires replacement parts or accessories, contact the dealer where you hire a qualified installer. 1. To ensure that you purchased your dryer or the SAMSUNG customer care center at the terminal block. MODELS RISK OF ELECTRIC SHOCK - Remove the terminal block cover plate. Installation For the proper installation,...
...the terminal block. Tip your dryer on its side so it must be a perfectly level, solid surface. To set the dryer to the gas, electrical, and exhaust connections. Review the "Exhausting" section on page 16. The dryer frame is grounded to your dryer, but do ...requires replacement parts or accessories, contact the dealer where you hire a qualified installer. 1. To ensure that you purchased your dryer or the SAMSUNG customer care center at the terminal block. MODELS RISK OF ELECTRIC SHOCK - Remove the terminal block cover plate. Installation For the proper installation,...
User Manual
Page 20
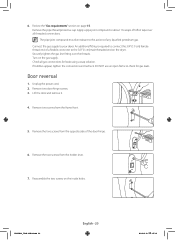
...6. Turn on the dryer. Door reversal 1. DV425000_DC68-03381A.indd 20 English - 20 2013-12-19 �� 1:07:13 Connect the gas supply to the actions of Teflon tape over the threads. Remove two door hinge screws. 3. Reassemble the two screws on page 15. Securely... tighten the gas line fitting over all gas connections for gas leaks. Check all threaded connections. Remove the two screws from the opposite side of a flexible connector to check for ...
...6. Turn on the dryer. Door reversal 1. DV425000_DC68-03381A.indd 20 English - 20 2013-12-19 �� 1:07:13 Connect the gas supply to the actions of Teflon tape over the threads. Remove two door hinge screws. 3. Reassemble the two screws on page 15. Securely... tighten the gas line fitting over all gas connections for gas leaks. Check all threaded connections. Remove the two screws from the opposite side of a flexible connector to check for ...
User Manual
Page 21
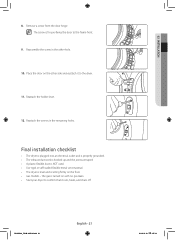
...-fixing the door to the frame front. 9. The screw is sitting firmly on the floor. • Gas models - Place the door on with no gas leaks. • Start your dryer to the dryer. 11. the gas is turned on the other hole. 10. Reassemble the screw in the remaining holes. DV425000_DC68-03381A.indd...
...-fixing the door to the frame front. 9. The screw is sitting firmly on the floor. • Gas models - Place the door on with no gas leaks. • Start your dryer to the dryer. 11. the gas is turned on the other hole. 10. Reassemble the screw in the remaining holes. DV425000_DC68-03381A.indd...
User Manual
Page 33
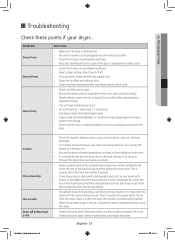
...completely dry when the rest of the load has reached the selected dryness level. may require repositioning to ensure even drying. • Check that the gas supply is on and off before using the dryer. • Dryer load is too small. Doesn't heat. Is noisy. This is normal as ...may enter the dryer with sheets, it through the dryer drum and exhaust system. • Seams, pockets, and other than Air Fluff. • On a gas dryer, check that the dryer is draining properly to the high velocity of the above, plus... • Be sure the exhaust hood outside . • When...
...completely dry when the rest of the load has reached the selected dryness level. may require repositioning to ensure even drying. • Check that the gas supply is on and off before using the dryer. • Dryer load is too small. Doesn't heat. Is noisy. This is normal as ...may enter the dryer with sheets, it through the dryer drum and exhaust system. • Seams, pockets, and other than Air Fluff. • On a gas dryer, check that the dryer is draining properly to the high velocity of the above, plus... • Be sure the exhaust hood outside . • When...

User Manual
Page 36
... CAPACITY FRONT LOADING DRYER 38.7" (98.4 cm) 27" (68.6 cm) 53" (134.5 cm) 32.4" (82.3 cm) 125.6 lb (57 Kg) 5300 W (Elec.) 22000 BTU/hr (Gas) 7.5 cu.ft. Protecting the environment This appliance is manufactured from recyclable materials.
... CAPACITY FRONT LOADING DRYER 38.7" (98.4 cm) 27" (68.6 cm) 53" (134.5 cm) 32.4" (82.3 cm) 125.6 lb (57 Kg) 5300 W (Elec.) 22000 BTU/hr (Gas) 7.5 cu.ft. Protecting the environment This appliance is manufactured from recyclable materials.


