
User Manual
Page 1
DV455* Gas and Electric Dryer user manual This manual is made with 100% recycled paper. To receive more complete service or accessory parts, please register your product at or contact www.samsung.com/register 1-800-SAMSUNG (726-7864) DV455_02836F-08_EN.indd 1 2013-12-12 5:11:49 imagine the possibilities Thank you for purchasing this Samsung product.
DV455* Gas and Electric Dryer user manual This manual is made with 100% recycled paper. To receive more complete service or accessory parts, please register your product at or contact www.samsung.com/register 1-800-SAMSUNG (726-7864) DV455_02836F-08_EN.indd 1 2013-12-12 5:11:49 imagine the possibilities Thank you for purchasing this Samsung product.

User Manual
Page 2
... 11 Ducting requirements 12 Important to installer 13 Location considerations 13 Alcove or closet installations 15 Exhausting 16 Gas requirements 16 Commonwealth of massachusetts installation instructions 17 Electrical requirements 17 Grounding 18 Electrical connections 19 Connecting the inlet hose 21 Replacement parts and accessories 21 Installation 24 Final installation checklist 24 Dryer exhaust tips 25 Door Reversal OPERATING INSTRUCTIONS, TIPS 27 27 Overview of the control panel 32 Rack Dry 33 Clean the lint filter 33 Load the dryer properly 33 Getting started 34 Vent Sensor...
... 11 Ducting requirements 12 Important to installer 13 Location considerations 13 Alcove or closet installations 15 Exhausting 16 Gas requirements 16 Commonwealth of massachusetts installation instructions 17 Electrical requirements 17 Grounding 18 Electrical connections 19 Connecting the inlet hose 21 Replacement parts and accessories 21 Installation 24 Final installation checklist 24 Dryer exhaust tips 25 Door Reversal OPERATING INSTRUCTIONS, TIPS 27 27 Overview of the control panel 32 Rack Dry 33 Clean the lint filter 33 Load the dryer properly 33 Getting started 34 Vent Sensor...
User Manual
Page 5
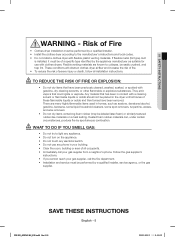
...'s instructions and local codes. • Do not install a clothes dryer with gasoline, dry cleaning solvents, or other flammable or explosive substances. There are known to light any appliance. • Do not turn on a heat setting. If flexible metal (foil type) duct is installed, it must be of Fire • Clothes dryer installation must be easily crushed, and trap lint. WARNING WHAT TO DO IF YOU SMELL GAS: •...
...'s instructions and local codes. • Do not install a clothes dryer with gasoline, dry cleaning solvents, or other flammable or explosive substances. There are known to light any appliance. • Do not turn on a heat setting. If flexible metal (foil type) duct is installed, it must be of Fire • Clothes dryer installation must be easily crushed, and trap lint. WARNING WHAT TO DO IF YOU SMELL GAS: •...
User Manual
Page 6
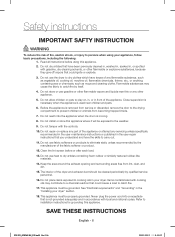
... the fabric softener or product. 12. Clean the lint screen before using your appliance, follow basic precautions, including the following: 1. Do not use the dryer to dry clothes which have been previously cleaned in, washed in, soaked in the user-repair instructions that could ignite or explode. 3. Never plug the power cord into the appliance when the drum is used near this or any other flammable...
... the fabric softener or product. 12. Clean the lint screen before using your appliance, follow basic precautions, including the following: 1. Do not use the dryer to dry clothes which have been previously cleaned in, washed in, soaked in the user-repair instructions that could ignite or explode. 3. Never plug the power cord into the appliance when the drum is used near this or any other flammable...

User Manual
Page 11
... flexible duct in diameter can extend drying times, affect machine operations, and collect lint. • The exhaust duct should be removed regularly. • If a flexible metal duct must be insulated and slope slightly down . • Never install a screen over the exhaust outlet. • To avoid lint buildup, do not exhaust the dryer directly into a window well. The hood opening should be used, use a flexible duct with duct tape. English...
... flexible duct in diameter can extend drying times, affect machine operations, and collect lint. • The exhaust duct should be removed regularly. • If a flexible metal duct must be insulated and slope slightly down . • Never install a screen over the exhaust outlet. • To avoid lint buildup, do not exhaust the dryer directly into a window well. The hood opening should be used, use a flexible duct with duct tape. English...

User Manual
Page 12
... INSTALLER Please read the following instructions carefully before cleaning. • Check frequently to make sure: • The exhaust system meets all local, state, and national codes. • That a flexible plastic duct is not used . These instructions should be kept for future reference. ELECTRIC AND GAS DRYER Weather Hood Type Recommended Use only for short-run installation No. The dryer tumbler should be empty and the lint filter clean...
... INSTALLER Please read the following instructions carefully before cleaning. • Check frequently to make sure: • The exhaust system meets all local, state, and national codes. • That a flexible plastic duct is not used . These instructions should be kept for future reference. ELECTRIC AND GAS DRYER Weather Hood Type Recommended Use only for short-run installation No. The dryer tumbler should be empty and the lint filter clean...

User Manual
Page 13
.... A dryer produces combustible lint. This dryer is located has enough fresh air. The dryer must not be installed or stored in which the dryer is factory-ready for a combined minimum total area of the closet must be exhausted to water and/or weather. The dryer area must be exhausted to the outside to ensure adequate air for the exhaust system. A slatted door with the kit. closet...
.... A dryer produces combustible lint. This dryer is located has enough fresh air. The dryer must not be installed or stored in which the dryer is factory-ready for a combined minimum total area of the closet must be exhausted to water and/or weather. The dryer area must be exhausted to the outside to ensure adequate air for the exhaust system. A slatted door with the kit. closet...

User Manual
Page 14
It is not recommended to stack DV457* on your dryer With optional pedestal base or stacking kit Required Dimensions for Installation With Pedestal 51.2 in .** (7.6 cm) (2.5 cm) (86.5 cm) (20.3 cm) * Required spacing ** An external exhaust elbow requires additional space. Installing your washer. (it might be hard to clear open door Required Dimensions for Installation With Stacking Kit 39 in. (99 cm) 53.6 in. (136.2 cm) 6 in. * (15.2 cm) 34.1 in. 5 in...
It is not recommended to stack DV457* on your dryer With optional pedestal base or stacking kit Required Dimensions for Installation With Pedestal 51.2 in .** (7.6 cm) (2.5 cm) (86.5 cm) (20.3 cm) * Required spacing ** An external exhaust elbow requires additional space. Installing your washer. (it might be hard to clear open door Required Dimensions for Installation With Stacking Kit 39 in. (99 cm) 53.6 in. (136.2 cm) 6 in. * (15.2 cm) 34.1 in. 5 in...

User Manual
Page 17
... plug must be run with the national Fuel Code ANSI/Z2231 - It is located on the plate below the control panel. • WARNING • • The improper connection of the equipment grounding conductor can result in accordance with the circuit conductors and connected to the equipment grounding terminal or lead on the dryer. Gas models WARNING Your dryer has a cord with your dryer - Check with all wiring and...
... plug must be run with the national Fuel Code ANSI/Z2231 - It is located on the plate below the control panel. • WARNING • • The improper connection of the equipment grounding conductor can result in accordance with the circuit conductors and connected to the equipment grounding terminal or lead on the dryer. Gas models WARNING Your dryer has a cord with your dryer - Check with all wiring and...

User Manual
Page 18
... dryer ELECTRICAL CONNECTIONS Before operating or testing, follow all grounding instructions in the "Grounding" section on page 17. Electric models - U.S. Canada Only • A 120/240 volt, 60 Hz AC approved electrical service fused through a 30-ampere fuse or circuit breaker on both sides of the line is required. • If a power cord is used, the cord should be found on both sides of WARNING a new power supply cord kit, marked for 4 wire receptacles, NEMA type...
... dryer ELECTRICAL CONNECTIONS Before operating or testing, follow all grounding instructions in the "Grounding" section on page 17. Electric models - U.S. Canada Only • A 120/240 volt, 60 Hz AC approved electrical service fused through a 30-ampere fuse or circuit breaker on both sides of the line is required. • If a power cord is used, the cord should be found on both sides of WARNING a new power supply cord kit, marked for 4 wire receptacles, NEMA type...
User Manual
Page 23
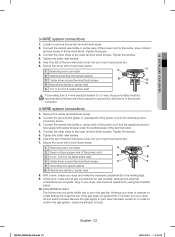
... center wire) of the power cord to confirm the gas ignition, check the exhaust for heat. Connect the other wires to the outer terminal block screws. Connect the other wires to the outer terminal block screws. Allowing your dryer to your dryer's rear panel slot. 7. If the gas does not ignite within 5 minutes, turn your dryer and make sure all gas connections (on gas models), exhaust and electrical connections are complete. Be sure the gas supply to operate on...
... center wire) of the power cord to confirm the gas ignition, check the exhaust for heat. Connect the other wires to the outer terminal block screws. Connect the other wires to the outer terminal block screws. Allowing your dryer to your dryer's rear panel slot. 7. If the gas does not ignite within 5 minutes, turn your dryer and make sure all gas connections (on gas models), exhaust and electrical connections are complete. Be sure the gas supply to operate on...

User Manual
Page 24
... no gas leaks. • Start your dryer to confirm that have many elbows. • Allowing dented or clogged ducts and vent. Never use lint-trapping screws. 4" Tape Duct 3. Be sure the vent flap opens and closes freely. Clean all joints, including at the dryer. Installing your dryer FINAL INSTALLATION CHECKLIST • the dryer is plugged into an electrical outlet and is properly grounded. • The exhaust ductwork is hooked...
... no gas leaks. • Start your dryer to confirm that have many elbows. • Allowing dented or clogged ducts and vent. Never use lint-trapping screws. 4" Tape Duct 3. Be sure the vent flap opens and closes freely. Clean all joints, including at the dryer. Installing your dryer FINAL INSTALLATION CHECKLIST • the dryer is plugged into an electrical outlet and is properly grounded. • The exhaust ductwork is hooked...

User Manual
Page 28
... using Manual Dry cycles, you can change the drying time.(Minimum time : 20 minutes) *For best results, load no more than Medium to partially dry items. Use for smoothing out wrinkles and reducing odors from clothes stored in the display panel until the cycle is pressed. When your dryer is in the cycle after several minutes of the cycle. Larger or bulkier 3 Selection Button loads may require the Very Dry or More Dry setting...
... using Manual Dry cycles, you can change the drying time.(Minimum time : 20 minutes) *For best results, load no more than Medium to partially dry items. Use for smoothing out wrinkles and reducing odors from clothes stored in the display panel until the cycle is pressed. When your dryer is in the cycle after several minutes of the cycle. Larger or bulkier 3 Selection Button loads may require the Very Dry or More Dry setting...
User Manual
Page 31
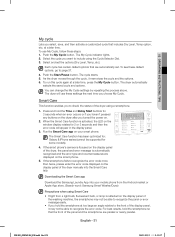
... recognized and the error type and countermeasures are automatically set the options (Dry Level, Temp, etc.) Each cycle has certain default options that includes Dry Level, Temp option, etc. For best results, hold the Time and Delay Start buttons for some models). 4. The dryer automatically selects the saved cycle and options. 03 OPERATING INSTRUCTIONS, TIPS My cycle Lets you turned the power on. 2. The Smart Care function has...
... recognized and the error type and countermeasures are automatically set the options (Dry Level, Temp, etc.) Each cycle has certain default options that includes Dry Level, Temp option, etc. For best results, hold the Time and Delay Start buttons for some models). 4. The dryer automatically selects the saved cycle and options. 03 OPERATING INSTRUCTIONS, TIPS My cycle Lets you turned the power on. 2. The Smart Care function has...
User Manual
Page 53
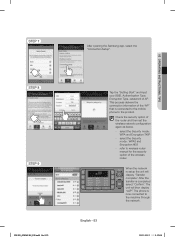
... After opening the Samsung app, select the "Connection Setup". 03 OPERATING INSTRUCTIONS, TIPS STEP 8 STEP 9 DV455_02836F-08_EN.indd Sec3:53 Tap the "Setting Start" and input your SSID, Authentication Type, Encryption Type, password of the router and then set the ...wireless network configuration again as below. - select the Security mode : WPA and Encryption:TKIP - The phone is setup the unit will then display "oAP". When the network is now connected to wireless router manual for the security option of the "AP" that is completed select "Confirm". Check...
... After opening the Samsung app, select the "Connection Setup". 03 OPERATING INSTRUCTIONS, TIPS STEP 8 STEP 9 DV455_02836F-08_EN.indd Sec3:53 Tap the "Setting Start" and input your SSID, Authentication Type, Encryption Type, password of the router and then set the ...wireless network configuration again as below. - select the Security mode : WPA and Encryption:TKIP - The phone is setup the unit will then display "oAP". When the network is now connected to wireless router manual for the security option of the "AP" that is completed select "Confirm". Check...
User Manual
Page 64
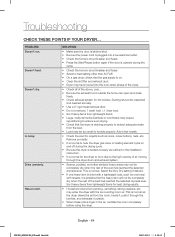
...; Check exhaust system for lint buildup. PROBLEM Doesn't run. Dries unevenly. SOLUTION • Make sure the door is latched shut. • Be sure the power cord is plugged into the cool-down phase of the cycle. • Check all of the load has reached the selected dryness level. may have moved into a live electrical outlet. • Check the home's circuit breaker and fuses. • Press the Start/Pause button again if the door is opened...
...; Check exhaust system for lint buildup. PROBLEM Doesn't run. Dries unevenly. SOLUTION • Make sure the door is latched shut. • Be sure the power cord is plugged into the cool-down phase of the cycle. • Check all of the load has reached the selected dryness level. may have moved into a live electrical outlet. • Check the home's circuit breaker and fuses. • Press the Start/Pause button again if the door is opened...
User Manual
Page 66
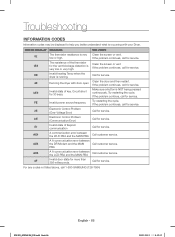
.... Running the dryer with your Dryer. Try restarting the cycle. Call for service. Call customer service. Call for service. Troubleshooting INFORMATION CODES Information codes may be displayed to help you better understand what is occurring with door open Invalid state of key. Clean the door and then restart. SOLUTION Clean the screen or vent. The resistance of the thermistor for service. Try restarting the cycle. Call customer service. If the problem continues...
.... Running the dryer with your Dryer. Try restarting the cycle. Call for service. Call customer service. Call for service. Troubleshooting INFORMATION CODES Information codes may be displayed to help you better understand what is occurring with door open Invalid state of key. Clean the door and then restart. SOLUTION Clean the screen or vent. The resistance of the thermistor for service. Try restarting the cycle. Call customer service. If the problem continues...
User Manual
Page 71
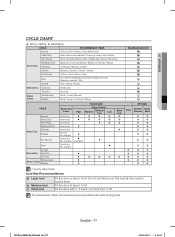
... Gas model Load Size Recommendations Large load Medium load Small load Fill the drum to tumble freely. Do not add items over this level as blankets, Sheets, Comforters, Pillows Underwear, Blouses, Lingerie Sanitize Bedding, Curtains, Children` clothing Eco Normal Cottons, Work clothes, Linen Wool For machine washable and tumble dryable wool only (Maximum amount : 3lb) Air Fluff Form, Rubber, Plastic Manual Dry Quick Dry Small loads Time Dry Any load Steam Cycles Wrinkle...
... Gas model Load Size Recommendations Large load Medium load Small load Fill the drum to tumble freely. Do not add items over this level as blankets, Sheets, Comforters, Pillows Underwear, Blouses, Lingerie Sanitize Bedding, Curtains, Children` clothing Eco Normal Cottons, Work clothes, Linen Wool For machine washable and tumble dryable wool only (Maximum amount : 3lb) Air Fluff Form, Rubber, Plastic Manual Dry Quick Dry Small loads Time Dry Any load Steam Cycles Wrinkle...
User Manual
Page 85
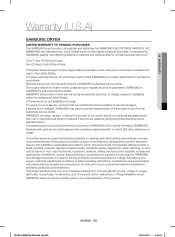
... from incorrect electric current, voltage or supply, light bulbs, house fuses, house wiring, cost of a service call for instructions, or fixing installation errors. cosmetic damage or exterior finish; This limited warranty covers manufacturing defects in materials and workmanship encountered in normal, noncommercial use of products, equipment, systems, utilities, services, parts, supplies, accessories, applications, installations, repairs, external wiring or connectors not supplied or authorized by SAMSUNG that damage...
... from incorrect electric current, voltage or supply, light bulbs, house fuses, house wiring, cost of a service call for instructions, or fixing installation errors. cosmetic damage or exterior finish; This limited warranty covers manufacturing defects in materials and workmanship encountered in normal, noncommercial use of products, equipment, systems, utilities, services, parts, supplies, accessories, applications, installations, repairs, external wiring or connectors not supplied or authorized by SAMSUNG that damage...
User Manual
Page 87
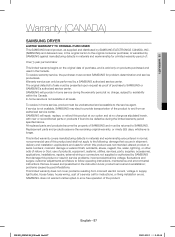
...:14 Warranty service can only be returned to SAMSUNG. If service is not available, SAMSUNG may elect to provide transportation of the product to and from incorrect electric current, voltage or supply, light bulbs, house fuses, house wiring, cost of a service call for instructions, or fixing installation errors. problems caused by pest infestations. SAMSUNG does not warrant uninterrupted or error-free operation of nature or God; 08 WARRANTY Warranty (CANADA) SAMSUNG DRYER LIMITED WARRANTY...
...:14 Warranty service can only be returned to SAMSUNG. If service is not available, SAMSUNG may elect to provide transportation of the product to and from incorrect electric current, voltage or supply, light bulbs, house fuses, house wiring, cost of a service call for instructions, or fixing installation errors. problems caused by pest infestations. SAMSUNG does not warrant uninterrupted or error-free operation of nature or God; 08 WARRANTY Warranty (CANADA) SAMSUNG DRYER LIMITED WARRANTY...


