User Manual (user Manual) (ver.1.0) (English)
Page 1
DV431AE* DV431AG* Gas and Electric Dryer user manual imagine the possibilities Thank you for purchasing this Samsung product. To receive more complete service, please register your product at www.samsung.com/register DV431AEP-03021A-01_EN.indd 1 2011-02-08 11:27:18
DV431AE* DV431AG* Gas and Electric Dryer user manual imagine the possibilities Thank you for purchasing this Samsung product. To receive more complete service, please register your product at www.samsung.com/register DV431AEP-03021A-01_EN.indd 1 2011-02-08 11:27:18
User Manual (user Manual) (ver.1.0) (English)
Page 2
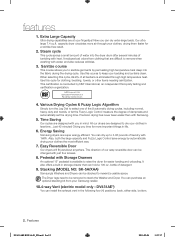
... Cycles & Fuzzy Logic Algorithm Simply turn the Jog Dial to keep your clothes, drying them faster for easier loading and unloading. Energy Saving Samsung dryers are designed to remove when washing with Storage Drawers An optional 15" pedestal is available to stack the Washer and... of our easy reversible door can be changed with 1kWh. It reduces bad odors from your fingertips! Stacking (MODEL NO: SK-5A/XAA) Samsung's Washers and Dryers can be stacked to 3.06 pounds of water into the fabric during the drying cycle. Now you time for clothing, bedding, towels, or ...
... Cycles & Fuzzy Logic Algorithm Simply turn the Jog Dial to keep your clothes, drying them faster for easier loading and unloading. Energy Saving Samsung dryers are designed to remove when washing with Storage Drawers An optional 15" pedestal is available to stack the Washer and... of our easy reversible door can be changed with 1kWh. It reduces bad odors from your fingertips! Stacking (MODEL NO: SK-5A/XAA) Samsung's Washers and Dryers can be stacked to 3.06 pounds of water into the fabric during the drying cycle. Now you time for clothing, bedding, towels, or ...
User Manual (user Manual) (ver.1.0) (English)
Page 3
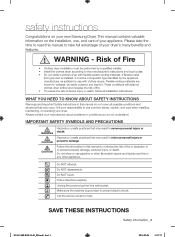
... and increase the risk of fire. • To reduce the risk of your dryer. It is grounded to the manufacturer's instructions and local codes. • Do not install a clothes dryer with clothes dryers. Always contact your new Samsung Dryer. IMPORTANT SAFETY SYMBOLS AND PRECAUTIONS WARNING CAUTION CAUTION Hazards or unsafe practices that may result...
... and increase the risk of fire. • To reduce the risk of your dryer. It is grounded to the manufacturer's instructions and local codes. • Do not install a clothes dryer with clothes dryers. Always contact your new Samsung Dryer. IMPORTANT SAFETY SYMBOLS AND PRECAUTIONS WARNING CAUTION CAUTION Hazards or unsafe practices that may result...
User Manual (user Manual) (ver.1.0) (English)
Page 4
... fabric softeners or products to eliminate static unless recommended by the manufacturer of the fabric softener or product. 10.Clean lint screen before using your dryer. Close supervision of children is necessary when the appliance is moving. 6. Items contaminated with gasoline, dry-cleaning solvents, or other flammable or explosive substances...
... fabric softeners or products to eliminate static unless recommended by the manufacturer of the fabric softener or product. 10.Clean lint screen before using your dryer. Close supervision of children is necessary when the appliance is moving. 6. Items contaminated with gasoline, dry-cleaning solvents, or other flammable or explosive substances...
User Manual (user Manual) (ver.1.0) (English)
Page 5
...under certain circumstances, produce fire by a qualified installer, service agency, or the gas supplier. Before discarding or removing your dryer from service, remove the door to the drying compartment to prevent children or animals from lint, dust, and dirt. SAVE THESE INSTRUCTIONS Safety ..., waxes, and wax removers Items containing foam rubber (may be labeled latex foam) or similarly textured rubberlike materials must be placed in the dryer until all occupants. • Immediately call the fire department. WHAT TO DO IF YOU SMELL GAS: • Do not try to...
...under certain circumstances, produce fire by a qualified installer, service agency, or the gas supplier. Before discarding or removing your dryer from service, remove the door to the drying compartment to prevent children or animals from lint, dust, and dirt. SAVE THESE INSTRUCTIONS Safety ..., waxes, and wax removers Items containing foam rubber (may be labeled latex foam) or similarly textured rubberlike materials must be placed in the dryer until all occupants. • Immediately call the fire department. WHAT TO DO IF YOU SMELL GAS: • Do not try to...
User Manual (user Manual) (ver.1.0) (English)
Page 6
...storing these items from escaping and can cause minor exposure to change specifications without notice. Because of continuing product improvements, Samsung reserves the right to four of these substances, namely benzene, carbon monoxide, formaldehyde, and soot, caused primarily by the incomplete ... alone. This appliance must be dangerous. Do not sit on clothing can be properly grounded. These objects could damage your dryer that is not grounded adequately and in your product before selecting cabinetry, making cutouts, or beginning installation. Do not wash clothing...
...storing these items from escaping and can cause minor exposure to change specifications without notice. Because of continuing product improvements, Samsung reserves the right to four of these substances, namely benzene, carbon monoxide, formaldehyde, and soot, caused primarily by the incomplete ... alone. This appliance must be dangerous. Do not sit on clothing can be properly grounded. These objects could damage your dryer that is not grounded adequately and in your product before selecting cabinetry, making cutouts, or beginning installation. Do not wash clothing...

User Manual (user Manual) (ver.1.0) (English)
Page 7
...Electrical requirements 15 Grounding 16 Electrical connections 17 Connecting the inlet hose 18 Replacement parts and accessories 18 Installation 21 Final installation checklist 22 Dryer Exhaust Tips 23 Door Reversal 24 Overview of the control panel 27 Child lock 27 Drum Light 27 Changing The Language 27 My ...cycle 28 Rack Dry 29 Clean the lint filter 29 Load the dryer properly 29 Getting started 30 Control Panel 30 Tumbler 30 Stainless Steel Tumbler 30 Dryer Exterior 30 Dryer Exhaust System SPECIAL LAUNDRY TIPS 31 31 Special laundry tips TROUBLESHOOTING 32 32 Check these points...
...Electrical requirements 15 Grounding 16 Electrical connections 17 Connecting the inlet hose 18 Replacement parts and accessories 18 Installation 21 Final installation checklist 22 Dryer Exhaust Tips 23 Door Reversal 24 Overview of the control panel 27 Child lock 27 Drum Light 27 Changing The Language 27 My ...cycle 28 Rack Dry 29 Clean the lint filter 29 Load the dryer properly 29 Getting started 30 Control Panel 30 Tumbler 30 Stainless Steel Tumbler 30 Dryer Exterior 30 Dryer Exhaust System SPECIAL LAUNDRY TIPS 31 31 Special laundry tips TROUBLESHOOTING 32 32 Check these points...
User Manual (user Manual) (ver.1.0) (English)
Page 8
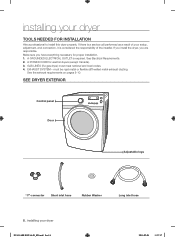
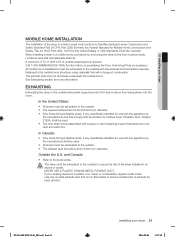
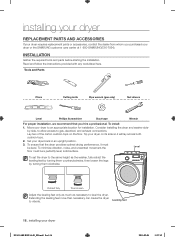
...Control panel Door Adjustable legs "Y"-connector Short inlet hose Rubber Washer Long inlet hose 8_ installing your dryer TOOLS NEEDED FOR INSTALLATION Hire a professional to install this dryer properly. If there is a service call performed as a result of the installer. Make sure ...you are responsible. See the exhaust requirements on pages 8-10. installing your dryer DV431AEP-03021A-01_EN.indd Sec5:8 2011-02-08 11:27:37 If you install the dryer, you have everything necessary for electric dryers (except Canada). 3. EXHAUST SYSTEM - See Electrical Requirements. 2. A POWER ...
...Control panel Door Adjustable legs "Y"-connector Short inlet hose Rubber Washer Long inlet hose 8_ installing your dryer TOOLS NEEDED FOR INSTALLATION Hire a professional to install this dryer properly. If there is a service call performed as a result of the installer. Make sure ...you are responsible. See the exhaust requirements on pages 8-10. installing your dryer DV431AEP-03021A-01_EN.indd Sec5:8 2011-02-08 11:27:37 If you install the dryer, you have everything necessary for electric dryers (except Canada). 3. EXHAUST SYSTEM - See Electrical Requirements. 2. A POWER ...

User Manual (user Manual) (ver.1.0) (English)
Page 9
...8226; Secure joints with a thin foil wall. The hood opening should be used for obstructions. THIS COULD CREATE A FIRE HAZARD FROM LINT EXPELLED BY THE DRYER. • A plastic flexible duct can kink, sag, be cleaned regularly. • If a flexible metal duct must run installation No. ...03021A-01_EN.indd Sec5:9 2011-02-08 11:27:38 Lint accumulation should be punctured, reduce airflow, extend drying times, and affect dryer operation. • Exhaust systems longer than 4 inches (10.2 cm) in increased lint accumulation. Never use the type with a swing-out ...
...8226; Secure joints with a thin foil wall. The hood opening should be used for obstructions. THIS COULD CREATE A FIRE HAZARD FROM LINT EXPELLED BY THE DRYER. • A plastic flexible duct can kink, sag, be cleaned regularly. • If a flexible metal duct must run installation No. ...03021A-01_EN.indd Sec5:9 2011-02-08 11:27:38 Lint accumulation should be punctured, reduce airflow, extend drying times, and affect dryer operation. • Exhaust systems longer than 4 inches (10.2 cm) in increased lint accumulation. Never use the type with a swing-out ...
User Manual (user Manual) (ver.1.0) (English)
Page 10
... exhaust out the bottom or the right or the left, use the accessory exhaust kit. LOCATION CONSIDERATIONS The dryer should be less than 0. It's important to the dryer. On gas dryers, adequate clearance as noted on the data plate must not exceed 0.83 inches of water column, or be kept for... the exhaust system. THE AREA AROUND THE DRYER SHOULD BE KEPT LINT-FREE. 10_ installing your dryer If the new dryer is installed into an existing exhaust system you must be maintained to ensure adequate air for rear exhaust. The ...
... exhaust out the bottom or the right or the left, use the accessory exhaust kit. LOCATION CONSIDERATIONS The dryer should be less than 0. It's important to the dryer. On gas dryers, adequate clearance as noted on the data plate must not exceed 0.83 inches of water column, or be kept for... the exhaust system. THE AREA AROUND THE DRYER SHOULD BE KEPT LINT-FREE. 10_ installing your dryer If the new dryer is installed into an existing exhaust system you must be maintained to ensure adequate air for rear exhaust. The ...
User Manual (user Manual) (ver.1.0) (English)
Page 11
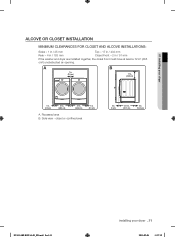
... or confined area 1 in. (2.5 cm) 2 in. (5 cm) 31.9 in. (81.1 cm) 4 in. (10.2 cm) DV431AEP-03021A-01_EN.indd Sec5:11 installing your dryer ALCOVE OR CLOSET INSTALLATION MINIMUM CLEARANCES FOR CLOSET AND ALCOVE INSTALLATIONS: Sides - 1 in / 25 mm Top - 17 in / 432 mm Rear - 4 in / 102 mm Closet... Front - 2 in / 51 mm If the washer and dryer are installed together, the closet front must have at least a 72 in . (68.6 cm) A. 01 installing your dryer _11 2011-02-08 11:27:39 A 1 in. (2.5 cm) B 17 in. (43.2 cm) 1 in. (2.5 cm...
... or confined area 1 in. (2.5 cm) 2 in. (5 cm) 31.9 in. (81.1 cm) 4 in. (10.2 cm) DV431AEP-03021A-01_EN.indd Sec5:11 installing your dryer ALCOVE OR CLOSET INSTALLATION MINIMUM CLEARANCES FOR CLOSET AND ALCOVE INSTALLATIONS: Sides - 1 in / 25 mm Top - 17 in / 432 mm Rear - 4 in / 102 mm Closet... Front - 2 in / 51 mm If the washer and dryer are installed together, the closet front must have at least a 72 in . (68.6 cm) A. 01 installing your dryer _11 2011-02-08 11:27:39 A 1 in. (2.5 cm) B 17 in. (43.2 cm) 1 in. (2.5 cm...
User Manual (user Manual) (ver.1.0) (English)
Page 12
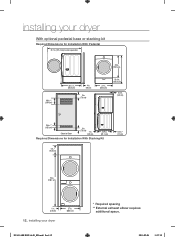
installing your dryer With optional pedestal base or stacking kit Required Dimensions for Installation With Pedestal 51.7 in. (131.4 cm) to clear open door 48 in.² * (310 ....9 in. (81.1 cm) Required Dimensions for Installation With Stacking Kit 6 in. * (15.2 cm) 5.5 in.** (14 cm) 78 in. (198.1 cm) 1 in. (2.5 cm) 12_ installing your dryer 27 in. (68.6 cm) DV431AEP-03021A-01_EN.indd Sec5:12 * Required spacing ** External exhaust elbow requires additional space. 2011-02-08 11:27:39
installing your dryer With optional pedestal base or stacking kit Required Dimensions for Installation With Pedestal 51.7 in. (131.4 cm) to clear open door 48 in.² * (310 ....9 in. (81.1 cm) Required Dimensions for Installation With Stacking Kit 6 in. * (15.2 cm) 5.5 in.** (14 cm) 78 in. (198.1 cm) 1 in. (2.5 cm) 12_ installing your dryer 27 in. (68.6 cm) DV431AEP-03021A-01_EN.indd Sec5:12 * Required spacing ** External exhaust elbow requires additional space. 2011-02-08 11:27:39
User Manual (user Manual) (ver.1.0) (English)
Page 13
... into the duct and catch lint. In the United States: • All dryers must be 4inch (102mm) in an WARNING alcove or closet. If your dryer _13 2011-02-08 11:27:40 Call 1-800-SAMSUNG(726-7864) for more information. See Exhausting section for information on purchasing the... Floor Anchoring Kit as an accessory. EXHAUSTING Exhausting the dryer to the outside to the local codes. Outside ...
... into the duct and catch lint. In the United States: • All dryers must be 4inch (102mm) in an WARNING alcove or closet. If your dryer _13 2011-02-08 11:27:40 Call 1-800-SAMSUNG(726-7864) for more information. See Exhausting section for information on purchasing the... Floor Anchoring Kit as an accessory. EXHAUSTING Exhausting the dryer to the outside to the local codes. Outside ...
User Manual (user Manual) (ver.1.0) (English)
Page 14
... (46 cm) above the floor. GAS IGNITION - There is used must be installed immediately upstream of Massachusetts installation instructions Your dryer must be disconnected from the gas supply pipe system during any liquefied petroleum gas. • As a courtesy, most local ...will inspect a gas appliance installation. Commonwealth of your system, creating a dangerous situation. Gas suppliers recommend you plan to use your dryer. Gas dryers are equipped with a burner vent for safe and proper performance by the American Gas Association (CGA in the gas supply line to your...
... (46 cm) above the floor. GAS IGNITION - There is used must be installed immediately upstream of Massachusetts installation instructions Your dryer must be disconnected from the gas supply pipe system during any liquefied petroleum gas. • As a courtesy, most local ...will inspect a gas appliance installation. Commonwealth of your system, creating a dangerous situation. Gas suppliers recommend you plan to use your dryer. Gas dryers are equipped with a burner vent for safe and proper performance by the American Gas Association (CGA in the gas supply line to your...
User Manual (user Manual) (ver.1.0) (English)
Page 15
... TO PLASTIC PLUMBING LINES, GAS LINES, OR HOT WATER PIPES. Do not modify the plug provided with your dryer - B149 Installation Codes - GROUNDING This dryer must be grounded. The plug must be plugged into an appropriate outlet that is properly installed and grounded in ...;t the outlet, have a proper outlet installed by providing a path of electric shock. It is your responsibility to whether your dryer is to be permanently wired, the dryer must be connected to the equipment grounding terminal. if it doesn't fit the outlet, have a proper outlet installed by ...
... TO PLASTIC PLUMBING LINES, GAS LINES, OR HOT WATER PIPES. Do not modify the plug provided with your dryer - B149 Installation Codes - GROUNDING This dryer must be grounded. The plug must be plugged into an appropriate outlet that is properly installed and grounded in ...;t the outlet, have a proper outlet installed by providing a path of electric shock. It is your responsibility to whether your dryer is to be permanently wired, the dryer must be connected to the equipment grounding terminal. if it doesn't fit the outlet, have a proper outlet installed by ...
User Manual (user Manual) (ver.1.0) (English)
Page 16
... on both sides of cord. 2. 3/4" (1.9 cm) UL-listed strain relief • Do not reuse a power supply cord from an old dryer. Canada Only • A 120/240 volt, 60 Hz AC approved electrical service fused through a 30-ampere fuse or circuit breaker on the data...-30R.) Electric models - An individual branch (or separate) circuit serving only your dryer is required. Electric models - It is not permissible to convert a dryer in Canada to 208 volts. 16_ installing your dryer ELECTRICAL CONNECTIONS Before operating or testing, follow all grounding instructions in the Grounding section....
... on both sides of cord. 2. 3/4" (1.9 cm) UL-listed strain relief • Do not reuse a power supply cord from an old dryer. Canada Only • A 120/240 volt, 60 Hz AC approved electrical service fused through a 30-ampere fuse or circuit breaker on the data...-30R.) Electric models - An individual branch (or separate) circuit serving only your dryer is required. Electric models - It is not permissible to convert a dryer in Canada to 208 volts. 16_ installing your dryer ELECTRICAL CONNECTIONS Before operating or testing, follow all grounding instructions in the Grounding section....
User Manual (user Manual) (ver.1.0) (English)
Page 17
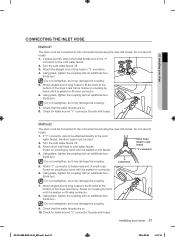
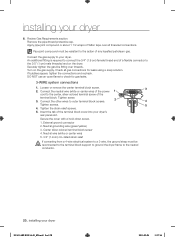
...41 Screw on the faucet. Do not overtighten, as it is seated on coupling by hand until it may damage the coupling. 9. Method2 The dryer must be connected to fill the valve at the bottom of small hose. Screw on fill valve connector. 8. Using pliers, ...it may damage the coupling. 7. If "Y" connector cannot be attached directly to cold water faucet. If space permits, attach the brass female end of the dryer's rear frame. Short hose (Inlet to "Y' connector. 4. Turn the cold water faucet off . 3. Check that the water faucets are on coupling by...
...41 Screw on the faucet. Do not overtighten, as it is seated on coupling by hand until it may damage the coupling. 9. Method2 The dryer must be connected to fill the valve at the bottom of small hose. Screw on fill valve connector. 8. Using pliers, ...it may damage the coupling. 7. If "Y" connector cannot be attached directly to cold water faucet. If space permits, attach the brass female end of the dryer's rear frame. Short hose (Inlet to "Y' connector. 4. Turn the cold water faucet off . 3. Check that the water faucets are on coupling by...
User Manual (user Manual) (ver.1.0) (English)
Page 18
... its side so it must be level. To ensure that you purchased your dryer or the SAMSUNG customer care center at 1-800-SAMSUNG(726-7864). Tip your dryer on the floor. Extending the leveling feet more than necessary can cause the dryer to gas, electrical, and exhaust connections. by turning them counterclockwise, then loosen...
... its side so it must be level. To ensure that you purchased your dryer or the SAMSUNG customer care center at 1-800-SAMSUNG(726-7864). Tip your dryer on the floor. Extending the leveling feet more than necessary can cause the dryer to gas, electrical, and exhaust connections. by turning them counterclockwise, then loosen...

User Manual (user Manual) (ver.1.0) (English)
Page 19
... system is used . Insert the power cord with a UL-listed strain relief through neutral. A strain relief must point away from your dryer to your dryer before installing the exhaust system. Be sure they are produced for new or remodeled construction, mobile homes, or if local codes do not...the terminal block. The crimped end of exhaust system to the neutral conductor at the terminal block. These joints should be used , the dryer frame cannot be grounded to the following instructions for tight installations: install a section of the duct sections must be taped. U.S. models are ...
... system is used . Insert the power cord with a UL-listed strain relief through neutral. A strain relief must point away from your dryer to your dryer before installing the exhaust system. Be sure they are produced for new or remodeled construction, mobile homes, or if local codes do not...the terminal block. The crimped end of exhaust system to the neutral conductor at the terminal block. These joints should be used , the dryer frame cannot be grounded to the following instructions for tight installations: install a section of the duct sections must be taped. U.S. models are ...
User Manual (user Manual) (ver.1.0) (English)
Page 20
... the connections and recheck. Loosen or remove the center terminal block screw. 2. Insert the tab of the terminal block cover into your dryer 6. External ground connector 2. Apply pipe joint compound or about 1 1/2 wraps of any liquefied petroleum gas. An additional fitting...block. Turn on tape over threads. Check all threaded connections. Tighten screws. 4. Secure the cover with a hold-down screw. 1. installing your dryer's rear panel slot. Connect the neutral wire (white or center wire) of the power cord to the center, silver-colored terminal screw of ...
... the connections and recheck. Loosen or remove the center terminal block screw. 2. Insert the tab of the terminal block cover into your dryer 6. External ground connector 2. Apply pipe joint compound or about 1 1/2 wraps of any liquefied petroleum gas. An additional fitting...block. Turn on tape over threads. Check all threaded connections. Tighten screws. 4. Secure the cover with a hold-down screw. 1. installing your dryer's rear panel slot. Connect the neutral wire (white or center wire) of the power cord to the center, silver-colored terminal screw of ...


