User Manual
Page 1
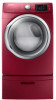
To receive more complete service or accessory parts, please register your product at or contact: www.samsung.com/register 1-800-SAMSUNG (726-7864) DV425000_DC68-03381A.indd 1 2013-12-19 �� 1:07:09 DV42H5400* DV42H5200* DV42H5000* Gas and Electric Dryer User manual Imagine the possibilities Thank you for purchasing this Samsung product.
To receive more complete service or accessory parts, please register your product at or contact: www.samsung.com/register 1-800-SAMSUNG (726-7864) DV425000_DC68-03381A.indd 1 2013-12-19 �� 1:07:09 DV42H5400* DV42H5200* DV42H5000* Gas and Electric Dryer User manual Imagine the possibilities Thank you for purchasing this Samsung product.
User Manual
Page 2
... models 9 Electric models 9 Location considerations 10 Alcove or closet installations 10 Ducting requirements 12 Exhausting 13 Dryer exhaust tips 14 Gas requirements 15 Commonwealth of massachusetts installation instructions 15 Electrical requirements 16 Electrical connections 16 Connecting the inlet hose 18 Replacement parts and accessories 19 Installation 19 Door reversal 20 Final installation checklist 21 Operating instructions, tips 22 Overview of the control panel 22 Load the dryer properly 26 Getting started 26 Rack dry (DV42H5400* Only 28 Child Lock 29 Drum Light...
... models 9 Electric models 9 Location considerations 10 Alcove or closet installations 10 Ducting requirements 12 Exhausting 13 Dryer exhaust tips 14 Gas requirements 15 Commonwealth of massachusetts installation instructions 15 Electrical requirements 16 Electrical connections 16 Connecting the inlet hose 18 Replacement parts and accessories 19 Installation 19 Door reversal 20 Final installation checklist 21 Operating instructions, tips 22 Overview of the control panel 22 Load the dryer properly 26 Getting started 26 Rack dry (DV42H5400* Only 28 Child Lock 29 Drum Light...
User Manual
Page 5
...; Clothes dryer installation must be performed by a qualified installer. • Install the clothes dryer according to the manufacturer's instructions and local codes. • Do not install a clothes dryer with gasoline, dry cleaning solvents, or other flammable or explosive substances. They emit vapors that have been removed. If flexible metal (foil type) duct is installed, it must be of all occupants. • Immediately call the fire department. • Installation and service...
...; Clothes dryer installation must be performed by a qualified installer. • Install the clothes dryer according to the manufacturer's instructions and local codes. • Do not install a clothes dryer with gasoline, dry cleaning solvents, or other flammable or explosive substances. They emit vapors that have been removed. If flexible metal (foil type) duct is installed, it must be of all occupants. • Immediately call the fire department. • Installation and service...
User Manual
Page 6
... dryer" section. 17. Do not repair or replace any part of the appliance or attempt any servicing unless specifically recommended in the user-maintenance instructions or published in accordance with local and national codes. Clean the lint screen before using your system, resulting in front of the appliance. Do not use gasoline or other appliance. 4. Refer to play on, in, or in a dangerous situation. 20. Gas...
... dryer" section. 17. Do not repair or replace any part of the appliance or attempt any servicing unless specifically recommended in the user-maintenance instructions or published in accordance with local and national codes. Clean the lint screen before using your system, resulting in front of the appliance. Do not use gasoline or other appliance. 4. Refer to play on, in, or in a dangerous situation. 20. Gas...
User Manual
Page 9
... exhaust ducting. Electric models Your dryer has an optional cord with an equipment-grounding conductor and a grounding plug, which is sold separately. • The plug must be plugged into an appropriate outlet that is required. • A POWER CORD electric dryer (except for future reference. if it doesn't fit the outlet, have a proper outlet installed by a qualified electrician. • Never connect the ground wire to the plastic plumbing lines, gas lines, or hot water pipes. Basic requirements...
... exhaust ducting. Electric models Your dryer has an optional cord with an equipment-grounding conductor and a grounding plug, which is sold separately. • The plug must be plugged into an appropriate outlet that is required. • A POWER CORD electric dryer (except for future reference. if it doesn't fit the outlet, have a proper outlet installed by a qualified electrician. • Never connect the ground wire to the plastic plumbing lines, gas lines, or hot water pipes. Basic requirements...
User Manual
Page 10
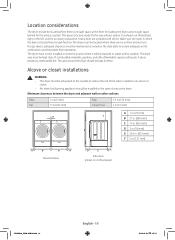
... the rear exhaust option. To exhaust out the bottom, right or the left, use the accessory exhaust kit. The dryer must not be installed or stored in the same closet as noted on the data plate to water and/or weather. The dryer must be located where there are included with the kit. Location considerations The dryer should be located where there is located has enough fresh air. A dryer...
... the rear exhaust option. To exhaust out the bottom, right or the left, use the accessory exhaust kit. The dryer must not be installed or stored in the same closet as noted on the data plate to water and/or weather. The dryer must be located where there are included with the kit. Location considerations The dryer should be located where there is located has enough fresh air. A dryer...
User Manual
Page 11
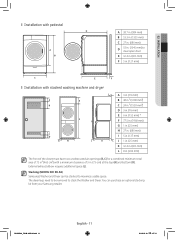
The dryer legs need to be stacked to maximize usable space. You can be removed to clear open door E 32.4 in. (823 mm) F 5 in. (127 mm) C E F Installation with stacked washing machine and dryer ...INSTALLATION Installation with pedestal D A B A 38.7 in. (984 mm) B 53.3 in. (1355 mm) C 27 in. (686 mm) D 53 in. (1345 mm) to stack the Washer and Dryer. Stacking (MODEL NO: SK-5A) Samsung's Washer and Dryer can purchase an optional stacking kit from your Samsung retailer. DV425000_DC68-03381A.indd 11 English - 11 2013-12-19 �� 1:07:11 External exhaust elbow requires...
The dryer legs need to be stacked to maximize usable space. You can be removed to clear open door E 32.4 in. (823 mm) F 5 in. (127 mm) C E F Installation with stacked washing machine and dryer ...INSTALLATION Installation with pedestal D A B A 38.7 in. (984 mm) B 53.3 in. (1355 mm) C 27 in. (686 mm) D 53 in. (1345 mm) to stack the Washer and Dryer. Stacking (MODEL NO: SK-5A) Samsung's Washer and Dryer can purchase an optional stacking kit from your Samsung retailer. DV425000_DC68-03381A.indd 11 English - 11 2013-12-19 �� 1:07:11 External exhaust elbow requires...

User Manual
Page 15
... (0.3 cm) N.P.T. (National Pipe Thread) plugged tapping, accessible for use it in the gas supply line to ignite the burner. The National Fuel Gas Code requires that you plan to use your dryer with LP gas (liquid propane), the conversion must be done by smell alone. • Gas suppliers recommend that an accessible, approved manual gas shut-off valve be installed within 6 inches of massachusetts installation instructions Your dryer must be installed in accordance with natural gas.
... (0.3 cm) N.P.T. (National Pipe Thread) plugged tapping, accessible for use it in the gas supply line to ignite the burner. The National Fuel Gas Code requires that you plan to use your dryer with LP gas (liquid propane), the conversion must be done by smell alone. • Gas suppliers recommend that an accessible, approved manual gas shut-off valve be installed within 6 inches of massachusetts installation instructions Your dryer must be installed in accordance with natural gas.

User Manual
Page 16
... terminals, open-end spade lugs with turned up ends, or with a dryer, that is prohibited for (1) new branch-circuit installations, (2) mobile homes, (3) recreational vehicles, and (4) areas where local codes prohibit grounding through the neutral conductor. (Use a 4-prong plug for use with tinned leads. • Do not reuse a power supply cord from an old dryer. Check with a suitable UL-listed strain relief. • Grounding through a 30-ampere fuse...
... terminals, open-end spade lugs with turned up ends, or with a dryer, that is prohibited for (1) new branch-circuit installations, (2) mobile homes, (3) recreational vehicles, and (4) areas where local codes prohibit grounding through the neutral conductor. (Use a 4-prong plug for use with tinned leads. • Do not reuse a power supply cord from an old dryer. Check with a suitable UL-listed strain relief. • Grounding through a 30-ampere fuse...
User Manual
Page 17
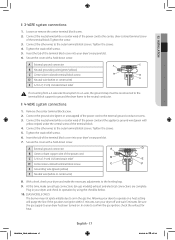
... power cord C 3/4 in the gas line. Connect the ground wire (green or unwrapped) of the terminal block cover into your dryer and make sure all gas connections (on gas models), exhaust and electrical connections are complete. With a level, check your dryer's rear panel slot. 6. Tighten the screw. 3. Insert the tab of the power cord to the neutral conductor. 4-WIRE system connections 1. Secure the cover with a hold -down screw. Allowing your dryer has been turned on a heat setting will purge the line...
... power cord C 3/4 in the gas line. Connect the ground wire (green or unwrapped) of the terminal block cover into your dryer and make sure all gas connections (on gas models), exhaust and electrical connections are complete. With a level, check your dryer's rear panel slot. 6. Tighten the screw. 3. Insert the tab of the power cord to the neutral conductor. 4-WIRE system connections 1. Secure the cover with a hold -down screw. Allowing your dryer has been turned on a heat setting will purge the line...
User Manual
Page 19
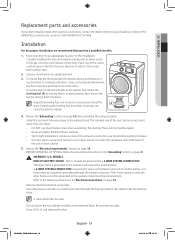
... to the following instructions for "Electrical connections" on the terminal block. Install the ductwork from your dryer. • DO NOT use plastic flexible exhaust material. • Tip for a 3-WIRE SYSTEM CONNECTION. BEFORE OPERATING OR TESTING, follow the grounding instructions in dryer cabinet. 5. WARNING - models are tight. A strain relief must be used , the dryer frame cannot be taped. • Never use sheet metal screws when assembling the ducting. Tip your dryer on its side...
... to the following instructions for "Electrical connections" on the terminal block. Install the ductwork from your dryer. • DO NOT use plastic flexible exhaust material. • Tip for a 3-WIRE SYSTEM CONNECTION. BEFORE OPERATING OR TESTING, follow the grounding instructions in dryer cabinet. 5. WARNING - models are tight. A strain relief must be used , the dryer frame cannot be taped. • Never use sheet metal screws when assembling the ducting. Tip your dryer on its side...
User Manual
Page 21
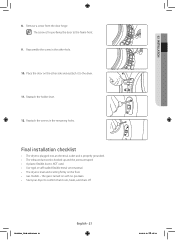
... remaining holes. Final installation checklist • The dryer is plugged into an electrical outlet and is properly grounded. • The exhaust ductwork is hooked up and the joints are taped. • A plastic flexible duct is NOT used. • Use rigid or stiff-walled flexible metal vent material. • The dryer is level and is for pre-fixing the door to the dryer. 11. DV425000_DC68-03381A...
... remaining holes. Final installation checklist • The dryer is plugged into an electrical outlet and is properly grounded. • The exhaust ductwork is hooked up and the joints are taped. • A plastic flexible duct is NOT used. • Use rigid or stiff-walled flexible metal vent material. • The dryer is level and is for pre-fixing the door to the dryer. 11. DV425000_DC68-03381A...
User Manual
Page 25
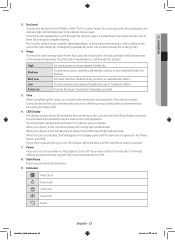
..., or other Sensor Dry cycles, press the Dry Level button. For heat sensitive items labeled Tumble Dry Low or Tumble Dry Warm. 03 OPERATION 3. Provides the lowest heated dry temperature possible. 5. Press again to dry. 4. If your dryer is designed to partially dry items. Use for more than Medium to the desired dryness level. Press the button repeatedly to scroll through the settings. Indicators Filter Check Drum Light Child Lock Sound Off Steam DV425000_DC68-03381A...
..., or other Sensor Dry cycles, press the Dry Level button. For heat sensitive items labeled Tumble Dry Low or Tumble Dry Warm. 03 OPERATION 3. Provides the lowest heated dry temperature possible. 5. Press again to dry. 4. If your dryer is designed to partially dry items. Use for more than Medium to the desired dryness level. Press the button repeatedly to scroll through the settings. Indicators Filter Check Drum Light Child Lock Sound Off Steam DV425000_DC68-03381A...
User Manual
Page 33
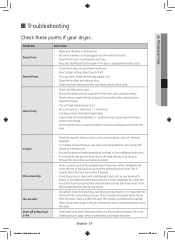
... dryer drum and exhaust system. • Seams, pockets, and other similarly heavy areas may have moved into a live electrical outlet. • Check the home's circuit breaker and fuses. • Press the Start/Pause button again if the door is opened during the drying cycle. • Be sure the dryer is leveled properly as outlined in the air, ventilate the room completely before load is dry • Check the load for the dryer...
... dryer drum and exhaust system. • Seams, pockets, and other similarly heavy areas may have moved into a live electrical outlet. • Check the home's circuit breaker and fuses. • Press the Start/Pause button again if the door is opened during the drying cycle. • Be sure the dryer is leveled properly as outlined in the air, ventilate the room completely before load is dry • Check the load for the dryer...
User Manual
Page 34
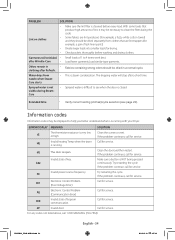
... the lint filter is running. HE Invalid heating Temp when the dryer is cleaned before washing and drying clothes. Try restarting the cycle. Invalid power source frequency. Electronic Control Problem 9E1 (Over Voltage Error.) Call for service. Call for service. Call for service. Water drips from clothes that are lint producers (for service. Information codes Information codes may be displayed to 4 items work best. If the problem continue, call for service. dF Invalid door. With some loads...
... the lint filter is running. HE Invalid heating Temp when the dryer is cleaned before washing and drying clothes. Try restarting the cycle. Invalid power source frequency. Electronic Control Problem 9E1 (Over Voltage Error.) Call for service. Call for service. Call for service. Water drips from clothes that are lint producers (for service. Information codes Information codes may be displayed to 4 items work best. If the problem continue, call for service. dF Invalid door. With some loads...
User Manual
Page 37
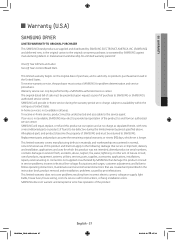
... product to and from incorrect electric current, voltage or supply, light bulbs, house fuses, house wiring, cost of a service call for instructions, or fixing installation errors. All replaced parts and products become the property of purchase to SAMSUNG. Replacement parts and products assume the remaining original warranty, or ninety (90) days, whichever is valid only on products purchased and used in -home service, product must be presented upon...
... product to and from incorrect electric current, voltage or supply, light bulbs, house fuses, house wiring, cost of a service call for instructions, or fixing installation errors. All replaced parts and products become the property of purchase to SAMSUNG. Replacement parts and products assume the remaining original warranty, or ninety (90) days, whichever is valid only on products purchased and used in -home service, product must be presented upon...
User Manual
Page 39
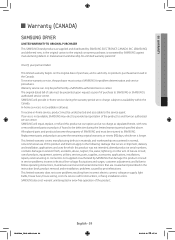
... service during the warranty period at no charge, subject to availability within the Canada. use of nature or God; product removal and reinstallation; SAMSUNG does not warrant uninterrupted or error-free operation of products, equipment, systems, utilities, services, parts, supplies, accessories, applications, installations, repairs, external wiring or connectors not supplied or authorized by SAMSUNG that occurs in shipment; The original dated bill of a service call for instructions, or fixing installation errors...
... service during the warranty period at no charge, subject to availability within the Canada. use of nature or God; product removal and reinstallation; SAMSUNG does not warrant uninterrupted or error-free operation of products, equipment, systems, utilities, services, parts, supplies, accessories, applications, installations, repairs, external wiring or connectors not supplied or authorized by SAMSUNG that occurs in shipment; The original dated bill of a service call for instructions, or fixing installation errors...

Trouble Shooting Guide Tech Manual (English, French, Spanish)
Page 2
... lint screen. - Loose or open wire terminals in Door Sense circuit. Check for : - Check PCB and Wire harness. - AE Electronic Control Problem (Communication Error) Check for : - ALIGNMENT AND ADJUSTMENTS WARNING To avoid risk of Eeprom communication Check for : - Close the door, and run the dryer. - Check for : - disconnect power to dryer before servicing, unless testing requires power. Check for : - Invalid power frequency sense circuit Check for : - Check Power supply. Check PCB and Wire harness. - FE Invalid power source Frequency 9E1 Electronic Control Problem...
... lint screen. - Loose or open wire terminals in Door Sense circuit. Check for : - Check PCB and Wire harness. - AE Electronic Control Problem (Communication Error) Check for : - ALIGNMENT AND ADJUSTMENTS WARNING To avoid risk of Eeprom communication Check for : - Close the door, and run the dryer. - Check for : - disconnect power to dryer before servicing, unless testing requires power. Check for : - Invalid power frequency sense circuit Check for : - Check Power supply. Check PCB and Wire harness. - FE Invalid power source Frequency 9E1 Electronic Control Problem...
Trouble Shooting Guide Tech Manual (English, French, Spanish)
Page 5
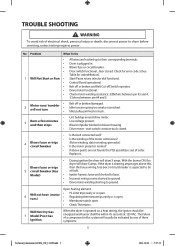
... X amps. start switch contacts stuck closed . Replace it. • During ignition the dryer will not turn • • • Belt off Switch operates. Will Not Dry Gas 7 Model Poor Gas Ignition When the dryer is open . • Check Thermistor. Open heating element. 6 Will not heat (motor runs) • • • Hi-Limit trips easily or is operated on a heat setting, the igniter should be energized and burner shall fire within 45 seconds at fault. TROUBLE SHOOTING WARNING...
... X amps. start switch contacts stuck closed . Replace it. • During ignition the dryer will not turn • • • Belt off Switch operates. Will Not Dry Gas 7 Model Poor Gas Ignition When the dryer is open . • Check Thermistor. Open heating element. 6 Will not heat (motor runs) • • • Hi-Limit trips easily or is operated on a heat setting, the igniter should be energized and burner shall fire within 45 seconds at fault. TROUBLE SHOOTING WARNING...

Trouble Shooting Guide Tech Manual (English, French, Spanish)
Page 6
... heats up but the main burner flame is not ignited, remove power and using an ohmmeter, check the following: • Open secondary coil • Open holding coil • Open wire harness • Stuck flame sensor (Stuck closed . • Exhaust too long, too many elbows, flex ductwork installed. • Poor intake air available for fabric content and cycle selected. • Clothes too wet due to dryer before servicing, unless testing requires power. check...
... heats up but the main burner flame is not ignited, remove power and using an ohmmeter, check the following: • Open secondary coil • Open holding coil • Open wire harness • Stuck flame sensor (Stuck closed . • Exhaust too long, too many elbows, flex ductwork installed. • Poor intake air available for fabric content and cycle selected. • Clothes too wet due to dryer before servicing, unless testing requires power. check...


