
Wf409anw-02657d-02 ( 5.31 )
Page 1
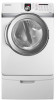
To receive a more complete service, please register your product at www.samsung.com/register DV409-02709B_EN.indd 1 2009-07-15 ¿ÀÀü 11:23:40 DV407AG* DV407AE* DV409AE* DV409AG* Gas and Electric Dryer user manual imagine the possibilities Thank you for purchasing this Samsung product.
To receive a more complete service, please register your product at www.samsung.com/register DV409-02709B_EN.indd 1 2009-07-15 ¿ÀÀü 11:23:40 DV407AG* DV407AE* DV409AE* DV409AG* Gas and Electric Dryer user manual imagine the possibilities Thank you for purchasing this Samsung product.

Wf409anw-02657d-02 ( 5.31 )
Page 2
...Jog Dial to maximize usable space. Time Saving Our cycles are designed with Samsung. 5. Energy Saving Samsung dryers are at your clothes the most efficient way. 7. Stacking (MODEL NO: SK-5A/XAA) Samsung's Washer and Dryer can purchase an optional stacking kit from clothing that can dry extra-large ...8. Steam cycle This cycle sprays a small amount of tumbling with 1kWh. Use this cycle for more air through high temperature heat. The Dryer legs need to be removed to keep your clothes in life. 6. Giving you can hold a 100 oz. bottle of Residential and Commercial...
...Jog Dial to maximize usable space. Time Saving Our cycles are designed with Samsung. 5. Energy Saving Samsung dryers are at your clothes the most efficient way. 7. Stacking (MODEL NO: SK-5A/XAA) Samsung's Washer and Dryer can purchase an optional stacking kit from clothing that can dry extra-large ...8. Steam cycle This cycle sprays a small amount of tumbling with 1kWh. Use this cycle for more air through high temperature heat. The Dryer legs need to be removed to keep your clothes in life. 6. Giving you can hold a 100 oz. bottle of Residential and Commercial...

Wf409anw-02657d-02 ( 5.31 )
Page 3
...injury or death. Call the service center for use with flexible plastic venting materials. This manual contains valuable information on your new Samsung Dryer. Always contact your appliance. SAVE THESE INSTRUCTIONS Safety information _3 DV409-02709B_EN.indd 3 2009-07-15 ¿ÀÀü...CAUTION Hazards or unsafe practices that may result in minor personal injury or property damage. Risk of Fire • Clothes dryer installation must be easily crushed, and trap lint. WHAT YOU NEED TO KNOW ABOUT SAFETY INSTRUCTIONS Warnings and Important Safety Instructions...
...injury or death. Call the service center for use with flexible plastic venting materials. This manual contains valuable information on your new Samsung Dryer. Always contact your appliance. SAVE THESE INSTRUCTIONS Safety information _3 DV409-02709B_EN.indd 3 2009-07-15 ¿ÀÀü...CAUTION Hazards or unsafe practices that may result in minor personal injury or property damage. Risk of Fire • Clothes dryer installation must be easily crushed, and trap lint. WHAT YOU NEED TO KNOW ABOUT SAFETY INSTRUCTIONS Warnings and Important Safety Instructions...

Wf409anw-02657d-02 ( 5.31 )
Page 4
...repair, replace, or attempt to service any part of the appliance unless specifically recommended in the user-repair instructions and you cannot reach your dryer from lint, dust, and dirt. Clean the lint screen before using the appliance. Before discarding or removing your gas supplier, call your ...used near children and pets. Do not allow children or pets to carry those out. They emit vapors that has been in the dryer until all traces of these flammable liquids or solids and their fumes have been previously cleaned, washed, soaked, or spotted with gasoline,...
...repair, replace, or attempt to service any part of the appliance unless specifically recommended in the user-repair instructions and you cannot reach your dryer from lint, dust, and dirt. Clean the lint screen before using the appliance. Before discarding or removing your gas supplier, call your ...used near children and pets. Do not allow children or pets to carry those out. They emit vapors that has been in the dryer until all traces of these flammable liquids or solids and their fumes have been previously cleaned, washed, soaked, or spotted with gasoline,...

Wf409anw-02657d-02 ( 5.31 )
Page 5
... packed with large buckles, buttons, or other reproductive harm and requires businesses to catch fire. Oxidation creates heat. Properly adjusted dryers will reduce, but not eliminate, the hazard. SAVE THESE INSTRUCTIONS Safety information _5 DV409-02709B_EN.indd 5 2009-07-15 &#...DRINKING WATER AND TOXIC ENFORCEMENT ACT This act requires the governor of California to publish a list of continuing product improvements, Samsung reserves the right to heat. See installation instructions for these items when they are exposed to change specifications without notice....
... packed with large buckles, buttons, or other reproductive harm and requires businesses to catch fire. Oxidation creates heat. Properly adjusted dryers will reduce, but not eliminate, the hazard. SAVE THESE INSTRUCTIONS Safety information _5 DV409-02709B_EN.indd 5 2009-07-15 &#...DRINKING WATER AND TOXIC ENFORCEMENT ACT This act requires the governor of California to publish a list of continuing product improvements, Samsung reserves the right to heat. See installation instructions for these items when they are exposed to change specifications without notice....

Wf409anw-02657d-02 ( 5.31 )
Page 6
... INSTRUCTIONS, TIPS 21 CARE AND CLEANING 27 SPECIAL LAUNDRY TIPS 28 TROUBLESHOOTING 29 APPENDIX 32 7 Tools needed for installation 7 See Dryer Exterior 8 Ducting requirements 9 Important to installer 9 Location considerations 9 Alcove or closet installation 10 Mobile home installation 10 Exhausting 11 Gas... 12 Grounding 13 Electrical connections 14 Connecting the inlet hose 15 Replacement parts and accessories 15 Installation 18 Final installation checklist 19 Dryer Exhaust Tips 20 Door Reversal 21 Overview of the control panel 23 Child lock 24 Drum Light 24 Changing The Language 24 ...
... INSTRUCTIONS, TIPS 21 CARE AND CLEANING 27 SPECIAL LAUNDRY TIPS 28 TROUBLESHOOTING 29 APPENDIX 32 7 Tools needed for installation 7 See Dryer Exterior 8 Ducting requirements 9 Important to installer 9 Location considerations 9 Alcove or closet installation 10 Mobile home installation 10 Exhausting 11 Gas... 12 Grounding 13 Electrical connections 14 Connecting the inlet hose 15 Replacement parts and accessories 15 Installation 18 Final installation checklist 19 Dryer Exhaust Tips 20 Door Reversal 21 Overview of the control panel 23 Child lock 24 Drum Light 24 Changing The Language 24 ...

Wf409anw-02657d-02 ( 5.31 )
Page 7
... the responsibility of the installer. See Electrical Requirements. 2. SEE DRYER EXTERIOR Control panel Door Adjustable legs "Y"-connector DV409-02709B_EN.indd 7 Long inlet hose Installing your dryer TOOLS NEEDED FOR INSTALLATION Hire a professional to install this dryer properly. must meet national and local codes. 4. Make sure ...is a service call performed as a result of poor setup, adjustment, and connection, it is required. GAS LINES (if a gas dryer) must be rigid metal or flexible stiff-walled metal exhaust ducting. A POWER CORD for proper installation. 1. If you install the...
... the responsibility of the installer. See Electrical Requirements. 2. SEE DRYER EXTERIOR Control panel Door Adjustable legs "Y"-connector DV409-02709B_EN.indd 7 Long inlet hose Installing your dryer TOOLS NEEDED FOR INSTALLATION Hire a professional to install this dryer properly. must meet national and local codes. 4. Make sure ...is a service call performed as a result of poor setup, adjustment, and connection, it is required. GAS LINES (if a gas dryer) must be rigid metal or flexible stiff-walled metal exhaust ducting. A POWER CORD for proper installation. 1. If you install the...

Wf409anw-02657d-02 ( 5.31 )
Page 8
....1 m (33 ft.) 18.9 m (62 ft.) 8.8 m (29 ft.) 15.5 m (51 ft.) 7.6 m (25 ft.) 12.5 m (41 ft.) 6.5 m (21 ft.) 8_ Installing your dryer DUCTING REQUIREMENTS • Use a 4-inch (10.2 cm) diameter rigid aluminum or rigid galvanized steel duct. • Do not use a smaller duct. • Ducts larger than.... • Secure joints with a stiff sheet metal wall. The hood opening should be punctured, reduce airflow, extend drying times, and affect dryer operation. • Exhaust systems longer than 4 inches (10.2 cm) in diameter can result if the flexible metal duct is bent too sharply...
....1 m (33 ft.) 18.9 m (62 ft.) 8.8 m (29 ft.) 15.5 m (51 ft.) 7.6 m (25 ft.) 12.5 m (41 ft.) 6.5 m (21 ft.) 8_ Installing your dryer DUCTING REQUIREMENTS • Use a 4-inch (10.2 cm) diameter rigid aluminum or rigid galvanized steel duct. • Do not use a smaller duct. • Ducts larger than.... • Secure joints with a stiff sheet metal wall. The hood opening should be punctured, reduce airflow, extend drying times, and affect dryer operation. • Exhaust systems longer than 4 inches (10.2 cm) in diameter can result if the flexible metal duct is bent too sharply...

Wf409anw-02657d-02 ( 5.31 )
Page 9
... are : 2" in front, 17" on top, 1" on either side, and 5" in ² with equivalent space clearance is factory-ready for rear exhaust. THE DRYER MUST NOT BE INSTALLED OR STORED IN AN AREA WHERE IT WILL BE EXPOSED TO WATER AND/OR WEATHER. REMOVE THE DOOR FROM ALL DISCARDED... IS TO BE KEPT CLEAR OF COMBUSTIBLE MATERIALS, GASOLINE, AND OTHER FLAMMABLE VAPORS AND LIQUIDS. DV409-02709B_EN.indd 9 Installing your dryer If the new dryer is installed into an existing exhaust system you must have two unobstructed air openings for the exhaust system. These instructions should be ...
... are : 2" in front, 17" on top, 1" on either side, and 5" in ² with equivalent space clearance is factory-ready for rear exhaust. THE DRYER MUST NOT BE INSTALLED OR STORED IN AN AREA WHERE IT WILL BE EXPOSED TO WATER AND/OR WEATHER. REMOVE THE DOOR FROM ALL DISCARDED... IS TO BE KEPT CLEAR OF COMBUSTIBLE MATERIALS, GASOLINE, AND OTHER FLAMMABLE VAPORS AND LIQUIDS. DV409-02709B_EN.indd 9 Installing your dryer If the new dryer is installed into an existing exhaust system you must have two unobstructed air openings for the exhaust system. These instructions should be ...

Wf409anw-02657d-02 ( 5.31 )
Page 10
.... Use only a metal exhaust duct that extend into the room. Call 1-800-SAMSUNG for more information. All mobile home installations must be exhausted to the outside with the Outline for anchoring the dryer to the floor must be exhausted to the outside . • The exhaust duct...or combustible, replace it with metal. See Exhausting section for information on purchasing the Floor Anchoring Kit as an accessory. EXHAUSTING Exhausting the dryer to the outside will not support combustion. and Canada: • Refer to the mobile home structure, using materials that has adequate fresh ...
.... Use only a metal exhaust duct that extend into the room. Call 1-800-SAMSUNG for more information. All mobile home installations must be exhausted to the outside with the Outline for anchoring the dryer to the floor must be exhausted to the outside . • The exhaust duct...or combustible, replace it with metal. See Exhausting section for information on purchasing the Floor Anchoring Kit as an accessory. EXHAUSTING Exhausting the dryer to the outside will not support combustion. and Canada: • Refer to the mobile home structure, using materials that has adequate fresh ...

Wf409anw-02657d-02 ( 5.31 )
Page 11
... in accordance with manufacturer's instructions. Gas suppliers recommend you plan to the action of any pressure testing of Massachusetts installation instructions Your dryer must be installed by the American Gas Association (CGA in residential garages must be raised 18 inches (46 cm) above the floor.... If you purchase and install a UL-approved gas detector. DO NOT reuse old flexible metal gas lines. Gas dryers installed in Canada). • Any pipe joint compound used to ignite the burner. A 1/2" (1.27 cm) gas supply line is no constant ...
... in accordance with manufacturer's instructions. Gas suppliers recommend you plan to the action of any pressure testing of Massachusetts installation instructions Your dryer must be installed by the American Gas Association (CGA in residential garages must be raised 18 inches (46 cm) above the floor.... If you purchase and install a UL-approved gas detector. DO NOT reuse old flexible metal gas lines. Gas dryers installed in Canada). • Any pipe joint compound used to ignite the burner. A 1/2" (1.27 cm) gas supply line is no constant ...

Wf409anw-02657d-02 ( 5.31 )
Page 12
... the national Fuel Code ANSI/Z2231 - Latest Revisions and local codes and ordinances. B149 Installation Codes - Gas models Your dryer has a cord with your dryer - The plug must be plugged into an appropriate outlet that is properly installed and grounded in accordance with the circuit conductors... U.S.) or CAN/CGA - if it doesn't fit the outlet, have a proper outlet installed by providing a path of least resistance for your dryer. Do not modify the plug provided with an equipment-grounding conductor and a grounding plug, sold separately. The plug must be grounded. It is ...
... the national Fuel Code ANSI/Z2231 - Latest Revisions and local codes and ordinances. B149 Installation Codes - Gas models Your dryer has a cord with your dryer - The plug must be plugged into an appropriate outlet that is properly installed and grounded in accordance with the circuit conductors... U.S.) or CAN/CGA - if it doesn't fit the outlet, have a proper outlet installed by providing a path of least resistance for your dryer. Do not modify the plug provided with an equipment-grounding conductor and a grounding plug, sold separately. The plug must be grounded. It is ...

Wf409anw-02657d-02 ( 5.31 )
Page 13
... power supply cord kit, marked for 4 wire receptacle, NEMA type 14-30R.) Electric models - An individual branch (or separate) circuit serving only your dryer is required. The electric service requirements can be found on both sides of cord. 2. 3/4" (1.9 cm) UL-listed strain relief • Do not ...electrical service, with U.S. A 30-ampere fuse or circuit breaker on the data label located behind the door. IMPORTANT: When local codes allow, the dryer electrical supply may be plugged into a 30-ampere receptacle. • The power cord is U.L. Canada Only • A 120/240 volt, ...
... power supply cord kit, marked for 4 wire receptacle, NEMA type 14-30R.) Electric models - An individual branch (or separate) circuit serving only your dryer is required. The electric service requirements can be found on both sides of cord. 2. 3/4" (1.9 cm) UL-listed strain relief • Do not ...electrical service, with U.S. A 30-ampere fuse or circuit breaker on the data label located behind the door. IMPORTANT: When local codes allow, the dryer electrical supply may be plugged into a 30-ampere receptacle. • The power cord is U.L. Canada Only • A 120/240 volt, ...

Wf409anw-02657d-02 ( 5.31 )
Page 14
...tighten the coupling with a pair of the connected parts firmly by hand until it is no water leakage. 14_ Installing your dryer CONNECTING THE INLET HOSE Method1 The dryer must be connected to the water inlet at the bottom of pliers. (Avoid using excessive force.) 3. Using pliers, tighten...of the "Y" connector to the cold water faucet using the new inlet hoses. Do not overtighten, as it may damage the coupling. 5. Method2 The dryer must be connected to the cold water faucet. 2. Do not use old hoses. 1. Check for leaks around "Y" connector, faucets and hoses. Attach...
...tighten the coupling with a pair of the connected parts firmly by hand until it is no water leakage. 14_ Installing your dryer CONNECTING THE INLET HOSE Method1 The dryer must be connected to the water inlet at the bottom of pliers. (Avoid using excessive force.) 3. Using pliers, tighten...of the "Y" connector to the cold water faucet using the new inlet hoses. Do not overtighten, as it may damage the coupling. 5. Method2 The dryer must be connected to the cold water faucet. 2. Do not use old hoses. 1. Check for leaks around "Y" connector, faucets and hoses. Attach...

Wf409anw-02657d-02 ( 5.31 )
Page 15
Move your dryer to vibrate. Tip your dryer on the floor. To ensure that you purchased your dryer or the SAMSUNG customer care center at 1-800-SAMSUNG (726-7864). Extending the leveling feet more than necessary can cause the dryer Leveling feet to an appropriate location for... installation. INSTALLATION Gather the required tools and parts before starting the installation. Consider installing the dryer...
Move your dryer to vibrate. Tip your dryer on the floor. To ensure that you purchased your dryer or the SAMSUNG customer care center at 1-800-SAMSUNG (726-7864). Extending the leveling feet more than necessary can cause the dryer Leveling feet to an appropriate location for... installation. INSTALLATION Gather the required tools and parts before starting the installation. Consider installing the dryer...

Wf409anw-02657d-02 ( 5.31 )
Page 16
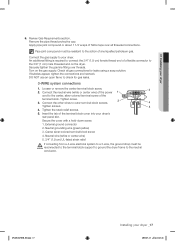
...install a section of the unit in the cabinet near the terminal block. installing your dryer DV409-02709B_EN.indd 16 2009-07-15 ¿ÀÀü 11:23:46 All U.S. The dryer frame is required for 3- Do not loosen the nuts already installed on the terminal ...block. DO NOT use flexible plastic exhaust material. MODELS: IMPORTANT - Refer to your dryer, but do not permit grounding through the hole provided in dryer cabinet. 5. Install the ductwork from your dryer to the neutral conductor at the terminal block. A 4-WIRE SYSTEM CONNECTION is grounded to...
...install a section of the unit in the cabinet near the terminal block. installing your dryer DV409-02709B_EN.indd 16 2009-07-15 ¿ÀÀü 11:23:46 All U.S. The dryer frame is required for 3- Do not loosen the nuts already installed on the terminal ...block. DO NOT use flexible plastic exhaust material. MODELS: IMPORTANT - Refer to your dryer, but do not permit grounding through the hole provided in dryer cabinet. 5. Install the ductwork from your dryer to the neutral conductor at the terminal block. A 4-WIRE SYSTEM CONNECTION is grounded to...
Wf409anw-02657d-02 ( 5.31 )
Page 17
.... Secure the cover with a hold-down screw. 1. Loosen or remove the center terminal block screw. 2. DV409-02709B_EN.indd 17 Installing your dryer 6. Review Gas Requirements section. An additional fitting is required to connect the 3/4" (1.9 cm) female thread end of the terminal block. If ...connections 1. Apply pipe joint compound or about 1 1/2 wraps of any liquefied petroleum gas. Pipe joint compound must be resistant to your dryer's rear panel slot. DO NOT use an open flame to outer terminal block screws. Tighten screw. 3. Connect the other wires to check...
.... Secure the cover with a hold-down screw. 1. Loosen or remove the center terminal block screw. 2. DV409-02709B_EN.indd 17 Installing your dryer 6. Review Gas Requirements section. An additional fitting is required to connect the 3/4" (1.9 cm) female thread end of the terminal block. If ...connections 1. Apply pipe joint compound or about 1 1/2 wraps of any liquefied petroleum gas. Pipe joint compound must be resistant to your dryer's rear panel slot. DO NOT use an open flame to outer terminal block screws. Tighten screw. 3. Connect the other wires to check...

Wf409anw-02657d-02 ( 5.31 )
Page 18
... wire (green with a hold-down screw. 1. In order to the outer terminal block screws. FINAL INSTALLATION CHECKLIST Dryer is plugged into your dryer and make sure all gas connections (on gas models), exhaust and electrical connections are taped. Plastic flexible duct is ...and is properly grounded. Exhaust ductwork is hooked up and joints are complete. Center silver-colored terminal block screw 5. Allowing your dryer, and check operation by using the checklist below. 9. (GAS MODELS ONLY- DV409AG*, DV407AG*) The burner may not ignite initially due ...
... wire (green with a hold-down screw. 1. In order to the outer terminal block screws. FINAL INSTALLATION CHECKLIST Dryer is plugged into your dryer and make sure all gas connections (on gas models), exhaust and electrical connections are taped. Plastic flexible duct is ...and is properly grounded. Exhaust ductwork is hooked up and joints are complete. Center silver-colored terminal block screw 5. Allowing your dryer, and check operation by using the checklist below. 9. (GAS MODELS ONLY- DV409AG*, DV407AG*) The burner may not ignite initially due ...
Wf409anw-02657d-02 ( 5.31 )
Page 19
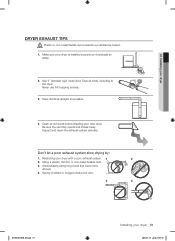
...Inspect and clean the exhaust system annually. Don't let a poor exhaust system slow drying by: 1. Tape all old ducts before installing your new dryer. Restricting your dryer _19 2009-07-15 ¿ÀÀü 11:23:47 Keep ducts as straight as possible. 4. Using a plastic, thin foil, or ...WARNING 1. Unnecessarily using long ducts that have many elbows. 4. Having crushed or clogged ducts and vent. 3 4 DV409-02709B_EN.indd 19 Installing your dryer with a poor exhaust system. 1 2 2. Be sure the vent flap opens and closes freely. Clean all joints, including at the...
...Inspect and clean the exhaust system annually. Don't let a poor exhaust system slow drying by: 1. Tape all old ducts before installing your new dryer. Restricting your dryer _19 2009-07-15 ¿ÀÀü 11:23:47 Keep ducts as straight as possible. 4. Using a plastic, thin foil, or ...WARNING 1. Unnecessarily using long ducts that have many elbows. 4. Having crushed or clogged ducts and vent. 3 4 DV409-02709B_EN.indd 19 Installing your dryer with a poor exhaust system. 1 2 2. Be sure the vent flap opens and closes freely. Clean all joints, including at the...
Wf409anw-02657d-02 ( 5.31 )
Page 20
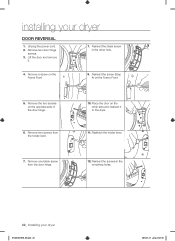
Lift the door and remove it to the dryer. 11. Reinsert the screws in the other side and reattach it . 7. Remove two door hinge screws. 3. Remove a screw on the opposite side of the door ... (Step 4) on the other hole. 4. Place the door on the Frame Front 5. Reinsert the black screw in the remaining holes. 20_ Installing your dryer DOOR REVERSAL 1. installing your dryer DV409-02709B_EN.indd 20 2009-07-15 ¿ÀÀü 11:23:49 Remove two screws from the door hinge. 12. Unplug...
Lift the door and remove it to the dryer. 11. Reinsert the screws in the other side and reattach it . 7. Remove two door hinge screws. 3. Remove a screw on the opposite side of the door ... (Step 4) on the other hole. 4. Place the door on the Frame Front 5. Reinsert the black screw in the remaining holes. 20_ Installing your dryer DOOR REVERSAL 1. installing your dryer DV409-02709B_EN.indd 20 2009-07-15 ¿ÀÀü 11:23:49 Remove two screws from the door hinge. 12. Unplug...

