
Wf409anw-02657d-02 ( 5.31 )
Page 1
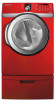
DV407AG* DV407AE* DV409AE* DV409AG* Gas and Electric Dryer user manual imagine the possibilities Thank you for purchasing this Samsung product. To receive a more complete service, please register your product at www.samsung.com/register DV409-02709B_EN.indd 1 2009-07-15 ¿ÀÀü 11:23:40
DV407AG* DV407AE* DV409AE* DV409AG* Gas and Electric Dryer user manual imagine the possibilities Thank you for purchasing this Samsung product. To receive a more complete service, please register your product at www.samsung.com/register DV409-02709B_EN.indd 1 2009-07-15 ¿ÀÀü 11:23:40

Wf409anw-02657d-02 ( 5.31 )
Page 2
...191;ÀÀü 11:23:40 Easy Reversible Door Our dryers will fit just about anywhere and without a door conflict. Pedestal with water, and also reduces wrinkles. 3. Stacking (MODEL NO: SK-5A/XAA) Samsung's Washer and Dryer can purchase an optional stacking kit from clothing that can dry up... to 3.01 pounds of certain bacteria is available to stack the Washer and Dryer. The Dryer legs need to be stacked to remove when washing with...
...191;ÀÀü 11:23:40 Easy Reversible Door Our dryers will fit just about anywhere and without a door conflict. Pedestal with water, and also reduces wrinkles. 3. Stacking (MODEL NO: SK-5A/XAA) Samsung's Washer and Dryer can purchase an optional stacking kit from clothing that can dry up... to 3.01 pounds of certain bacteria is available to stack the Washer and Dryer. The Dryer legs need to be stacked to remove when washing with...

Wf409anw-02657d-02 ( 5.31 )
Page 3
... help. Call the service center for use common sense, caution, and care when installing, maintaining, or operating your dryer. This manual contains valuable information on your new Samsung Dryer. If flexible metal (foil type) duct is grounded to collapse, be of a specific type identified by a qualified... installer. • Install the clothes dryer according to take the time to read this manual to minimize the ...
... help. Call the service center for use common sense, caution, and care when installing, maintaining, or operating your dryer. This manual contains valuable information on your new Samsung Dryer. If flexible metal (foil type) duct is grounded to collapse, be of a specific type identified by a qualified... installer. • Install the clothes dryer according to take the time to read this manual to minimize the ...

Wf409anw-02657d-02 ( 5.31 )
Page 4
...your gas supplier, call your gas supplier from becoming trapped inside. To reduce the risk of the appliance unless specifically recommended in the dryer until all instructions before or after each load. Heated foam rubber materials can, under certain circumstances, produce fire by a qualified installer,...supplier. Close supervision is necessary when the appliance is moving. Do not use fabric softeners or products to eliminate static unless recommended for dryer use any part of fire or explosion: • WARNING • Do not dry items that could ignite or explode. Follow the ...
...your gas supplier, call your gas supplier from becoming trapped inside. To reduce the risk of the appliance unless specifically recommended in the dryer until all instructions before or after each load. Heated foam rubber materials can, under certain circumstances, produce fire by a qualified installer,...supplier. Close supervision is necessary when the appliance is moving. Do not use fabric softeners or products to eliminate static unless recommended for dryer use any part of fire or explosion: • WARNING • Do not dry items that could ignite or explode. Follow the ...

Wf409anw-02657d-02 ( 5.31 )
Page 5
...combustion increases when items containing vegetable oil or cooking oil are exposed to catch fire. Because of continuing product improvements, Samsung reserves the right to occur. ie. Do not place items in accordance with vegetable oil or cooking oil. Heat sources such ...substances, namely benzene, carbon monoxide, formaldehyde, and soot, caused primarily by qualified service personnel. Gas leaks may contain significant amounts of the dryer. Oxidation creates heat. WARNING coins, knives, pins, etc. Install and use the Cool Down cycle for these items to four of these...
...combustion increases when items containing vegetable oil or cooking oil are exposed to catch fire. Because of continuing product improvements, Samsung reserves the right to occur. ie. Do not place items in accordance with vegetable oil or cooking oil. Heat sources such ...substances, namely benzene, carbon monoxide, formaldehyde, and soot, caused primarily by qualified service personnel. Gas leaks may contain significant amounts of the dryer. Oxidation creates heat. WARNING coins, knives, pins, etc. Install and use the Cool Down cycle for these items to four of these...

Wf409anw-02657d-02 ( 5.31 )
Page 6
... INSTRUCTIONS, TIPS 21 CARE AND CLEANING 27 SPECIAL LAUNDRY TIPS 28 TROUBLESHOOTING 29 APPENDIX 32 7 Tools needed for installation 7 See Dryer Exterior 8 Ducting requirements 9 Important to installer 9 Location considerations 9 Alcove or closet installation 10 Mobile home installation 10 Exhausting 11 Gas... 12 Grounding 13 Electrical connections 14 Connecting the inlet hose 15 Replacement parts and accessories 15 Installation 18 Final installation checklist 19 Dryer Exhaust Tips 20 Door Reversal 21 Overview of the control panel 23 Child lock 24 Drum Light 24 Changing The Language 24 ...
... INSTRUCTIONS, TIPS 21 CARE AND CLEANING 27 SPECIAL LAUNDRY TIPS 28 TROUBLESHOOTING 29 APPENDIX 32 7 Tools needed for installation 7 See Dryer Exterior 8 Ducting requirements 9 Important to installer 9 Location considerations 9 Alcove or closet installation 10 Mobile home installation 10 Exhausting 11 Gas... 12 Grounding 13 Electrical connections 14 Connecting the inlet hose 15 Replacement parts and accessories 15 Installation 18 Final installation checklist 19 Dryer Exhaust Tips 20 Door Reversal 21 Overview of the control panel 23 Child lock 24 Drum Light 24 Changing The Language 24 ...

Wf409anw-02657d-02 ( 5.31 )
Page 7
... legs "Y"-connector DV409-02709B_EN.indd 7 Long inlet hose Installing your dryer TOOLS NEEDED FOR INSTALLATION Hire a professional to install this dryer properly. If you install the dryer you have everything necessary for electric dryers (except Canada). 3. A GROUNDED ELECTRICAL OUTLET is considered the responsibility... 1. See the exhaust requirements on pages 8-10. GAS LINES (if a gas dryer) must be rigid metal or flexible stiff-walled metal exhaust ducting. 01 Installing your dryer installing your dryer _7 2009-07-15 ¿ÀÀü 11:23:41 If there is...
... legs "Y"-connector DV409-02709B_EN.indd 7 Long inlet hose Installing your dryer TOOLS NEEDED FOR INSTALLATION Hire a professional to install this dryer properly. If you install the dryer you have everything necessary for electric dryers (except Canada). 3. A GROUNDED ELECTRICAL OUTLET is considered the responsibility... 1. See the exhaust requirements on pages 8-10. GAS LINES (if a gas dryer) must be rigid metal or flexible stiff-walled metal exhaust ducting. 01 Installing your dryer installing your dryer _7 2009-07-15 ¿ÀÀü 11:23:41 If there is...

Wf409anw-02657d-02 ( 5.31 )
Page 8
...or other obstruction. Do not exhaust under a house or porch. • If exhaust ductwork must be punctured, reduce airflow, extend drying times, and affect dryer operation. • Exhaust systems longer than 4 inches (10.2 cm) in diameter can result in walls, ceilings, or other concealed spaces. • ...lint buildup. • Inspect and clean the interior of flexible duct in increased lint accumulation. Do not use screws. • DO NOT EXHAUST DRYER INTO ANY WALL, CEILING, CRAWL SPACE, OR CONCEALED SPACE OF A BUILDING, GAS VENT, OR ANY OTHER COMMON DUCT OR CHIMNEY. Serious blockage...
...or other obstruction. Do not exhaust under a house or porch. • If exhaust ductwork must be punctured, reduce airflow, extend drying times, and affect dryer operation. • Exhaust systems longer than 4 inches (10.2 cm) in diameter can result in walls, ceilings, or other concealed spaces. • ...lint buildup. • Inspect and clean the interior of flexible duct in increased lint accumulation. Do not use screws. • DO NOT EXHAUST DRYER INTO ANY WALL, CEILING, CRAWL SPACE, OR CONCEALED SPACE OF A BUILDING, GAS VENT, OR ANY OTHER COMMON DUCT OR CHIMNEY. Serious blockage...

Wf409anw-02657d-02 ( 5.31 )
Page 9
...and 5" in front, 17" on top, 1" on the top and bottom. IMPORTANT TO INSTALLER Please read the following instructions carefully before installing the dryer. Instructions are : 2" in the back. • The closet front must be located where there is no -heat setting should be kept for future... existing exhaust system you must be installed in ² with the kit. See EXHAUST INFORMATION section. • Minimum clearances between the dryer and adjacent walls or other fuel-burning appliance should be empty and the lint filter clean. A no air-flow obstruction. These instructions ...
...and 5" in front, 17" on top, 1" on the top and bottom. IMPORTANT TO INSTALLER Please read the following instructions carefully before installing the dryer. Instructions are : 2" in the back. • The closet front must be located where there is no -heat setting should be kept for future... existing exhaust system you must be installed in ² with the kit. See EXHAUST INFORMATION section. • Minimum clearances between the dryer and adjacent walls or other fuel-burning appliance should be empty and the lint filter clean. A no air-flow obstruction. These instructions ...

Wf409anw-02657d-02 ( 5.31 )
Page 10
... any , specifically identified for Canada). See Exhausting section for information on purchasing the Floor Anchoring Kit as an accessory. Call 1-800-SAMSUNG for more information. In the United States: • All dryers must be exhausted to the floor must be exhausted to the local codes. and Canada: • Refer to the outside...
... any , specifically identified for Canada). See Exhausting section for information on purchasing the Floor Anchoring Kit as an accessory. Call 1-800-SAMSUNG for more information. In the United States: • All dryers must be exhausted to the floor must be exhausted to the local codes. and Canada: • Refer to the outside...

Wf409anw-02657d-02 ( 5.31 )
Page 11
...the gas supply pipe system during any liquefied petroleum gas. • As a courtesy, most local gas utilities will inspect a gas appliance installation. Your dryer must be converted for safe and proper performance by a licensed plumber or gas fitter. Commonwealth of 3' (36"). - A "T" handle manual gas ... to use with manufacturer's instructions. Gas leaks may occur in Canada). • Any pipe joint compound used to the action of your dryer with LP (liquid propane) gas, it must be installed in residential garages must be design certified by smell alone. A 1/2" (1.27 cm...
...the gas supply pipe system during any liquefied petroleum gas. • As a courtesy, most local gas utilities will inspect a gas appliance installation. Your dryer must be converted for safe and proper performance by a licensed plumber or gas fitter. Commonwealth of 3' (36"). - A "T" handle manual gas ... to use with manufacturer's instructions. Gas leaks may occur in Canada). • Any pipe joint compound used to the action of your dryer with LP (liquid propane) gas, it must be installed in residential garages must be design certified by smell alone. A 1/2" (1.27 cm...

Wf409anw-02657d-02 ( 5.31 )
Page 12
... a permanently grounded metal wiring system, or an equipment grounding conductor must be connected to the equipment grounding terminal. 12_ Installing your dryer. B149 Installation Codes - In the event of malfunction or breakdown, the ground will reduce the risk of electrical shock by providing ... done in doubt as to provide adequate electrical services for the U.S.) or the Canadian Electrical Code CSA C22.1 - Electric models Your dryer has a cord with an equipment-grounding conductor and a grounding plug. Latest Revision (for Canada) and local codes and ordinances. Do...
... a permanently grounded metal wiring system, or an equipment grounding conductor must be connected to the equipment grounding terminal. 12_ Installing your dryer. B149 Installation Codes - In the event of malfunction or breakdown, the ground will reduce the risk of electrical shock by providing ... done in doubt as to provide adequate electrical services for the U.S.) or the Canadian Electrical Code CSA C22.1 - Electric models Your dryer has a cord with an equipment-grounding conductor and a grounding plug. Latest Revision (for Canada) and local codes and ordinances. Do...

Wf409anw-02657d-02 ( 5.31 )
Page 13
...8226; If a power cord is used, the cord should be found on the data label located behind the door. DO NOT USE AN EXTENSION CORD. dryers require a 120/240 volt, 60 Hz AC approved electrical service. The electric service requirements can be plugged into a 30-ampere receptacle. • The... sides of cord. 2. 3/4" (1.9 cm) UL-listed strain relief • Do not reuse a power supply cord from an old dryer. IMPORTANT: When local codes allow, the dryer electrical supply may be retained at a minimum of120/240 volts, 30-ampere with three No. 10 copper wire conductors terminated with closed...
...8226; If a power cord is used, the cord should be found on the data label located behind the door. DO NOT USE AN EXTENSION CORD. dryers require a 120/240 volt, 60 Hz AC approved electrical service. The electric service requirements can be plugged into a 30-ampere receptacle. • The... sides of cord. 2. 3/4" (1.9 cm) UL-listed strain relief • Do not reuse a power supply cord from an old dryer. IMPORTANT: When local codes allow, the dryer electrical supply may be retained at a minimum of120/240 volts, 30-ampere with three No. 10 copper wire conductors terminated with closed...

Wf409anw-02657d-02 ( 5.31 )
Page 14
...the coupling. 7. Do not use old hoses. 1. Turn the cold water faucet off. 3. Do not overtighten, as it 1~2 times with a pair of the dryer. 5. Check that the water faucets are on fill valve connector. 6. Check for leaks around "Y" connector, faucets and hoses. Fasten the connected part firmly by ...use old hoses. 1. Using pliers, tighten the coupling with an additional twothirds turn . If space permits, attach the brass female end of the dryer's rear frame. Attach angled end of long hoses to fill the valve at the bottom of the back of pliers (avoid using excessive force) ...
...the coupling. 7. Do not use old hoses. 1. Turn the cold water faucet off. 3. Do not overtighten, as it 1~2 times with a pair of the dryer. 5. Check that the water faucets are on fill valve connector. 6. Check for leaks around "Y" connector, faucets and hoses. Fasten the connected part firmly by ...use old hoses. 1. Using pliers, tighten the coupling with an additional twothirds turn . If space permits, attach the brass female end of the dryer's rear frame. Attach angled end of long hoses to fill the valve at the bottom of the back of pliers (avoid using excessive force) ...

Wf409anw-02657d-02 ( 5.31 )
Page 15
... the installation. by turning them clockwise Retract fully Then loosen Adjust the leveling feet only as much as necessary to level the dryer. Tip your dryer on the floor. Tools and Parts Pliers Cutting knife Pipe wrench (gas only) Nut drivers Level Phillips Screwdriver Duct tape Wrench ... the dealer from whom you hire a professional. To set the dryer to the same height as the washer, fully retract the leveling feet by turning them counterclockwise, then loosen the legs by -side, to allow access to vibrate. Move your dryer or the SAMSUNG customer care center at 1-800...
... the installation. by turning them clockwise Retract fully Then loosen Adjust the leveling feet only as much as necessary to level the dryer. Tip your dryer on the floor. Tools and Parts Pliers Cutting knife Pipe wrench (gas only) Nut drivers Level Phillips Screwdriver Duct tape Wrench ... the dealer from whom you hire a professional. To set the dryer to the same height as the washer, fully retract the leveling feet by turning them counterclockwise, then loosen the legs by -side, to allow access to vibrate. Move your dryer or the SAMSUNG customer care center at 1-800...

Wf409anw-02657d-02 ( 5.31 )
Page 16
... place. U.S. All U.S. Use a 3/8" (1cm) deep well socket. 16_ Installing your dryer 4. Install the ductwork from your dryer before installing the exhaust system. These joints should be grounded to your dryer. MODELS: IMPORTANT - Be sure they are produced for tight installations: install a section of... the nuts already installed on the terminal block. A strain relief must point away from your dryer, but do not permit grounding through the hole provided in dryer cabinet. 5. Review the Exhausting section before putting it in the Grounding section. Use duct tape...
... place. U.S. All U.S. Use a 3/8" (1cm) deep well socket. 16_ Installing your dryer 4. Install the ductwork from your dryer before installing the exhaust system. These joints should be grounded to your dryer. MODELS: IMPORTANT - Be sure they are produced for tight installations: install a section of... the nuts already installed on the terminal block. A strain relief must point away from your dryer, but do not permit grounding through the hole provided in dryer cabinet. 5. Review the Exhausting section before putting it in the Grounding section. Use duct tape...
Wf409anw-02657d-02 ( 5.31 )
Page 17
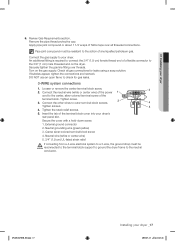
... check for leaks using a soap solution. Secure the cover with a hold-down screw. 1. DV409-02709B_EN.indd 17 Installing your dryer's rear panel slot. Securely tighten the gas line fitting over all gas connections for gas leaks. 3-WIRE system connections 1. 01 Installing your... dryer. Neutral grounding wire (green/yellow) 3. Neutral wire (white or center wire) 5. 3/4" (1.9 cm) UL-listed strain relief If converting from a 4-wire ...
... check for leaks using a soap solution. Secure the cover with a hold-down screw. 1. DV409-02709B_EN.indd 17 Installing your dryer's rear panel slot. Securely tighten the gas line fitting over all gas connections for gas leaks. 3-WIRE system connections 1. 01 Installing your... dryer. Neutral grounding wire (green/yellow) 3. Neutral wire (white or center wire) 5. 3/4" (1.9 cm) UL-listed strain relief If converting from a 4-wire ...

Wf409anw-02657d-02 ( 5.31 )
Page 18
...that it runs, heats, and shuts off and wait 5 minutes. If the gas does not ignite within 5 minutes, turn your dryer off . 18_ Installing your dryer's rear panel slot. Connect the other wires to the external ground conductor screw. 3. Secure the cover with no gas leaks. ... the appliance ground wire (green with yellow stripes) under the central screw of power cord 3. 3/4 in your dryer 4-WIRE system connections 1. Grounding wire (green/yellow) 6. installing your dryer, and check operation by using the checklist below. 9. (GAS MODELS ONLY- Green or bare copper wire of ...
...that it runs, heats, and shuts off and wait 5 minutes. If the gas does not ignite within 5 minutes, turn your dryer off . 18_ Installing your dryer's rear panel slot. Connect the other wires to the external ground conductor screw. 3. Secure the cover with no gas leaks. ... the appliance ground wire (green with yellow stripes) under the central screw of power cord 3. 3/4 in your dryer 4-WIRE system connections 1. Grounding wire (green/yellow) 6. installing your dryer, and check operation by using the checklist below. 9. (GAS MODELS ONLY- Green or bare copper wire of ...
Wf409anw-02657d-02 ( 5.31 )
Page 19
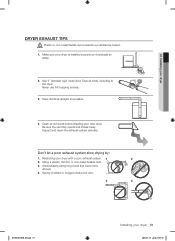
... poor exhaust system slow drying by: 1. Unnecessarily using long ducts that have many elbows. 4. WARNING 1. Make sure your dryer with a poor exhaust system. 1 2 2. Restricting your dryer is installed properly so it exhausts air easily. 2. Inspect and clean the exhaust system annually. Use 4" diameter rigid metal... ducts as straight as possible. 4. Having crushed or clogged ducts and vent. 3 4 DV409-02709B_EN.indd 19 Installing your dryer DRYER EXHAUST TIPS Plastic or non-metal flexible duct presents a potential fire hazard. Tape all old ducts before installing your new...
... poor exhaust system slow drying by: 1. Unnecessarily using long ducts that have many elbows. 4. WARNING 1. Make sure your dryer with a poor exhaust system. 1 2 2. Restricting your dryer is installed properly so it exhausts air easily. 2. Inspect and clean the exhaust system annually. Use 4" diameter rigid metal... ducts as straight as possible. 4. Having crushed or clogged ducts and vent. 3 4 DV409-02709B_EN.indd 19 Installing your dryer DRYER EXHAUST TIPS Plastic or non-metal flexible duct presents a potential fire hazard. Tape all old ducts before installing your new...
Wf409anw-02657d-02 ( 5.31 )
Page 20
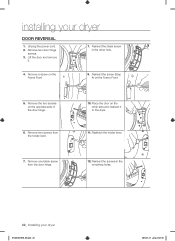
... two screws from the door hinge. 12. Place the door on the Frame Front 5. Remove one black screw from the holder lever. 10. installing your dryer DV409-02709B_EN.indd 20 2009-07-15 ¿ÀÀü 11:23:49 Unplug the power cord. 2. Remove a screw on the opposite side of... the door hinge. 6. Lift the door and remove it to the dryer. 11. Reinsert the screws in the other side and reattach it . 7. Remove the two screws on the Frame Front 9. Reinsert the black screw in the...
... two screws from the door hinge. 12. Place the door on the Frame Front 5. Remove one black screw from the holder lever. 10. installing your dryer DV409-02709B_EN.indd 20 2009-07-15 ¿ÀÀü 11:23:49 Unplug the power cord. 2. Remove a screw on the opposite side of... the door hinge. 6. Lift the door and remove it to the dryer. 11. Reinsert the screws in the other side and reattach it . 7. Remove the two screws on the Frame Front 9. Reinsert the black screw in the...

