(English)
Page 1
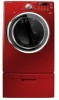
To receive more complete service, please register your product at www.samsung.com/register DV350-02821A_EN.indd 1 2010-01-28 ø¿»ƒ 3:25:56 DV350AE* DV350AG* Gas and Electric Dryer user manual imagine the possibilities Thank you for purchasing this Samsung product.
To receive more complete service, please register your product at www.samsung.com/register DV350-02821A_EN.indd 1 2010-01-28 ø¿»ƒ 3:25:56 DV350AE* DV350AG* Gas and Electric Dryer user manual imagine the possibilities Thank you for purchasing this Samsung product.

(English)
Page 2
.... Steam cycle This cycle sprays a small amount of water into the fabric during the drying cycle. The direction of tumbling with you time for clothing, bedding, towels, or other items needing sanitization. It also offers a built-in life. 6. Use this course to remove when washing with just four screws. 8. Easy Reversible Door Our dryers will fit just about anywhere. Use this cycle for more air through high temperature heat. NSF...
.... Steam cycle This cycle sprays a small amount of water into the fabric during the drying cycle. The direction of tumbling with you time for clothing, bedding, towels, or other items needing sanitization. It also offers a built-in life. 6. Use this course to remove when washing with just four screws. 8. Easy Reversible Door Our dryers will fit just about anywhere. Use this cycle for more air through high temperature heat. NSF...
(English)
Page 3
... full advantage of your manufacturer about problems or conditions you do not cover all installation instructions. Flexible venting materials are known to prevent electric shock. safety instructions Congratulations on the installation, use, and care of your dryer's many benefits and features. Unplug the power plug from the wall socket. Do NOT attempt. Follow directions explicity. If flexible metal (foil type) duct is grounded to collapse, be...
... full advantage of your manufacturer about problems or conditions you do not cover all installation instructions. Flexible venting materials are known to prevent electric shock. safety instructions Congratulations on the installation, use, and care of your dryer's many benefits and features. Unplug the power plug from the wall socket. Do NOT attempt. Follow directions explicity. If flexible metal (foil type) duct is grounded to collapse, be...
(English)
Page 4
... touch any electrical switch. • Do not use by the manufacturer of the fabric softener or product. There are many highly flammable items used near children and pets. Do not allow children or pets to play on, in, or in the user-repair instructions and you cannot reach your gas supplier, call your dryer from service, remove the door to the drying compartment...
... touch any electrical switch. • Do not use by the manufacturer of the fabric softener or product. There are many highly flammable items used near children and pets. Do not allow children or pets to play on, in, or in the user-repair instructions and you cannot reach your gas supplier, call your dryer from service, remove the door to the drying compartment...
(English)
Page 5
... in hot water with large buckles, buttons, or other reproductive harm and requires businesses to warn customers of potential exposure to change specifications without notice. Piling, stacking, or storing these items from the dryer hot or interrupt the drying cycle until the items have been spotted or soaked with the manufacturer's instructions. See installation instructions for these substances can ignite spontaneoulsy. Gas leaks may prevent heat...
... in hot water with large buckles, buttons, or other reproductive harm and requires businesses to warn customers of potential exposure to change specifications without notice. Piling, stacking, or storing these items from the dryer hot or interrupt the drying cycle until the items have been spotted or soaked with the manufacturer's instructions. See installation instructions for these substances can ignite spontaneoulsy. Gas leaks may prevent heat...
(English)
Page 6
... Dryer Exterior 8 Ducting requirements 9 Important to installer 9 Location considerations 9 Alcove or closet installation 10 Mobile home installation 10 Exhausting 11 Gas requirements 12 Electrical requirements 12 Grounding 13 Electrical connections 14 Connecting the inlet hose 15 Replacement parts and accessories 15 Installation 18 Final installation checklist 19 Dryer Exhaust Tips 20 Door Reversal 21 Overview of the control panel 23 Child lock 24 Drum Light 24 Changing The Language 24 My cycle 25 Rack Dry 26 Clean the lint filter 26 Load the dryer properly 26 Getting started 27 Control Panel...
... Dryer Exterior 8 Ducting requirements 9 Important to installer 9 Location considerations 9 Alcove or closet installation 10 Mobile home installation 10 Exhausting 11 Gas requirements 12 Electrical requirements 12 Grounding 13 Electrical connections 14 Connecting the inlet hose 15 Replacement parts and accessories 15 Installation 18 Final installation checklist 19 Dryer Exhaust Tips 20 Door Reversal 21 Overview of the control panel 23 Child lock 24 Drum Light 24 Changing The Language 24 My cycle 25 Rack Dry 26 Clean the lint filter 26 Load the dryer properly 26 Getting started 27 Control Panel...
(English)
Page 7
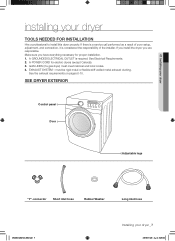
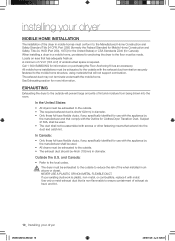
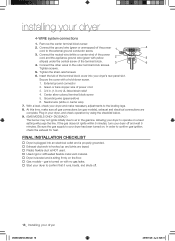
... the exhaust requirements on pages 8-10. A GROUNDED ELECTRICAL OUTLET is considered the responsibility of poor setup, adjustment, and connection, it is required. EXHAUST SYSTEM - See Electrical Requirements. 2. Make sure you are responsible. SEE DRYER EXTERIOR Control panel Door Adjustable legs "Y"-connector Short inlet hose Rubber Washer Long inlet hose DV350-02821A_EN.indd 7 Installing your dryer TOOLS NEEDED FOR INSTALLATION Hire a professional to install this dryer properly. must meet national and local codes. 4. 01 Installing your dryer installing your dryer _7...
... the exhaust requirements on pages 8-10. A GROUNDED ELECTRICAL OUTLET is considered the responsibility of poor setup, adjustment, and connection, it is required. EXHAUST SYSTEM - See Electrical Requirements. 2. Make sure you are responsible. SEE DRYER EXTERIOR Control panel Door Adjustable legs "Y"-connector Short inlet hose Rubber Washer Long inlet hose DV350-02821A_EN.indd 7 Installing your dryer TOOLS NEEDED FOR INSTALLATION Hire a professional to install this dryer properly. must meet national and local codes. 4. 01 Installing your dryer installing your dryer _7...
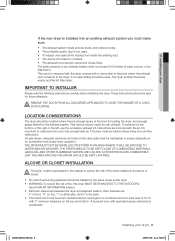
(English)
Page 9
... appliance should be located where there is enough space at the point where the exhaust duct connects to ensure adequate air for the exhaust system. The dryer tumbler should be used . • To Inspect and clean all lint buildup from inside the existing duct. • The duct is not kinked or crushed. • The exhaust hood damper opens and closes freely. Instructions are : 2" in front...
... appliance should be located where there is enough space at the point where the exhaust duct connects to ensure adequate air for the exhaust system. The dryer tumbler should be used . • To Inspect and clean all lint buildup from inside the existing duct. • The duct is not kinked or crushed. • The exhaust hood damper opens and closes freely. Instructions are : 2" in front...
(English)
Page 10
... required exhaust duct is non-flammable to the local codes. installing your dryer MOBILE HOME INSTALLATION The installation of the dryer in diameter. • Only those foil-type flexible ducts, if any , specifically identified for use with the appliance by the manufacturer and that comply with the Outline for Clothes Dryer Transition Duct, Subject 2158A, shall be used . • All dryers must be exhausted to the outside. • The exhaust duct...
... required exhaust duct is non-flammable to the local codes. installing your dryer MOBILE HOME INSTALLATION The installation of the dryer in diameter. • Only those foil-type flexible ducts, if any , specifically identified for use with the appliance by the manufacturer and that comply with the Outline for Clothes Dryer Transition Duct, Subject 2158A, shall be used . • All dryers must be exhausted to the outside. • The exhaust duct...

(English)
Page 11
...'s instructions. Flexible gas lines must be raised 18 inches (46 cm) above the floor. Gas dryers installed in accordance with a burner vent for test gauge connection, must be resistant to install your dryer GAS REQUIREMENTS Use only natural or LP (liquid propane) gases. Additionally, a 1/8" (0.3 cm) N.P.T. (National Pipe Thread) plugged tapping, accessible for use in residential garages must be design certified by a qualified service technician. 01 Installing your dryer, the connector must have a maximum length...
...'s instructions. Flexible gas lines must be raised 18 inches (46 cm) above the floor. Gas dryers installed in accordance with a burner vent for test gauge connection, must be resistant to install your dryer GAS REQUIREMENTS Use only natural or LP (liquid propane) gases. Additionally, a 1/8" (0.3 cm) N.P.T. (National Pipe Thread) plugged tapping, accessible for use in residential garages must be design certified by a qualified service technician. 01 Installing your dryer, the connector must have a maximum length...
(English)
Page 12
... equipment grounding terminal. 12_ Installing your dryer DV350-02821A_EN.indd 12 2010-01-28 ø¿»ƒ 3:26:02 installing your dryer ELECTRICAL REQUIREMENTS Wiring diagram is located on the plate below the control panel. • WARNING • • Improper connection of the equipment grounding conductor can result in a risk of electrical shock by a qualified electrician. NEVER CONNECT GROUND WIRE TO PLASTIC PLUMBING LINES, GAS LINES, OR HOT WATER PIPES...
... equipment grounding terminal. 12_ Installing your dryer DV350-02821A_EN.indd 12 2010-01-28 ø¿»ƒ 3:26:02 installing your dryer ELECTRICAL REQUIREMENTS Wiring diagram is located on the plate below the control panel. • WARNING • • Improper connection of the equipment grounding conductor can result in a risk of electrical shock by a qualified electrician. NEVER CONNECT GROUND WIRE TO PLASTIC PLUMBING LINES, GAS LINES, OR HOT WATER PIPES...
(English)
Page 13
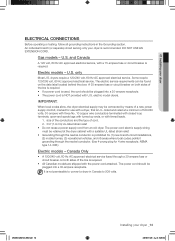
... copper wire conductors terminated with closed loop terminals, open-end spade lugs with turned up ends, or with a 15-ampere fuse or circuit breaker is U.L. DV350-02821A_EN.indd 13 Installing your dryer ELECTRICAL CONNECTIONS Before operating or testing, follow all grounding instructions in Canada to 208 volts. Electric models - only Most U.S. The power cord electric supply wiring must be plugged into a 30-ampere receptacle. U.S. Some require 120/208 volt, 60 Hz approved electrical service. and...
... copper wire conductors terminated with closed loop terminals, open-end spade lugs with turned up ends, or with a 15-ampere fuse or circuit breaker is U.L. DV350-02821A_EN.indd 13 Installing your dryer ELECTRICAL CONNECTIONS Before operating or testing, follow all grounding instructions in Canada to 208 volts. Electric models - only Most U.S. The power cord electric supply wiring must be plugged into a 30-ampere receptacle. U.S. Some require 120/208 volt, 60 Hz approved electrical service. and...
(English)
Page 15
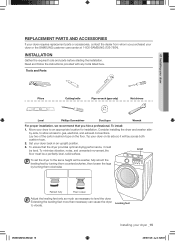
... dryer requires replacement parts or accessories, contact the dealer from whom you hire a professional. INSTALLATION Gather the required tools and parts before starting the installation. To set the dryer to the same height as necessary to an appropriate location for installation. Read and follow the instructions provided with any tools listed here. Consider installing the dryer and washer side- Tools and Parts Pliers Cutting knife Pipe wrench (gas only) Nut drivers...
... dryer requires replacement parts or accessories, contact the dealer from whom you hire a professional. INSTALLATION Gather the required tools and parts before starting the installation. To set the dryer to the same height as necessary to an appropriate location for installation. Read and follow the instructions provided with any tools listed here. Consider installing the dryer and washer side- Tools and Parts Pliers Cutting knife Pipe wrench (gas only) Nut drivers...
(English)
Page 18
... of the power cord to confirm gas ignition, check the exhaust for heat. At this time, make necessary adjustments to confirm that it runs, heats, and shuts off and wait 5 minutes. If the gas does not ignite within 5 minutes, turn your dryer's rear panel slot. Grounding wire (green/yellow) 6. Green or bare copper wire of the terminal block. 4. Remove the center terminal block screw. 2. Secure the cover with no gas leaks. Start your dryer to...
... of the power cord to confirm gas ignition, check the exhaust for heat. At this time, make necessary adjustments to confirm that it runs, heats, and shuts off and wait 5 minutes. If the gas does not ignite within 5 minutes, turn your dryer's rear panel slot. Grounding wire (green/yellow) 6. Green or bare copper wire of the terminal block. 4. Remove the center terminal block screw. 2. Secure the cover with no gas leaks. Start your dryer to...
(English)
Page 19
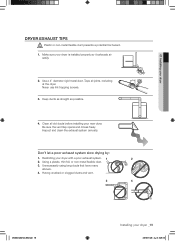
... exhausts air easily. 2. Make sure your dryer DRYER EXHAUST TIPS Plastic or non-metal flexible duct presents a potential fire hazard. Never use lint-trapping screws. 3. Restricting your new dryer. Clean all joints, including at the dryer. Using a plastic, thin foil, or non-metal flexible duct. 3. Tape all old ducts before installing your dryer with a poor exhaust system. 1 2 2. Inspect and clean the exhaust system annually. Keep ducts as straight as possible. 4. Unnecessarily using long ducts...
... exhausts air easily. 2. Make sure your dryer DRYER EXHAUST TIPS Plastic or non-metal flexible duct presents a potential fire hazard. Never use lint-trapping screws. 3. Restricting your new dryer. Clean all joints, including at the dryer. Using a plastic, thin foil, or non-metal flexible duct. 3. Tape all old ducts before installing your dryer with a poor exhaust system. 1 2 2. Inspect and clean the exhaust system annually. Keep ducts as straight as possible. 4. Unnecessarily using long ducts...
(English)
Page 22
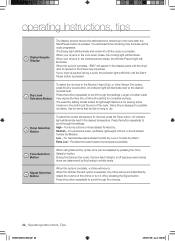
... the desired temperature. Medium - When the Wrinkle Prevent option is pressed. The estimated time remaining may require the Very Dry or More Dry setting for leaving some moisture in the clothing at the end of the chime or turn it off because exact drying times are determined by pressing the Time Selection button. If your dryer is complete, a chime will illuminate. Time Selection 5 Button When using Manual Dry cycles, time can...
... the desired temperature. Medium - When the Wrinkle Prevent option is pressed. The estimated time remaining may require the Very Dry or More Dry setting for leaving some moisture in the clothing at the end of the chime or turn it off because exact drying times are determined by pressing the Time Selection button. If your dryer is complete, a chime will illuminate. Time Selection 5 Button When using Manual Dry cycles, time can...
(English)
Page 29
...... • Be sure the exhaust hood outside . • When these odors linger in the installation instruction. • It is normal. This is draining properly to extract adequate water from the load. • Load may have moved into a live electrical outlet. • Check the home's circuit breaker and fuses. • Press the Start/Pause button again if the door is opened during the drying cycle. • Be sure the...
...... • Be sure the exhaust hood outside . • When these odors linger in the installation instruction. • It is normal. This is draining properly to extract adequate water from the load. • Load may have moved into a live electrical outlet. • Check the home's circuit breaker and fuses. • Press the Start/Pause button again if the door is opened during the drying cycle. • Be sure the...
(English)
Page 31
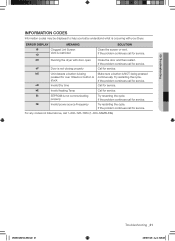
... Running the dryer with your Dryer. stuck If the problem continues call for service. oD Invalid Dry time Call for service. FE Invalid power source Frequency Try restarting the cycle. Et EEPROM is restricted tO Clean the screen or vent. If the problem continues call for service. ERROR DISPLAY MEANING SOLUTION tS Clogged Lint Screen Vent is not communicating Try restarting the cycle. If the problem continues call for service. If the problem...
... Running the dryer with your Dryer. stuck If the problem continues call for service. oD Invalid Dry time Call for service. FE Invalid power source Frequency Try restarting the cycle. Et EEPROM is restricted tO Clean the screen or vent. If the problem continues call for service. ERROR DISPLAY MEANING SOLUTION tS Clogged Lint Screen Vent is not communicating Try restarting the cycle. If the problem continues call for service. If the problem...

(English)
Page 32
... garment care direction. The use of symbols ensures consistency among garment manufacturers of domestic and imported items. Follow care label directions to maximize garment life and reduce laundering problems. Wash Cycle Special Instructions Warning Symbols for Laundering Normal Line Dry/ Hang to Dry Do Not Wash Permanent Press / Wrinkle Resistant / Wrinkle Control Drip Dry Do Not Wring Gentle/Delicates Dry Flat Do Not Bleach Hand Wash Water Temperature** Hot Heat Setting...
... garment care direction. The use of symbols ensures consistency among garment manufacturers of domestic and imported items. Follow care label directions to maximize garment life and reduce laundering problems. Wash Cycle Special Instructions Warning Symbols for Laundering Normal Line Dry/ Hang to Dry Do Not Wash Permanent Press / Wrinkle Resistant / Wrinkle Control Drip Dry Do Not Wring Gentle/Delicates Dry Flat Do Not Bleach Hand Wash Water Temperature** Hot Heat Setting...
(English)
Page 35
... and installation; incorrect electrical line voltage, fluctuations and surges; product removal and reinstallation; SAMSUNG does not warrant uninterrupted or error-free operation of nature or God; All replaced parts and products become the property of SAMSUNG and must be presented upon request as proof of this product or result in normal, noncommercial use of products, equipment, systems, utilities, services, parts, supplies, accessories, applications, installations, repairs, external wiring or connectors...
... and installation; incorrect electrical line voltage, fluctuations and surges; product removal and reinstallation; SAMSUNG does not warrant uninterrupted or error-free operation of nature or God; All replaced parts and products become the property of SAMSUNG and must be presented upon request as proof of this product or result in normal, noncommercial use of products, equipment, systems, utilities, services, parts, supplies, accessories, applications, installations, repairs, external wiring or connectors...


