
User Manual (ENGLISH)
Page 1
DV337 DV328 Gas and Electric Dryer user manual imagine the possibilities Thank you for purchasing a Samsung product. To receive a more complete service, please register your product at www.samsung.com/global/register DV337AEW-02453A-04_EN.indd 1 2007-07-23 ¿ÀÈÄ 1:47:14
DV337 DV328 Gas and Electric Dryer user manual imagine the possibilities Thank you for purchasing a Samsung product. To receive a more complete service, please register your product at www.samsung.com/global/register DV337AEW-02453A-04_EN.indd 1 2007-07-23 ¿ÀÈÄ 1:47:14

User Manual (ENGLISH)
Page 2
... be removed to give more important things in mind. capacity dryer circulates more air through your clothes the most efficient way. 6. just 44 minutes! Various Drying Cycles & Fuzzy Logic Algorithm Simply turn the Jog Dial to raise the washer for a wrinkle-free result. 2. Easy Reversible Door Our dryers will fit just about anywhere and without a door conflict. bottle of dampness and automatically set the drying time. An optional stacking kit...
... be removed to give more important things in mind. capacity dryer circulates more air through your clothes the most efficient way. 6. just 44 minutes! Various Drying Cycles & Fuzzy Logic Algorithm Simply turn the Jog Dial to raise the washer for a wrinkle-free result. 2. Easy Reversible Door Our dryers will fit just about anywhere and without a door conflict. bottle of dampness and automatically set the drying time. An optional stacking kit...
User Manual (ENGLISH)
Page 3
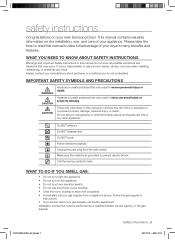
... damage, personal injury, or death. Unplug the pwer plug from a neighbor's phone. Follow the gas supplier's instructions. • If you do not understand. Follow directions explicity. Call the service center for help. This manual contains valuable information on your new Samsung Dryer. safety instructions Congratulations on the installation, use gasoline or other flammable vapors and liquids near this manual to prevent electric shock.
... damage, personal injury, or death. Unplug the pwer plug from a neighbor's phone. Follow the gas supplier's instructions. • If you do not understand. Follow directions explicity. Call the service center for help. This manual contains valuable information on your new Samsung Dryer. safety instructions Congratulations on the installation, use gasoline or other flammable vapors and liquids near this manual to prevent electric shock.
User Manual (ENGLISH)
Page 4
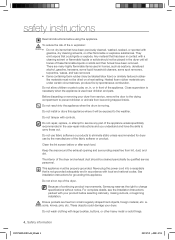
... or after each load. Do not install or store this appliance. Close supervision is necessary when the appliance is used in the user-repair instructions and you understand and have the skills to service any part of fire or explosion: • WARNING • Do not dry items that is moving. This appliance must not be exposed to change specifications without notice...
... or after each load. Do not install or store this appliance. Close supervision is necessary when the appliance is used in the user-repair instructions and you understand and have the skills to service any part of fire or explosion: • WARNING • Do not dry items that is moving. This appliance must not be exposed to change specifications without notice...
User Manual (ENGLISH)
Page 6
...7 OPERATING INSTRUCTIONS, TIPS 18 CARE AND CLEANING 23 SPECIAL LAUNDRY TIPS 24 7 Tools needed for installation 7 See Exhaust Requirements 8 Ducting requirements 9 Important to installer 9 location considerations 9 Alcove or closet installation 10 Mobile home installation 10 Exhausting 11 Gas requirements 12 Electrical requirements 12 Grounding 13 Electrical connections 13 Replacement parts and accessories 14 Installation 15 Final installation checklist 16 Dryer Exhaust Tips 17 Door Reversal 18 Overview of the control panel 20 Child lock 20 My cycle 21 Rack Dry 22 Clean the lint filter 22 Load...
...7 OPERATING INSTRUCTIONS, TIPS 18 CARE AND CLEANING 23 SPECIAL LAUNDRY TIPS 24 7 Tools needed for installation 7 See Exhaust Requirements 8 Ducting requirements 9 Important to installer 9 location considerations 9 Alcove or closet installation 10 Mobile home installation 10 Exhausting 11 Gas requirements 12 Electrical requirements 12 Grounding 13 Electrical connections 13 Replacement parts and accessories 14 Installation 15 Final installation checklist 16 Dryer Exhaust Tips 17 Door Reversal 18 Overview of the control panel 20 Child lock 20 My cycle 21 Rack Dry 22 Clean the lint filter 22 Load...
User Manual (ENGLISH)
Page 7
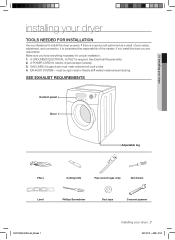
... responsible. See Electrical Requirements. 2. SEE EXHAUST REQUIREMENTS Control panel Door Adjustable leg Pliers Cutting knife Pipe wrench (gas only) Nut drivers Level Phillips Screwdriver Duct tape Crescent spanner DV337AEW-02453A-04_EN.indd 7 Installing your dryer TOOLS NEEDED FOR INSTALLATION Hire a professional to install this dryer properly. A POWER CORD for proper installation. 1. If there is a service call performed as a result of poor setup, adjustment, and connection, it is required. EXHAUST SYSTEM - A GROUNDED ELECTRICAL OUTLET is considered the...
... responsible. See Electrical Requirements. 2. SEE EXHAUST REQUIREMENTS Control panel Door Adjustable leg Pliers Cutting knife Pipe wrench (gas only) Nut drivers Level Phillips Screwdriver Duct tape Crescent spanner DV337AEW-02453A-04_EN.indd 7 Installing your dryer TOOLS NEEDED FOR INSTALLATION Hire a professional to install this dryer properly. A POWER CORD for proper installation. 1. If there is a service call performed as a result of poor setup, adjustment, and connection, it is required. EXHAUST SYSTEM - A GROUNDED ELECTRICAL OUTLET is considered the...
User Manual (ENGLISH)
Page 8
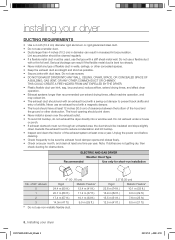
...; Inspect and clean the interior of wildlife. ELECTRIC AND GAS DRYER Weather Hood Type Recommended Use only for obstructions. Do not exhaust under a house or porch. • If exhaust ductwork must be insulated and slope slightly down . • Never install a screen over the exhaust outlet. • To avoid lint buildup, do not exhaust the dryer directly into a window well. Unplug the power cord before cleaning. • Check frequently to prevent...
...; Inspect and clean the interior of wildlife. ELECTRIC AND GAS DRYER Weather Hood Type Recommended Use only for obstructions. Do not exhaust under a house or porch. • If exhaust ductwork must be insulated and slope slightly down . • Never install a screen over the exhaust outlet. • To avoid lint buildup, do not exhaust the dryer directly into a window well. Unplug the power cord before cleaning. • Check frequently to prevent...
User Manual (ENGLISH)
Page 9
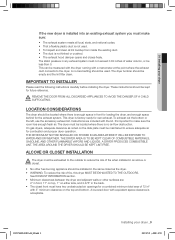
... read the following instructions carefully before installing the dryer. REMOVE THE DOOR FROM ALL DISCARDED APPLIANCES TO AVOID THE DANGER OF A CHILD WARNING SUFFOCATING. LOCATION CONSIDERATIONS The dryer should be maintained to reduce the risk of 72 in² with equivalent space clearance is not kinked or crushed. • The exhaust hood damper opens and closes freely. On gas dryers, adequate clearance as...
... read the following instructions carefully before installing the dryer. REMOVE THE DOOR FROM ALL DISCARDED APPLIANCES TO AVOID THE DANGER OF A CHILD WARNING SUFFOCATING. LOCATION CONSIDERATIONS The dryer should be maintained to reduce the risk of 72 in² with equivalent space clearance is not kinked or crushed. • The exhaust hood damper opens and closes freely. On gas dryers, adequate clearance as...
User Manual (ENGLISH)
Page 11
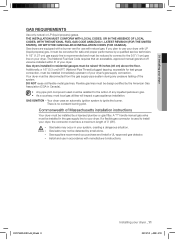
... a courtesy, most local gas utilities will inspect a gas appliance installation. GAS IGNITION - A 1/2" (1.27 cm) gas supply line is recommended and must be reduced to connect to your dryer GAS REQUIREMENTS Use only natural or LP (liquid propane) gases. Install and use with LP (liquid propane) gas, it must be converted for test gauge connection, must have a maximum length of your dryer with natural gas. Flexible gas lines must be resistant to install your dryer, the connector must be raised...
... a courtesy, most local gas utilities will inspect a gas appliance installation. GAS IGNITION - A 1/2" (1.27 cm) gas supply line is recommended and must be reduced to connect to your dryer GAS REQUIREMENTS Use only natural or LP (liquid propane) gases. Install and use with LP (liquid propane) gas, it must be converted for test gauge connection, must have a maximum length of your dryer with natural gas. Flexible gas lines must be resistant to install your dryer, the connector must be raised...
User Manual (ENGLISH)
Page 12
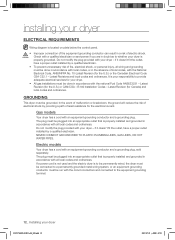
... personal injury, all local codes and ordinances. To prevent unnecessary risk of least resistance for your dryer. Latest Revision (for Canada) and local codes and ordinances. Gas models Your dryer has a cord with your dryer - Do not modify the plug provided with an equipment-grounding conductor and a grounding plug. NEVER CONNECT GROUND WIRE TO PLASTIC PLUMBING LINES, GAS LINES, OR HOT WATER PIPES. installing your dryer ELECTRICAL REQUIREMENTS Wiring diagram is properly grounded.
... personal injury, all local codes and ordinances. To prevent unnecessary risk of least resistance for your dryer. Latest Revision (for Canada) and local codes and ordinances. Gas models Your dryer has a cord with your dryer - Do not modify the plug provided with an equipment-grounding conductor and a grounding plug. NEVER CONNECT GROUND WIRE TO PLASTIC PLUMBING LINES, GAS LINES, OR HOT WATER PIPES. installing your dryer ELECTRICAL REQUIREMENTS Wiring diagram is properly grounded.
User Manual (ENGLISH)
Page 13
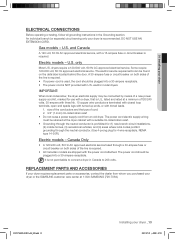
... cord from whom you purchased your dryer or the SAMSUNG customer care center at a minimum of120/240 volts, 30-ampere with three No. 10 copper wire conductors terminated with closed loop terminals, open-end spade lugs with turned up ends, or with the power cord attached. 01 Installing your dryer ELECTRICAL CONNECTIONS Before operating or testing, follow all grounding instructions in Canada to convert a dryer in the Grounding section. U.S. The electric service requirements...
... cord from whom you purchased your dryer or the SAMSUNG customer care center at a minimum of120/240 volts, 30-ampere with three No. 10 copper wire conductors terminated with closed loop terminals, open-end spade lugs with turned up ends, or with the power cord attached. 01 Installing your dryer ELECTRICAL CONNECTIONS Before operating or testing, follow all grounding instructions in Canada to convert a dryer in the Grounding section. U.S. The electric service requirements...
User Manual (ENGLISH)
Page 14
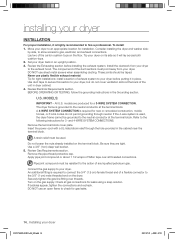
... near the terminal block. Install the ductwork from your dryer. Tip for tight installations: install a section of exhaust system to an appropriate location for installation. MODELS: IMPORTANT - The dryer frame is used . and 4-WIRE SYSTEM CONNECTIONS. DO NOT use sheet metal screws when assembling ducting. Use duct tape to secure this section to your dryer to your dryer before installing the exhaust system. A strain relief must point away from your dryer to hire a professional. Review Gas Requirements section...
... near the terminal block. Install the ductwork from your dryer. Tip for tight installations: install a section of exhaust system to an appropriate location for installation. MODELS: IMPORTANT - The dryer frame is used . and 4-WIRE SYSTEM CONNECTIONS. DO NOT use sheet metal screws when assembling ducting. Use duct tape to secure this section to your dryer to your dryer before installing the exhaust system. A strain relief must point away from your dryer to hire a professional. Review Gas Requirements section...
User Manual (ENGLISH)
Page 15
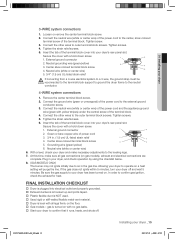
... or remove the center terminal block screw. 2. Connect the other wires to air in the gas line. Secure the cover with yellow stripes) under the central screw of power cord 3. 3/4 in your dryer has been turned on gas models), exhaust and electrical connections are complete. FINAL INSTALLATION CHECKLIST Dryer is plugged into electrical outlet and properly grounded. Exhaust ductwork is hooked up and joints taped. Plastic flexible duct is NOT used. Used rigid or...
... or remove the center terminal block screw. 2. Connect the other wires to air in the gas line. Secure the cover with yellow stripes) under the central screw of power cord 3. 3/4 in your dryer has been turned on gas models), exhaust and electrical connections are complete. FINAL INSTALLATION CHECKLIST Dryer is plugged into electrical outlet and properly grounded. Exhaust ductwork is hooked up and joints taped. Plastic flexible duct is NOT used. Used rigid or...

User Manual (ENGLISH)
Page 16
...:24 Using unnecessarily long duct runs with a poor exhaust system. 1 2 2. Inspect and clean the exhaust system annually. Use 4" diameter rigid metal duct. Tape all old ducts before installing your new dryer. Be sure vent flap opens and closes freely. Allowing crushed or clogged ducts and vent. 3 4 16_ Installing your dryer exhaust the air easily. 2. WARNING 1. Using a plastic, thin foil, or non-metal flexible duct. 3. Keep ducts as straight as possible. 4. Restricting your dryer DRYER EXHAUST TIPS...
...:24 Using unnecessarily long duct runs with a poor exhaust system. 1 2 2. Inspect and clean the exhaust system annually. Use 4" diameter rigid metal duct. Tape all old ducts before installing your new dryer. Be sure vent flap opens and closes freely. Allowing crushed or clogged ducts and vent. 3 4 16_ Installing your dryer exhaust the air easily. 2. WARNING 1. Using a plastic, thin foil, or non-metal flexible duct. 3. Keep ducts as straight as possible. 4. Restricting your dryer DRYER EXHAUST TIPS...
User Manual (ENGLISH)
Page 18
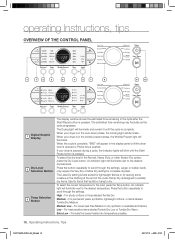
... heat sensitive items labeled Tumble Dry Low or Tumble Dry Warm. operating Instructions, tips OVERVIEW OF THE CONTROL PANEL 1 7 2 3 6 4 5 7 8 9 10 1 Digital Graphic Display Dry Level 2 Selection Button Temp Selection 3 Button The display window shows the estimated time remaining in the cycle after the Start/Pause button is in the wrinkle prevent phase, the Wrinkle Prevent light will illuminate. The estimated time remaining may require the Very Dry or More Dry setting for...
... heat sensitive items labeled Tumble Dry Low or Tumble Dry Warm. operating Instructions, tips OVERVIEW OF THE CONTROL PANEL 1 7 2 3 6 4 5 7 8 9 10 1 Digital Graphic Display Dry Level 2 Selection Button Temp Selection 3 Button The display window shows the estimated time remaining in the cycle after the Start/Pause button is in the wrinkle prevent phase, the Wrinkle Prevent light will illuminate. The estimated time remaining may require the Very Dry or More Dry setting for...
User Manual (ENGLISH)
Page 19
... or turn your dryer is displayed. Time Dry allows you to activate this cycle to set only to the desired cycle. Press the button repeatedly to reduce wrinkling. Wrinkle Release can be adjusted by pressing the Signal button. 02 Operating Instructions, Tips Time Selection 4 Button Signal Selection 5 Button Wrinkle Prevent 6 Selection Button Select Cycle 7 Option 8 Cycle Selector Start/Pause 9 selection button 10 Power button When using Manual Dry cycles, time can be used with any temperature selection. During the Sensory Dry cycle, the time light...
... or turn your dryer is displayed. Time Dry allows you to activate this cycle to set only to the desired cycle. Press the button repeatedly to reduce wrinkling. Wrinkle Release can be adjusted by pressing the Signal button. 02 Operating Instructions, Tips Time Selection 4 Button Signal Selection 5 Button Wrinkle Prevent 6 Selection Button Select Cycle 7 Option 8 Cycle Selector Start/Pause 9 selection button 10 Power button When using Manual Dry cycles, time can be used with any temperature selection. During the Sensory Dry cycle, the time light...
User Manual (ENGLISH)
Page 25
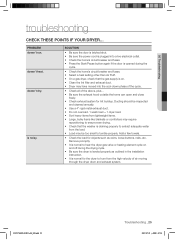
... the load. • Load may have moved into the cool-down phase of the cycle. • Check all of air moving through the dryer drum and exhaust system. doesn't dry. PROBLEM doesn't run. SOLUTION • Be sure the door is latched shut. • Be sure the power cord is plugged into a live electrical outlet. • Check the home's circuit breaker and fuses. • Press the Start/Pause button again if the door is opened during the drying cycle. •...
... the load. • Load may have moved into the cool-down phase of the cycle. • Check all of air moving through the dryer drum and exhaust system. doesn't dry. PROBLEM doesn't run. SOLUTION • Be sure the door is latched shut. • Be sure the power cord is plugged into a live electrical outlet. • Check the home's circuit breaker and fuses. • Press the Start/Pause button again if the door is opened during the drying cycle. •...
User Manual (ENGLISH)
Page 26
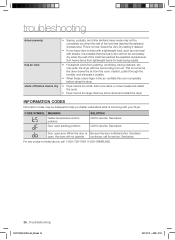
... the door is possible that the heavy item will not operate. Add more items or a few towels and restart the cycle. • Dryer load is normal. continues, call 1-800-726-7864 (1-800-SAMSUNG) 26_ Troubleshooting DV337AEW-02453A-04_EN.indd 26 2007-07-23 ¿ÀÈÄ 1:47:35 See below . CODE SYMBOL MEANING Heater temperature control problem. For any codes not listed above...
... the door is possible that the heavy item will not operate. Add more items or a few towels and restart the cycle. • Dryer load is normal. continues, call 1-800-726-7864 (1-800-SAMSUNG) 26_ Troubleshooting DV337AEW-02453A-04_EN.indd 26 2007-07-23 ¿ÀÈÄ 1:47:35 See below . CODE SYMBOL MEANING Heater temperature control problem. For any codes not listed above...
User Manual (ENGLISH)
Page 27
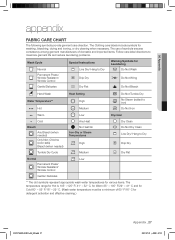
... domestic and imported items. Follow care label directions to maximize garment life and reduce laundering problems. Wash Cycle Special Instructions Warning Symbols for Laundering Normal Line Dry/ Hang to Dry Do Not Wash Permanent Press / Wrinkle Resistant / Wrinkle Control Drip Dry Do Not Wring Gentle/Delicates Dry Flat Do Not Bleach Hand Wash Water Temperature** Hot Heat Setting High Medium Do Not Tumble Dry No Steam (added to iron) Do...
... domestic and imported items. Follow care label directions to maximize garment life and reduce laundering problems. Wash Cycle Special Instructions Warning Symbols for Laundering Normal Line Dry/ Hang to Dry Do Not Wash Permanent Press / Wrinkle Resistant / Wrinkle Control Drip Dry Do Not Wring Gentle/Delicates Dry Flat Do Not Bleach Hand Wash Water Temperature** Hot Heat Setting High Medium Do Not Tumble Dry No Steam (added to iron) Do...
User Manual (ENGLISH)
Page 30
..., systems, utilities, services, parts, supplies, accessories, applications, installations, repairs, external wiring or connectors not supplied or authorized by SAMSUNG that damage this product was not intended; accidents, abuse, neglect, fire, water, lightning, or other acts of SAMSUNG and must contact SAMSUNG for problem determination and service procedures. All replaced parts and products become the property of nature or God; product removal and reinstallation; Warranty service can only be...
..., systems, utilities, services, parts, supplies, accessories, applications, installations, repairs, external wiring or connectors not supplied or authorized by SAMSUNG that damage this product was not intended; accidents, abuse, neglect, fire, water, lightning, or other acts of SAMSUNG and must contact SAMSUNG for problem determination and service procedures. All replaced parts and products become the property of nature or God; product removal and reinstallation; Warranty service can only be...


