
User Manual (user Manual) (ver.1.0) (English)
Page 2
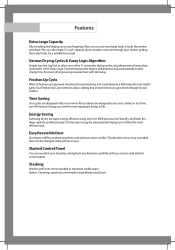
... of the 11 automatic drying cycles, including normal, heavy duty and towels. And both the washer and dryer. Easy Reversible Door Our dryers will fit just about anywhere and without a door conflict. Notice : Dryer legs need washing, but could deserve a little help after last night's party. Giving you time for a wrinkle-free result. Slanted Control Panel You can be changed with just four screws...
... of the 11 automatic drying cycles, including normal, heavy duty and towels. And both the washer and dryer. Easy Reversible Door Our dryers will fit just about anywhere and without a door conflict. Notice : Dryer legs need washing, but could deserve a little help after last night's party. Giving you time for a wrinkle-free result. Slanted Control Panel You can be changed with just four screws...
User Manual (user Manual) (ver.1.0) (English)
Page 4
... the appliance when the drum is used in the dryer until all instructions before or after each load. 4SAVSEATMHSEUSENIGNSTDRUryCeTrIOOwNnSer's Instructions Clean the lint screen before using your dryer from service, remove the door to the drying compartment to prevent children or animals from a neighbor's phone. Read all traces of fire, explosion, electric shock, or personal injury when using your gas supplier from becoming trapped inside. 5. Any material that...
... the appliance when the drum is used in the dryer until all instructions before or after each load. 4SAVSEATMHSEUSENIGNSTDRUryCeTrIOOwNnSer's Instructions Clean the lint screen before using your dryer from service, remove the door to the drying compartment to prevent children or animals from a neighbor's phone. Read all traces of fire, explosion, electric shock, or personal injury when using your gas supplier from becoming trapped inside. 5. Any material that...
User Manual (user Manual) (ver.1.0) (English)
Page 5
... oil. Never remove these items from lint, dust, and dirt. 12. Keep the area around the exhaust opening and surrounding areas free from the dryer hot or interrupt the drying cycle until the items have been spotted or soaked with your dryer. 16. See installation instructions for these items when they are hot. Do not place items in accordance with large buckles, buttons, or...
... oil. Never remove these items from lint, dust, and dirt. 12. Keep the area around the exhaust opening and surrounding areas free from the dryer hot or interrupt the drying cycle until the items have been spotted or soaked with your dryer. 16. See installation instructions for these items when they are hot. Do not place items in accordance with large buckles, buttons, or...
User Manual (user Manual) (ver.1.0) (English)
Page 6
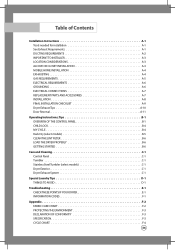
... PARTS AND ACCESSORIES A-7 INSTALLATION A-8 FINAL INSTALLATION CHECKLIST A-9 Dryer Exhaust Tips A-10 Door Reversal A-11 Operating Instructions, Tips B-1 OVERVIEW OF THE CONTROL PANEL B-1 CHILD LOCK B-4 MY CYCLE B-4 Rack Dry (select models B-5 CLEAN THE LINT FILTER B-6 LOAD THE DRYER PROPERLY B-6 GETTING STARTED B-6 Care and Cleaning C-1 Control Panel C-1 Tumbler C-1 Stainless Steel Tumbler (select models C-1 Dryer Exterior C-1 Dryer Exhaust System C-1 Special Laundry Tips D-1 THINGS TO AVOID D-1 Troubleshooting E-1 CHECK THESE POINTS IF YOUR DRYER E-1 INFORMATION CODES...
... PARTS AND ACCESSORIES A-7 INSTALLATION A-8 FINAL INSTALLATION CHECKLIST A-9 Dryer Exhaust Tips A-10 Door Reversal A-11 Operating Instructions, Tips B-1 OVERVIEW OF THE CONTROL PANEL B-1 CHILD LOCK B-4 MY CYCLE B-4 Rack Dry (select models B-5 CLEAN THE LINT FILTER B-6 LOAD THE DRYER PROPERLY B-6 GETTING STARTED B-6 Care and Cleaning C-1 Control Panel C-1 Tumbler C-1 Stainless Steel Tumbler (select models C-1 Dryer Exterior C-1 Dryer Exhaust System C-1 Special Laundry Tips D-1 THINGS TO AVOID D-1 Troubleshooting E-1 CHECK THESE POINTS IF YOUR DRYER E-1 INFORMATION CODES...
User Manual (user Manual) (ver.1.0) (English)
Page 7
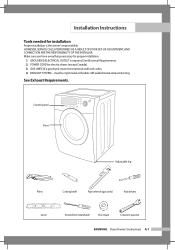
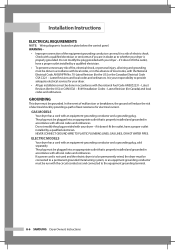
... CONNECTION ARE THE RESPONSIBILITY OF THE INSTALLER. See Electrical Requirements. 2. Control panel Door Adjustable leg Pliers Cutting knife Pipe wrench (gas only) Nut drivers Level Screwdriver (standard) Duct tape Crescent spanner SAMSUNG Dryer Owner's Instructions A-1 Make sure you have everything necessary for electric dryers (except Canada). 3. POWER CORD for proper installation. 1. See Exhaust Requirements. Installation Instructions Tools needed for installation Proper installation is required. must meet national and local codes. 4. GROUNDED ELECTRICAL OUTLET is...
... CONNECTION ARE THE RESPONSIBILITY OF THE INSTALLER. See Electrical Requirements. 2. Control panel Door Adjustable leg Pliers Cutting knife Pipe wrench (gas only) Nut drivers Level Screwdriver (standard) Duct tape Crescent spanner SAMSUNG Dryer Owner's Instructions A-1 Make sure you have everything necessary for electric dryers (except Canada). 3. POWER CORD for proper installation. 1. See Exhaust Requirements. Installation Instructions Tools needed for installation Proper installation is required. must meet national and local codes. 4. GROUNDED ELECTRICAL OUTLET is...
User Manual (user Manual) (ver.1.0) (English)
Page 8
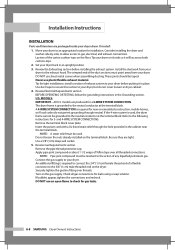
... . • Never install a screen over the exhaust outlet. • To avoid lint buildup, do not exhaust the dryer directly into a window well. Serious blockage can extend drying times, affect machine operation, and may collect lint. • The exhaust duct should be sure the exhaust hood damper opens and closes freely. • Check once per month, and clean at least once a year. Unplug the power cord before cleaning. • Check frequently to...
... . • Never install a screen over the exhaust outlet. • To avoid lint buildup, do not exhaust the dryer directly into a window well. Serious blockage can extend drying times, affect machine operation, and may collect lint. • The exhaust duct should be sure the exhaust hood damper opens and closes freely. • Check once per month, and clean at least once a year. Unplug the power cord before cleaning. • Check frequently to...
User Manual (user Manual) (ver.1.0) (English)
Page 9
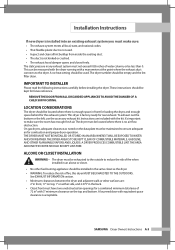
... and clean all lint buildup from inside the existing duct. • The duct is not kinked or crushed. • The exhaust hood damper opens and closes freely. This can be located where there is enough space in front for loading the dryer, and enough space behind for the exhaust system. IMPORTANT TO INSTALLER Please read the following instructions carefully before installing the dryer. REMOVE THE DOOR FROM...
... and clean all lint buildup from inside the existing duct. • The duct is not kinked or crushed. • The exhaust hood damper opens and closes freely. This can be located where there is enough space in front for loading the dryer, and enough space behind for the exhaust system. IMPORTANT TO INSTALLER Please read the following instructions carefully before installing the dryer. REMOVE THE DOOR FROM...
User Manual (user Manual) (ver.1.0) (English)
Page 11
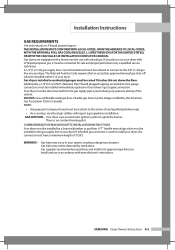
... line to use your dryer with LP (liquid propane) gas, it must be detected by a licensed plumber or gas fitter. GAS IGNITION - COMMONWEALTH OF MASSACHUSETTS INSTALLATION INSTRUCTIONS Your dryer must be converted for test gauge connection, must have a maximum length of the system. Gas leaks may not be raised 18 inches (46 cm) above the floor. The National Fuel Gas Code requires that an accessible, approved manual gas shut-off valve...
... line to use your dryer with LP (liquid propane) gas, it must be detected by a licensed plumber or gas fitter. GAS IGNITION - COMMONWEALTH OF MASSACHUSETTS INSTALLATION INSTRUCTIONS Your dryer must be converted for test gauge connection, must have a maximum length of the system. Gas leaks may not be raised 18 inches (46 cm) above the floor. The National Fuel Gas Code requires that an accessible, approved manual gas shut-off valve...
User Manual (user Manual) (ver.1.0) (English)
Page 12
... circuit conductors and connected to the equipment grounding terminal. GAS MODELS Your dryer has a cord with your dryer - A-6 SAMSUNG Dryer Owner's Instructions Latest Revision (for the U.S.) or CAN/CGA - Do not modify the plug provided with an equipment-grounding conductor and a grounding plug. B149 Installation Codes - Installation Instructions ELECTRICAL REQUIREMENTS NOTE: Wiring diagram is to be permanently wired, the dryer must be connected to a permanent grounded metal wiring system, or an equipment grounding conductor must be run...
... circuit conductors and connected to the equipment grounding terminal. GAS MODELS Your dryer has a cord with your dryer - A-6 SAMSUNG Dryer Owner's Instructions Latest Revision (for the U.S.) or CAN/CGA - Do not modify the plug provided with an equipment-grounding conductor and a grounding plug. B149 Installation Codes - Installation Instructions ELECTRICAL REQUIREMENTS NOTE: Wiring diagram is to be permanently wired, the dryer must be connected to a permanent grounded metal wiring system, or an equipment grounding conductor must be run...

User Manual (user Manual) (ver.1.0) (English)
Page 13
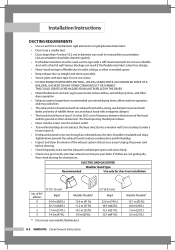
... power supply cord kit, marked for 4 wire receptacle, NEMA type 14-30R.) ELECTRIC MODELS - DO NOT USE AN EXTENSION CORD. dryers require a 120/240 volt, 60 Hz AC approved electrical service. SAMSUNG Dryer Owner's Instructions A-7 An individual branch (or separate) circuit serving only your dryer or the SAMSUNG customer care center at a minimum of120/240 volts, 30-ampere with three No. 10 copper wire conductors terminated with closed loop terminals, open-end spade lugs with turned...
... power supply cord kit, marked for 4 wire receptacle, NEMA type 14-30R.) ELECTRIC MODELS - DO NOT USE AN EXTENSION CORD. dryers require a 120/240 volt, 60 Hz AC approved electrical service. SAMSUNG Dryer Owner's Instructions A-7 An individual branch (or separate) circuit serving only your dryer or the SAMSUNG customer care center at a minimum of120/240 volts, 30-ampere with three No. 10 copper wire conductors terminated with closed loop terminals, open-end spade lugs with turned...
User Manual (user Manual) (ver.1.0) (English)
Page 14
... codes do not cover louvers in an upright position. 3. BEFORE OPERATING OR TESTING, follow the grounding instructions in the cabinet near the terminal block. MODELS: IMPORTANT - models are packaged inside your dryer before installing the exhaust system. The dryer frame is required for tight installations: install a section of a flexible connector to the following instructions for leaks using a soap solution. A 4-WIRE SYSTEM CONNECTION is grounded to gas, electrical, and exhaust connections. If the 4-wire system is required...
... codes do not cover louvers in an upright position. 3. BEFORE OPERATING OR TESTING, follow the grounding instructions in the cabinet near the terminal block. MODELS: IMPORTANT - models are packaged inside your dryer before installing the exhaust system. The dryer frame is required for tight installations: install a section of a flexible connector to the following instructions for leaks using a soap solution. A 4-WIRE SYSTEM CONNECTION is grounded to gas, electrical, and exhaust connections. If the 4-wire system is required...
User Manual (user Manual) (ver.1.0) (English)
Page 15
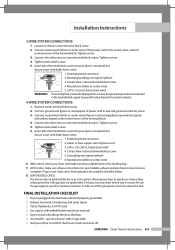
... been turned on a heat setting will purge the line. Connect ground wire (green or unwrapped) of terminal block cover into electrical outlet and properly grounded. □ Exhaust ductwork is hooked up and joints taped. □ Plastic flexible duct is NOT used. □ Use rigid or stiff-walled flexible metal vent material. □ Dryer is turned on gas models), exhaust and electrical connections are complete. Insert tab of power cord to your dryer's rear panel slot. Grounding wire...
... been turned on a heat setting will purge the line. Connect ground wire (green or unwrapped) of terminal block cover into electrical outlet and properly grounded. □ Exhaust ductwork is hooked up and joints taped. □ Plastic flexible duct is NOT used. □ Use rigid or stiff-walled flexible metal vent material. □ Dryer is turned on gas models), exhaust and electrical connections are complete. Insert tab of power cord to your dryer's rear panel slot. Grounding wire...

User Manual (user Manual) (ver.1.0) (English)
Page 16
... sure vent flap opens and closes freely. Using a plastic, thin foil, or non-metal flexible duct. 3. A-10 SAMSUNG Dryer Owner's Instructions Keep ducts as straight as possible. 4. Don't let a poor exhaust system slow drying by: 1 2 3 4 1. Let your dryer with many elbows. 4. Use 4" diameter rigid metal duct.Tape all old ducts before installing your new dryer. Clean all joints, including at the dryer. Restricting your dryer exhaust the air easily. 2. Using unnecessarily long duct runs...
... sure vent flap opens and closes freely. Using a plastic, thin foil, or non-metal flexible duct. 3. A-10 SAMSUNG Dryer Owner's Instructions Keep ducts as straight as possible. 4. Don't let a poor exhaust system slow drying by: 1 2 3 4 1. Let your dryer with many elbows. 4. Use 4" diameter rigid metal duct.Tape all old ducts before installing your new dryer. Clean all joints, including at the dryer. Restricting your dryer exhaust the air easily. 2. Using unnecessarily long duct runs...

User Manual (user Manual) (ver.1.0) (English)
Page 17
Place the door on the opposite side of door hinge. 7. Remove two door hinge screws. 3. Remove two screws on the other side and reattach it to dryer. 4. Reassemble the screws in the remaining holes. Lift the door and remove from dryer. 6. Reassemble holder lever. 5. SAMSUNG Dryer Owner's Instructions A-11 Installation Instructions Door Reversal 1. Remove two screws on holder lever. 8. Unplug power cord. 2.
Place the door on the opposite side of door hinge. 7. Remove two door hinge screws. 3. Remove two screws on the other side and reattach it to dryer. 4. Reassemble the screws in the remaining holes. Lift the door and remove from dryer. 6. Reassemble holder lever. 5. SAMSUNG Dryer Owner's Instructions A-11 Installation Instructions Door Reversal 1. Remove two screws on holder lever. 8. Unplug power cord. 2.
User Manual (user Manual) (ver.1.0) (English)
Page 19
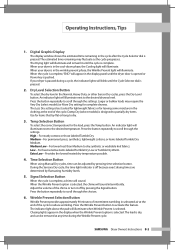
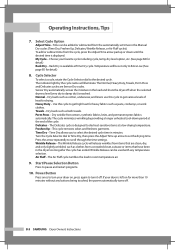
... cycle. When the cycle is complete, "END" will appear in the cool-down phase, the Cooling light will blink until the dryer door is opened or Power key is off because exact drying times are determined by pressing the Signal button. When the Wrinkle Prevent option is pressed. 2. If your dryer is in the display panel until the Cycle Selector dial is selected, the chime will sound. Operating Instructions...
... cycle. When the cycle is complete, "END" will appear in the cool-down phase, the Cooling light will blink until the dryer door is opened or Power key is off because exact drying times are determined by pressing the Signal button. When the Wrinkle Prevent option is pressed. 2. If your dryer is in the display panel until the Cycle Selector dial is selected, the chime will sound. Operating Instructions...
User Manual (user Manual) (ver.1.0) (English)
Page 20
..., or work clothes. Use this cycle to dry heat-sensitive items at a low drying temperature. The cycle minimizes wrinkling by the cycle name will release wrinkles from the automatically set times in the dryer too long after the cycle has ended. Delicates - Air Fluff - Power Button Press once to turn your dryer on for detail.) 8. To add or subtract time from a crowded closet, suitcase or items that are Sensor Dry cycles. The indicator light by providing...
..., or work clothes. Use this cycle to dry heat-sensitive items at a low drying temperature. The cycle minimizes wrinkling by the cycle name will release wrinkles from the automatically set times in the dryer too long after the cycle has ended. Delicates - Air Fluff - Power Button Press once to turn your dryer on for detail.) 8. To add or subtract time from a crowded closet, suitcase or items that are Sensor Dry cycles. The indicator light by providing...
User Manual (user Manual) (ver.1.0) (English)
Page 26
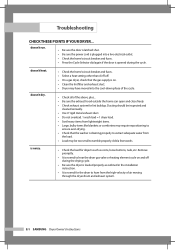
... the installation instruction. • It is plugged into the cool-down phase of the cycle. • Check all of air moving through the dryer drum and exhaust system. doesn't heat. Add a few towels. E-1 SAMSUNG Dryer Owner's Instructions doesn't run. • Be sure the door is latched shut. • Be sure the power cord is normal for lint buildup. Ducting should be inspected and cleaned annually. • Use 4" rigid metal exhaust duct. • Do not overload. 1 wash load = 1 dryer load...
... the installation instruction. • It is plugged into the cool-down phase of the cycle. • Check all of air moving through the dryer drum and exhaust system. doesn't heat. Add a few towels. E-1 SAMSUNG Dryer Owner's Instructions doesn't run. • Be sure the door is latched shut. • Be sure the power cord is normal for lint buildup. Ducting should be inspected and cleaned annually. • Use 4" rigid metal exhaust duct. • Do not overload. 1 wash load = 1 dryer load...
User Manual (user Manual) (ver.1.0) (English)
Page 28
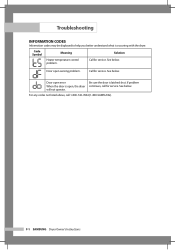
See below . Door open error Be sure the door is occurring with the dryer. For any codes not listed above, call for service. Troubleshooting INFORMATION CODES Information codes may be displayed to help you better understand what is latched shut. If problem When the door is open sensing problem. Door open , the dryer continues, call 1-800-726-7864 (1-800-SAMSUNG). F-1 SAMSUNG Dryer Owner's Instructions Code Symbol Meaning Solution Heater temperature control problem. See below . See below. Call for service. Call for service. will not operate.
See below . Door open error Be sure the door is occurring with the dryer. For any codes not listed above, call for service. Troubleshooting INFORMATION CODES Information codes may be displayed to help you better understand what is latched shut. If problem When the door is open sensing problem. Door open , the dryer continues, call 1-800-726-7864 (1-800-SAMSUNG). F-1 SAMSUNG Dryer Owner's Instructions Code Symbol Meaning Solution Heater temperature control problem. See below . See below. Call for service. Call for service. will not operate.
User Manual (user Manual) (ver.1.0) (English)
Page 29
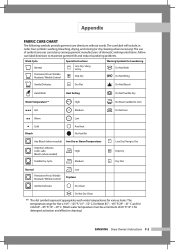
... problems. Wash Cycle Special Instructions Warning Symbols for Laundering Normal Line Dry/ Hang to Dry Do Not Wash Permanent Press/ Wrinkle Resistant/ Wrinkle Control Drip Dry Do Not Wring Gentle/Delicates Dry Flat Do Not Bleach Hand Wash Heat Setting Do Not Tumble Dry Water Temperature** High No Steam (added to iron) Hot Medium Do Not Iron Warm Low Cold Bleach Any Heat No Heat/Air Any Bleach (when needed) Iron-Dry or Steam Temperatures...
... problems. Wash Cycle Special Instructions Warning Symbols for Laundering Normal Line Dry/ Hang to Dry Do Not Wash Permanent Press/ Wrinkle Resistant/ Wrinkle Control Drip Dry Do Not Wring Gentle/Delicates Dry Flat Do Not Bleach Hand Wash Heat Setting Do Not Tumble Dry Water Temperature** High No Steam (added to iron) Hot Medium Do Not Iron Warm Low Cold Bleach Any Heat No Heat/Air Any Bleach (when needed) Iron-Dry or Steam Temperatures...
User Manual (user Manual) (ver.1.0) (English)
Page 32
... accessible to SAMSUNG. To receive warranty service, the purchaser must be returned to the service agent. In-home service is valid only on the original date of products, equipment, systems, utilities, services, parts, supplies, accessories, applications, installations, repairs, external wiring or connectors not supplied or authorized by pest infestations. This limited warranty does not cover problems resulting from incorrect electric current, voltage or supply, light bulbs, house fuses, house wiring...
... accessible to SAMSUNG. To receive warranty service, the purchaser must be returned to the service agent. In-home service is valid only on the original date of products, equipment, systems, utilities, services, parts, supplies, accessories, applications, installations, repairs, external wiring or connectors not supplied or authorized by pest infestations. This limited warranty does not cover problems resulting from incorrect electric current, voltage or supply, light bulbs, house fuses, house wiring...


