
User Manual
Page 2
... need to know about the safety instructions Important safety symbols CALIFORNIA PROPOSITION 65 WARNING Important safety precautions Warnings Cautions Before installation Key installation requirements Location considerations Electrical requirements Installation What's included Step-by-step installation STEP 1 Connect the electrical wiring STEP 2 Level the dryer Drain hose (if necessary) Installation checklist Before using the dryer Switching the door position Before you start Sort and load Functional prerequisite Operations Control panel Simple steps to start Cycle overview Cycle guide Special...
... need to know about the safety instructions Important safety symbols CALIFORNIA PROPOSITION 65 WARNING Important safety precautions Warnings Cautions Before installation Key installation requirements Location considerations Electrical requirements Installation What's included Step-by-step installation STEP 1 Connect the electrical wiring STEP 2 Level the dryer Drain hose (if necessary) Installation checklist Before using the dryer Switching the door position Before you start Sort and load Functional prerequisite Operations Control panel Simple steps to start Cycle overview Cycle guide Special...
User Manual
Page 4
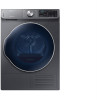
... to read this instruction manual. This manual contains important information on your appliance. Safety information Congratulations on the installation, use common sense, caution and care when installing, maintaining and operating your new appliance. NOTE Indicates that may be applicable. Because the following operating instructions cover various models, the characteristics of your nearest service center or find help and information online at www.samsung.com. These...
... to read this instruction manual. This manual contains important information on your appliance. Safety information Congratulations on the installation, use common sense, caution and care when installing, maintaining and operating your new appliance. NOTE Indicates that may be applicable. Because the following operating instructions cover various models, the characteristics of your nearest service center or find help and information online at www.samsung.com. These...

User Manual
Page 6
... "Electrical requirements" and "Grounding" in your hand under the dryer. • This may result in injury. 6 English SAVE THESE INSTRUCTIONS DV6850N_DC68-03650E-05_EN.indd 6 2019/8/7 17:41:29 The interior of the appliance or attempt any part of the appliance should be grounded. Do not insert your dryer. Clean the lint screen before the end of a tumble dryer cycle occurs without heat (cool...
... "Electrical requirements" and "Grounding" in your hand under the dryer. • This may result in injury. 6 English SAVE THESE INSTRUCTIONS DV6850N_DC68-03650E-05_EN.indd 6 2019/8/7 17:41:29 The interior of the appliance or attempt any part of the appliance should be grounded. Do not insert your dryer. Clean the lint screen before the end of a tumble dryer cycle occurs without heat (cool...
User Manual
Page 7
... has been in the user-repair instructions and you have been previously cleaned, washed, soaked, or spotted with the controls. • Do not repair, replace, or attempt to service any part of small, irregularly shaped hard objects and foreign material, i.e. Safety information WARNING - Warnings WARNING • Ensure pockets are free of the appliance unless specifically instructed to play on a heat setting. Any material that...
... has been in the user-repair instructions and you have been previously cleaned, washed, soaked, or spotted with the controls. • Do not repair, replace, or attempt to service any part of small, irregularly shaped hard objects and foreign material, i.e. Safety information WARNING - Warnings WARNING • Ensure pockets are free of the appliance unless specifically instructed to play on a heat setting. Any material that...

User Manual
Page 8
... the area around the exhaust opening and surrounding areas free from the dryer hot or interrupt the drying cycle until the items have been spotted or soaked with vegetable oil or cooking oil. Oxidation creates heat. Never pile or stack these items in accordance with extra detergent will reduce, but not eliminate, the hazard. Never plug the power cord into a receptacle that...
... the area around the exhaust opening and surrounding areas free from the dryer hot or interrupt the drying cycle until the items have been spotted or soaked with vegetable oil or cooking oil. Oxidation creates heat. Never pile or stack these items in accordance with extra detergent will reduce, but not eliminate, the hazard. Never plug the power cord into a receptacle that...
User Manual
Page 9
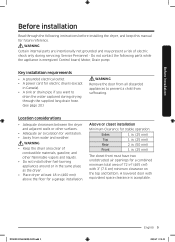
... clearance is energized: Control board, Motor, Drain pump. Before installation Before installation Read through the supplied long drain hose. (See page 20.) WARNING Remove the door from all discarded appliances to prevent a child from water and weather. A louvered door with 3" (7.6 cm) minimum clearance on the top and bottom. Key installation requirements • A grounded electrical outlet. • A power cord for a garage installation. WARNING Certain internal parts are intentionally not grounded...
... clearance is energized: Control board, Motor, Drain pump. Before installation Before installation Read through the supplied long drain hose. (See page 20.) WARNING Remove the door from all discarded appliances to prevent a child from water and weather. A louvered door with 3" (7.6 cm) minimum clearance on the top and bottom. Key installation requirements • A grounded electrical outlet. • A power cord for a garage installation. WARNING Certain internal parts are intentionally not grounded...
User Manual
Page 13
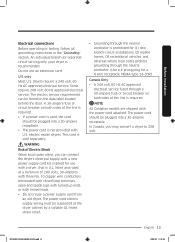
... operating or testing, follow all grounding instructions in the "Grounding" section. NOTE All Canadian models are shipped with tinned leads. • Do not reuse a power supply cord from an old dryer. Do not use with a dryer, that is U.L. The electric service requirements can connect the dryer's electrical supply with U.S. WARNING Risk of 240 volts, 30-amperes with three No. 10 copper wire conductors terminated with closed loop terminals, open...
... operating or testing, follow all grounding instructions in the "Grounding" section. NOTE All Canadian models are shipped with tinned leads. • Do not reuse a power supply cord from an old dryer. Do not use with a dryer, that is U.L. The electric service requirements can connect the dryer's electrical supply with U.S. WARNING Risk of 240 volts, 30-amperes with three No. 10 copper wire conductors terminated with closed loop terminals, open...
User Manual
Page 15
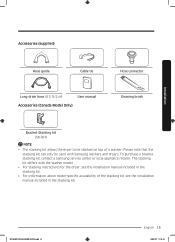
... kit, see the installation manual included in the stacking kit. To purchase a bracket stacking kit, contact a Samsung service center or local appliance retailer. Installation Accessories (supplied) Hose guide Cable tie Long drain hose (6.5 ft/2 m) User manual Accessories (Canada Model Only) Hose connector Cleaning brush Bracket-Stacking kit (SK-DH) NOTE • The stacking kit allows the dryer to be used with the washer model. • For stacking instructions for the dryer, see the installation manual included in the stacking kit. • For information about model-specific...
... kit, see the installation manual included in the stacking kit. To purchase a bracket stacking kit, contact a Samsung service center or local appliance retailer. Installation Accessories (supplied) Hose guide Cable tie Long drain hose (6.5 ft/2 m) User manual Accessories (Canada Model Only) Hose connector Cleaning brush Bracket-Stacking kit (SK-DH) NOTE • The stacking kit allows the dryer to be used with the washer model. • For stacking instructions for the dryer, see the installation manual included in the stacking kit. • For information about model-specific...

User Manual
Page 16
... 2019/8/7 17:41:33 STEP 1 Connect the electrical wiring First, read through the "Electrical requirements" section, and then follow the instructions on this page or the next page. Tighten the C screws. 4. E. Insert the terminal block cover into the rear panel of the terminal block. Neutral wire (white or center wire) strap to the terminal block support to C. Installation Installation Step-by step installation instructions start below. Instructions for a 3-wire system are on the next page...
... 2019/8/7 17:41:33 STEP 1 Connect the electrical wiring First, read through the "Electrical requirements" section, and then follow the instructions on this page or the next page. Tighten the C screws. 4. E. Insert the terminal block cover into the rear panel of the terminal block. Neutral wire (white or center wire) strap to the terminal block support to C. Installation Installation Step-by step installation instructions start below. Instructions for a 3-wire system are on the next page...

User Manual
Page 17
... U.S. Remove the external ground connector's screw, and connect the ground wire (green or unwrapped) of power cord • To connect the ground wire to the screw. Insert the tab of the terminal block cover into the rear panel of the terminal block. Neutral grounding wire (white or green/ yellow) C. ¾" (1.9 cm) UL-listed strain relief D. Connect the neutral wire (white or center wire) and ground wire (white) to the outer terminal block screws...
... U.S. Remove the external ground connector's screw, and connect the ground wire (green or unwrapped) of power cord • To connect the ground wire to the screw. Insert the tab of the terminal block cover into the rear panel of the terminal block. Neutral grounding wire (white or green/ yellow) C. ¾" (1.9 cm) UL-listed strain relief D. Connect the neutral wire (white or center wire) and ground wire (white) to the outer terminal block screws...

User Manual
Page 23
Installation Installation checklist • The dryer is plugged into a properly grounded outlet. • All packaging material is completely removed and properly disposed. • The dryer is level and standing firmly on the floor. • The long drain hose is installed if you want water captured by the drying process drained automatically. • Start the dryer to make sure that it runs, heats, and shuts off. • Run a TIME DRY cycle for 20...
Installation Installation checklist • The dryer is plugged into a properly grounded outlet. • All packaging material is completely removed and properly disposed. • The dryer is level and standing firmly on the floor. • The long drain hose is installed if you want water captured by the drying process drained automatically. • Start the dryer to make sure that it runs, heats, and shuts off. • Run a TIME DRY cycle for 20...

User Manual
Page 31
...*H*) Drying Cooling Check filter alarm Heat-exchanger clean alarm My Cycle Sound Off Child Lock Wrinkle Prevent DV6850N_DC68-03650E-05_EN.indd 31 English 31 2019/8/7 17:41:50 You can control the dryer remotely. Operations 09 Smart Control (DV22N685*H*) 10 Adjust Time 11 Power 12 Start/Pause (Hold to Start) After connecting the dryer to open. We recommend that have one button (Adjust Time). NOTE Items that you can change the cycle time, press the Adjust Time buttons...
...*H*) Drying Cooling Check filter alarm Heat-exchanger clean alarm My Cycle Sound Off Child Lock Wrinkle Prevent DV6850N_DC68-03650E-05_EN.indd 31 English 31 2019/8/7 17:41:50 You can control the dryer remotely. Operations 09 Smart Control (DV22N685*H*) 10 Adjust Time 11 Power 12 Start/Pause (Hold to Start) After connecting the dryer to open. We recommend that have one button (Adjust Time). NOTE Items that you can change the cycle time, press the Adjust Time buttons...

User Manual
Page 32
To change the cycle during operation 1. Press and hold Start/Pause (Hold to select a cycle. 3. Sorting and loading • Overloading will extend drying time significantly. Optionally, you can activate options available by pressing the relevant button. (Adjust Time - Press Start/Pause (Hold to Start) to start 1. Turn the Cycle Selector to Start). The dryer indicator turns on and shows an estimated cycle time on the dryer. 2. and +, Wrinkle Prevent, and/or Damp Alert...
To change the cycle during operation 1. Press and hold Start/Pause (Hold to select a cycle. 3. Sorting and loading • Overloading will extend drying time significantly. Optionally, you can activate options available by pressing the relevant button. (Adjust Time - Press Start/Pause (Hold to Start) to start 1. Turn the Cycle Selector to Start). The dryer indicator turns on and shows an estimated cycle time on the dryer. 2. and +, Wrinkle Prevent, and/or Damp Alert...
User Manual
Page 38
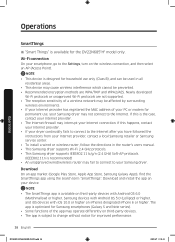
... AP (Access Point). Download On an app market (Google Play Store, Apple App Store, Samsung Galaxy Apps), find the SmartThings app using the search term "SmartThings". Download and install the app on your smartphone, go to the Settings, turn on third-party devices. • The app is available for the DV22N685*H* model only. Wi-Fi connection On your device. Operations Operations SmartThings...
... AP (Access Point). Download On an app market (Google Play Store, Apple App Store, Samsung Galaxy Apps), find the SmartThings app using the search term "SmartThings". Download and install the app on your smartphone, go to the Settings, turn on third-party devices. • The app is available for the DV22N685*H* model only. Wi-Fi connection On your device. Operations Operations SmartThings...
User Manual
Page 43
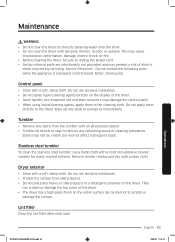
... cloth. They can scratch or damage the top cover of the dryer. • Some laundry pre-treatment soil and stain removers may damage the control panel. • When using liquid cleaning agents, apply them directly to the dryer. DV6850N_DC68-03650E-05_EN.indd 43 English 43 2019/8/7 17:41:53 Service Personnel - Control panel • Clean with benzene, thinner, alcohol, or acetone. Lint filter Clean the lint filter after each load...
... cloth. They can scratch or damage the top cover of the dryer. • Some laundry pre-treatment soil and stain removers may damage the control panel. • When using liquid cleaning agents, apply them directly to the dryer. DV6850N_DC68-03650E-05_EN.indd 43 English 43 2019/8/7 17:41:53 Service Personnel - Control panel • Clean with benzene, thinner, alcohol, or acetone. Lint filter Clean the lint filter after each load...

User Manual
Page 48
... if the door was opened during a cycle. • Clean the lint filter. • Check your home's circuit breakers or fuses. • Press and hold Start/Pause (Hold to the high velocity of problems in the installation instructions. • It is draining properly and extracting adequate water from the load. • The load may have moved into a live electrical outlet. • Check your home's circuit breakers or fuses. • Some cycles do not require heating. Troubleshooting 48 English...
... if the door was opened during a cycle. • Clean the lint filter. • Check your home's circuit breakers or fuses. • Press and hold Start/Pause (Hold to the high velocity of problems in the installation instructions. • It is draining properly and extracting adequate water from the load. • The load may have moved into a live electrical outlet. • Check your home's circuit breakers or fuses. • Some cycles do not require heating. Troubleshooting 48 English...

User Manual
Page 50
... information code on inverter PBAs. Turn the power on the screen, contact a Samsung service center. If this continues, call for service. If any information code keeps appearing on and restart. Code tC tC5 dC Air temperature sensor issue Compressor temperature sensor issue Running the dryer with door open Action Clean the lint filter and/or heat exchanger. Water tank full Empty the water tank, turn it on the display panel. Close the door and restart. again. Troubleshooting 50...
... information code on inverter PBAs. Turn the power on the screen, contact a Samsung service center. If this continues, call for service. If any information code keeps appearing on and restart. Code tC tC5 dC Air temperature sensor issue Compressor temperature sensor issue Running the dryer with door open Action Clean the lint filter and/or heat exchanger. Water tank full Empty the water tank, turn it on the display panel. Close the door and restart. again. Troubleshooting 50...

User Manual
Page 51
.... Follow care label directions to dry Drip dry Dry flat Heat setting High Medium Low Any heat No heat / Air Specification DV6850N_DC68-03650E-05_EN.indd 51 English 51 2019/8/7 17:42:02 The clothing care labels include symbols for detergent activation and effective cleaning.) Bleach Any bleach (when needed) Only non-chlorine (color-safe) bleach (when needed) Tumble dry Normal Permanent press/Wrinkle resistant/Wrinkle control Gentle/Delicates Special instructions Line dry/Hang...
.... Follow care label directions to dry Drip dry Dry flat Heat setting High Medium Low Any heat No heat / Air Specification DV6850N_DC68-03650E-05_EN.indd 51 English 51 2019/8/7 17:42:02 The clothing care labels include symbols for detergent activation and effective cleaning.) Bleach Any bleach (when needed) Only non-chlorine (color-safe) bleach (when needed) Tumble dry Normal Permanent press/Wrinkle resistant/Wrinkle control Gentle/Delicates Special instructions Line dry/Hang...
User Manual
Page 59
damage caused by use of equipment, utilities, services, parts, supplies, accessories, applications, installations, repairs, external wiring or connectors not supplied or authorized by failure to operate and maintain the product according to you may not apply to instructions; The cost of repair or replacement under these issues. Please contact your product; DV6850N_DC68-03650E-05_EN.indd 59 English 59 2019/8/7 17:42:07...
damage caused by use of equipment, utilities, services, parts, supplies, accessories, applications, installations, repairs, external wiring or connectors not supplied or authorized by failure to operate and maintain the product according to you may not apply to instructions; The cost of repair or replacement under these issues. Please contact your product; DV6850N_DC68-03650E-05_EN.indd 59 English 59 2019/8/7 17:42:07...
User Manual
Page 62
... TO THIS PRODUCT SHALL BE BINDING ON SAMSUNG. Warranty (CANADA) This limited warranty covers manufacturing defects in materials and workmanship encountered in normal, noncommercial use of products, equipment, systems, utilities, services, parts, supplies, accessories, applications, installations, repairs, external wiring or connectors not supplied or authorized by pest infestations. SAMSUNG does not warrant uninterrupted or error-free operation of nature or God; NOR SHALL RECOVERY OF ANY...
... TO THIS PRODUCT SHALL BE BINDING ON SAMSUNG. Warranty (CANADA) This limited warranty covers manufacturing defects in materials and workmanship encountered in normal, noncommercial use of products, equipment, systems, utilities, services, parts, supplies, accessories, applications, installations, repairs, external wiring or connectors not supplied or authorized by pest infestations. SAMSUNG does not warrant uninterrupted or error-free operation of nature or God; NOR SHALL RECOVERY OF ANY...


