
User Manual
Page 2
... need to know about the safety instructions Important safety symbols CALIFORNIA PROPOSITION 65 WARNING Important safety precautions Warnings Cautions Before installation Key installation requirements Location considerations Electrical requirements Installation What's included Step-by-step installation STEP 1 Connect the electrical wiring STEP 2 Level the dryer Drain hose (if necessary) Installation checklist Before using the dryer Switching the door position Before you start Sort and load Functional prerequisite Operations Control panel Simple steps to start Cycle overview Cycle guide Special...
... need to know about the safety instructions Important safety symbols CALIFORNIA PROPOSITION 65 WARNING Important safety precautions Warnings Cautions Before installation Key installation requirements Location considerations Electrical requirements Installation What's included Step-by-step installation STEP 1 Connect the electrical wiring STEP 2 Level the dryer Drain hose (if necessary) Installation checklist Before using the dryer Switching the door position Before you start Sort and load Functional prerequisite Operations Control panel Simple steps to start Cycle overview Cycle guide Special...
User Manual
Page 4
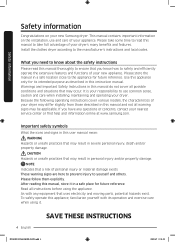
... that uses electricity and moving parts, potential hazards exist. Please store the manual in a safe location close to use and care of your dryer may differ slightly from those described in this manual thoroughly to ensure that you have any equipment that may result in a safe place for its operation and exercise care when using the appliance. Because the following operating instructions cover various models, the...
... that uses electricity and moving parts, potential hazards exist. Please store the manual in a safe location close to use and care of your dryer may differ slightly from those described in this manual thoroughly to ensure that you have any equipment that may result in a safe place for its operation and exercise care when using the appliance. Because the following operating instructions cover various models, the...

User Manual
Page 6
... removed and spread out so that the heat is used near children. 18. Do not repair or replace any part of fire due to catch fire. like materials. 14. To reduce the risk of the appliance or attempt any service unless specifically recommended in the user-maintenance instructions or in published userrepair instructions that could cause a load to contaminated loads, the final part of the drying cycle...
... removed and spread out so that the heat is used near children. 18. Do not repair or replace any part of fire due to catch fire. like materials. 14. To reduce the risk of the appliance or attempt any service unless specifically recommended in the user-maintenance instructions or in published userrepair instructions that could cause a load to contaminated loads, the final part of the drying cycle...
User Manual
Page 7
... with the controls. • Do not repair, replace, or attempt to prevent children or animals from becoming trapped inside. • Do not reach into the appliance when the drum is energized: Control board, Motor, Drain pump. Warnings WARNING • Ensure pockets are free of the appliance unless specifically instructed to in the dryer until all traces of the appliance. Service Personnel - Close...
... with the controls. • Do not repair, replace, or attempt to prevent children or animals from becoming trapped inside. • Do not reach into the appliance when the drum is energized: Control board, Motor, Drain pump. Warnings WARNING • Ensure pockets are free of the appliance unless specifically instructed to in the dryer until all traces of the appliance. Service Personnel - Close...

User Manual
Page 8
... in hot water with vegetable oil or cooking oil. Never remove these oils. • Residual oil on top of items may contain significant amounts of the dryer and exhaust duct should be cleaned periodically by qualified service personnel. • This appliance must be dangerous. If this appliance. • Do not sit on clothing can ignite spontaneously. Never plug the power cord into...
... in hot water with vegetable oil or cooking oil. Never remove these oils. • Residual oil on top of items may contain significant amounts of the dryer and exhaust duct should be cleaned periodically by qualified service personnel. • This appliance must be dangerous. If this appliance. • Do not sit on clothing can ignite spontaneously. Never plug the power cord into...
User Manual
Page 9
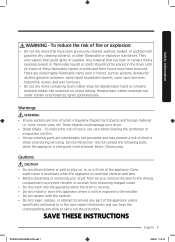
...: Control board, Motor, Drain pump. Service Personnel - DV6850N_DC68-03650E-05_EN.indd 9 English 9 2019/8/7 17:41:29 A louvered door with 3" (7.6 cm) minimum clearance on the top and bottom. Before installation Before installation Read through the supplied long drain hose. (See page 20.) WARNING Remove the door from all discarded appliances to prevent a child from water and weather. Location considerations • Adequate clearances between the dryer...
...: Control board, Motor, Drain pump. Service Personnel - DV6850N_DC68-03650E-05_EN.indd 9 English 9 2019/8/7 17:41:29 A louvered door with 3" (7.6 cm) minimum clearance on the top and bottom. Before installation Before installation Read through the supplied long drain hose. (See page 20.) WARNING Remove the door from all discarded appliances to prevent a child from water and weather. Location considerations • Adequate clearances between the dryer...
User Manual
Page 13
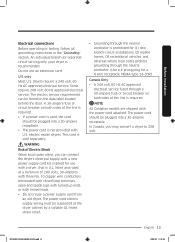
... U.S. dryers require a 240 volt, 60 Hz AC approved electrical service. An individual branch (or separate) circuit serving only your dryer is sold separately. The power cord should be found on both sides of Electric Shock When local codes allow, you may convert a dryer to 208 volt. Some require 208 volt, 60 Hz approved electrical service. electric model dryers. This cord is recommended. Before installation Electrical connections Before operating or testing, follow all grounding instructions in...
... U.S. dryers require a 240 volt, 60 Hz AC approved electrical service. An individual branch (or separate) circuit serving only your dryer is sold separately. The power cord should be found on both sides of Electric Shock When local codes allow, you may convert a dryer to 208 volt. Some require 208 volt, 60 Hz approved electrical service. electric model dryers. This cord is recommended. Before installation Electrical connections Before operating or testing, follow all grounding instructions in...
User Manual
Page 15
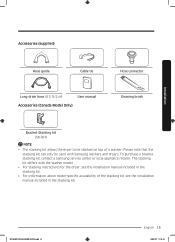
... stacking kit, see the installation manual included in the stacking kit. • For information about model-specific availability of a washer. Installation Accessories (supplied) Hose guide Cable tie Long drain hose (6.5 ft/2 m) User manual Accessories (Canada Model Only) Hose connector Cleaning brush Bracket-Stacking kit (SK-DH) NOTE • The stacking kit allows the dryer to be used with the washer model. • For stacking instructions for the dryer, see the installation manual included in the stacking kit. To purchase a bracket stacking kit, contact a Samsung service...
... stacking kit, see the installation manual included in the stacking kit. • For information about model-specific availability of a washer. Installation Accessories (supplied) Hose guide Cable tie Long drain hose (6.5 ft/2 m) User manual Accessories (Canada Model Only) Hose connector Cleaning brush Bracket-Stacking kit (SK-DH) NOTE • The stacking kit allows the dryer to be used with the washer model. • For stacking instructions for the dryer, see the installation manual included in the stacking kit. To purchase a bracket stacking kit, contact a Samsung service...

User Manual
Page 16
... rear panel of the terminal block. Tighten the strain relief screws. Tighten the C screws. 4. External ground connector If using strap terminals, make sure they are on this page. STEP 1 Connect the electrical wiring First, read through the "Electrical requirements" section, and then follow the instructions on this page or the next page. Then, secure the cover with a hold-down screw. Installation Installation Step-by step installation instructions start below. Instructions...
... rear panel of the terminal block. Tighten the strain relief screws. Tighten the C screws. 4. External ground connector If using strap terminals, make sure they are on this page. STEP 1 Connect the electrical wiring First, read through the "Electrical requirements" section, and then follow the instructions on this page or the next page. Then, secure the cover with a hold-down screw. Installation Installation Step-by step installation instructions start below. Instructions...

User Manual
Page 17
... terminal block. 3. Connect the other wires to the neutral conductor at the terminal block. • Remove the terminal block cover plate. Insert the tab of the terminal block cover into the rear panel of the terminal block. Tighten the screw. 4. Remove the external ground connector's screw, and connect the ground wire (green or unwrapped) of power cord • To connect the ground wire to the screw. Neutral grounding wire (white or green/ yellow) C. ¾" (1.9 cm) UL-listed...
... terminal block. 3. Connect the other wires to the neutral conductor at the terminal block. • Remove the terminal block cover plate. Insert the tab of the terminal block cover into the rear panel of the terminal block. Tighten the screw. 4. Remove the external ground connector's screw, and connect the ground wire (green or unwrapped) of power cord • To connect the ground wire to the screw. Neutral grounding wire (white or green/ yellow) C. ¾" (1.9 cm) UL-listed...

User Manual
Page 23
... it runs, heats, and shuts off. • Run a TIME DRY cycle for 20 minutes to keep the surrounding area clean. • Keep the dryer level with the ground. • Do not remove the adjustable levelling legs of the cooling grill at least 1 hour before operating the dryer. • Do not block the air inlet hole of the dryer. Installation Installation checklist • The dryer is plugged into a properly grounded outlet. •...
... it runs, heats, and shuts off. • Run a TIME DRY cycle for 20 minutes to keep the surrounding area clean. • Keep the dryer level with the ground. • Do not remove the adjustable levelling legs of the cooling grill at least 1 hour before operating the dryer. • Do not block the air inlet hole of the dryer. Installation Installation checklist • The dryer is plugged into a properly grounded outlet. •...

User Manual
Page 31
... Manual Dry cycles. The Smart Control indicator blinks. To change the set time in the dryer. Press to turn off the dryer. Press and hold to start an operation, or press to open. The dryer enters waiting mode for remote commands. We recommend that have one button (Adjust Time). You can degrade drying efficiency or cause the dryer's door to stop an operation temporarily. Indicators (DV22N685*H*) Drying Child Lock Cooling Wi-Fi Check filter alarm Heat-exchanger clean alarm Water...
... Manual Dry cycles. The Smart Control indicator blinks. To change the set time in the dryer. Press to turn off the dryer. Press and hold to start an operation, or press to open. The dryer enters waiting mode for remote commands. We recommend that have one button (Adjust Time). You can degrade drying efficiency or cause the dryer's door to stop an operation temporarily. Indicators (DV22N685*H*) Drying Child Lock Cooling Wi-Fi Check filter alarm Heat-exchanger clean alarm Water...

User Manual
Page 32
...; Unless recommended on the care label, avoid drying woolens or fiberglass items. • Avoid drying unwashed items. • Do not dry items soiled with oil, alcohol, gasoline, etc. Operations Water Tank Full Drum Light Damp Alert Simple steps to turn on the dryer. 2. Press Power to start the new cycle. Turn the Cycle Selector to select a cycle. 3. and +, Wrinkle Prevent, and/or Damp Alert) 5. To change the cycle during operation 1.
...; Unless recommended on the care label, avoid drying woolens or fiberglass items. • Avoid drying unwashed items. • Do not dry items soiled with oil, alcohol, gasoline, etc. Operations Water Tank Full Drum Light Damp Alert Simple steps to turn on the dryer. 2. Press Power to start the new cycle. Turn the Cycle Selector to select a cycle. 3. and +, Wrinkle Prevent, and/or Damp Alert) 5. To change the cycle during operation 1.
User Manual
Page 38
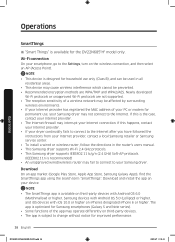
... and WPA2/AES. Operations Operations SmartThings ※ "Smart Things" is available for permanent use only (Class B), and can be used in the router's users manual. • This Samsung dryer supports Wi-Fi 2.4 GHz protocols. • This Samsung dryer supports IEEE802.11 b/g/n (2.4 GHz) Soft-AP protocols. (IEEE802.11n is recommended) • An unapproved wired/wireless router may fail to connect to the Settings, turn on the wireless...
... and WPA2/AES. Operations Operations SmartThings ※ "Smart Things" is available for permanent use only (Class B), and can be used in the router's users manual. • This Samsung dryer supports Wi-Fi 2.4 GHz protocols. • This Samsung dryer supports IEEE802.11 b/g/n (2.4 GHz) Soft-AP protocols. (IEEE802.11n is recommended) • An unapproved wired/wireless router may fail to connect to the Settings, turn on the wireless...
User Manual
Page 43
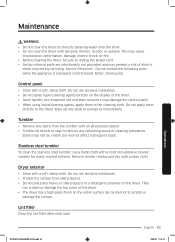
... not place any spills or overspray immediately. Be careful not to the dryer. Service Personnel - Remove cleaner residue and dry with benzene, thinner, alcohol, or acetone. They can scratch or damage the top cover of electric shock only during servicing. Do not apply them to unplug the power cord. • Certain internal parts are intentionally not grounded and may cause discoloration...
... not place any spills or overspray immediately. Be careful not to the dryer. Service Personnel - Remove cleaner residue and dry with benzene, thinner, alcohol, or acetone. They can scratch or damage the top cover of electric shock only during servicing. Do not apply them to unplug the power cord. • Certain internal parts are intentionally not grounded and may cause discoloration...

User Manual
Page 48
... to tumble properly. Problem Does not run. Troubleshooting 48 English DV6850N_DC68-03650E-05_EN.indd 48 2019/8/7 17:41:57 Clean them if necessary. • The dryer may have moved into a live electrical outlet. • Check your home's circuit breakers or fuses. • Press and hold Start/Pause (Hold to Start) again if the door was opened during a cycle. • Clean the lint filter. • Check your washer is normal for objects...
... to tumble properly. Problem Does not run. Troubleshooting 48 English DV6850N_DC68-03650E-05_EN.indd 48 2019/8/7 17:41:57 Clean them if necessary. • The dryer may have moved into a live electrical outlet. • Check your home's circuit breakers or fuses. • Press and hold Start/Pause (Hold to Start) again if the door was opened during a cycle. • Clean the lint filter. • Check your washer is normal for objects...

User Manual
Page 50
... the • Turn the dryer off and turn the 5C power on the display panel. again. Troubleshooting 50 English DV6850N_DC68-03650E-05_EN.indd 50 2019/8/7 17:41:57 Troubleshooting Information codes If the dryer fails to operate, you should do, check the list of order continues, call for service. Code tC tC5 dC Air temperature sensor issue Compressor temperature sensor issue Running the dryer with door open Action Clean the lint filter and/or heat exchanger. If...
... the • Turn the dryer off and turn the 5C power on the display panel. again. Troubleshooting 50 English DV6850N_DC68-03650E-05_EN.indd 50 2019/8/7 17:41:57 Troubleshooting Information codes If the dryer fails to operate, you should do, check the list of order continues, call for service. Code tC tC5 dC Air temperature sensor issue Compressor temperature sensor issue Running the dryer with door open Action Clean the lint filter and/or heat exchanger. If...

User Manual
Page 51
The clothing care labels include symbols for detergent activation and effective cleaning.) Bleach Any bleach (when needed) Only non-chlorine (color-safe) bleach (when needed) Tumble dry Normal Permanent press/Wrinkle resistant/Wrinkle control Gentle/Delicates Special instructions Line dry/Hang to optimize garment life and reduce laundering problems. Wash cycle Normal Permanent press/Wrinkle resistant/Wrinkle control Gentle/Delicates Hand wash Water temperature Hot Warm Cold NOTE The Water Temperature table lists appropriate...
The clothing care labels include symbols for detergent activation and effective cleaning.) Bleach Any bleach (when needed) Only non-chlorine (color-safe) bleach (when needed) Tumble dry Normal Permanent press/Wrinkle resistant/Wrinkle control Gentle/Delicates Special instructions Line dry/Hang to optimize garment life and reduce laundering problems. Wash cycle Normal Permanent press/Wrinkle resistant/Wrinkle control Gentle/Delicates Hand wash Water temperature Hot Warm Cold NOTE The Water Temperature table lists appropriate...
User Manual
Page 59
... original factory serial numbers have other rights, which this product was not intended; This warranty gives you specific rights, and you . damage caused by use of the product; in-home instruction on how long an implied warranty lasts, so the above limitations or exclusions may also have been removed, defaced, changed in shipment, delivery, installation, and uses for help with electrical or plumbing codes or correction...
... original factory serial numbers have other rights, which this product was not intended; This warranty gives you specific rights, and you . damage caused by use of the product; in-home instruction on how long an implied warranty lasts, so the above limitations or exclusions may also have been removed, defaced, changed in shipment, delivery, installation, and uses for help with electrical or plumbing codes or correction...
User Manual
Page 62
... the instruction book; This limited warranty does not cover problems resulting from incorrect electric current, voltage or supply, light bulbs, house fuses, house wiring, cost of nature or God; NO WARRANTY OR GUARANTEE GIVEN BY ANY PERSON, FIRM, OR CORPORATION WITH RESPECT TO THIS PRODUCT SHALL BE BINDING ON SAMSUNG. use of this product and shall not apply to follow operating instructions, maintenance and environmental instructions that...
... the instruction book; This limited warranty does not cover problems resulting from incorrect electric current, voltage or supply, light bulbs, house fuses, house wiring, cost of nature or God; NO WARRANTY OR GUARANTEE GIVEN BY ANY PERSON, FIRM, OR CORPORATION WITH RESPECT TO THIS PRODUCT SHALL BE BINDING ON SAMSUNG. use of this product and shall not apply to follow operating instructions, maintenance and environmental instructions that...


