
User Manual
Page 2
... need to know about the safety instructions Important safety symbols CALIFORNIA PROPOSITION 65 WARNING Important safety precautions Warnings Cautions Before installation Key installation requirements Location considerations Electrical requirements Installation What's included Step-by-step installation STEP 1 Connect the electrical wiring STEP 2 Level the dryer Drain hose (if necessary) Installation checklist Before using the dryer Switching the door position Before you start Sort and load Functional prerequisite Operations Control panel Simple steps to start Cycle overview Cycle guide Special...
... need to know about the safety instructions Important safety symbols CALIFORNIA PROPOSITION 65 WARNING Important safety precautions Warnings Cautions Before installation Key installation requirements Location considerations Electrical requirements Installation What's included Step-by-step installation STEP 1 Connect the electrical wiring STEP 2 Level the dryer Drain hose (if necessary) Installation checklist Before using the dryer Switching the door position Before you start Sort and load Functional prerequisite Operations Control panel Simple steps to start Cycle overview Cycle guide Special...
User Manual
Page 4
... injury or material damage exists. Install the clothes dryer according to yourself and others. Because the following operating instructions cover various models, the characteristics of your nearest service center or find help and information online at www.samsung.com. If you need to know how to take some time to read this manual to safely and efficiently operate the extensive features and functions of...
... injury or material damage exists. Install the clothes dryer according to yourself and others. Because the following operating instructions cover various models, the characteristics of your nearest service center or find help and information online at www.samsung.com. If you need to know how to take some time to read this manual to safely and efficiently operate the extensive features and functions of...

User Manual
Page 6
.... Close supervision of a tumble dryer cycle occurs without heat (cool down period). To reduce the risk of fire due to catch fire. Take care that children's fingers are quickly removed and spread out so that could cause a load to contaminated loads, the final part of children is necessary when the appliance is dissipated. 16. Clean the lint screen before the end of...
.... Close supervision of a tumble dryer cycle occurs without heat (cool down period). To reduce the risk of fire due to catch fire. Take care that children's fingers are quickly removed and spread out so that could cause a load to contaminated loads, the final part of children is necessary when the appliance is dissipated. 16. Clean the lint screen before the end of...
User Manual
Page 7
...: Control board, Motor, Drain pump. Service Personnel - SAVE THESE INSTRUCTIONS English 7 DV6850N_DC68-03650E-05_EN.indd 7 2019/8/7 17:41:29 Do not contact the following parts while the appliance is used in front of electric shock only during servicing. They emit vapors that could damage your dryer from service, remove the door to the drying compartment to prevent children or animals from becoming trapped inside...
...: Control board, Motor, Drain pump. Service Personnel - SAVE THESE INSTRUCTIONS English 7 DV6850N_DC68-03650E-05_EN.indd 7 2019/8/7 17:41:29 Do not contact the following parts while the appliance is used in front of electric shock only during servicing. They emit vapors that could damage your dryer from service, remove the door to the drying compartment to prevent children or animals from becoming trapped inside...

User Manual
Page 8
... of the dryer and exhaust duct should be properly grounded. Never plug the power cord into a receptacle that is recommended for dryer use by qualified service personnel. • This appliance must be cleaned periodically by the manufacturer of the dryer. • Do not dry clothing with large buckles, buttons, or other heavy metal or solid objects. • Install and use in accordance with the manufacturer's instructions. •...
... of the dryer and exhaust duct should be properly grounded. Never plug the power cord into a receptacle that is recommended for dryer use by qualified service personnel. • This appliance must be cleaned periodically by the manufacturer of the dryer. • Do not dry clothing with large buckles, buttons, or other heavy metal or solid objects. • Install and use in accordance with the manufacturer's instructions. •...
User Manual
Page 9
... have two unobstructed air openings for a combined minimum total area of electric shock only during drying through the following parts while the appliance is acceptable. Service Personnel - Key installation requirements • A grounded electrical outlet. • A power cord for a garage installation. WARNING Certain internal parts are intentionally not grounded and may present a risk of 72 in (460 mm) above the floor for electric dryers (except in Canada...
... have two unobstructed air openings for a combined minimum total area of electric shock only during drying through the following parts while the appliance is acceptable. Service Personnel - Key installation requirements • A grounded electrical outlet. • A power cord for a garage installation. WARNING Certain internal parts are intentionally not grounded and may present a risk of 72 in (460 mm) above the floor for electric dryers (except in Canada...
User Manual
Page 13
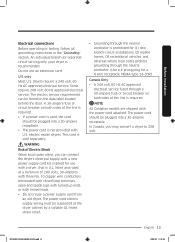
... electric model dryers. only Most U.S. The electric service requirements can connect the dryer's electrical supply with a new power supply cord kit, marked for a 4 wire receptacle, NEMA type 14-30R.) Canada Only • A 240 volt, 60 Hz AC approved electrical service fused through a 30-ampere fuse or circuit breaker on the data label located behind the door. NOTE All Canadian models are shipped with tinned leads. • Do not reuse a power supply cord from an old dryer...
... electric model dryers. only Most U.S. The electric service requirements can connect the dryer's electrical supply with a new power supply cord kit, marked for a 4 wire receptacle, NEMA type 14-30R.) Canada Only • A 240 volt, 60 Hz AC approved electrical service fused through a 30-ampere fuse or circuit breaker on the data label located behind the door. NOTE All Canadian models are shipped with tinned leads. • Do not reuse a power supply cord from an old dryer...
User Manual
Page 15
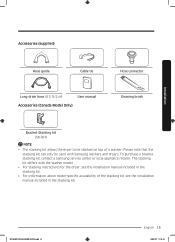
... stacking kit, contact a Samsung service center or local appliance retailer. The stacking kit differs with Samsung washers and dryers. DV6850N_DC68-03650E-05_EN.indd 15 English 15 2019/8/7 17:41:33 Installation Accessories (supplied) Hose guide Cable tie Long drain hose (6.5 ft/2 m) User manual Accessories (Canada Model Only) Hose connector Cleaning brush Bracket-Stacking kit (SK-DH) NOTE • The stacking kit allows the dryer to be used with the washer model. • For stacking instructions for the dryer, see the installation manual included...
... stacking kit, contact a Samsung service center or local appliance retailer. The stacking kit differs with Samsung washers and dryers. DV6850N_DC68-03650E-05_EN.indd 15 English 15 2019/8/7 17:41:33 Installation Accessories (supplied) Hose guide Cable tie Long drain hose (6.5 ft/2 m) User manual Accessories (Canada Model Only) Hose connector Cleaning brush Bracket-Stacking kit (SK-DH) NOTE • The stacking kit allows the dryer to be used with the washer model. • For stacking instructions for the dryer, see the installation manual included...

User Manual
Page 16
... technician install the dryer. STEP 1 Connect the electrical wiring First, read through the "Electrical requirements" section, and then follow the instructions on this page or the next page. Tighten the B screws. 3. Installation Installation Step-by step installation instructions start below. For a 3-wire system 1. Tighten the strain relief screws. D E 5. CAUTION A. Insert the terminal block cover into the rear panel of the terminal block. D. ¾" (1.9 cm) UL-listed strain relief • Ring-type terminals are tightened...
... technician install the dryer. STEP 1 Connect the electrical wiring First, read through the "Electrical requirements" section, and then follow the instructions on this page or the next page. Tighten the B screws. 3. Installation Installation Step-by step installation instructions start below. For a 3-wire system 1. Tighten the strain relief screws. D E 5. CAUTION A. Insert the terminal block cover into the rear panel of the terminal block. D. ¾" (1.9 cm) UL-listed strain relief • Ring-type terminals are tightened...

User Manual
Page 17
...) UL-listed strain relief D. External ground connector F. Loosen or remove the screws from the center terminal block. 3. Insert the tab of the terminal block cover into the rear panel of the terminal block. Then, secure the cover with a holddown screw. A 4-wire system connection is not user serviceable. • Ring-type terminals are recommended. Installation For a 4-wire system 1. Remove the external ground connector's screw, and connect the ground wire (green or unwrapped) of A the power cable to...
...) UL-listed strain relief D. External ground connector F. Loosen or remove the screws from the center terminal block. 3. Insert the tab of the terminal block cover into the rear panel of the terminal block. Then, secure the cover with a holddown screw. A 4-wire system connection is not user serviceable. • Ring-type terminals are recommended. Installation For a 4-wire system 1. Remove the external ground connector's screw, and connect the ground wire (green or unwrapped) of A the power cable to...

User Manual
Page 23
... remains inside the drum. • Plug in the power cord just before operating the dryer. • Do not block the air inlet hole of the cooling grill at least 1 hour before using the dryer. DV6850N_DC68-03650E-05_EN.indd 23 English 23 2019/8/7 17:41:38 Installation Installation checklist • The dryer is plugged into a properly grounded outlet. • All packaging material is completely removed and properly disposed...
... remains inside the drum. • Plug in the power cord just before operating the dryer. • Do not block the air inlet hole of the cooling grill at least 1 hour before using the dryer. DV6850N_DC68-03650E-05_EN.indd 23 English 23 2019/8/7 17:41:38 Installation Installation checklist • The dryer is plugged into a properly grounded outlet. • All packaging material is completely removed and properly disposed...

User Manual
Page 31
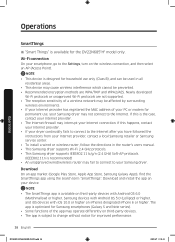
... Manual Dry cycles. You can control the dryer remotely. and +) until the desired time is displayed. ※ Only DV22N680*H* model have become extremely tangled in the wash can degrade drying efficiency or cause the dryer's door to open. Press to stop an operation temporarily. NOTE Items that you can change the cycle time, press the Adjust Time buttons (- To change the set time in the dryer. Indicators (DV22N685*H*) Drying Child Lock Cooling Wi-Fi Check filter alarm Heat...
... Manual Dry cycles. You can control the dryer remotely. and +) until the desired time is displayed. ※ Only DV22N680*H* model have become extremely tangled in the wash can degrade drying efficiency or cause the dryer's door to open. Press to stop an operation temporarily. NOTE Items that you can change the cycle time, press the Adjust Time buttons (- To change the set time in the dryer. Indicators (DV22N685*H*) Drying Child Lock Cooling Wi-Fi Check filter alarm Heat...

User Manual
Page 32
Operations Water Tank Full Drum Light Damp Alert Simple steps to select a cycle. 3. Optionally, you can activate options available by pressing the relevant button. (Adjust Time - Select a different cycle. 3. Turn the Cycle Selector to start the new cycle. Change the cycle settings (Dry Level and Time) as necessary. 4. Press Start/Pause (Hold to Start) to turn on the dryer. 2. Press Power to stop operation. 2. Operations 32 English DV6850N_DC68-03650E-05_EN.indd 32 2019/8/7 17:41...
Operations Water Tank Full Drum Light Damp Alert Simple steps to select a cycle. 3. Optionally, you can activate options available by pressing the relevant button. (Adjust Time - Select a different cycle. 3. Turn the Cycle Selector to start the new cycle. Change the cycle settings (Dry Level and Time) as necessary. 4. Press Start/Pause (Hold to Start) to turn on the dryer. 2. Press Power to stop operation. 2. Operations 32 English DV6850N_DC68-03650E-05_EN.indd 32 2019/8/7 17:41...
User Manual
Page 38
... app is optimized for household use only (Class B), and can be used in the router's users manual. • This Samsung dryer supports Wi-Fi 2.4 GHz protocols. • This Samsung dryer supports IEEE802.11 b/g/n (2.4 GHz) Soft-AP protocols. (IEEE802.11n is recommended) • An unapproved wired/wireless router may fail to connect to your smartphone, go to the Settings, turn on third-party devices. •...
... app is optimized for household use only (Class B), and can be used in the router's users manual. • This Samsung dryer supports Wi-Fi 2.4 GHz protocols. • This Samsung dryer supports IEEE802.11 b/g/n (2.4 GHz) Soft-AP protocols. (IEEE802.11n is recommended) • An unapproved wired/wireless router may fail to connect to your smartphone, go to the Settings, turn on third-party devices. •...
User Manual
Page 43
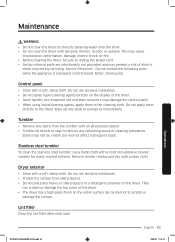
... cleaner suitable for easily marred surfaces. Lint filter Clean the lint filter after each load. Maintenance Operations WARNING • Do not clean the dryer by directly spraying water onto the dryer. • Do not clean the dryer with a soft, damp cloth. Remove cleaner residue and dry with a soft, damp cloth. They can scratch or damage the top cover of electric shock only during servicing. Tumbler • Remove any stains from sharp objects. •...
... cleaner suitable for easily marred surfaces. Lint filter Clean the lint filter after each load. Maintenance Operations WARNING • Do not clean the dryer by directly spraying water onto the dryer. • Do not clean the dryer with a soft, damp cloth. Remove cleaner residue and dry with a soft, damp cloth. They can scratch or damage the top cover of electric shock only during servicing. Tumbler • Remove any stains from sharp objects. •...

User Manual
Page 48
...; Check the lint filter and heat exchanger. Troubleshooting Checkpoints If the dryer operates abnormally, first check the list of problems in the installation instructions. • It is normal for objects such as blankets or comforters, may require repositioning to ensure even drying. • Make sure that your home's circuit breakers or fuses. • Some cycles do not require heating. Action • Make sure the door is latched shut. • Make sure the power cord...
...; Check the lint filter and heat exchanger. Troubleshooting Checkpoints If the dryer operates abnormally, first check the list of problems in the installation instructions. • It is normal for objects such as blankets or comforters, may require repositioning to ensure even drying. • Make sure that your home's circuit breakers or fuses. • Some cycles do not require heating. Action • Make sure the door is latched shut. • Make sure the power cord...

User Manual
Page 50
... Air temperature sensor issue Compressor temperature sensor issue Running the dryer with door open Action Clean the lint filter and/or heat exchanger. AC6 between the main and the • Turn the dryer off and turn the 5C power on and restart. Then, restart the cycle. • If the information code continues to appear, call for service. • Try restarting the cycle. 3C Check the motor for operation. • If the information code continues to Check...
... Air temperature sensor issue Compressor temperature sensor issue Running the dryer with door open Action Clean the lint filter and/or heat exchanger. AC6 between the main and the • Turn the dryer off and turn the 5C power on and restart. Then, restart the cycle. • If the information code continues to appear, call for service. • Try restarting the cycle. 3C Check the motor for operation. • If the information code continues to Check...

User Manual
Page 51
The clothing care labels include symbols for detergent activation and effective cleaning.) Bleach Any bleach (when needed) Only non-chlorine (color-safe) bleach (when needed) Tumble dry Normal Permanent press/Wrinkle resistant/Wrinkle control Gentle/Delicates Special instructions Line dry/Hang to optimize garment life and reduce laundering problems. Wash cycle Normal Permanent press/Wrinkle resistant/Wrinkle control Gentle/Delicates Hand wash Water temperature Hot Warm Cold NOTE The Water Temperature table lists appropriate...
The clothing care labels include symbols for detergent activation and effective cleaning.) Bleach Any bleach (when needed) Only non-chlorine (color-safe) bleach (when needed) Tumble dry Normal Permanent press/Wrinkle resistant/Wrinkle control Gentle/Delicates Special instructions Line dry/Hang to optimize garment life and reduce laundering problems. Wash cycle Normal Permanent press/Wrinkle resistant/Wrinkle control Gentle/Delicates Hand wash Water temperature Hot Warm Cold NOTE The Water Temperature table lists appropriate...
User Manual
Page 59
... to use of equipment, utilities, services, parts, supplies, accessories, applications, installations, repairs, external wiring or connectors not supplied or authorized by failure to operate and maintain the product according to correct installation not in any of these excluded circumstances shall be readily determined; product where the original factory serial numbers have other damage to you may also have been removed, defaced, changed in...
... to use of equipment, utilities, services, parts, supplies, accessories, applications, installations, repairs, external wiring or connectors not supplied or authorized by failure to operate and maintain the product according to correct installation not in any of these excluded circumstances shall be readily determined; product where the original factory serial numbers have other damage to you may also have been removed, defaced, changed in...
User Manual
Page 62
..., installations, repairs, external wiring or connectors not supplied or authorized by pest infestations. customer adjustments and failure to the following: damage that damage this product was not intended; delivery and installation; accidents, abuse, neglect, fire, water, lightning, or other acts of the product. This limited warranty does not cover problems resulting from incorrect electric current, voltage or supply, light bulbs, house fuses, house wiring...
..., installations, repairs, external wiring or connectors not supplied or authorized by pest infestations. customer adjustments and failure to the following: damage that damage this product was not intended; delivery and installation; accidents, abuse, neglect, fire, water, lightning, or other acts of the product. This limited warranty does not cover problems resulting from incorrect electric current, voltage or supply, light bulbs, house fuses, house wiring...


